【APUE】Chapter11 Threads
看完了APUE第三版的Chapter11 Threads,跟着书上的demo走了一遍,并且参考了这个blog(http://www.cnblogs.com/chuyuhuashi/p/4447817.html)的非常好的example。
下面的内容就是看书过程中记录的,可以作为一个参考,但决不能代替看APUE原著。
本来想在自己的mac上跑(毕竟也叫unix系统),后来发现mac上有些pthread的库支持的不全(比如,没有barrier),就改到了centos server上跑。
(一)Thread Identification
1. 线程的id只在创建它的进程中有效
2. pthread_t唯一标示一个线程,但是不同系统对于pthread_t的实现是不一样的(有的是long有的是unsigned integer,有的甚至是structure)
(二)Thread Creation
#include "apue.h"

#include <stdio.h>

#include <stdlib.h>

#include <pthread.h>

pthread_t ntid;

void printids(const char *s)

{

    pid_t pid;

    pthread_t tid;

    pid = getpid();

    tid = pthread_self();

    printf("%s pid %lu tid %lu (0x%lx)\n",

        s ,

        (unsigned long)pid,

        (unsigned long)tid,

        (unsigned long)tid);

}

void * thr_fn(void *arg)

{

    printids("new thread: ");

    return ((void *));

}

int main(int argc, char const *argv[])

{

    int err;

    err = pthread_create(&ntid, NULL, thr_fn, NULL);

    printids("main thread: ");

    sleep();

    exit();

}
结果如下:

这个例子主要看不同系统下tid的值的不同。
(三)Thread Termination
第一个例子
#include "apue.h"

#include <pthread.h>

void * thr_fn1(void *arg)

{

    printf(("thread 1 returning\n"));

    return ((void *));

}

void * thr_fn2(void *arg)

{

    printf(("thread 2 exiting\n"));

    pthread_exit((void *));

}

int main(int argc, char const *argv[])

{

    int err;

    pthread_t tid1, tid2;

    void *tret;

    err = pthread_create(&tid1, NULL, thr_fn1, NULL);

    if (err!=)

        err_exit(err, "can't create thread 1");

    err = pthread_create(&tid2, NULL, thr_fn2, NULL);

    if (err!=)

        err_exit(err, "can't create thread 2");

    sleep();

    err = pthread_join(tid1, &tret);

    if (err!=)

        err_exit(err, "can't join with thread 1");

    printf("thread 1 exit code %ld\n",(long)tret);

    err = pthread_join(tid2, &tret);

    if (err!=)

        err_exit(err, "can't join with thread 2");

    printf("thread 2 exit code %ld\n",(long)tret);

    return ;

}
执行结果:

1. 这里有个的err记录的是pthread_create()或pthread_join()是否执行成功:0或者非0与具体线程函数返回值没有关系
2. 即使是子线程已经执行完毕了,在main中调用pthread_join(..., &tret)依然可以获得这个子线程的返回值,记录在tret中
第二个例子(这个例子被我在书上的例子基础上修改过了,红色的两行)
#include "apue.h"

#include <pthread.h>

struct foo

{

    int a, b, c, d;

};

void printfoo(const char *s, const struct foo *fp)

{

    printf("%s",s);

    printf(" structure at 0x%lx\n", (unsigned long)fp);

    printf(" foo.a = %d\n", fp->a);

    printf(" foo.b = %d\n", fp->b);

    printf(" foo.c = %d\n", fp->c);

    printf(" foo.d = %d\n", fp->d);

}

void * thr_fn1(void *arg)

{

    struct foo *foo = malloc(sizeof(struct foo));

    foo->a = ;

    foo->b = ;

    foo->c = ;

    foo->d = ;

    printfoo("thread 1:\n", foo);

    pthread_exit((void *)foo);

}

void * thr_fn2(void *arg)

{

    printf("thread 2: ID is %lu\n", (unsigned long)pthread_self());

    pthread_exit((void *));

}

int main(int argc, char const *argv[])

{

    int err;

    pthread_t tid1, tid2;

    struct foo *fp;

    err = pthread_create(&tid1, NULL, thr_fn1, NULL);

    err = pthread_join(tid1, (void *)&fp);

    sleep();

    printf("parent starting second thread\n");

    err = pthread_create(&tid2, NULL, thr_fn2, NULL);

    sleep();

    printfoo("parent:\n", fp);

    free(fp);

    exit();

}
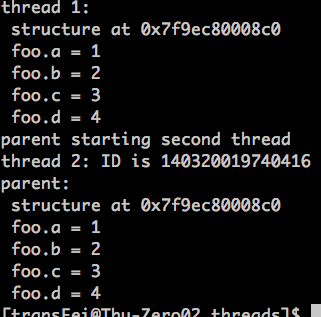
运行结果如下:

如果在一个子线程中创建的资源要保证子线程退出后还是可以用的,就要用malloc动态分配。
当然,如果忘记了free(fp)就产生了内存泄露。
第三个例子
#include "apue.h"

#include <pthread.h>

void cleanup(void *arg)

{

    printf("cleanup: %s\n", (char *)arg);

}

void * thr_fn1(void *arg)

{

    printf("thread 1 start\n");

    pthread_cleanup_push(cleanup, "thread 1 first handler");

    pthread_cleanup_push(cleanup, "thread 1 second handler");

    printf("thread 1 push complete\n");

    if (arg)

        pthread_exit((void *));

    pthread_cleanup_pop();

    pthread_cleanup_pop();

    return ((void *));

}

void * thr_fn2(void *arg)

{

    printf("thread 2 start\n");

    //if (arg)

    //    pthread_exit((void *)2);

    pthread_cleanup_push(cleanup, "thread 2 first handler");

    pthread_cleanup_push(cleanup, "thread 2 second handler");

    printf("thread 2 push complete\n");

    pthread_cleanup_pop();

    pthread_cleanup_pop();

    pthread_exit((void *));

}

int main(int argc, char const *argv[])

{

    int err;

    pthread_t tid1, tid2;

    void *tret;

    err = pthread_create(&tid1, NULL, thr_fn1, (void *));

    err = pthread_create(&tid2, NULL, thr_fn2, (void *));

    err = pthread_join(tid1, &tret);

    if (err!=)

        err_exit(err, "can't join with thread 1");

    printf("thread 1 exit code %ld\n",(long)tret);

    err = pthread_join(tid2, &tret);

    if (err!=)

        err_exit(err, "can't join with thread 2");

    printf("thread 2 exit code %ld\n",(long)tret);

    exit();

}
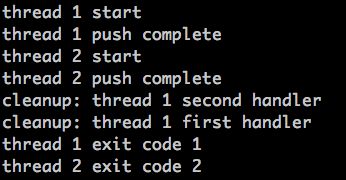
运行结果如下:

这个例子主要讲的是termination中的cleanup的用法:
1. 如果线程退出的时候,是调用pthread_exit,系统就会检查是否有清理函数在栈中;如果有,则按push的逆序,一个个弹出来并执行。
2. push和pop必须是成对出现的,有个push就有一个pop,必须这样的原因是push和pop都用了macro实现,不这么做complie通不过。
但这里就会有个容易含糊的地方:thr_fn1中,pop出现在exit之后,如果arg不是NULL,那么pop肯定执行不了啊?
没错,如果arg不是NULL,pop肯定执行不了,但是也必须出现(类似可以不发挥作用,但是必须开会占个位置)
3. 如果喂给pop的参数是0,则就直接把push进去的函数弹出来就完事了,并不执行(如上面的例子);如果喂给pop的参数不是0,比如下面这样:
void * thr_fn2(void *arg)

{

    printf("thread 2 start\n");

    //if (arg)

    //    pthread_exit((void *)2);

    pthread_cleanup_push(cleanup, "thread 2 first handler");

    pthread_cleanup_push(cleanup, "thread 2 second handler");

    printf("thread 2 push complete\n");

    pthread_cleanup_pop();

    pthread_cleanup_pop();

    pthread_exit((void *));

}
执行结果就是下面这样了:

4. 这个例子还说明了:thread1和thread2在被主线程join之前都执行完了,但是这个时候thread1和thread2的status are also retained。
(四)Thread Synchronization
这部分内容书上的例子并不是可以run,而是循序渐进,通过对某种需求场景下线程同步的不断改进变化来让读者加深理解。
一共有两个场景,二者的关系是渐进丰富的关系。
场景1说的是互斥量mutex的基本用法:“structure ojbect是动态分配的,并且一旦分配了资源,就可能被其他线程用上;因此对于object需要上锁保护,防止还有其他线程用着这个object的时候,这个object就被destory了;具体的做法是在structure object中维护一个计数变量f_count,记录当前有多少个其他线程用着这个ojbect。”
上面说的基本就是书上的原话,有些抽象,可以举个不恰当的例子来帮助理解:
可以想象成快递员(structure ojbect)与交给快递员的快递(用着object的线程);只有分配给这个快递员所有的快递都送完了之后(f_count为0),才能告诉这个快递员“你去休息吧(destory);否则快递员手上还有快递就休息了,这个快递就瞎了。
下面在分析代码的时候,为了便于理解,就用快递员和快递分别代指object和threads了。
代码如下:
#include <stdlib.h>

#include <pthread.h>

struct foo {

    int             f_count;

    pthread_mutex_t f_lock;

    int             f_id;

    /* ... more stuff here ... */

};

struct foo *

foo_alloc(int id) /* allocate the object */

{

    struct foo *fp;

    if ((fp = malloc(sizeof(struct foo))) != NULL) {

        fp->f_count = ;

        fp->f_id = id;

        if (pthread_mutex_init(&fp->f_lock, NULL) != ) {

            free(fp);

            return(NULL);

        }

        /* ... continue initialization ... */

    }

    return(fp);

}

void

foo_hold(struct foo *fp) /* add a reference to the object */

{

    pthread_mutex_lock(&fp->f_lock);

    fp->f_count++;

    pthread_mutex_unlock(&fp->f_lock);

}

void

foo_rele(struct foo *fp) /* release a reference to the object */

{

    pthread_mutex_lock(&fp->f_lock);

    if (--fp->f_count == ) { /* last reference */

        pthread_mutex_unlock(&fp->f_lock);

        pthread_mutex_destroy(&fp->f_lock);

        free(fp);

    } else {

        pthread_mutex_unlock(&fp->f_lock);

    }

}
这份代码不难理解:
1. foo_hold线程的功能是:分配给快递员一个新的快递(f_count++)
2. foo_rele线程的功能是:判断快递员身上是不是没有快递要送了,如果没有了就让他休息(pthread_mutex_destory, free)
foo_hold与foo_rele中都有多ojbect中f_count的操作,因此mutex互斥量就派上用场了:即对f_count的加和读都是线程安全的。mutex的作用就是:
防止一遍得知快递员身上已经没有快递可以休息了;同时,又来了一个新的快递分配给这个快递员。
场景二说的是死锁问题,分析了避免死锁的两种方法以及二者的trade-off:
场景二在场景一的基础上进行了“立体”丰富:
1. 现在有29个快递员据点
2. 每个快递员据点的快递员数目是动态变化的(会有新的快递员加入;也有快递员退出,类似场景一,快递员送完快递就歇了)
3. 如果新来了一个快递员,那么就会给这个快递员一个编号ID,快递员进入哪个据点是由它的编号ID决定的(在代码中其实就是一个HASH函数)
4. 在同一个据点中的快递员,后面进来的快递员B只认识在他之前来这个据点的那一个快递员A(单链表数据结构)
5. 接着4,只有通过快递员B才能找到快递员A;如果某个据点只有一个快递员,那么在据点就可以找到了
6. 这里还有一个问题:快递员身上的快递是怎么来的?这个不用考虑,只需要知道这也是一个独立的过程就好了
现在需要做的工作就是,分配新来快递员到这29个据点,并且根据快递员身上快递的数量找到快递员,并且决定是否让快递员休息(例子中不用管快递员的身上的快递是怎么来的,只需要判断有还是没有)。
场景二比场景一困难在哪呢?
1. 如何找到某个快递员?只能通过他的编号ID找到所在的据点,然后再按照快递员入据点的顺序顺藤摸瓜(遍历单链表)。
如果正访问某个快递员的时候,他前面那个快递员已经歇了呢,线索不就断了么?对据点结构的同步保护结构的锁,hashlock。
2. 如果已经找到了某个快递员,那么设计到的问题就是场景一的问题。对某个ojbect的同步保护的锁,f_lock。
这里面涉及到两个锁的同步问题,就可能会出现Dead Lock的问题,先看代码:
#include <stdlib.h>

#include <pthread.h>

#define NHASH 29

#define HASH(id) (((unsigned long)id)%NHASH)

struct foo *fh[NHASH];

pthread_mutex_t hashlock = PTHREAD_MUTEX_INITIALIZER;

struct foo {

    int             f_count;

    pthread_mutex_t f_lock;

    int             f_id;

    struct foo     *f_next; /* protected by hashlock */

    /* ... more stuff here ... */

};

struct foo *

foo_alloc(int id) /* allocate the object */

{

    struct foo    *fp;

    int            idx;

    if ((fp = malloc(sizeof(struct foo))) != NULL) {

        fp->f_count = ;

        fp->f_id = id;

        if (pthread_mutex_init(&fp->f_lock, NULL) != ) {

            free(fp);

            return(NULL);

        }

        idx = HASH(id);

        pthread_mutex_lock(&hashlock);

        fp->f_next = fh[idx];

        fh[idx] = fp;

        pthread_mutex_lock(&fp->f_lock);

        pthread_mutex_unlock(&hashlock);

        /* ... continue initialization ... */

        pthread_mutex_unlock(&fp->f_lock);

    }

    return(fp);

}

void

foo_hold(struct foo *fp) /* add a reference to the object */

{

    pthread_mutex_lock(&fp->f_lock);

    fp->f_count++;

    pthread_mutex_unlock(&fp->f_lock);

}

struct foo *

foo_find(int id) /* find an existing object */

{

    struct foo    *fp;

    pthread_mutex_lock(&hashlock);

    for (fp = fh[HASH(id)]; fp != NULL; fp = fp->f_next) {

        if (fp->f_id == id) {

            foo_hold(fp);

            break;

        }

    }

    pthread_mutex_unlock(&hashlock);

    return(fp);

}

void

foo_rele(struct foo *fp) /* release a reference to the object */

{

    struct foo    *tfp;

    int            idx;

    pthread_mutex_lock(&fp->f_lock);

    if (fp->f_count == ) { /* last reference */

        pthread_mutex_unlock(&fp->f_lock);

        pthread_mutex_lock(&hashlock);

        pthread_mutex_lock(&fp->f_lock);

        /* need to recheck the condition */

        if (fp->f_count != ) {

            fp->f_count--;

            pthread_mutex_unlock(&fp->f_lock);

            pthread_mutex_unlock(&hashlock);

            return;

        }

        /* remove from list */

        idx = HASH(fp->f_id);

        tfp = fh[idx];

        if (tfp == fp) {

            fh[idx] = fp->f_next;

        } else {

            while (tfp->f_next != fp)

                tfp = tfp->f_next;

            tfp->f_next = fp->f_next;

        }

        pthread_mutex_unlock(&hashlock);

        pthread_mutex_unlock(&fp->f_lock);

        pthread_mutex_destroy(&fp->f_lock);

        free(fp);

    } else {

        fp->f_count--;

        pthread_mutex_unlock(&fp->f_lock);

    }

}
上面的代码是不会出现死锁的,但是需要搞清楚上面的代码为什么这么设计。
APUE书中已经对代码的设计进行了解释,这里我记录一下书上没有的提到的内容。
问题一:foo_rele中为什么要先对hashlock上锁,再对f_lock上锁呢?
假如其他函数设计不变,foo_rele的上锁顺序颠倒一下就可能出现如下场景:
a. foo_rele已经获得对某个object的锁了,准备请求hashlock的锁
b. 同时,foo_find已经获得了hashlock的锁了,准备请求ojbect的锁
如果foo_rele和foo_find针对的都是同一个ojbect,那么死锁了:foo_rele占着ojbect等着hashlock,foo_find占着hashlock等着ojbect,双方互相等着,就都锁住了。
问题二:foo_alloc新产生一个ojbect的时候,为什么要在释放hashlock之前,先对这个object的f_lock上锁呢?(红字)
如果已经生成了一个ojbect了(这个时候object还不对外可见);但是一旦执行了“fh[idx]=fp”,这个ojbect就在“据点”中可以被找到了!
再如果,哪个不开眼的,这个时候正好foo_find到这个object,并且获得了object的f_count锁了,就会出现如下的场景:
foo_alloc正对新生成的object内容初始化着呢,foo_find同时就找到了这个ojbect并且扔给其他人去用了,这就瞎了,ojbect就不同步了。
想明白上面两个问题,也就可以理解书上的代码设计了。
总结一下解决方法:为了避免死锁情况出现,在锁不太多的情况下,保证每个线程的上锁顺序要一致。即,
线程A : lock(mutex_a) lock(mutex_b)
线程B :lock(mutex_a) lock(mutex_b)
如果是下面的情况:
线程A : lock(mutex_b) lock(mutex_a)
线程B :lock(mutex_a) lock(mutex_b)
很可能就死锁了,而且这种死锁还是不定期的,很难debug。
乍一看就是上锁的顺序保持一致呗,没啥难的啊。但是考虑实际情况中,业务逻辑可能是比较复杂的,两个锁可能被业务逻辑分割的比较远,解锁的位置也不一定在哪。就像上面书上的demo,这种上锁解锁的过程是需要仔细设计的,这也就体现出来技术含量了。
面对同样的问题,书上给了另一种避免死锁的程序设计思路:
#include <stdlib.h>

#include <pthread.h>

#define NHASH 29

#define HASH(id) (((unsigned long)id)%NHASH)

struct foo *fh[NHASH];

pthread_mutex_t hashlock = PTHREAD_MUTEX_INITIALIZER;

struct foo {

    int             f_count; /* protected by hashlock */

    pthread_mutex_t f_lock;

    int             f_id;

    struct foo     *f_next; /* protected by hashlock */

    /* ... more stuff here ... */

};

struct foo *

foo_alloc(int id) /* allocate the object */

{

    struct foo    *fp;

    int            idx;

    if ((fp = malloc(sizeof(struct foo))) != NULL) {

        fp->f_count = ;

        fp->f_id = id;

        if (pthread_mutex_init(&fp->f_lock, NULL) != ) {

            free(fp);

            return(NULL);

        }

        idx = HASH(id);

        pthread_mutex_lock(&hashlock);

        fp->f_next = fh[idx];

        fh[idx] = fp;

        pthread_mutex_lock(&fp->f_lock);

        pthread_mutex_unlock(&hashlock);

        /* ... continue initialization ... */

        pthread_mutex_unlock(&fp->f_lock);

    }

    return(fp);

}

void

foo_hold(struct foo *fp) /* add a reference to the object */

{

    pthread_mutex_lock(&hashlock);

    fp->f_count++;

    pthread_mutex_unlock(&hashlock);

}

struct foo *

foo_find(int id) /* find an existing object */

{

    struct foo    *fp;

    pthread_mutex_lock(&hashlock);

    for (fp = fh[HASH(id)]; fp != NULL; fp = fp->f_next) {

        if (fp->f_id == id) {

            fp->f_count++;

            break;

        }

    }

    pthread_mutex_unlock(&hashlock);

    return(fp);

}

void

foo_rele(struct foo *fp) /* release a reference to the object */

{

    struct foo    *tfp;

    int            idx;

    pthread_mutex_lock(&hashlock);

    if (--fp->f_count == ) { /* last reference, remove from list */

        idx = HASH(fp->f_id);

        tfp = fh[idx];

        if (tfp == fp) {

            fh[idx] = fp->f_next;

        } else {

            while (tfp->f_next != fp)

                tfp = tfp->f_next;

            tfp->f_next = fp->f_next;

        }

        pthread_mutex_unlock(&hashlock);

        pthread_mutex_destroy(&fp->f_lock);

        free(fp);

    } else {

        pthread_mutex_unlock(&hashlock);

    }

}
上面代码照比之前的版本简洁了很多,核心的原因就是:每个ojbect的f_count的同步保护交给了hashlock而不是f_lock。
1. foo_alloc的时候还是需要先锁hashlock再锁f_lock,这个没有变化。
2. foo_hold foo_find foo_rele都没有用到f_lock锁,都只用了hashlock锁;既然只用了一个锁,那么就不涉及到了死锁了问题了。
APUE书上的说法是“f_count的保护交给了hashlock”,其实换个角度来说更好“f_lock只在初始化时候保护了object,初始化完成就没用了”。
对比两种解决死锁的思路:
(1)思路一复杂,加锁解锁频繁;但是对hash和ojbect的锁分的比较清,该锁谁锁谁,该放谁就马上放,可能不会耽误并行处理
(2)思路二简洁,每个锁负责的职责比较单一;但是每次处理一个ojbect就要对整个hash都锁住,如果这种处理比较频繁,可能会影响并行效果
实际中,不得不考虑类似思路一还有思路二的trade-off。
(五)Barrier
Barrier的作用就是让多个线程coordinate的milestone:大家分头去干各自的事情,先干完的等着后干完的,然#include "apue.h"
#include <pthread.h>

#include <limits.h>

#include <sys/time.h>

#define NTHR 1

#define NUMNUM 8000000L

#define TNUM (NUMNUM/NTHR)

long nums[NUMNUM];

long snums[NUMNUM];

pthread_barrier_t b;

#define sort qsort

// compare two long integers ( helper fun for sort )

int complong(const void *arg1, const void *arg2)

{

    long l1 = *(long *)arg1;

    long l2 = *(long *)arg2;

    if (l1==l2)

        return ;

    else if (l1<l2)

        return -;

    else

        return ;

}

// worker thread to sort a portion of the set of numbers

void *thr_fn(void *arg)

{

    long idx = (long)arg;

    sort(&nums[idx], TNUM, sizeof(long), complong);

    pthread_barrier_wait(&b);

    // do some work

    return ((void *));

}

// merge the result of individual sorted ranges

void merge()

{

    long idx[NTHR];

    long i, minidx, sidx, num;

    for ( i=; i<NTHR; ++i ) idx[i] = i * TNUM;

    for ( sidx=; sidx < NUMNUM; ++sidx )

    {

        num = LONG_MAX;

        for ( i=; i<NTHR; ++i )

        {

            if ( (idx[i]<(i+)*TNUM) && (nums[idx[i]]<num) )

            {

                num = nums[idx[i]];

                minidx = i;

            }

        }

        snums[sidx] = nums[idx[minidx]];

        idx[minidx]++;

    }

}

int main()

{

    unsigned long i;

    struct timeval start, end;

    long long startusec, endusec;

    double elapsed;

    int err;

    pthread_t tid;

    // create the initial set of numbers to sort

    srandom();

    for ( i=; i<NUMNUM; ++i )

        nums[i] = random();

    // create 8 threads to sort the numbers

    gettimeofday(&start, NULL);

    pthread_barrier_init(&b, NULL, NTHR+);

    for ( i=; i<NTHR; ++i )

    {

        err = pthread_create(&tid, NULL, thr_fn, (void *)(i*TNUM));

        if ( err!= )

            err_exit(err, "can't create thread");

    }

    pthread_barrier_wait(&

    merge();

    gettimeofday(&end, NULL);

    startusec = start.tv_sec* + start.tv_usec;

    endusec = end.tv_sec* + end.tv_usec;

    elapsed = (double)(endusec-startusec)/1000000.0;

    printf("sort took %.4f seconds\n", elapsed);

    exit();

}
上面的代码,是我在原著基础上做了一些改动(红字)。改动的原因是:由于试验平台系统没有heapsort()函数,所以就改成了qsort(),也不影响体会barrier的功能。
对代码的解释:
1. 上述的代码是对8000000个long进行排序,一共用了8个线程,每个线程对相邻的1000000个数进行qsort
2. 将8个线程的排序结果合并起来,形成新的数组
这里
pthread_barrier_init(&b, NULL, NTHR+1);
为什么是NTHR+1呢?因为多出来的这个1是main线程。得多出来一个master线程,等着其余8个worker线程把活儿做完了再往下走。
还有一点,就是同一个平台上,对8000000个数据进行排序,使用多少个线程合适呢?
试验结果如下(我的试验平台是双路24线程cpu):
如果是单线程,排序时间大概是4秒;
如果是8线程,排序时间大概是0.8秒;
如果是16线程,排序时间是1.5秒;
可以得到结论:多线程在多核平台上是有速度优势的;但是不能认为仅仅靠增加线程数就可以提速,因为线程也是有开销的;因此,还是考虑trade-off。
(六)Condition Variable
这个部分书上给的例子我觉得不能run,不利于初学者学习体会。
而这个blog(http://www.cnblogs.com/chuyuhuashi/p/4447817.html)中,通过一道常见的多线程面试题目来体会了condition variable的用法。
背景很简洁:“我们再来看一道经典的面试题:用 4 个线程疯狂的打印 abcd 持续 5 秒钟,但是要按照顺序打印,不能是乱序的。”
这个问题有可以有两种解决方案,一种是chainlock(链锁解决方案),代码如下:
#include <stdio.h>

#include <stdlib.h>

#include <pthread.h>

#include <string.h>

#include <unistd.h>

#define NTHR 4

pthread_mutex_t muts[NTHR];

void *thr_func(void *arg)

{

    int n = (int)(arg);

    char c = n+'a';

    while()

    {

        pthread_mutex_lock(muts+n);

        printf("%c\n",c);

        pthread_mutex_unlock(muts+(n+)%NTHR);

    }

    pthread_exit((void *));

}

int main()

{

    pthread_t tid[NTHR];

    int i, err;

    for ( i=; i<NTHR; ++i )

    {

        // initialize mutex and lock them

        pthread_mutex_init(muts+i, NULL);

        pthread_mutex_lock(muts+i);

        // create new thread

        err = pthread_create(tid+i, NULL, thr_func, (void *)i );

        if ( err!= )

        {

            fprintf(stderr, "pthread_create():%s\n",strerror(err));

            exit();

        }

    }

    pthread_mutex_unlock(muts);

    alarm(); // wait 5 seconds

    for (i=; i<NTHR; ++i) pthread_join(tid[i], NULL);

    exit();

}
另一种解决方案是采用condition variable,代码如下:
#include <stdio.h>

#include <stdlib.h>

#include <pthread.h>

#include <unistd.h>

#include <string.h>

#define NTHR 4

pthread_mutex_t mut_num = PTHREAD_MUTEX_INITIALIZER;

pthread_cond_t cond_num = PTHREAD_COND_INITIALIZER;

volatile int num = ;

void *thr_fun(void *arg)

{

    int n = (int)arg;

    char ch = n+'a';

    while()

    {

        pthread_mutex_lock(&mut_num);

        while ( num!=n )

        {

            pthread_cond_wait(&cond_num, &mut_num);

        }

        printf("%c\n", ch);

        num = (num+)%NTHR;

        pthread_cond_broadcast(&cond_num);

        pthread_mutex_unlock(&mut_num);

    }

    pthread_exit((void *));

}

int main()

{

    int i, err;

    pthread_t tid[NTHR];

    for ( i=; i<NTHR; ++i )

    {

        err = pthread_create(tid+i, NULL, thr_fun, (void *)i);

        if ( err )

        {

            fprintf(stderr, "pthread_create():%s\n",strerror(err));

            exit();

        }

    }

    alarm();

    for ( i=; i<NTHR; ++i )

        pthread_join(tid[i],NULL);

    exit();

}
两种代码的设计思路在原blog中都说明了,不再赘述。
这两种方法比较,有什么trade-off呢?
(1)我觉得主要是采用condition variable的思路,只用一个互斥量mutex就可以了,从而降低了维护互斥量的代价。
(2)至于效率上,从试验结果来看:
chainlock在5秒钟内打印了700000个字符,而condition variable在相同时间内只打印了3000000个字符,由此可以反推condition variable的效率在当前问题上是chainlock的1/2。
如果是其他场景的话,可能二者的效率就又有所不同了。
【APUE】Chapter11 Threads的更多相关文章
- 【APUE】Chapter10 Signals
Signal主要分两大部分: A. 什么是Signal,有哪些Signal,都是干什么使的. B. 列举了非常多不正确(不可靠)的处理Signal的方式,以及怎么样设计来避免这些错误出现. 10.2 ...
- 【APUE】Chapter12 Thread Control
今天看了APUE的Chapter12 Thread Control的内容,记录一下看书的心得与示例code. 这一章的内容是对Chapter11 Threads(见上一篇日志)的补充,大部分内容都是理 ...
- 【APUE】Chapter14 Advanced I/O
14.1 Introduction 这一章介绍的内容主要有nonblocking I/O, record locking, I/O multiplexing, asynchronous I/O, th ...
- 【APUE】Chapter13 Daemon Processes
这章节内容比较紧凑,主要有5部分: 1. 守护进程的特点 2. 守护进程的构造步骤及原理. 3. 守护进程示例:系统日志守护进程服务syslogd的相关函数. 4. Singe-Instance 守护 ...
- 【APUE】Chapter7 Process Environment
这一章内容是Process的基础准备篇章.这一章的内容都是基于C Programm为例子. (一)进程开始: kernel → C start-up rountine → main function ...
- 【译】Activitys, Threads和 内存泄露
Android编程中一个共同的困难就是协调Activity的生命周期和长时间运行的任务(task),并且要避免可能的内存泄露.思考下面Activity的代码,在它启动的时候开启一个线程并循环执行任务. ...
- 【APUE】Chapter17 Advanced IPC & sign extension & 结构体内存对齐
17.1 Introduction 这一章主要讲了UNIX Domain Sockets这样的进程间通讯方式,并列举了具体的几个例子. 17.2 UNIX Domain Sockets 这是一种特殊s ...
- 【APUE】Chapter16 Network IPC: Sockets & makefile写法学习
16.1 Introduction Chapter15讲的是同一个machine之间不同进程的通信,这一章内容是不同machine之间通过network通信,切入点是socket. 16.2 Sock ...
- 【APUE】Chapter15 Interprocess Communication
15.1 Introduction 这部分太多概念我不了解.只看懂了最后一段,进程间通信(IPC)内容被组织成了三个部分: (1)classical IPC : pipes, FIFOs, messa ...
随机推荐
- April 17 2017 Week 16 Monday
You will find that it is necessary to let things go; simply for the reason that they are heavy. 你会明白 ...
- MySQL入门很简单: 2 MySQL数据类型
2. MySQL数据类型 2.1 整数类型 后面的是默认显示宽度: tinyint(4) smallint(6) mediumint(9) int(11) bigint(20) 2.2 浮点型和定点数 ...
- ZOJ - 2112 Dynamic Rankings(BIT套主席树)
纠结了好久的一道题,以前是用线段树套平衡树二分做的,感觉时间复杂度和分块差不多了... 终于用BIT套函数式线段树了过了,120ms就是快,此题主要是卡内存. 假设离散后有ns个不同的值,递归层数是l ...
- mm_struct简要解析
http://blog.chinaunix.net/uid-20729583-id-1884615.html struct mm_struct { /* 指向线性区对象的链表头 ...
- vuejs样式绑定
第一种:class的对象绑定,class引用的是一个对象,这个对象的属性显示不显示由变量决定 <style> .activated{ color:red; } </style> ...
- Linux操作系统下的三种Java环境配置方法
方法1:修改/etc/profile 文件 所有用户的 shell都有权使用这些环境变量 (1)在 shell终端执行命令:vi /etc/profile (2)在 profile文件末尾加入: e ...
- lasagne保存网络参数
# Optionally, you could now dump the network weights to a file like this: # np.savez('model.npz', *l ...
- Python 3 collections.defaultdict() 与 dict的使用和区别
综述: 这里的defaultdict(function_factory)构建的是一个类似dictionary的对象,其中keys的值,自行确定赋值,但是values的类型,是function_fact ...
- cudaMemcpy2D
- phpmyadmin高级功能尚未完全设置部分功能未激活
1.登录phpmyadmin,点击导入,选择/var/ww/html/phpmyadmin/examples/create_tables.sql并执行 完成后可以看到多出了一个库phpmyadmin. ...
