Linux Subreaper 机制及内核态逃离方法(PR_SET_CHILD_SUBREAPER, prctl, systemed)
PS:要转载请注明出处,本人版权所有。
PS: 这个只是基于《我自己》的理解,
如果和你的原则及想法相冲突,请谅解,勿喷。
环境说明
无
前言
由于某些其他的原因,我们在测试另外一个问题的时候发现了一个奇怪的现象:在我们一直朴素的认知下,如果一个程序创建了parent-process和child-process,这个时候,当child-process正在运行,parent-process退出的时候,child-process会被托孤到init进程。但是我们却通过pstree -p 发现了并不是这样的,他会被托孤到某一个特殊进程下面,这个特殊进程并不是init进程,而是init进程下面的某一个进程。下面是这个现象的验证过程:
测试程序
#include <unistd.h>

#include <sys/types.h>

#include <stdio.h>

int main(int argc, char * argv[])

{

    int pid = fork();

    if (pid < 0)

        printf("fork failed.\n");

    else if (pid > 0){

        printf("parent : child pid = %d\n", pid);

    }

    else{

        printf("child doing ... ...\n");

        printf("first get ppid = %d\n", getppid());

        sleep(20);

        printf("second get ppid = %d\n", getppid());

        sleep(1000);

    }

    sleep(15);

    return 0;

}
我们运行这个程序后,其运行输出如下图:

我们对这个图进行分析,可以知道,当前的运行a.out进程pid是72140,然后子进程的pid是72141,在parent-process退出后,我们再次获取ppid,可以看到输出是3203。
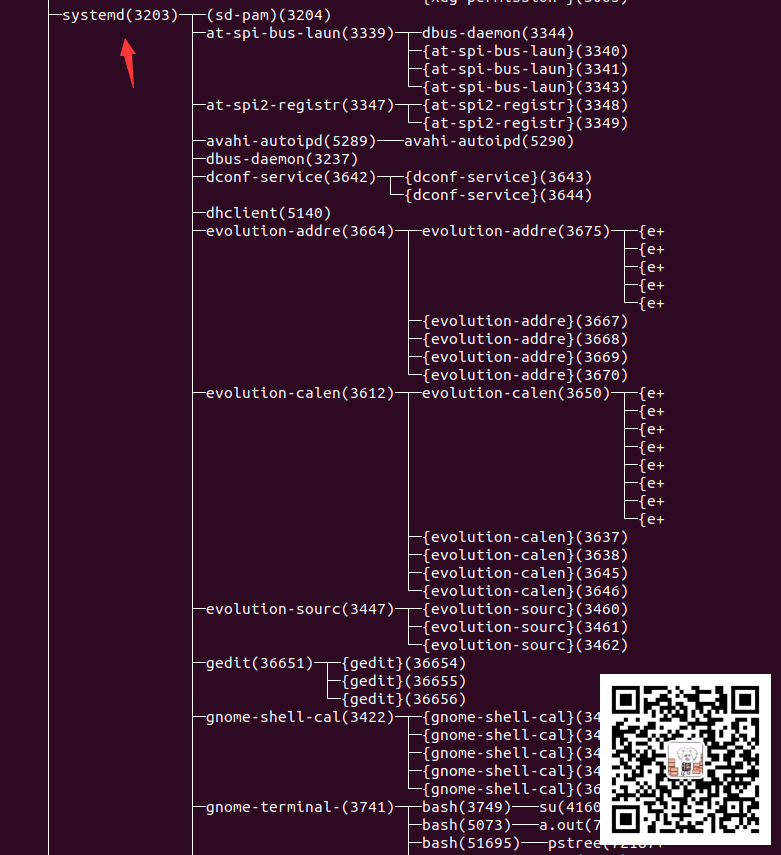
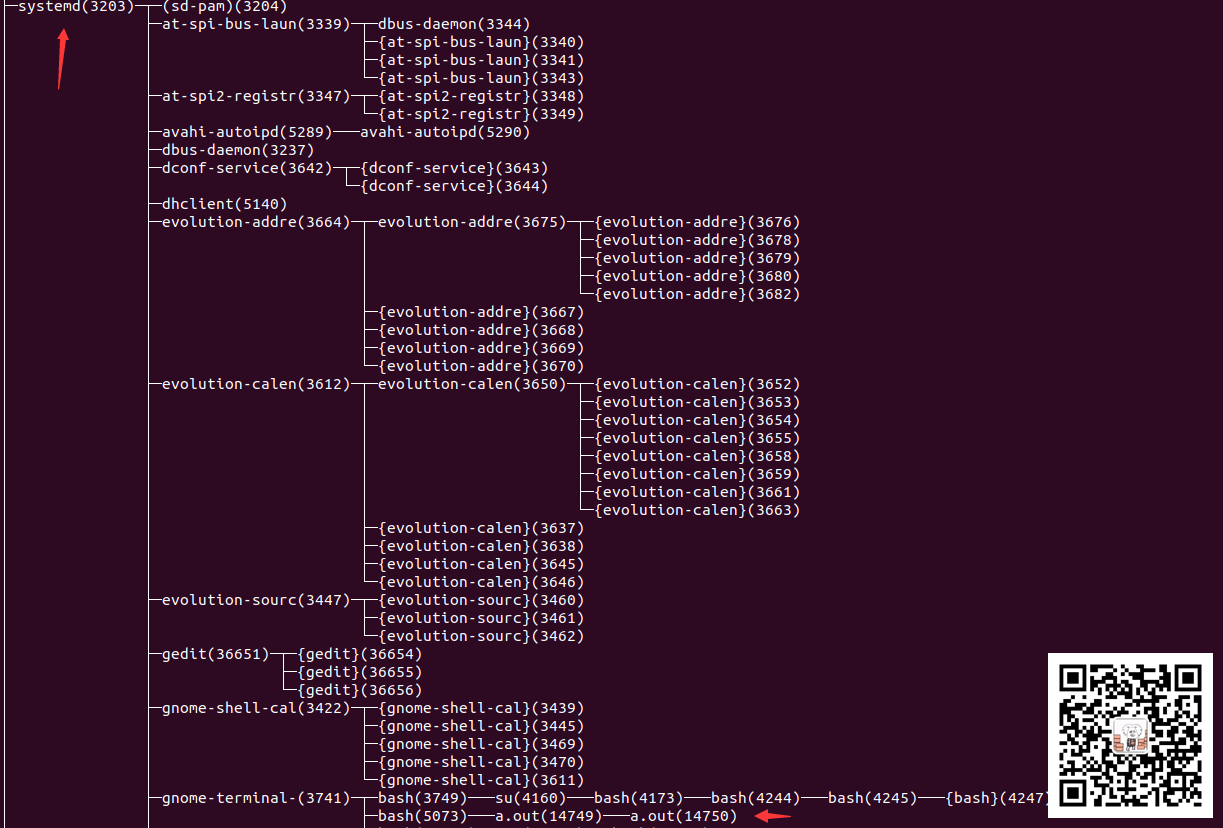
接着我们看一下在parent-process未退出时的进程树图片节选:

在图中我们可以知道,我们的a.out在systemd(3203)->gnome-terminal-(3741)->bash(5073)->a.out(72140)
接着我们看一下在parent-process退出时的进程树图片节选:

在图中我们可以知道,当parent-process退出后,子进程72141被托孤给了systemd(3203),并不是我们熟知的pid为1的init进程。这里提前透露一下3203是systemd --user一个进程(同时也是一个subreaper)。
带着对这个问题的疑问,我查询了相关的资料,做了相关的实验,查询到这个现象的原因是PR_SET_CHILD_SUBREAPER相关导致的,因此有了本文的相关内容。
什么是Subreaper(PR_SET_CHILD_SUBREAPER) ?
对于这个问题,我们还是要去看man手册,链接如下:https://man7.org/linux/man-pages/man2/prctl.2.html
通过prctl函数,我们可以对当前进程做很多有趣的设置,其中一个就是PR_SET_CHILD_SUBREAPER选项,他主要是用来收集这些托孤进程的,一般是用来给一些守护进程管理进程(例如:上文提到的systemd)使用,使得一个进程能够管理自己的所有后代进程。其主要还是操作当前进程的task_struct中的is_child_subreaper属性,下面是实现的源码节选:
//kernel/sys.c

static int propagate_has_child_subreaper(struct task_struct *p, void *data)

{

	/*

	 * If task has has_child_subreaper - all its descendants

	 * already have these flag too and new descendants will

	 * inherit it on fork, skip them.

	 *

	 * If we've found child_reaper - skip descendants in

	 * it's subtree as they will never get out pidns.

	 */

	if (p->signal->has_child_subreaper ||

	    is_child_reaper(task_pid(p)))

		return 0;

	p->signal->has_child_subreaper = 1;

	return 1;

}

//kernel/sys.c

SYSCALL_DEFINE5(prctl, int, option, unsigned long, arg2, unsigned long, arg3,

		unsigned long, arg4, unsigned long, arg5)

{

    struct task_struct *me = current;

    //...

    switch (option){

        //...

        case PR_SET_CHILD_SUBREAPER:

            me->signal->is_child_subreaper = !!arg2;

            if (!arg2)

                break;

            //此函数遍历当前进程的所有子进程,并调用propagate_has_child_subreaper设置has_child_subreaper属性。

            walk_process_tree(me, propagate_has_child_subreaper, NULL);

            break;

        case PR_GET_CHILD_SUBREAPER:

            error = put_user(me->signal->is_child_subreaper,

                    (int __user *)arg2);

            break;

        //...

    }

    //...

}
通过如上的源码,我们可以知道了PR_SET_CHILD_SUBREAPER的实现部分原理,但是现在我们还是不知道为啥这样设置之后,当一个进程还有子进程时,当前进程退出后,子进程就托孤给了这个子进程收割者。这里可以提前透露一下,主要是和task_struct中的has_child_subreaper属性有关系。
当含有子进程的父进程退出时,怎么进行托孤的?
其实从问题就可以看出一点端倪,这个托孤的动作一般是发生在进程退出的时候,所以我们去找进程退出相关的代码应该能够找到一些启发。一般来说,我们的进程退出都会调用exit系统调用,对应到内核态,其实就是do_exit。我们通过has_child_subreaper来全局搜索,可以看到一些关联。下面是部分代码节选:
void __noreturn do_exit(long code)

{

	struct task_struct *tsk = current;

    int group_dead;

    //...

    exit_notify(tsk, group_dead);

    //...

}

/*

 * Send signals to all our closest relatives so that they know

 * to properly mourn us..

 */

static void exit_notify(struct task_struct *tsk, int group_dead)

{

    //...

	LIST_HEAD(dead);

    //...

	forget_original_parent(tsk, &dead);

    //...

}

/*

 * This does two things:

 *

 * A.  Make init inherit all the child processes

 * B.  Check to see if any process groups have become orphaned

 *	as a result of our exiting, and if they have any stopped

 *	jobs, send them a SIGHUP and then a SIGCONT.  (POSIX 3.2.2.2)

 */

static void forget_original_parent(struct task_struct *father,

					struct list_head *dead)

{

	struct task_struct *p, *t, *reaper;

	if (unlikely(!list_empty(&father->ptraced)))

		exit_ptrace(father, dead);

	/* Can drop and reacquire tasklist_lock */

	//通过task_active_pid_ns()->child_reaper查找到一个reaper,然后返回出来,注意一般情况下这里查出来的进程就是当前namespace的init进程。

	reaper = find_child_reaper(father, dead);

	if (list_empty(&father->children))

		return;

	//根据init进程和has_child_subreaper属性,查询真正符合条件的reaper

	reaper = find_new_reaper(father, reaper);

	list_for_each_entry(p, &father->children, sibling) {//遍历当前退出进程的所有子进程

		for_each_thread(p, t) {//遍历所有子进程的线程

			RCU_INIT_POINTER(t->real_parent, reaper);//设置真正的父进程,这里的父进程就是上面我们查找出来了的满足要求的reaper

			BUG_ON((!t->ptrace) != (rcu_access_pointer(t->parent) == father));

			if (likely(!t->ptrace))

				t->parent = t->real_parent;

			if (t->pdeath_signal)

				group_send_sig_info(t->pdeath_signal,

						    SEND_SIG_NOINFO, t,

						    PIDTYPE_TGID);

		}

		/*

		 * If this is a threaded reparent there is no need to

		 * notify anyone anything has happened.

		 */

		if (!same_thread_group(reaper, father))

			reparent_leader(father, p, dead);

	}

	list_splice_tail_init(&father->children, &reaper->children);

}
在forget_original_parent中,我们可以看到整个方法的作用就是,找到一个reaper,然后将所有子进程交付给这个reaper。
我们怎么逃离PR_SET_CHILD_SUBREAPER的影响呢?
其实这个问题就在forget_original_parent中的find_new_reaper函数中,也就是has_child_subreaper这个属性怎么生效,下面我们来看看这个函数的功能:
/*

 * When we die, we re-parent all our children, and try to:

 * 1. give them to another thread in our thread group, if such a member exists

 * 2. give it to the first ancestor process which prctl'd itself as a

 *    child_subreaper for its children (like a service manager)

 * 3. give it to the init process (PID 1) in our pid namespace

 */

static struct task_struct *find_new_reaper(struct task_struct *father,

					   struct task_struct *child_reaper)

{

	struct task_struct *thread, *reaper;

	thread = find_alive_thread(father);

	if (thread)

		return thread;

	if (father->signal->has_child_subreaper) {//注意has_child_subreaper属性生效的地方。

		unsigned int ns_level = task_pid(father)->level;

		/*

		 * Find the first ->is_child_subreaper ancestor in our pid_ns.

		 * We can't check reaper != child_reaper to ensure we do not

		 * cross the namespaces, the exiting parent could be injected

		 * by setns() + fork().

		 * We check pid->level, this is slightly more efficient than

		 * task_active_pid_ns(reaper) != task_active_pid_ns(father).

		 */

		for (reaper = father->real_parent;

		     task_pid(reaper)->level == ns_level;

		     reaper = reaper->real_parent) {

			if (reaper == &init_task)

				break;

			if (!reaper->signal->is_child_subreaper)

				continue;

			thread = find_alive_thread(reaper);

			if (thread)

				return thread;

		}

	}

	return child_reaper;

}
我们从find_new_reaper中可以知道,当has_child_subreaper有值时,我们就从当前进程的父进程开始查找,当找到一个进程的is_child_subreaper属性是有值时,我们就返回这个进程作为真正的reaper。当has_child_subreaper无值时,就是以init进程为reaper来托孤。
从以上的推理来看,我们有两个方案可以逃离PR_SET_CHILD_SUBREAPER影响:
- 直接改写真正PR_SET_CHILD_SUBREAPER的地方,不启用这个属性。例如修改systemd的源码。
- 写一个内核态的小工具,修改指定进程的as_child_subreaper的值,当我们禁用此值时,在进程退出时,就会把子进程托孤给init进程。
我们怎么逃离PR_SET_CHILD_SUBREAPER的影响呢?
按照上一个小结的结论,我们一般情况下是不会去改一些开源的系统程序,例如:systemd。因此我们选择直接写一个基本的内核态模块,直接修改其task_struct数据结构即可。ko文件如下:
#include <linux/module.h>	/* Needed by all modules */

#include <linux/kernel.h>	/* Needed for KERN_INFO */

#include <linux/pid.h>

#include <linux/sched.h>

#include <linux/sched/signal.h>

#include <linux/sched/mm.h>

#include <linux/mm_types.h>

#include <linux/rwsem.h>

#include <linux/slab.h>

#include <linux/fs.h>

#include <linux/mmap_lock.h>

#include <linux/pid_namespace.h>

MODULE_AUTHOR("sky <sky@sky.com>");

MODULE_DESCRIPTION("sky's hack");

MODULE_LICENSE("GPL");

MODULE_VERSION("1.0.0");

static int hack_pid = -1;

module_param_named(hack_pid, hack_pid, uint, S_IRUGO);

MODULE_PARM_DESC(hack_pid, "hack_pid");

int init_module(void)

{

	printk(KERN_INFO "Hello sky_hack.\n");

	printk(KERN_INFO "hack pid %d\n", hack_pid);

	rcu_read_lock();

	struct pid * _pid_struct = find_vpid(hack_pid);

	if (NULL == _pid_struct){

		printk("get pid struct failed.\n");

		rcu_read_unlock();

		return -1;

	}

	struct task_struct * _task_struct = get_pid_task(_pid_struct, PIDTYPE_PID);

	if (NULL == _task_struct){

		printk("get task struct failed.\n");

		rcu_read_unlock();

		return -1;

	}

	struct mm_struct * _mm_struct = get_task_mm(_task_struct);

	if (NULL == _mm_struct){

		printk("get mm struct failed.\n");

		rcu_read_unlock();

		return -1;

	}

	mmap_read_lock(_mm_struct);

    if (_mm_struct->exe_file) {

                char * pathname = kmalloc(PATH_MAX, GFP_ATOMIC);

                if (pathname) {

                    char * p = d_path(&_mm_struct->exe_file->f_path, pathname, PATH_MAX);

                    /*Now you have the path name of exe in p*/

					printk(KERN_INFO "process full path %s\n", p);

                }

				kfree(pathname);

    }

	mmap_read_unlock(_mm_struct);

	struct pid_namespace *pid_ns = task_active_pid_ns(_task_struct);

	struct task_struct *reaper = pid_ns->child_reaper;

	printk(KERN_INFO "pid_ns->child_reaper=%x, current task_struct=%x\n", pid_ns->child_reaper, _task_struct);

	printk(KERN_INFO "is_child_subreaper %d\n", _task_struct->signal->is_child_subreaper);

	printk(KERN_INFO "has_child_subreaper %d\n", _task_struct->signal->has_child_subreaper);

	//escape from a subreaper by do_exit()

	_task_struct->signal->has_child_subreaper = 0;

	rcu_read_unlock();

	return 0;

}

void cleanup_module(void)

{

	printk(KERN_INFO "Goodbye sky_hack.\n");

}
当前这个驱动的唯一目的就是把指定pid进程的has_child_subreaper改为0,这样就可以逃离subreaper。
编译Makefile
obj-m += sky_hack.o

all:

    make -C /lib/modules/$(shell uname -r)/build M=$(PWD) modules

clean:

    make -C /lib/modules/$(shell uname -r)/build M=$(PWD) clean
下面我们再一次做上面的测试,运行a.out,查看a.out相关的进程树,然后运行sky_hack.ko hack_pid=‘a.out进程id’,等待一段时间后,当a.out退出后,再次查看a.out的相关进程树即可。
运行a.out的输出:

我们其实可以看到,按照上面我们的说明进行操作后,a.out第二次打印的ppid已经是1了,这意味着我们逃离subreaper成功了。
下面我们看看insmod sky_hack.ko hack_pid=14749的输出:

我们其实可以看到,在驱动里面我们打印了a.out进程的has_child_subreaper属性是1,因此我们在驱动中重置了它,导致了退出时,成功托孤给了init进程。
下面我们看看这整个阶段中的进程树状况:

这里的进程分布和上述开始的一样。
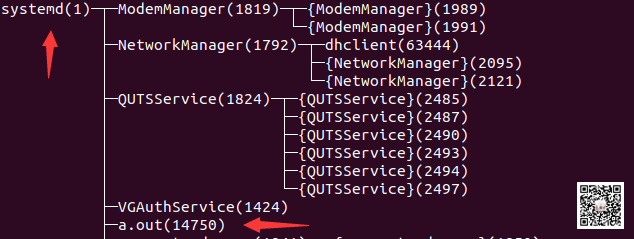
我们看看逃离subreaper后:

这里的进程分布就和最开始的不一样的,我们成功的将我们的子进程托孤给了init进程。
后记
我们首先从一个其他问题,遇到了这个现象,然后我们深究了这个现象产生的原因,并且最终尝试设计出逃离这种现象的技术方案。这其中会涉及一些内核源码,驱动编写,同时加深了我们对subreaper的理解。经过这些过程后,我们对Linux内核,Linux的应用开发会有一个新的认知和理解。同时也增强了我们解决问题的综合能力。
参考文献
- 无
打赏、订阅、收藏、丢香蕉、硬币,请关注公众号(攻城狮的搬砖之路)

PS: 请尊重原创,不喜勿喷。
PS: 要转载请注明出处,本人版权所有。
PS: 有问题请留言,看到后我会第一时间回复。
Linux Subreaper 机制及内核态逃离方法(PR_SET_CHILD_SUBREAPER, prctl, systemed)的更多相关文章
- Linux fork()一个进程内核态的变化
[前言]用户态的变化,耳熟能详不在赘述.现在支持读时共享,写时复制. 一.内核态的变化 1.fork一个子进程代码 #include <stdio.h> #include <stdl ...
- Linux内核态、用户态简介与IntelCPU特权级别--Ring0-3
一.现代操作系统的权限分离: 现代操作系统一般都至少分为内核态和用户态.一般应用程序通常运行于用户态,而当应用程序调用系统调用时候会执行内核代码,此时会处于内核态.一般的,应用程序是不能随便进入内核态 ...
- 简介---linux内核态和用户态
内核态:进程运行在内核空间:管理系统的所有资源,比如读写磁盘文件,分配回收内存,从网络接口读写数据等等 用户态:进程运行在用户空间.比如一些应用程序 内核如何调用硬件资源的:内核空间中的代码控制了硬件 ...
- Linux内核态抢占机制分析
http://blog.sina.com.cn/s/blog_502c8cc401012pxj.html [摘要]本文首先介绍非抢占式内核(Non-Preemptive Kernel)和可抢占式内核( ...
- Linux内核态抢占机制分析(转)
Linux内核态抢占机制分析 http://blog.sina.com.cn/s/blog_502c8cc401012pxj.html 摘 要]本文首先介绍非抢占式内核(Non-Preemptive ...
- Linux内核态抢占机制分析【转】
转自:http://blog.csdn.net/yiyeguzhou100/article/details/53097665 目录(?)[-] 1非抢占式和可抢占式内核的区别 21 用户态抢占User ...
- linux用户态和内核态通信之netlink机制【转】
本文转载自:http://blog.csdn.net/zcabcd123/article/details/8272360 这是一篇学习笔记,主要是对<Linux 系统内核空间与用户空间通信的实现 ...
- Linux内核态用户态相关知识 & 相互通信
http://www.cnblogs.com/bakari/p/5520860.html 内核从本质上看是一种软件——控制计算机的硬件资源,并提供上层应用程序运行的环境. 系统调用是操作系统的最小功能 ...
- Linux 用户态与内核态的交互【转载】
Linux 用户态与内核态的交互 在 Linux 2.4 版以后版本的内核中,几乎全部的中断过程与用户态进程的通信都是使用 netlink 套接字实现的,例如iprote2网络管理工具,它与内核的交 ...
- Linux内核堆栈使用方法 进程0和进程1【转】
转自:http://blog.csdn.net/yihaolovem/article/details/37119971 目录(?)[-] 8 Linux 系统中堆栈的使用方法 81 初始化阶段 82 ...
随机推荐
- AutoGPT是什么?超简单安装使用教程
1.AutoGPT 最近几天当红炸子鸡的是AutoGPT,不得不说AI发展真快啊,几天出来一个新东西,都跟不上时代的脚步了. AutoGPT是一个开源的应用程序,展示了GPT-4语言模型的能力.这个程 ...
- 3.4 CSP-J 补赛游寄
3.4 CSP-J 补赛游寄 Day -? 听说要去打比赛. Day -7 今天家长会,老师公布成绩 /fn/fn/fn.政治考废了,然后其他都挺好. 语文 $ 95 $,数学 $ 118 $,英语 ...
- 《ASP.NET Core 微服务实战》-- 读书笔记(第1章 、第2章)
译者序 微服务设计方法清晰定义了各个开发团队的业务边界,微服务框架以不同方式实现了服务之间的协作与集成. .NET Core 作为全新的 .NET 技术,它不仅完全开源.跨平台,更面向云原生开发进行了 ...
- Winows11-hosts文件无法修改保存
Win11系统hosts文件无法修改保存 新近使用win11新电脑修改hosts,添加IP和主机名映射,保存时提示host无法修改. 解决办法: 1.将hosts文件的权限"只读" ...
- Hive分区和分桶的区别
1.前言 Hive的分区和分桶都是细化数据管理,加快数据查询和分析,两者有什么区别呢?下面讲解一下分区和分桶的原理. 2.分区 (1)分区原理 Hive的分区表可以有一个或多个分区键,用于确定数据的存 ...
- .NET 9 首个预览版发布:瞄准云原生和智能应用开发
前言 前不久.NET团队发布了.NET 9 的首个预览版,并且分享.NET团队对 .NET 9 的初步愿景,该愿景将于今年年底在 .NET Conf 2024 上发布.其中最重要的关注领域是:云原生和 ...
- tensorflow中交叉熵损失函数详解
1 前言 tensorflow中定义了3个交叉熵损失函数: softmax_cross_entropy_with_logits(logits, labels) softmax_cross_entrop ...
- CDN 加速原理
=> CDN 加速原理 HTTP 请求流程说明: 用户在浏览器输入要访问的网站域名,向本地 DNS 发起域名解析请求. 域名解析的请求被发往网站授权 DNS 服务器. 网站 DNS 服务器解析发 ...
- [Android 逆向]旅行青蛙破解
1. 旅行青蛙V1.0,4 apk 安装到手机,可以运行 2. jadx 打开apk 存在这两个dll ,说明是 unity开发的 3. 导出Assembly-CSharp.dll, 使用DnSpy ...
- OpenCV开发笔记(七十五):相机标定矫正中使用remap重映射进行畸变矫正
前言 相机标定,重映射可以进行插值映射从而矫正图像,这是一种方法,也有矩阵映射方法,本篇使用重映射方式解说畸变矫正的计算原理. Demo 横向纵向区域固定拉伸: 横向纵向拉伸: ...
