SegmentControl 那些令人烦恼的事儿
每个人的曾经都很苦逼。我知道我很卑微,但我不曾放慢脚步,在这条路上至死不悔。愿与你同行。
UISegmentControl
概述
- UISegmentControl 是系统的段选择控件,具有简洁大方的外观,但是通常不能满足产品设计的需求。用户( developer )对 UISegmentControl 的外观的可控性是比较差的,为了满足我们
完美的产品设计需求,我们通常需要绞尽脑汁的思考如何去改变 UISegmentControl 的外观,但结果却不那么令人满意。最终你会发现 UISegmentControl 满足需求需要花费很多的时间(或者说初学者根本无法完成需求)。在此,首先简单叙述 UISegmentControl 的实现原理,和事件处理;然后,详细介绍如何自定义 IDSegmentControl,并与 UISegmentControl 对比。 大家在能使用系统控件的情况下,尽量使用系统控件。本 Blog 自定义 IDSegmentControl 只是向大家提供一种解决问题的方式。
- UISegmentControl 是系统的段选择控件,具有简洁大方的外观,但是通常不能满足产品设计的需求。用户( developer )对 UISegmentControl 的外观的可控性是比较差的,为了满足我们
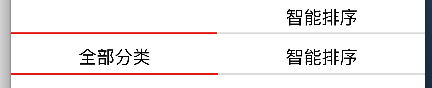
效果图
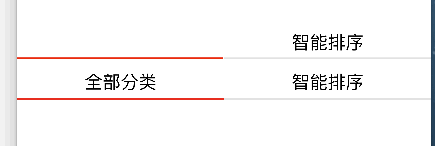
注: 上边的是 UISegmentControl 实现的效果,下边是 IDSegmentControl 实现的效果
UISegmentControl(下面以 UISegmentControl 的示例,来叙述其使用细节)
初始化 UISegmentControl 实例,并设置标题(默认状态下,UISegmentControl不选中任何一个 segment)
self.segmentControl = [[UISegmentedControl alloc] initWithItems:@[@"全部分类", @"智能排序"]];
效果

设置标题的字体和颜色(选中第一个 segment,此时的背景色为蓝色)
NSMutableDictionary *dictionary = [NSMutableDictionary dictionary];

dictionary[NSForegroundColorAttributeName] = [UIColor blackColor];

dictionary[NSFontAttributeName] = [UIFont systemFontOfSize:18];

[self.segmentControl setTitleTextAttributes:dictionary forState:UIControlStateNormal];
效果

设置 segment 三个状态(不要问那三个状态哦)下的图片
[self.segmentControl setBackgroundImage:[UIImage imageNamed:@"unselected"] forState:UIControlStateNormal barMetrics:UIBarMetricsDefault];

[self.segmentControl setBackgroundImage:[UIImage imageNamed:@"selected"] forState:UIControlStateSelected barMetrics:UIBarMetricsDefault];
[self.segmentControl setBackgroundImage:[UIImage imageNamed:@"unselected"] forState:UIControlStateHighlighted barMetrics:UIBarMetricsDefault];
```- 效果 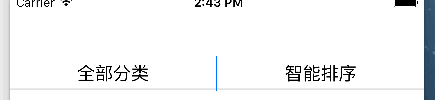 注:此时我们会看到,当选中 segment 时,文字会被遮挡(你可以让美工给你切个图哦,如果美工说:“你长的太丑了,不给切”。那你可以联系我,我会告诉你怎么做。`代码能解决的问题,就不用去找美工喽`)。
改变分割线
使用 tintColor
[self.segmentControl setTintColor:[UIColor whiteColor]];
效果

使用 dividerImage(设置一张图片即可)
- (void)setDividerImage:(nullable UIImage *)dividerImage forLeftSegmentState:(UIControlState)leftState rightSegmentState:(UIControlState)rightState barMetrics:(UIBarMetrics)barMetrics
默认选中第一个 segment
self.segmentControl.selectedSegmentIndex = 0;
效果
为 UISegmentControl 添加事件
[self.segmentControl addTarget:self action:@selector(segmentControlselectedSegmentIndexChange:) forControlEvents:UIControlEventValueChanged];
至此,UISegmentControl 的使用已经简单介绍到此。接下来,会介绍如何实现自己的 segmentControl,如:IDSegmentControl。若你觉得没有必要,那就可以不要往下看了,你不会损失很多。但还是建议你看一下,因为我相信你会收获很多。
IDSegmentControl
概述
- 之所以自定义 IDSegmentControl,是为了增加其可控性,使其用起来更得心应手。同时也是一种技术的积淀。
设计思路
使用 UIView 的子类来实现 IDSegmentControl,每个 Item 是一个 Button,通过控制 Button 来控制 segment 的外观和事件
使用代理模式来实现 IDSegmentControl 的事件处理(
继承自 UIControl 的版本,会使用 addTarget 实现)注:
或许你的自定控件,通常是继承自 UIView,但是你是否想过让它继承自 UIControl 呢!!!若你有兴趣,那么请联系我,感谢您的支持
具体实现
设计接口
设置 IDSegmentControl 的 items 的 title(
IDSegmentControl 中 item 和 indicator 的布局需要基于 items 的 count)/** 所有segment的标题 */
@property (nonatomic, strong) NSArray *titlesOfSegments;
#pragma mark - overided setter, update the appreance of the segmentControl
- (void)setTitlesOfSegments:(NSArray *)titlesOfSegments {
_titlesOfSegments = titlesOfSegments;
// 根据 _titlesOfSegments 向 IDSegmentControl 中添加 items(button)
for (NSInteger i = 0; i < _titlesOfSegments.count; i++) {
UIButton *segmentButton = [[UIButton alloc] init];
[segmentButton.titleLabel setFont:[UIFont systemFontOfSize:18]];
[segmentButton setTitleColor:[UIColor blackColor] forState:UIControlStateNormal];
[segmentButton setTitle:_titlesOfSegments[i] forState:UIControlStateNormal];
[segmentButton addTarget:self action:@selector(segmentButtonClick:) forControlEvents:UIControlEventTouchUpInside];
[self.segmentArray addObject:segmentButton];
[self addSubview:segmentButton];
}
}
搭建 IDSegmentControl 的界面
添加分割线和指示器
#pragma mark - initializer

- (instancetype)initWithFrame:(CGRect)frame {

    if (self = [super initWithFrame:frame]) {

        [self addSubview:self.seperatorView];

        [self addSubview:self.indicatorView];

    }

    return self;

}
布局所有的子控件(为什么在 layoutSubviews 布局子控件,原因想必大家都知道的)
/** 布局所有的子控件 */

- (void)layoutSubviews {

    [super layoutSubviews];

    // 底部的分割线

    self.seperatorView.frame = CGRectMake(0, self.bounds.size.height - SeperatorHeight, self.bounds.size.width, SeperatorHeight);

    // 指示器

    self.indicatorView.frame = CGRectMake(0, self.bounds.size.height - SeperatorHeight, self.bounds.size.width / (CGFloat)self.titlesOfSegments.count, SeperatorHeight);

    // 所有的 segment

    CGFloat segmentWith = self.bounds.size.width / (CGFloat)self.titlesOfSegments.count;

    CGFloat segmentHeight = self.bounds.size.height;

    for (NSInteger i = 0; i < self.segmentArray.count; i++) {

        self.segmentArray[i].frame = CGRectMake(i * segmentWith, 0, segmentWith, segmentHeight - 1);

    }

}
为 IDSegmentControl 添加协议
@protocol IDSegementControlDelegate <NSObject>

@optional

- (void)segmentControlDidSelectItem:(UIButton *)selectedItem atIndex:(NSInteger)selectedIndex;

@end
为 IDSegmentControl 添加接口
/** 代理 */

@property (nonatomic, weak) id<ZBSegementControlDelegate> delegate;

/** 选中的segment的索引 */

@property (nonatomic, assign) NSInteger selectedIndex;

/** 指示器的偏移量 */

@property (nonatomic, assign) CGFloat indicatorOffsetX;
处理按钮事件
#pragma mark - 按钮点击事件

- (void)segmentButtonClick:(UIButton *)segmentButton {

    // 处理选中 segment 的逻辑

    if (![self.lastSegmentButton isEqual:segmentButton]) {

        self.lastSegmentButton.selected = NO;

    }

    segmentButton.selected = !segmentButton.selected;

    // 改变 indicator 的位置

    CGFloat segmentWidth = self.bounds.size.width / (CGFloat)self.titlesOfSegments.count;

    // 同样是 segmentButton,你知道为什么可以找到对应的 segmentButton 吗?

    NSInteger selectedIndex = [self.segmentArray indexOfObject:segmentButton];

    [UIView animateWithDuration:0.25 animations:^{

        [self setIndicatorOffsetX:selectedIndex * segmentWidth];

    }];

    // 通知代理,选中的 segment 已经改变

    if ([self.delegate respondsToSelector:@selector(segmentControlDidSelectItem:atIndex:)]) {

        [self.delegate segmentControlDidSelectItem:segmentButton atIndex:selectedIndex];

    }

    // 更新上一次选中的 segment(当前的 segment 是下一次选中新的 segment 时的 lastSegmentButton。好好理解吧)

    if (self.lastSegmentButton == nil) {

        self.lastSegmentButton = segmentButton;

    } else {

        if (![self.lastSegmentButton isEqual:segmentButton]) {

            self.lastSegmentButton = segmentButton;

        }

    }

}
viewController 使用示例
添加 segmentControl
/** UISegmentedControl */

- (void)setupSystemSegmentControl {

    // titles

    self.segmentControl = [[UISegmentedControl alloc] initWithItems:@[@"全部分类", @"智能排序"]];

    // titleAttributes

    NSMutableDictionary *dictionary = [NSMutableDictionary dictionary];

    dictionary[NSForegroundColorAttributeName] = [UIColor blackColor];

    dictionary[NSFontAttributeName] = [UIFont systemFontOfSize:18];

    [self.segmentControl setTitleTextAttributes:dictionary forState:UIControlStateNormal];

    // backgroundImage

    [self.segmentControl setBackgroundImage:[UIImage imageNamed:@"unselected"] forState:UIControlStateHighlighted barMetrics:UIBarMetricsDefault];

    [self.segmentControl setBackgroundImage:[UIImage imageNamed:@"unselected"] forState:UIControlStateNormal barMetrics:UIBarMetricsDefault];

    [self.segmentControl setBackgroundImage:[UIImage imageNamed:@"selected"] forState:UIControlStateSelected barMetrics:UIBarMetricsDefault];

    // tintColor

    [self.segmentControl setTintColor:[UIColor whiteColor]];

    // 选中第一个 segment

    self.segmentControl.selectedSegmentIndex = 0;

    // action

    [self.segmentControl addTarget:self action:@selector(systemSegmentControlselectedSegmentIndexChange:) forControlEvents:UIControlEventValueChanged];

    [self.view addSubview:self.segmentControl];

}

/** IDSegmentControl */

- (void)setupIDSegmentControl {

    self.customSegmentControl = [[IDSegmentControl alloc] init];

    self.customSegmentControl.delegate = self;

    self.customSegmentControl.titlesOfSegments = @[@"全部分类", @"智能排序"];

    [self.view addSubview:self.customSegmentControl];

}
布局子控件
- (void)viewDidLayoutSubviews {

    [super viewDidLayoutSubviews];

    self.segmentControl.frame = CGRectMake(0, 64, self.view.bounds.size.width, 35);

    self.customSegmentControl.frame = CGRectMake(0, 104, self.view.bounds.size.width, 35);

}
处理 segmentControl 事件
// UISegmentControl

- (void)systemSegmentControlselectedSegmentIndexChange:(UISegmentedControl *)segmentControl {

    NSLog(@"%zd", segmentControl.selectedSegmentIndex);

}

// IDSegmentControl

- (void)segmentControlDidSelectItem:(UIButton *)selectedItem atIndex:(NSInteger)selectedIndex {

    NSLog(@"%zd", selectedIndex);

}
声明:若你需要工程文件,请@我喽。若您觉得 Blog 还可以,那么请点赞喽。非常感谢您的支持
SegmentControl 那些令人烦恼的事儿的更多相关文章
- ORACLE-023:令人烦恼的 ora-01722 无效数字
https://blog.csdn.net/yysyangyangyangshan/article/details/51762746
- Java如何解决脆弱基类(基类被冻结)问题
概述 大多数好的设计者象躲避瘟疫一样来避免使用实现继承(extends 关系).实际上80%的代码应该完全用interfaces写,而不是通过extends.“JAVA设计模式”一书详细阐述了怎样用 ...
- Qt实用小技巧(转)
原博网址:http://www.cnblogs.com/feiyangqingyun/archive/2010/12/06/1898143.html 1.如果在窗体关闭前自行判断是否可关闭答:重新实现 ...
- Win7系统安装好Axure点击运行报.NET Framework4.0未安装的解决办法
1:问题 由于工作需要,需要研究一下Axure原型设计软件的使用方式,在公司的电脑上成功安装了从同事那里拿来的Axure7.0软件,能够正确运行没有任何问题,在自己的电脑上安装的也非常顺利,不过运 ...
- 委托、IOC全知道
话说写代码已有数年,曾经花了很多时间,看了很多大牛的文章也是不能参透,日思夜想都没有理解的概念,通过不断的实践与学习,回过头来再看,总算有了一个清晰的理解与认识,也看到一句话说,最好的学习就是把别人教 ...
- html5 Web Workers
虽然在JavaScript中有setInterval和setTimeout函数使javaScript看起来好像使多线程执行,单实际上JavaScript使单线程的,一次只能做一件事情(关于JavaSc ...
- 安装 Ubuntu 后的个人常用配置
在 ASA 猪队友的带领下,拥抱开源世界,用上了Ubuntu.资深强迫症现身说法,配置符合自己使用习惯的Ubuntu. 1. 窗口标题栏显示菜单项 打开系统设置->外观->行为,在[显示窗 ...
- 从 MySQL+MMM 到 MariaDB+Galera Cluster : 一个高可用性系统改造
很少有事情比推出高可用性(HA)系统之后便经常看到的系统崩溃更糟糕.对于我们这个Rails运行机的团队来说,这个失效的HA系统是MySQL多主复制管理器(MMM). 我们已经找寻MMM的替代品有一段时 ...
- Linux GDB Debugging
Catalog . GDB Introduction . GDB基本命令 1. GDB Introduction GDB是GNU开源组织发布的一个强大的UNIX下的程序调试工具,GDB主要可帮助工程师 ...
随机推荐
- AngularJS 第四天----控制器
控制器的作用 今天和大家学习AngularJS中控制器方面的知识,本文会给出一些例子来说明如何使用AngularJS的控制器.在开始我们的例子之前,首先说说AngularJS控制器的作用.简单的来说A ...
- Android SQLite调试
调试SQLite的神器,再也不用自己去打Log了,只需简单的几个命令. adb shell setprop log.tag.SQLiteLog V adb shell setprop log.tag. ...
- nfs 笔记 2
http://woxihuanpes.blog.163.com/blog/static/12423219820097139145238/ http://blog.csdn.net/willvc123/ ...
- VirtualBox 桥接上网方式的配置
最近在搞Redis所以装了个virtualbox的ubuntu的虚拟机, redis不是在ubuntu上. 因为需要使用本机客户端访问redis服务,所以需要配置虚拟机和本地机器的双向访问,所以就用到 ...
- Atitit 智能云网络摄像机的前世今生与历史 优点 密码默认888888
Atitit 智能云网络摄像机的前世今生与历史 优点 密码默认888888 用户名admin 密码aaaaaa 网络摄像机是一种结合传统摄像机与网络技术所产生的新一代摄像机,它可以将影像通过网络传 ...
- Oracle数据库自动备份SQL文本:Procedure存储过程,View视图,Function函数,Trigger触发器,Sequence序列号等
功能:备份存储过程,视图,函数触发器,Sequence序列号等准备工作:--1.创建文件夹 :'E:/OracleBackUp/ProcBack';--文本存放的路径--2.执行:create or ...
- 基于Caffe的DeepID2实现(下)
小喵的唠叨话:这次的博客,真心累伤了小喵的心.但考虑到知识需要巩固和分享,小喵决定这次把剩下的内容都写完. 小喵的博客:http://www.miaoerduo.com 博客原文: http://ww ...
- 10最好用的Node.js工具、插件和资料库
每一个称职的程序员都应该拥有一套极好的工具来提高自己的工作效率.在Livecoding.tv 上,那里的程序员分享了10个他们认为是最好用的工具.插件和资料库.据说,以下的这10个工具是使用Node. ...
- CSS画图
The Shapes of CSS All of the below use only a single HTML element. Any kind of CSS goes, as long as ...
- 《你不知道的JavaScript》整理(二)——this
最近在读一本进阶的JavaScript的书<你不知道的JavaScript(上卷)>,这次研究了一下“this”. 当一个函数被调用时,会创建一个活动记录(执行上下文). 这个记录会包含函 ...