springboot+quartz以持久化的方式实现定时任务
springboot+queue以持久化的方式实现定时任务
篇幅较长,耐心的人总能得到最后的答案
小生第一次用quartz做定时任务,不足之处多多谅解。
首先
在springboot项目里做定时任务是比较简单的,最简单的实现方式是使用@Scheduled注解,
然后在application启动类上使用@EnableScheduling开启定时任务。
示例
@SpringBootApplication

@EnableScheduling

public class Application {

    public static void main(String[] args) {

        SpringApplication.run(Application.class, args);

    }

    // cron为每秒执行一次

    @Scheduled(cron = "* * * * * ?")

    public void print(){

        System.out.println("执行定时任务");

    }

}
结果
执行定时任务

执行定时任务

执行定时任务

执行定时任务

执行定时任务

执行定时任务

执行定时任务

执行定时任务
简单的定时任务就可以用这种方式来做,cron表达式的结果为任务执行的间隔时间。这里放几个在线生成cron表达式的链接西施-王昭君-貂蝉-杨玉环四大美女!香不香
然而
实际开发中,我们的任务可能有很多,且需要手动操作单个/全部的任务,比如添加、开启、停止、继续等等操作。那么伴随着(千牛B类。。。)的BGM有请quartz登场。
quartz
整合
        <dependency>

            <groupId>org.springframework.boot</groupId>

            <artifactId>spring-boot-starter-quartz</artifactId>

        </dependency>
quartz的三要素
调度器Scheduler
启动触发器去执行任务
触发器Trigger
用来定义Job(任务)触发条件、触发时间,触发间隔,终止时间等
任务job
具体要执行的任务内容
使用
使用quartz是需要配置文件的,quartz.properties
在quartz的jar包的org.quartz包下可以找到默认的配置文件quartz.properties
# Default Properties file for use by StdSchedulerFactory

# to create a Quartz Scheduler Instance, if a different

# properties file is not explicitly specified.

#

# 名字

org.quartz.scheduler.instanceName: DefaultQuartzScheduler

org.quartz.scheduler.rmi.export: false

org.quartz.scheduler.rmi.proxy: false

org.quartz.scheduler.wrapJobExecutionInUserTransaction: false

# 实例化ThreadPool时,使用的线程类为SimpleThreadPool

org.quartz.threadPool.class: org.quartz.simpl.SimpleThreadPool

# 线程总个数

org.quartz.threadPool.threadCount: 10

# 线程的优先级

org.quartz.threadPool.threadPriority: 5

org.quartz.threadPool.threadsInheritContextClassLoaderOfInitializingThread: true

org.quartz.jobStore.misfireThreshold: 60000

# 持久化方式,默认持久化在内存中,后面我们使用db的方式

org.quartz.jobStore.class: org.quartz.simpl.RAMJobStore
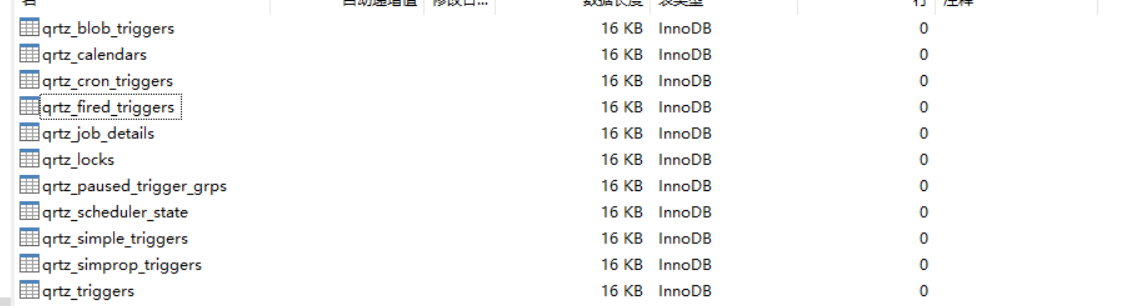
quartz任务持久化到db则需要一些官方定义的数据库表,表的sql文件可以在quartz的jar包里找到
坐标org.quartz.impl.jdbcjobstore,可以看到里面有很多sql文件,有各种数据库的,咱们用MySQL的,咱们不需要手动执行sql语句,后面咱们在启动项目的时候自动初始化。
创建我们自己的properties文件
# 实例化ThreadPool时,使用的线程类为SimpleThreadPool

org.quartz.threadPool.class=org.quartz.simpl.SimpleThreadPool

# threadCount和threadPriority将以setter的形式注入ThreadPool实例

# 并发个数

org.quartz.threadPool.threadCount=10

# 优先级

org.quartz.threadPool.threadPriority=5

org.quartz.threadPool.threadsInheritContextClassLoaderOfInitializingThread=true

org.quartz.jobStore.misfireThreshold=5000

#持久化使用的类

org.quartz.jobStore.class=org.quartz.impl.jdbcjobstore.JobStoreTX

#数据库中表的前缀

org.quartz.jobStore.tablePrefix=QRTZ_

#数据源命名

org.quartz.jobStore.dataSource=qzDS

#qzDS 数据源,我们使用hikaricp,默认的是c3p0

org.quartz.dataSource.qzDS.provider=hikaricp

org.quartz.dataSource.qzDS.driver=com.mysql.cj.jdbc.Driver

org.quartz.dataSource.qzDS.URL=jdbc:mysql://localhost:3306/quartz?useUnicode=true&characterEncoding=UTF-8&serverTimezone=GMT%2B8

org.quartz.dataSource.qzDS.user=root

org.quartz.dataSource.qzDS.password=123456

org.quartz.dataSource.qzDS.maxConnections=10
既然我们没有使用默认的连接池,那么就探索一下,上源码!
在这个包下:org.quartz.utils,有一个PoolingConnectionProvider,顾名思义,连接池提供者
部分源码
public interface PoolingConnectionProvider extends ConnectionProvider {

    /** The pooling provider. */

    String POOLING_PROVIDER = "provider";

    /** The c3p0 pooling provider. */

    String POOLING_PROVIDER_C3P0 = "c3p0";

    /** The Hikari pooling provider. */

    String POOLING_PROVIDER_HIKARICP = "hikaricp";

}
然后HikariCpPoolingConnectionProvider这个类实现了PoolingConnectionProvider,自行查看。
我们可以在org.quartz.impl下的StdSchedulerFactory中搜索c3p0找到
 if(poolingProvider != null && poolingProvider.equals(PoolingConnectionProvider.POOLING_PROVIDER_HIKARICP)) {

                        cpClass = "org.quartz.utils.HikariCpPoolingConnectionProvider";

                    }

                    else {

                        cpClass = "org.quartz.utils.C3p0PoolingConnectionProvider";

                    }
剩下的自己多看看吧,起始源码研究起来没有想象中那么难那么乏味(我也不喜欢看源码),但是这个源码看起来确实小有成就感。
回到正题频道,配置application.yml
spring:

  datasource:

    driver-class-name: com.mysql.cj.jdbc.Driver

    password: 123456

    url: jdbc:mysql://localhost:3306/quartz?characterEncoding=UTF8&useSSL=false&serverTimezone=GMT%2B8

    username: root

  quartz:

    jdbc:

      initialize-schema: always

    job-store-type: jdbc
initialize-schema: always每次启动项目,总是初始化数据库表自动创建表的关键地方,流程是先删除数据库表,再创建,如果表不存在,则抛异常,但是不会影响后面的生成表,下次再启动项目的时候,由于表已经存在了,所以不会再抛异常了
job-store-type: jdbc就是任务持久化类型,我们用jdbc
我们可能要在job里注入spring对象,不做配置,是无法注入的。
/**

 * @author: taoym

 * @date: 2020/6/4 11:32

 * @desc: 一定要自定义JobFactory重写SpringBeanJobFactory的createJobInstance方法,否则在job中是获取不到spring容器中的bean的

 */

@Component

public class JobFactory extends SpringBeanJobFactory {

    @Autowired

    private AutowireCapableBeanFactory beanFactory;

    /**

     * 这里覆盖了super的createJobInstance方法,对其创建出来的类再进行autowire

     */

    @Override

    protected Object createJobInstance(TriggerFiredBundle bundle) throws Exception {

        Object jobInstance = super.createJobInstance(bundle);

        beanFactory.autowireBean(jobInstance);

        return jobInstance;

    }

}
创建quartz的配置文件
@Configuration

public class QuartzConfig {

    @Autowired

    private JobFactory jobFactory;

    /**

     * 读取quartz.properties 文件

     * 将值初始化

     *

     * @return

     */

    @Bean

    public Properties quartzProperties() throws IOException {

        PropertiesFactoryBean propertiesFactoryBean = new PropertiesFactoryBean();

        propertiesFactoryBean.setLocation(new ClassPathResource("/quartz.properties"));

        propertiesFactoryBean.afterPropertiesSet();

        return propertiesFactoryBean.getObject();

    }

    @Bean

    public SchedulerFactoryBean schedulerFactoryBean() throws IOException {

        SchedulerFactoryBean schedulerFactoryBean = new SchedulerFactoryBean();

        schedulerFactoryBean.setJobFactory(jobFactory);

        schedulerFactoryBean.setQuartzProperties(quartzProperties());

        return schedulerFactoryBean;

    }

    /**

     * 初始化监听器

     *

     * @return

     */

    @Bean

    public QuartzInitializerListener executorListener() {

        return new QuartzInitializerListener();

    }

    @Bean(name = "scheduler")

    public Scheduler scheduler() throws IOException {

        return schedulerFactoryBean().getScheduler();

    }

}
创建触发器组件
public class TriggerComponent {

    /**

     * @author: taoym

     * @date: 2020/6/1 10:35

     * @desc: 构建cron触发器

     */

    public static Trigger cronTrigger(String cron) {

        CronTrigger cronTrigger = TriggerBuilder.newTrigger()

                .withSchedule(CronScheduleBuilder.cronSchedule(cron).withMisfireHandlingInstructionDoNothing())

                .build();

        return cronTrigger;

    }

    public static Trigger cronTrigger(String cron, JobDataMap jobDataMap) {

        CronTrigger cronTrigger = TriggerBuilder.newTrigger()

                .withSchedule(CronScheduleBuilder.cronSchedule(cron).withMisfireHandlingInstructionDoNothing())

                .usingJobData(jobDataMap)

                .build();

        return cronTrigger;

    }

}
触发器就用这个组件来获取就行了。
创建任务
@DisallowConcurrentExecution

public class TestJob extends QuartzJobBean {

    @Override

    protected void executeInternal(JobExecutionContext jobExecutionContext) throws JobExecutionException {

    }

}
jobExecutionContext这里面可以获取任务组、任务名、触发器组、触发器名、jobdetail等信息。
那个注解是为了让同一个实例(jobdetail)只能单线程执行。
可以这么理解,job为接口,jobdetail为实现类,a是其中一个实现类,a需要花费100s执行一定的操作,而你给的定时器是没50s就执行一次操作,a在执行到一半的时候又需要开启一个线程来执行。使用了DisallowConcurrentExecution就相当于a没有把操作执行完的时候,a不允许开启线程再执行当前操作。
不知道我的描述是否易懂!
按需创建自己的任务表,我是用定时任务做爬虫的(小爬虫)
CREATE TABLE `quartz_job` (

  `id` int(11) NOT NULL AUTO_INCREMENT COMMENT '编号',

  `job_name` varchar(50) DEFAULT '' COMMENT '任务名',

  `job_group` varchar(50) DEFAULT '' COMMENT '任务组名称',

  `job_desc` varchar(255) DEFAULT '' COMMENT 'job描述',

  `cron` varchar(50) DEFAULT '' COMMENT 'cron表达式',

  `status` tinyint(1) DEFAULT '0' COMMENT '状态',

  `url` varchar(255) DEFAULT '' COMMENT '请求地址',

  `param` varchar(255) DEFAULT '' COMMENT '参数',

  PRIMARY KEY (`id`)

) ENGINE=InnoDB AUTO_INCREMENT=31 DEFAULT CHARSET=utf8;
我们添加任务的时候不和quartz打交道,把任务放到数据库即可。别慌,后面有用到他的地方。
这个表需要有增删改查操作,我们会在系统中查询任务列表选择单个或者所有任务开始执行
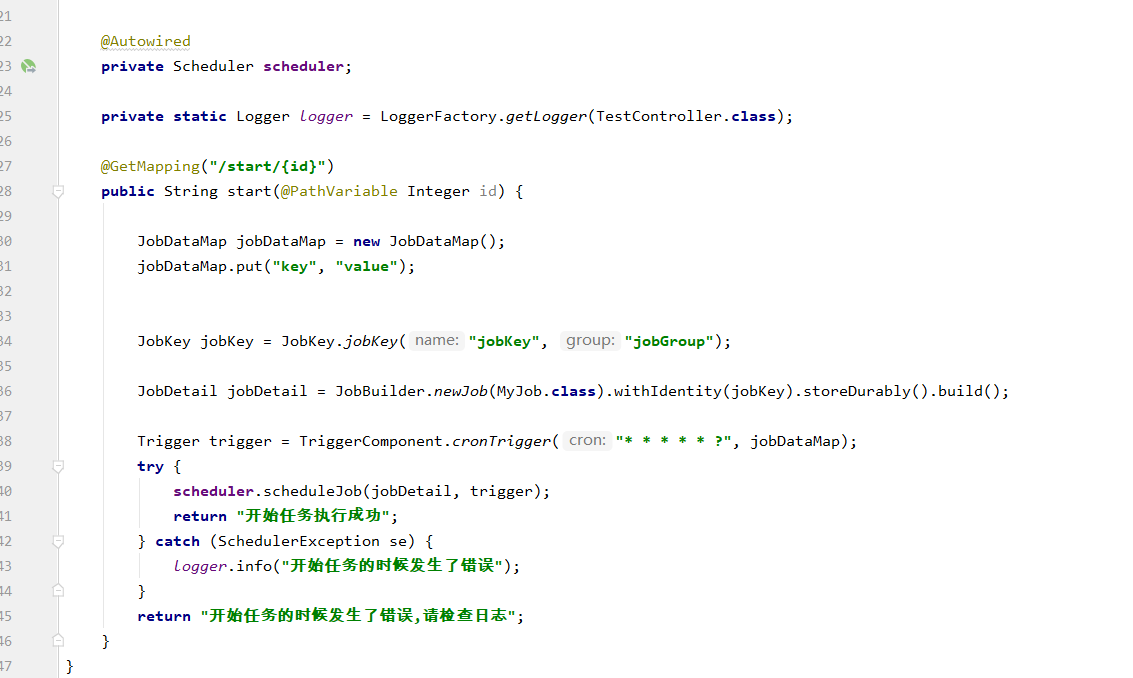
执行任务
@Resource

    private QuartzJobMapper quartzJobMapper;

    @Autowired

    private Scheduler scheduler;

    @Override

    public String start(Integer id) {

		JobDataMap jobDataMap = new JobDataMap();

        jobDataMap.put(k,v);

        QuartzJob quartzJob = quartzJobMapper.selectByPrimaryKey(id);

        JobKey jobKey = JobKey.jobKey(quartzJob.getJobName(), quartzJob.getJobGroup());

        jobDetail = JobBuilder.newJob(TestJob.class).withIdentity(jobKey).storeDurably().build();

        Trigger trigger = TriggerComponent.cronTrigger(quartzJob.getCron(), jobDataMap);

        try {

            scheduler.scheduleJob(jobDetail, trigger);

            quartzJobMapper.updateStatus(true, id);

            return "开始任务执行成功";

        } catch (SchedulerException se) {

            log.info("开始任务的时候发生了错误");

        }

        return "开始任务的时候发生了错误,请检查日志";

    }
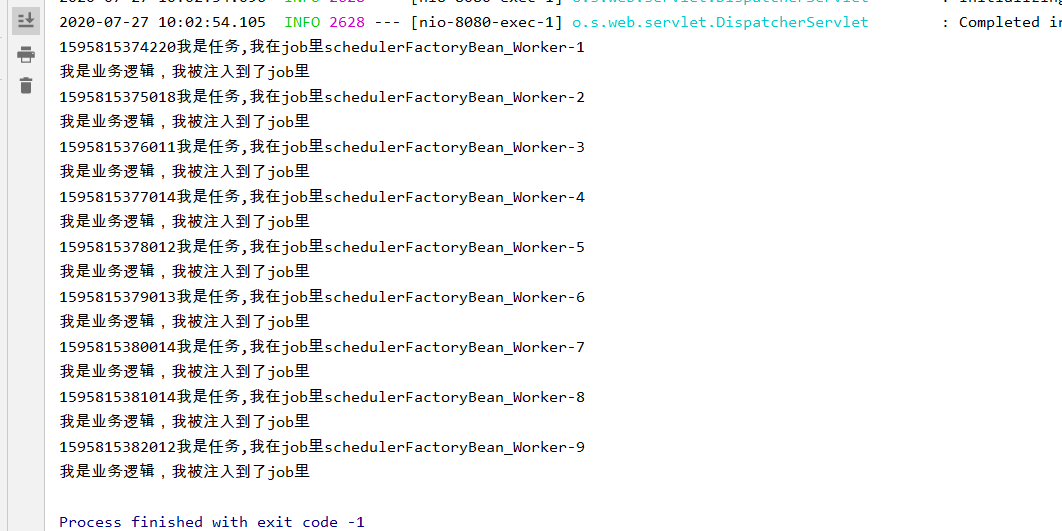
最后我又按照此教程上的内容粘贴了一遍代码,可以正常运行。


转载请说明来源,谢谢!
springboot+quartz以持久化的方式实现定时任务的更多相关文章
- SpringBoot整合任务调度框架Quartz及持久化配置
目录 本篇要点 SpringBoot与Quartz单机版快速整合 引入依赖 创建Job 调度器Scheduler绑定 自动配置,这里演示SimpleScheduleBuilder 手动配置,这里演示C ...
- SpringBoot + Quartz定时任务示例
程序文件结构,如下图,后面详细列出各文件的代码: 1. maven的pom.xml文件如下: <project xmlns="http://maven.apache.org/POM/4 ...
- Springboot quartz集群(3) — 多节点发送邮件
本期将提供quartz集群能力 集群案例分析: 上一期的邮件发送功能,若在服务需要部署多节点,但定时任务不支持集群,因此,多节点定时任务势必会同时运行, 若向用户发送邮件通知,这种情况下会向用户发送两 ...
- spring整合quartz并持久化
spring整合quartz有两种方式: 一.常见是使用配置文件,将定时任务保存到内存中 简单示例: <!-- 短信催还提醒任务调度 --> <bean id="overd ...
- SpringBoot入坑-持久化操作
前面内容中我们已经了解到了SpringBoot关于参数传递的相关知识,本篇我们一起来学习一下SpringBoot关于数据库持久化操作的知识,这里我们使用JPA进行数据库的持久化操作. 首先由于我们需要 ...
- spring-boot+quartz的CRUD动态任务管理系统
版权声明:作者: 小柒 出处: https://blog.52itstyle.com 分享是快乐的,也见证了个人成长历程,文章大多都是工作经验总结以及平时学习积累,基于自身认知不足之处在所难免,也请大 ...
- springboot搭建的2种方式
一.搭建springboot项目有两种方式1.继承springboot项目 <parent> <groupId>org.springframework.boot</gro ...
- redis笔记之两种持久化备份方式(RDB & AOF)
Redis支持的两种持久化备份方式(RDB & AOF) redis支持两种持久化方式,一种是RDB,一种是AOF. RDB是根据指定的规则定时将内存中的数据备份到硬盘上,AOF是在每次执行命 ...
- redis持久化的方式RDB 和 AOF
redis持久化的方式RDB 和 AOF 一.对Redis持久化的探讨与理解 目前Redis持久化的方式有两种: RDB 和 AOF 首先,我们应该明确持久化的数据有什么用,答案是用于重启后的数据恢复 ...
随机推荐
- Spring Cloud系列教程第九篇-Eureka自我保护机制
Spring Cloud系列教程第九篇-Eureka自我保护机制 本文主要内容: 1:自我保护介绍 2:导致原因分析 3:怎么禁止自我保护 本文是由凯哥(凯哥Java:kagejava)发布的< ...
- linux新用户(组)的那些事
linux新用户(组)的那些事 创建新用户 groupadd bigdata //添加新用户组bigdata useradd -g bigdata es //-g:为用户组添加新用户 passwd ...
- Java基础笔记01-02-03-04
一.今日内容介绍 1.Java开发环境搭建 2.HelloWorld案例 3.注释.关键字.标识符 4.数据(数据类型.常量) 01java语言概述 * A: java语言概述 * a: Java是s ...
- Scrapy模拟登录赶集网
1.打开赶集网登录界面,先模拟登录并抓包,获得post请求的request参数 2. 我们只需构造出上面的参数传入formdata即可 参数分析: setcookie:为自动登录所传的值,不勾选时默认 ...
- 用Python语言绘制股市OBV指标效果
我的新书<基于股票大数据分析的Python入门实战>于近日上架,在这篇博文向大家介绍我的新书:<基于股票大数据分析的Python入门实战>里,介绍了这本书的内容.这里将摘录出部 ...
- Flutter 1.17 新 Material motion 规范的预构建动画
老孟导读:在 Flutter 1.17 发布大会上,Flutter 团队还发布了新的 Animations 软件包,该软件包提供了实现新的 Material motion 规范的预构建动画. 软件包 ...
- JavaScript学习 Ⅰ
一. JavaScript的使用 <script>标签 在HTML中,JavaScript代码必须位于<script>与</script>标签之间. 实例: < ...
- python面试题二:Python 基础题
1.位和字节的关系? Byte 字节 bit 位 1Byte = 8bit 2.b.B.KB.MB.GB 的关系? 1Byte = 8bit KB 1KB=1024B MB 1MB=1024KB GB ...
- Python之爬虫(二十一) Scrapy爬取所有知乎用户信息(下)
在上一篇文章中主要写了关于爬虫过程的分析,下面是代码的实现,完整代码在:https://github.com/pythonsite/spider items中的代码主要是我们要爬取的字段的定义 cla ...
- Python并发编程06 /阻塞、异步调用/同步调用、异步回调函数、线程queue、事件event、协程
Python并发编程06 /阻塞.异步调用/同步调用.异步回调函数.线程queue.事件event.协程 目录 Python并发编程06 /阻塞.异步调用/同步调用.异步回调函数.线程queue.事件 ...