.NET Core 微服务—API网关(Ocelot) 教程 [二]
上篇文章(.NET Core 微服务—API网关(Ocelot) 教程 [一])介绍了Ocelot 的相关介绍。
接下来就一起来看如何使用,让它运行起来。
环境准备
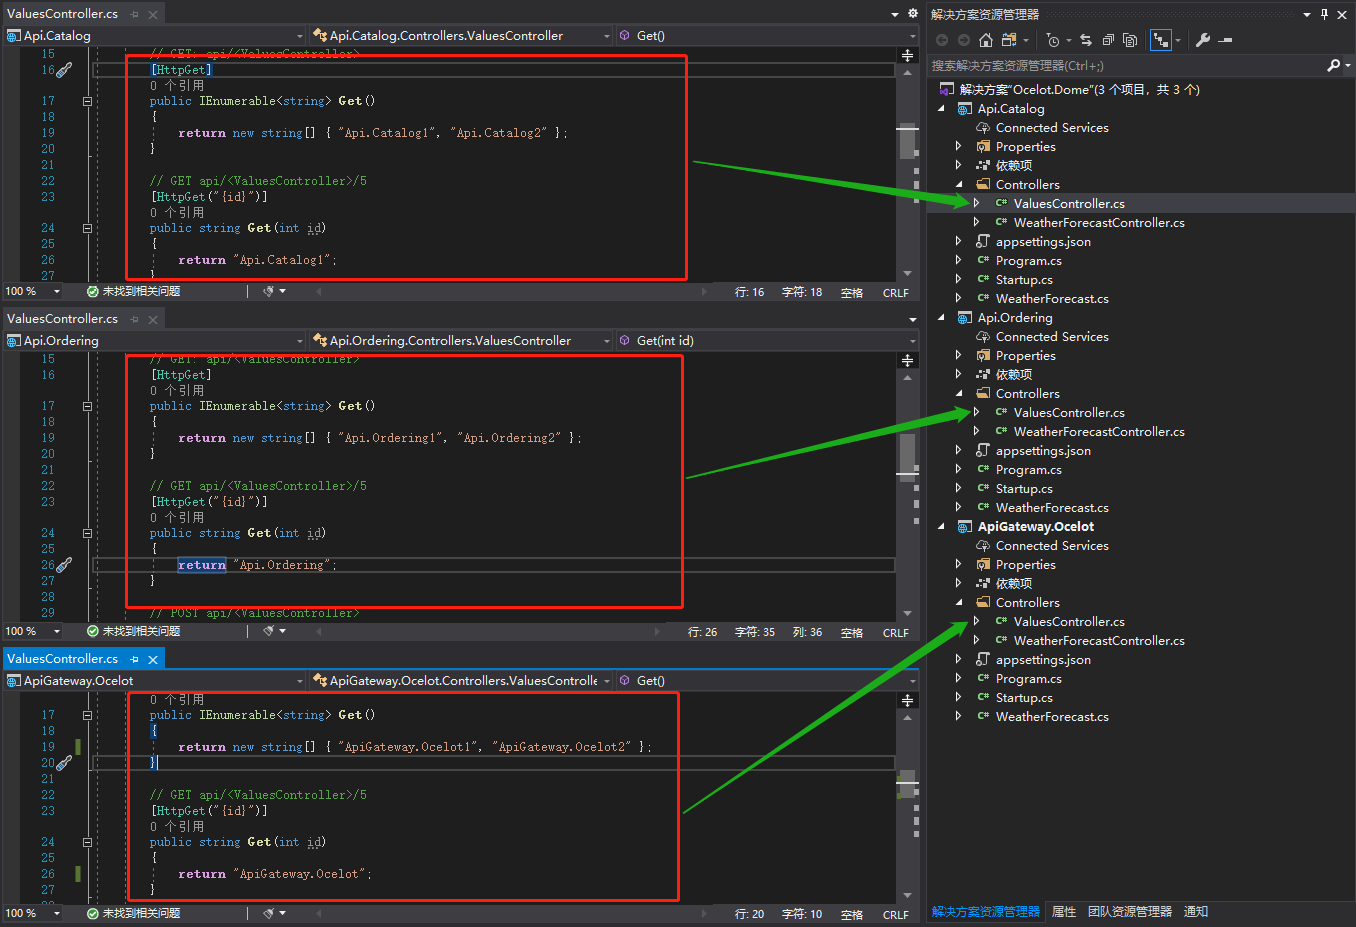
为了验证Ocelot 网关效果,我们先创建3个webapi项目:目录api(Api.Catalog)、订单api(Api.Ordering)、Ocelot网关(ApiGateway.Ocelot);并为每个WebApi项目添加Values控制器(ValuesController),用于区分最终调用效果
如下图:

Ocelot使用
1、添加Ocelot包依赖:
接下来使用Nuget包管理工具为ApiGateway.Ocelot项目添加Ocelot包引用:

当然也可用使用命令方式添加Ocelot包:
- Install-Package Ocelot
2、添加Ocelot配置文件:(重点)
向ApiGateway.Ocelot项目添加一个Ocelot.json配置文件,并修改配置文件为如下内容:


- {
- "GlobalConfiguration": {
- },
- "Routes": [
- {
- "DownstreamPathTemplate": "/api/{everything}",
- "DownstreamScheme": "http",
- "DownstreamHostAndPorts": [
- {
- "Host": "localhost",
- "Port":
- },
- {
- "Host": "localhost",
- "Port":
- }
- ],
- "UpstreamPathTemplate": "/{everything}",
- "UpstreamHttpMethod": [ "Get", "Post" ],
- "LoadBalancerOptions": {
- "Type": "RoundRobin"
- }
- }
- ]
- }
接下来简单介绍下相关配置节点意义。可以看出配置文件主要包含:Routes和GlobalConfiguration。完整的配置内容可以查看:官方文档
- GlobalConfiguration:顾名思义就是全局配置,此节点的配置允许覆盖Routes里面的配置
- Routes:告诉Ocelot如何处理上游的请求
- DownstreamPathTemplate:下游的路由模板,即真实处理请求的路径模板
- DownstreamScheme:请求的方式,如:http,https
- DownstreamHostAndPorts:下游的IP以及端口,可以有多个(如果使用负载均衡),方便实现负载均衡,当然你也可以使用服务发现,实现下游服务的自动注册与发现
- UpstreamPathTemplate:上游请求的模板,即用户真实请求的链接
- UpstreamHttpMethod:上游请求的http方法,是个数组,你可以写多个
- LoadBalancerOptions:负载均衡选项(DownstreamHostAndPorts有多个的时候才能看到效果),有三种方式
- LeastConnection : 将请求发往最空闲的那个服务器
- RoundRobin :轮流发送
- NoLoadBalance :不启用负载均衡,总是发往第一个请求或者服务发现的那个服务器
3、启用Ocelot中间件:
a) 首先在ApiGateway.Ocelot项目中的Program.cs中加载ocelot.json的配置文件,如下所示:


- public class Program
- {
- public static void Main(string[] args)
- {
- CreateHostBuilder(args).Build().Run();
- }
- public static IHostBuilder CreateHostBuilder(string[] args) =>
- Host.CreateDefaultBuilder(args)
- .ConfigureAppConfiguration((hostingContext, config) =>
- {
- config.SetBasePath(hostingContext.HostingEnvironment.ContentRootPath)
- .AddJsonFile("appsettings.json", true, true)
- .AddJsonFile($"appsettings.{hostingContext.HostingEnvironment.EnvironmentName}.json", true, true)
- .AddJsonFile("ocelot.json")
- .AddEnvironmentVariables();
- })
- .ConfigureWebHostDefaults(webBuilder =>
- {
- webBuilder.UseStartup<Startup>();
- });
- }
b) 接下来在Startup.cs文件中注册服务:


- public class Startup
- {
- public Startup(IConfiguration configuration)
- {
- Configuration = configuration;
- }
- public IConfiguration Configuration { get; }
- // This method gets called by the runtime. Use this method to add services to the container.
- public void ConfigureServices(IServiceCollection services)
- {
- services.AddOcelot();//注入Ocelot服务
- services.AddControllers();
- }
- // This method gets called by the runtime. Use this method to configure the HTTP request pipeline.
- public void Configure(IApplicationBuilder app, IWebHostEnvironment env)
- {
- if (env.IsDevelopment())
- {
- app.UseDeveloperExceptionPage();
- }
- app.UseOcelot().Wait();//使用Ocelot中间件
- app.UseRouting();
- app.UseAuthorization();
- app.UseEndpoints(endpoints =>
- {
- endpoints.MapControllers();
- });
- }
- }
c) 最后:
把目录api(Api.Catalog)、订单api(Api.Ordering)、Ocelot网关(ApiGateway.Ocelot)分别设置启动设置为:http://localhost:5332、http://localhost:5331、http://localhost:5330。
到此Ocelot基本使用完成,接下来验证下效果
效果验证:
通过ocelot.json设置可以得到:
- Ocelot网关设置生效,上游路由模板"/{everything}"对应下游路由模板"/api/{everything}"(也就是通过http://localhost:5330/values访问,最终访问的是http://localhost:5331/api/values或http://localhost:5332/api/values)
- 负载均衡选项设置的是:轮询(http://localhost:5330/values访问,刷新后两次结果不相同)
接着验证运行效果是不是这样:
1、打开http://localhost:5330/values 如下图:最终得到是: Api.Catalog 的结果

2、接着我们刷新下当前界面:得到如下结果:负载均衡轮询选项生效成功

总结:
通过上面的示例,非常简单的就成功的运行了Ocelot网关的路由效果和负载均衡的简单效果。
接下来我就要进一步详细了解Ocelot的配置内容和其他使用方式(如:认证服务方式、服务自动发现注册)
Reference:
.NET Core 微服务—API网关(Ocelot) 教程 [二]的更多相关文章
- .NET Core 微服务—API网关(Ocelot) 教程 [三]
前言: 前一篇文章<.NET Core 微服务—API网关(Ocelot) 教程 [二]>已经让Ocelot和目录api(Api.Catalog).订单api(Api.Ordering)通 ...
- .NET Core 微服务—API网关(Ocelot) 教程 [一]
前言: 最近在关注微服务,在 eShop On Containers 项目中存在一个API网关项目,引起想深入了解下它的兴趣. 一.API网关是什么 API网关是微服务架构中的唯一入口,它提供一个单独 ...
- .NET Core 微服务—API网关(Ocelot) 教程 [四]
前言: 上一篇 介绍了Ocelot网关和认证服务的结合使用,本篇继续介绍Ocelot相关请求聚合和Ocelot限流 一.请求聚合 Ocelot允许声明聚合路由,这样可以把多个正常的Routes打包并映 ...
- .NET Core微服务之基于Ocelot实现API网关服务
Tip: 此篇已加入.NET Core微服务基础系列文章索引 一.啥是API网关? API 网关一般放到微服务的最前端,并且要让API 网关变成由应用所发起的每个请求的入口.这样就可以明显的简化客户端 ...
- .NET Core微服务之基于Ocelot实现API网关服务(续)
Tip: 此篇已加入.NET Core微服务基础系列文章索引 一.负载均衡与请求缓存 1.1 负载均衡 为了验证负载均衡,这里我们配置了两个Consul Client节点,其中ClientServic ...
- .NET Core微服务之基于Ocelot+IdentityServer实现统一验证与授权
Tip: 此篇已加入.NET Core微服务基础系列文章索引 一.案例结构总览 这里,假设我们有两个客户端(一个Web网站,一个移动App),他们要使用系统,需要通过API网关(这里API网关始终作为 ...
- .NET Core微服务之基于Ocelot+Butterfly实现分布式追踪
Tip: 此篇已加入.NET Core微服务基础系列文章索引 一.什么是Tracing? 微服务的特点决定了功能模块的部署是分布式的,以往在单应用环境下,所有的业务都在同一个服务器上,如果服务器出现错 ...
- 【微服务】之六:轻松搞定SpringCloud微服务-API网关zuul
通过前面几篇文章的介绍,我们可以轻松搭建起来微服务体系中比较重要的几个基础构建服务.那么,在本篇博文中,我们重点讲解一下,如何将所有微服务的API同意对外暴露,这个就设计API网关的概念. 本系列教程 ...
- .Net Core微服务入门全纪录(二)——Consul-服务注册与发现(上)
前言 上一篇[.Net Core微服务入门全纪录(一)--项目搭建]讲到要做到服务的灵活伸缩,那么需要有一种机制来实现它,这个机制就是服务注册与发现.当然这也并不是必要的,如果你的服务实例很少,并且很 ...
随机推荐
- WebGPU+光线追踪Ray Tracing 开发三个月总结
大家好~这三个月以来,我一直在学习和实现"基于WebGPU的混合光线追踪实时渲染"的技术,使用了Ray Tracing管线(如.rgen..rmiss等着色器). 现在与大家分享和 ...
- py4j.protocol.Py4JJavaError: An error occurred while calling z:org.apache.spark.api.python.PythonRDD.collectAndServe. : java.lang.IllegalArgumentException: Unsupported class file major version 55
今天小编用Python编写Spark程序报了如下异常: py4j.protocol.Py4JJavaError: An error occurred while calling z:org.apach ...
- JavaScript基础Javascript中的循环(003)
1.普通循环JavaScript中一般的循环写法是这样的: // sub-optimal loop for (var i = 0; i < myarray.length; i++) { // d ...
- 浅谈MySQL数据库
目录 什么是数据库 定义 发展现状 数据库基本概念 数据库分类 关系数据库 非关系型数据库(NoSQL) 数据库启动与连接 启动服务端 连接数据库 用户信息查看 数据库的基本操作 表的基本操作 记录的 ...
- int c, int ndigit[10]; ++ndigit[c-'0'];
for example c-'0' is an integer expression with a value between 0and 9 corresponding to the characte ...
- Plink v0.1.0 发布——基于Flink的流处理平台
Plink是一个基于Flink的流处理平台,旨在基于 [Apache Flink]封装构建上层平台. 提供常见的作业管理功能.如作业的创建,删除,编辑,更新,保存,启动,停止,重启,管理,多作业模板配 ...
- 内存疯狂换页!CPU怒批操作系统
内存访问瓶颈 我是CPU一号车间的阿Q,前一阵子我们厂里发生了一件大喜事,老板拉到了一笔投资,准备扩大生产规模. 不过老板挺抠门的,拉到了投资也不给我们涨点工资,就知道让我们拼命干活,压榨我们的劳动力 ...
- Appium移动端自动化测试--搭建模拟器和真机测试环境
详细介绍安装Android Studio及Android SDK.安装Appium Server. 文章目录如下 目录 文章目录如下 模拟器--安装Android Studio及Android SDK ...
- 前端同学经常忽视的一个 JavaScript 面试题
题目 function Foo() { getName = function () { alert (1); }; return this; } Foo.getName = funct ...
- .Net Core 2.2升级3.1的避坑指南
写在前面 微软在更新.Net Core版本的时候,动作往往很大,使得每次更新版本的时候都得小心翼翼,坑实在是太多.往往是悄咪咪的移除了某项功能或者组件,或者不在支持XX方法,这就很花时间去找回需要的东 ...
