SpringBoot整合开发
1.SpringBoot分模块
分模块就是将一个项目分成多个模块,即maven项目。
1)首先创建一个springboot的项目:
第一步:选择springboot的项目
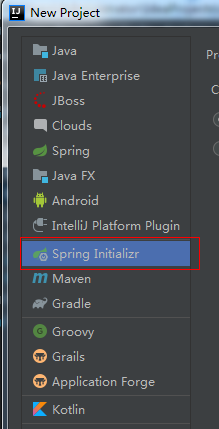
第二步:填写项目的相关信息,主要是下图的红框部分,改成自己的即可,这里就使用默认的,项目名是demo

第三步:选择所需要的依赖,这里就只添加web和lombok,其他的后面需要再进行依赖

点击完成后,等待加载完成。
2)创建一个项目启动器:
第一步:选中刚建的项目,右键创建一个maven的模块,填写模块名称,这里就为project-start

如果这个模块名称有-,那么在点击下一步后需要注意模块的名称,两个模块的名字必须一样。
第二步:创建完成后,在此模块的main>java和test>java 下新建原父模块同名的包,这里是com.example.demo。
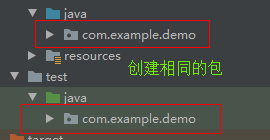
第三步:把java中的启动类拖到这个模块的包下,test中的测试类也是一样,application.properties也拖过来:
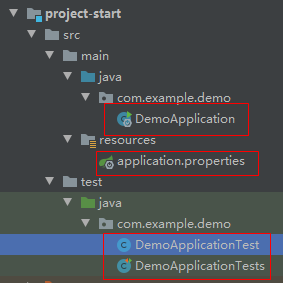
第三步:删除父工程的src目录,如果不需要mvnw,也可删除相关的文件。
3)新建一个web的模块,用于与页面交互:
第一步:新建一个maven的模块,名字为web-project
第二步:在project-start的pom.xml文件中添加web-project的依赖:


   <dependencies>

        <dependency>

            <groupId>com.example</groupId>

            <artifactId>web-project</artifactId>

            <version>0.0.1-SNAPSHOT</version>

        </dependency>

    </dependencies>
第三步:在main>java的目录下创建一个包,包名必须为com.example.demo。然后在这个包下再建其他的包和类即可。这里就在包下新建一个test.UserController的类,里面的内容如下:


package com.example.demo.test;

import org.springframework.web.bind.annotation.RequestMapping;

import org.springframework.web.bind.annotation.RestController;

@RestController

public class UserController {

    @RequestMapping("get")

    public String get(){

        return "123哈哈哈";

    }

}
第四步:启动springboot。如果整个项目创建的没有问题,那么下面红色框里是正常的,没有×号。点击右边的三角符号启动项目,那么整个项目都会进行编译运行

第五步:在浏览器输入localhost:8080/get,即可显示123哈哈哈。此时多模块的项目已经创建完成。若还需要其他模块,就直接创建模块,然后按照3的步骤即可。
注意:以上说的几个包名一定要注意,必须相同,否则是有问题的。
2.SpringBoot整合视图层技术(模板引擎)开发
整合Thymeleaf:Thymeleaf是新一代的java模板引擎,类似于FreeMarker。官网:https://www.thymeleaf.org。使用方式如下:
3.SpringBoot整合web开发
3.1返回json数据
1)使用默认的json处理器
当springboot中依赖了web之后,就有一个默认的json处理器jackjson-databind,可以直接返回json数据。
添加web依赖代码如下:


<dependency>

     <groupId>org.springframework.boot</groupId>

     <artifactId>spring-boot-starter-web</artifactId>

</dependency>
创建实体类Book:


@Setter

@Getter

@ToString

public class Book2 {

    //忽略id字段,那么在返回数据中就不包含这个字段

    @JsonIgnore

    private int id;

    private String name;

    private String author;

    //格式化字段

    @JsonFormat(pattern = "yyyy-MM-dd HH:mm:ss",timezone = "GMT+08")

    private Date time;

}
创建controller层:


package com.example.demo;

import org.springframework.web.bind.annotation.GetMapping;

import org.springframework.web.bind.annotation.RestController;

import java.util.ArrayList;

import java.util.Date;

import java.util.List;

@RestController

public class BookController {

    @GetMapping("/books")

    public List<Book> books(){

        List<Book> books=new ArrayList<>();

        Book b1=new Book();

        b1.setId(1001);

        b1.setName("西游记");

        b1.setAuthor("张三");

        b1.setTime(new Date());

        Book b2=new Book();

        b2.setId(1002);

        b2.setName("水浒传");

        b2.setAuthor("李四");

        books.add(b1);

        books.add(b2);

        b2.setTime(new Date());

        return  books;

    }

}
启动项目,在浏览器输入http://localhost:8080/books即可看到json格式的数据。这是springboot自带的,包含忽略字段和格式化等功能。不过也可以按照下面的两个进行自定义转换器。
2)使用fastjson处理器
fastjson是阿里巴巴开发的目前json解析速度最快的开源框架。使用的时候必须先除去jackjson-databind,然后依赖fastjson。依赖如下:


<dependency>

     <groupId>org.springframework.boot</groupId>

     <artifactId>spring-boot-starter-web</artifactId>

     <exclusions>

         <exclusion>

              <groupId>com.fasterxml.jackson.core</groupId>

              <artifactId>jackson-databind</artifactId>

         </exclusion>

      </exclusions>

</dependency>

<dependency>

      <groupId>com.alibaba</groupId>

      <artifactId>fastjson</artifactId>

      <version>1.2.47</version>

</dependency>
实体类需按照上面的写法,只不过需要去掉里面的两个注解。然后自定义json的配置类MyFastJsonConfig:


package com.zys.springbootintegration.config;

import com.alibaba.fastjson.serializer.SerializerFeature;

import com.alibaba.fastjson.support.config.FastJsonConfig;

import com.alibaba.fastjson.support.spring.FastJsonHttpMessageConverter;

import org.springframework.boot.autoconfigure.http.HttpMessageConverters;

import org.springframework.context.annotation.Bean;

import org.springframework.context.annotation.Configuration;

import org.springframework.http.MediaType;

import org.springframework.http.converter.HttpMessageConverter;

import java.nio.charset.Charset;

import java.util.ArrayList;

import java.util.List;

/**

 * fastjson配置

 */

@Configuration

public class MyFastJsonConfig {

    //使用@Bean注入fastJsonHttpMessageConvert

    @Bean

    public HttpMessageConverters fastJsonHttpMessageConverters()

    {

        FastJsonHttpMessageConverter fastJsonHttpMessageConverter = new FastJsonHttpMessageConverter();

        FastJsonConfig config = new FastJsonConfig();

        //设置日期的格式

        config.setDateFormat("yyyy-MM-dd HH:mm:ss");

        //设置显示的格式是json格式

        //config.setSerializerFeatures(SerializerFeature.PrettyFormat);

        // 处理中文的乱码问题

        // 创建MediaType的集合

        List<MediaType> supportedMediaTypes = new ArrayList<MediaType>();

        // 设置编码格式为UTF8

        supportedMediaTypes.add(MediaType.APPLICATION_JSON_UTF8);

        // 将supportedMediaTypes对象赋值给fastJsonHttpMessageConverter的SupportedMediaTypes属性

        fastJsonHttpMessageConverter.setSupportedMediaTypes(supportedMediaTypes );

        fastJsonHttpMessageConverter.setFastJsonConfig(config);

        return new HttpMessageConverters(fastJsonHttpMessageConverter);

    }

}
controller类同上,启动后测试,内容显示正常。
3)使用Gson处理器
Gson是Google的开源json解析框架,也要先去除jackjson-databind,依赖如下:


  <dependency>

        <groupId>org.springframework.boot</groupId>

        <artifactId>spring-boot-starter-web</artifactId>

        <exclusions>

                <exclusion>

                    <groupId>com.fasterxml.jackson.core</groupId>

                    <artifactId>jackson-databind</artifactId>

                </exclusion>

            </exclusions>

  </dependency>

  <dependency>

         <groupId>com.google.code.gson</groupId>

         <artifactId>gson</artifactId>

   </dependency>
然后启动项目就可以正常的显示数据了,只是时间是默认格式的时间。但是有时候需要对数据进行格式化等操作,所以可以自定义一个gsonHttpMessageConverter,代码如下:


package com.example.demo;

import com.google.gson.Gson;

import com.google.gson.GsonBuilder;

import org.springframework.context.annotation.Bean;

import org.springframework.context.annotation.Configuration;

import org.springframework.http.converter.json.GsonHttpMessageConverter;

import java.lang.reflect.Modifier;

@Configuration

public class GsonConfig {

    @Bean

    GsonHttpMessageConverter gsonHttpMessageConverter(){

        //初始化实例

        GsonHttpMessageConverter converter=new GsonHttpMessageConverter();

        GsonBuilder builder=new GsonBuilder();

        //设置日期的解析格式

        builder.setDateFormat("yyyy-MM-dd HH:mm:ss");

        //设置被过滤的字段的修饰符,这里设置protected的被过滤

        builder.excludeFieldsWithModifiers(Modifier.PROTECTED);

        Gson gson=builder.create();

        //将对象放入实例中

        converter.setGson(gson);

        return  converter;

    }

}
然后把Book对象的id字段修饰符改为protected,然后controller同上,启动项目,测试发现时间是格式化之后的格式,id并没有显示,是因为这里被过滤掉了。
3.2静态资源访问
3.2.1 springboot配置了静态的资源过滤,而静态资源一共有5个位置:
1)classpath:/META-INF/resourses/
2)classpath:/resourses/
3)classpath:/static/
4)classpath:/public/
5)/
第五种可不考虑,他们的优先级依次从高到低。即找资源位置的先后顺序。
3.2.2 自定义过滤策略
先在resources目录下新建一个static1的目录,复制一张图片进去,名字为1.png。
1)在配置文件中定义
配置资源目录的位置:
spring.resources.static-locations=classpath:/static1/
2)使用java编码定义
只需要创建一个配置的类实现WebMvcConfigurer接口即可:


package com.example.demo;

import org.springframework.context.annotation.Configuration;

import org.springframework.web.servlet.config.annotation.ResourceHandlerRegistry;

import org.springframework.web.servlet.config.annotation.WebMvcConfigurer;

@Configuration

public class MyWebMvcConfig implements WebMvcConfigurer {

    @Override

    public void addResourceHandlers(ResourceHandlerRegistry registry) {

        registry.addResourceHandler("/**").addResourceLocations("classpath:/static1/");

    }

}
不管是哪种方式定义,启动项目,在浏览器输入http://localhost:8080/1.png都可以看到这张图片。
3.3文件上传
3.3.1单文件上传
首先创建一个springboot的项目,依赖spring-boot-starter-web,(后面的默认都使用快速创建的方式创建SpringBoot项目,并勾选了web项)然后步骤如下:
1)在资源目录下创建一个文件上传的页面upload.html


<!DOCTYPE html>

<html lang="en">

<head>

    <meta charset="UTF-8">

    <title>文件上传</title>

</head>

<body>

    <form action="/upload" method="post" enctype="multipart/form-data">

        <input type="file" name="file" value="选择文件">

        <input type="submit" value="上传">

    </form>

</body>

</html>
2)创建文件上传的接口upload


package com.example.uploaddemo.controller;

import org.springframework.web.bind.annotation.PostMapping;

import org.springframework.web.bind.annotation.RestController;

import org.springframework.web.multipart.MultipartFile;

import javax.servlet.http.HttpServletRequest;

import java.io.File;

import java.io.IOException;

import java.text.SimpleDateFormat;

import java.util.Date;

import java.util.UUID;

@RestController

public class UploadController {

    @PostMapping("/upload")

    public String upload(MultipartFile file, HttpServletRequest request){

        //设置日期的格式

        SimpleDateFormat sdf=new SimpleDateFormat("yyyy/MM/dd");

        //设置文件的保存路径是项目运行目录下的uploadFile目录下

        String realPath=new File("D:/upload/").getAbsolutePath();

        //通过日期 对文件归类,如2019/11/30,2019/11/29

        String format=File.separator+sdf.format(new Date());

        //根据规则创建目录

        File folder=new File(realPath+format);

        if(!folder.isDirectory()){

            folder.mkdirs();

        }

        //获取文件的原始名

        String oldName=file.getOriginalFilename();

        //获取文件的后缀名

        String suffix=oldName.substring(oldName.lastIndexOf("."),oldName.length());

        //使用uuid设置新的文件名,防止文件名重复

        String newName= UUID.randomUUID().toString()+suffix;

        try {

            //文件保存

            file.transferTo(new File(folder,newName));

            //生成文件的保存路径

            String accessPath=realPath+format+File.separator+newName;

            return accessPath;

        } catch (IOException e) {

            e.printStackTrace();

        }

        return  "上传失败";

    }

}
注意:按照上面的写法,页面中type是file的name值必须和后台得参数值相同,否则会出现空指针异常。
3)测试
启动项目,在浏览器输入upload.html,选择文件上传,上传成功时会返回文件保存的位置,此时在指定的目录下会生成多级的目录,最后一级是文件。
3.3.2多文件上传
1)页面upload2.html:


<!DOCTYPE html>

<html lang="en">

<head>

    <meta charset="UTF-8">

    <title>多文件上传</title>

</head>

<body>

    <form action="/uploads" method="post" enctype="multipart/form-data">

        <input type="file" name="file" value="选择文件"  multiple>

        <input type="submit" value="上传">

    </form>

</body>

</html>
2)后台接口uploads:


 @PostMapping("/uploads")

    public String uploads(MultipartFile[] file, HttpServletRequest request) {

        //设置日期的格式

        SimpleDateFormat sdf = new SimpleDateFormat("yyyy/MM/dd");

        //设置文件的保存路径是项目运行目录下的uploadFile目录下

        String realPath = new File("D:/upload/").getAbsolutePath();

        //通过日期 对文件归类,如2019/11/30,2019/11/29

        String format = "/" + sdf.format(new Date());

        //根据规则创建目录

        File folder = new File(realPath + format);

        if (!folder.isDirectory()) {

            folder.mkdirs();

        }

        try {

            for (MultipartFile multipartFile : file) {

                //获取文件的原始名

                String oldName = multipartFile.getOriginalFilename();

                //获取文件的后缀名

                String suffix = oldName.substring(oldName.lastIndexOf("."), oldName.length());

                //使用uuid设置新的文件名,防止文件名重复

                String newName = UUID.randomUUID().toString() + suffix;

                //文件保存

                multipartFile.transferTo(new File(folder, newName));

                //生成文件的保存路径

                String accessPath = realPath + format + newName;

            }

            return "上传成功";

        } catch (IOException e) {

            e.printStackTrace();

        }

        return "上传失败";

    }
然后启动项目,进行测试。在选择文件的时候,使用ctrl来选择多个文件,然后点击打开,接着上传就行了。
3.4@ControllerAdvice
它是@Controller的增强版,功能比较多。
1)全局异常处理
当上面的文件大小超出限制时,就会抛出异常,但是我们是需要处理的,就可以使用@ControllerAdvice。新建一个异常处理的类CustomExceptionHandler,代码如下,那么当文件大小超出限制时就会在页面显示我设置输出的内容:


package com.example.demo;

import org.springframework.web.bind.annotation.ControllerAdvice;

import org.springframework.web.bind.annotation.ExceptionHandler;

import org.springframework.web.multipart.MaxUploadSizeExceededException;

import javax.servlet.http.HttpServletResponse;

import java.io.IOException;

import java.io.PrintWriter;

@ControllerAdvice

public class CustomExceptionHandler {

    @ExceptionHandler(MaxUploadSizeExceededException.class)

    public void uploadException(MaxUploadSizeExceededException e, HttpServletResponse resp) throws IOException {

        resp.setContentType("text/html;charset=utf-8");

        PrintWriter out=resp.getWriter();

        out.write("文件大小超出限制");

        out.flush();

        out.close();

    }

}
2)全局数据配置
只要配置了全局数据,那么就可以在任何的Controller中通过方法参数中的Model获取对应的内容。
新建一个去全局数据配置的类:


package com.example.demo;

import org.springframework.web.bind.annotation.ControllerAdvice;

import org.springframework.web.bind.annotation.ModelAttribute;

import java.util.HashMap;

import java.util.Map;

@ControllerAdvice

public class GlobalConfig {

    //配置全局数据

    @ModelAttribute("user")

    public Map<String,String> user(){

        Map<String,String> map=new HashMap<>();

        map.put("username","张三");

        map.put("sex","女");

        return  map;

    }

}
新建一个Controller来获取这个全局数据:


package com.example.demo;

import org.springframework.ui.Model;

import org.springframework.web.bind.annotation.GetMapping;

import org.springframework.web.bind.annotation.RestController;

import java.util.Iterator;

import java.util.Map;

import java.util.Set;

@RestController

public class HelloController {

    @GetMapping("/hello")

    public void hello(Model model){

        Map<String,Object> map=model.asMap();

        Set<String> keySet=map.keySet();

        Iterator<String> iterator = keySet.iterator();

        while (iterator.hasNext()){

            String key=iterator.next();

            Object value=map.get(key);

            System.out.println(key+",,"+value);

        }

    }

}
在浏览器访问localhost:8080/htllo,就会在控制台打印结果,如下

3)请求参数预处理
将表单的数据绑定到实体类上时进行额外的处理。
先创建两个实体类Book和Author:


public class Book {

    private String name;

    private String author;

    //setter/getter方法略

}


public class Author {

    private String name;

    private int age;

    //setter/getter方法略

}
在传递参数时,两个name是一样的,会混淆,那就创建Controller的类,进行配置,关键代码如下:


  @GetMapping("book")

    public String book(@ModelAttribute("b") Book book,@ModelAttribute("a")  Author author){

        return book.toString()+"--"+author.toString();

    }
对参数预处理,代码如下:


package com.example.demo;

import org.springframework.web.bind.WebDataBinder;

import org.springframework.web.bind.annotation.ControllerAdvice;

import org.springframework.web.bind.annotation.InitBinder;

@ControllerAdvice

public class GlobalConfig {

  //给每个方法的字段加上前缀

   @InitBinder("a")

    public void inita(WebDataBinder binder){

       binder.setFieldDefaultPrefix("a.");

   }

    @InitBinder("b")

    public void initb(WebDataBinder binder){

        binder.setFieldDefaultPrefix("b.");

    }

}
3.5拦截器
创建springboot项目,添加web依赖,然后创建拦截器,代码如下:


package com.example.demo;

import org.springframework.web.servlet.HandlerInterceptor;

import org.springframework.web.servlet.ModelAndView;

import javax.servlet.http.HttpServletRequest;

import javax.servlet.http.HttpServletResponse;

public class MyInterceptor implements HandlerInterceptor {

    @Override

    public boolean preHandle(HttpServletRequest request, HttpServletResponse response, Object handler) throws Exception {

        System.out.println("preHandle...");

        return true;

    }

    @Override

    public void postHandle(HttpServletRequest request, HttpServletResponse response, Object handler, ModelAndView modelAndView) throws Exception {

        System.out.println("postHandle...");

    }

    @Override

    public void afterCompletion(HttpServletRequest request, HttpServletResponse response, Object handler, Exception ex) throws Exception {

        System.out.println("afterCompletion...");

    }

}
配置拦截器:


package com.example.demo;

import org.springframework.context.annotation.Configuration;

import org.springframework.web.servlet.config.annotation.InterceptorRegistry;

import org.springframework.web.servlet.config.annotation.WebMvcConfigurer;

@Configuration

public class WebMvcConfig implements WebMvcConfigurer {

    @Override

    public void addInterceptors(InterceptorRegistry registry) {

        // addPathPatterns配置拦截路径

        // excludePathPatterns排除拦截的路径

        registry.addInterceptor(new MyInterceptor()).addPathPatterns("/**").excludePathPatterns("/hello");

    }

}
拦截器的方法按照preHandle、Controller、postHandle、afterCompletion的顺序执行,只有当preHandle方法返回true时后面的方法才会执行。当拦截器链存在多个拦截器时,postHandler在拦截器内的所有拦截器返回成功时才会调用,而afterCompletion只要preHandle返回true时才会调用。
4.Spring Boot整合持久层
整合持久层就是和数据库打交道,这里以mysql为例。
4.1准备工作
首先创建一个数据库和表,代码如下:


create database test1 default character set utf8;

use test1;

CREATE TABLE `book` (

  `id` int(11) NOT NULL AUTO_INCREMENT,

  `name` varchar(20) DEFAULT NULL,

  `author` varchar(20) DEFAULT NULL,

  PRIMARY KEY (`id`)

) ENGINE=InnoDB AUTO_INCREMENT=3 DEFAULT CHARSET=utf8;

insert into book values(null,'三国演义','罗贯中');

insert into book values(null,'水浒传','施耐庵');
然后创建springboot的项目。
4.2整合JdbcTemplate
第一步:导入依赖


 <dependency>

            <groupId>org.springframework.boot</groupId>

            <artifactId>spring-boot-starter-jdbc</artifactId>

        </dependency>

        <dependency>

            <groupId>mysql</groupId>

            <artifactId>mysql-connector-java</artifactId>

            <scope>runtime</scope>

        </dependency>

        <dependency>

            <groupId>com.alibaba</groupId>

            <artifactId>druid</artifactId>

            <version>1.1.9</version>

        </dependency>

        <dependency>

            <groupId>org.projectlombok</groupId>

            <artifactId>lombok</artifactId>

            <version>1.18.8</version>

        </dependency>
其中lombok可以导入也可以不导入,这里是为了使用get和set方法方便。
第二步:配置数据源,这里使用的配置文件是application.yml


#数据源配置

spring:

  datasource:

    #使用阿里巴巴的druid

    type: com.alibaba.druid.pool.DruidDataSource

    #配置数据库的路径和用户名密码

    url: jdbc:mysql://localhost:3306/test1?useUnicode=true&useJDBCCompliantTimezoneShift=true&useLegacyDatetimeCode=false&serverTimezone=UTC

    username: root

    password: root
第三步:创建类Book


package com.example.demo.entity;

import lombok.Getter;

import lombok.Setter;

import lombok.ToString;

@Getter

@Setter

@ToString

public class Book {

    private Integer id;

    private String name;

    private String author;

}
第四步:创建类BookController


package com.example.demo.controller;

import com.example.demo.entity.Book;

import com.example.demo.service.Bookservice;

import org.springframework.beans.factory.annotation.Autowired;

import org.springframework.web.bind.annotation.RequestMapping;

import org.springframework.web.bind.annotation.RestController;

import java.util.List;

@RestController

@RequestMapping("/book")

public class BookController {

    @Autowired

    private BookService bookservice;

    @RequestMapping("/addBook")

    public String addBook(){

        Book book=new Book();

        book.setName("西游记");

        book.setAuthor("张三");

        bookservice.addBook(book);

        return "添加成功";

    }

    @RequestMapping("/updateBook")

    public String updateBook(){

        Book book=new Book();

        book.setId(3);

        book.setName("西游记2");

        book.setAuthor("张三2");

        bookservice.updateBook(book);

        return "修改成功";

    }

    @RequestMapping("/deleteBook")

    public String deleteBook(){

        bookservice.deleteBook(3);

        return "添删成功";

    }

    @RequestMapping("/getAllBook")

    public List<Book> getAllBook(){

        return bookservice.getAllBook();

    }

}
第五步:创建类BookService


package com.example.demo.service;

import com.example.demo.dao.BookDao;

import com.example.demo.entity.Book;

import org.springframework.beans.factory.annotation.Autowired;

import org.springframework.stereotype.Service;

import java.util.List;

@Service

public class BookService {

    @Autowired

    private BookDao bookDao;

    public int addBook(Book book){

        return  bookDao.addBook(book);

    }

    public int updateBook(Book book){

        return  bookDao.updateBook(book);

    }

    public int deleteBook(Integer id){

        return  bookDao.deleteBook(id);

    }

    public List<Book> getAllBook(){

        return  bookDao.getAllBook();

    }

}
第六步:创建类BookDao


package com.example.demo.dao;

import com.example.demo.entity.Book;

import org.springframework.beans.factory.annotation.Autowired;

import org.springframework.jdbc.core.BeanPropertyRowMapper;

import org.springframework.jdbc.core.JdbcTemplate;

import org.springframework.stereotype.Repository;

import java.util.List;

@Repository

public class BookDao {

    @Autowired

    private  JdbcTemplate template;

    //添加图书

    public int addBook(Book book){

        String sql="insert into book values(null,?,?)";

        return template.update(sql,book.getName(),book.getAuthor());

    }

    //修改图书

    public int updateBook(Book book){

        String sql="update book set author=?,name=? where id=?";

        return template.update(sql,book.getAuthor(),book.getName(),book.getId());

    }

    //删除图书

    public int deleteBook(Integer id){

        String sql="delete from book where id=?";

        return template.update(sql,id);

    }

    //查询图书

    public List<Book> getAllBook(){

        String sql="select * from book";

        return template.query(sql,new BeanPropertyRowMapper<>(Book.class));

    }

}
第七步:测试。启动项目,在浏览器输入localhost:8080/book/abbBook即可向数据库添加设定的数据,同理其他的几个接口也可以使用。到这里SpringBoo整合JdbcTemolate已经完成了,至于从前端向controller的接口传递数据,这里暂时不讲。
4.3整合MyBatis
第一步:导入依赖


  <dependency>

            <groupId>org.mybatis.spring.boot</groupId>

            <artifactId>mybatis-spring-boot-starter</artifactId>

            <version>1.3.2</version>

        </dependency>

        <dependency>

            <groupId>mysql</groupId>

            <artifactId>mysql-connector-java</artifactId>

            <scope>runtime</scope>

        </dependency>

        <dependency>

            <groupId>com.alibaba</groupId>

            <artifactId>druid</artifactId>

            <version>1.1.9</version>

        </dependency>
第二步:类Book,类BookController同上,而BookService中只需把@Autowired中的BookDao改成BookMapper即可,其他同上。
第三步:创建接口BookMapper


package com.example.demo.dao;

import com.example.demo.entity.Book;

import org.apache.ibatis.annotations.Mapper;

import java.util.List;

@Mapper

public interface BookMapper {

    int addBook(Book book);

    int updateBook(Book book);

    int deleteBook(Integer id);

    List<Book> getAllBook();

}
第四步:创建BookMapper.xml文件
在资源目录下先创建mapper目录,在目录下创建一个名为BookMapper.xml的文件


<?xml version="1.0" encoding="uTF-8" ?>

<!DOCTYPE mapper PUBLIC "-//mybatis.org//DTD Mapper 3.0//EN"

        "http://mybatis.org/dtd/mybatis-3-mapper.dtd">

<mapper namespace="com.example.demo.dao.BookMapper">

    <insert id="addBook" parameterType="com.example.demo.entity.Book">

        insert into book values(null,#{name},#{author})

    </insert>

    <update id="updateBook" parameterType="com.example.demo.entity.Book">

        update book set name=#{name},author=#{author} where id=#{id}

    </update>

    <delete id="deleteBook" parameterType="java.lang.Integer">

        delete from book where id=#{id}

    </delete>

    <select id="getAllBook" resultType="com.example.demo.entity.Book">

        select * from book

    </select>

</mapper>
第五步:修改yml文件


#数据源配置

spring:

  datasource:

    #使用阿里巴巴的druid

    type: com.alibaba.druid.pool.DruidDataSource

    #配置数据库的路径和用户名密码

    url: jdbc:mysql://localhost:3306/test1?useUnicode=true&useJDBCCompliantTimezoneShift=true&useLegacyDatetimeCode=false&serverTimezone=UTC

    username: root

    password: 123456

#配置xml的位置

mybatis:

  mapperLocations: classpath*:mapper/*Mapper.xml
第六步:启动项目,进行测试,接口可以正常使用。
4.4整合Spring Data JPA
JPA是一种ORM规范,Hibernate是一个ORM框架,因此JPA相当于Hibernate的一个子集。这里只需要有数据库即可,就是要test1数据库,不需要手动创建表,。
第一步:导入依赖


 <dependency>

            <groupId>org.springframework.boot</groupId>

            <artifactId>spring-boot-starter-data-jpa</artifactId>

        </dependency>

        <dependency>

            <groupId>mysql</groupId>

            <artifactId>mysql-connector-java</artifactId>

            <scope>runtime</scope>

        </dependency>

        <dependency>

            <groupId>com.alibaba</groupId>

            <artifactId>druid</artifactId>

            <version>1.1.9</version>

        </dependency>
第二步:数据库配置


spring:

  #数据源配置

  datasource:

    #使用阿里巴巴的druid

    type: com.alibaba.druid.pool.DruidDataSource

    #配置数据库的路径和用户名密码

    url: jdbc:mysql://localhost:3306/test1?useUnicode=true&useJDBCCompliantTimezoneShift=true&useLegacyDatetimeCode=false&serverTimezone=UTC

    username: root

    password: root

  #JPA相关配置

  jpa:

    #指定数据库

    database: mysql

    #在控制台打印JPA执行过程中生成的sql

    show-sql: true

    #项目启动时根据实体类更新数据库的表

    hibernate:

      ddl-auto: update
第三步:创建实体类Book


package com.example.demo.entity;

import lombok.Getter;

import lombok.Setter;

import lombok.ToString;

import javax.persistence.*;

@Getter

@Setter

@ToString

//表示该类是一个实体类,name是表名,不写则默认是类名

@Entity(name="t_book")

public class Book {

    //id表示是主键,然后GeneratedValue是自动生成,配置生成的策略

    @Id

    @GeneratedValue(strategy = GenerationType.IDENTITY)

    private Integer id;

    //Column设置字段的名字,不写则是属性名

    @Column(name = "book_name",nullable = false)

    private String name;

    private String author;

    private Float price;

    //Transient设置忽略的字段,创建表时不生成此字段

    @Transient

    private String description;

}
第四步:创建类BookController


package com.example.demo.controller;

import com.example.demo.entity.Book;

import com.example.demo.service.BookService;

import org.springframework.beans.factory.annotation.Autowired;

import org.springframework.web.bind.annotation.GetMapping;

import org.springframework.web.bind.annotation.RequestMapping;

import org.springframework.web.bind.annotation.RestController;

import java.util.List;

@RestController

@RequestMapping("/book")

public class BookController {

    @Autowired

    private BookService bookservice;

    @GetMapping("/add")

    public Book insert( Book book){

        return bookservice.save(book);

    }

    @GetMapping("/findAll")

    public List<Book> findAll(){

        return bookservice.findAll();

    }

}
第五步:创建类BookService


package com.example.demo.service;

import com.example.demo.dao.BookDao;

import com.example.demo.entity.Book;

import org.springframework.beans.factory.annotation.Autowired;

import org.springframework.stereotype.Service;

import java.util.List;

@Service

public class BookService {

    @Autowired

    private BookDao bookDao;

    public Book save(Book book) {

      return bookDao.save(book);

    }

    public List<Book> findAll() {

        return bookDao.findAll();

    }

}
第六步:创建接口BookDao


package com.example.demo.dao;

import com.example.demo.entity.Book;

import org.springframework.data.jpa.repository.JpaRepository;

import org.springframework.stereotype.Component;

@Component

public interface BookDao  extends JpaRepository<Book,Integer>{

}
BookDao中没有写方法,原因是jpa中有一些常用的方法。
4.5配置多数据源
多数据源就是javaEE项目中采用了不同数据库实例中的 多个库,或者同一个数据库实例中多个不同的库。
1)JdbcTemplate多数据源
第一步:创建两个数据库test1,test2,然后在两个数据库中分别创建一个book,并插入一条不同的内容,创建test1的脚本如下,test2同


create database test2 default character set utf8

use test2

CREATE TABLE `book` (

  `id` int(11) NOT NULL AUTO_INCREMENT,

  `name` varchar(20) DEFAULT NULL,

  `author` varchar(20) DEFAULT NULL,

  PRIMARY KEY (`id`)

) ENGINE=InnoDB AUTO_INCREMENT=5 DEFAULT CHARSET=utf8;
第二步:添加依赖


 <dependency>

            <groupId>org.springframework.boot</groupId>

            <artifactId>spring-boot-starter-jdbc</artifactId>

        </dependency>

        <dependency>

            <groupId>mysql</groupId>

            <artifactId>mysql-connector-java</artifactId>

            <scope>runtime</scope>

        </dependency>

        <dependency>

            <groupId>com.alibaba</groupId>

            <artifactId>druid-spring-boot-starter</artifactId>

            <version>1.1.10</version>

        </dependency>
第三步:配置数据库


#多数据源配置

#数据源1

spring:

  datasource:

    one:

      type: com.alibaba.druid.pool.DruidDataSource

      #配置数据库的路径和用户名密码

      url: jdbc:mysql://localhost:3306/test1?useUnicode=true&useJDBCCompliantTimezoneShift=true&useLegacyDatetimeCode=false&serverTimezone=UTC

      username: root

      password: root

    #数据源2

    two:

      type: com.alibaba.druid.pool.DruidDataSource

      #配置数据库的路径和用户名密码

      url: jdbc:mysql://localhost:3306/test2?useUnicode=true&useJDBCCompliantTimezoneShift=true&useLegacyDatetimeCode=false&serverTimezone=UTC

      username: root

      password: root
第四步:配置多数据源


package com.example.demo.config;

import com.alibaba.druid.spring.boot.autoconfigure.DruidDataSourceBuilder;

import org.springframework.boot.context.properties.ConfigurationProperties;

import org.springframework.context.annotation.Bean;

import org.springframework.context.annotation.Configuration;

import javax.sql.DataSource;

@Configuration

public class DataSourceConfig {

    //根据不同前缀的配置文件来创建不同的DataSource实例

    @Bean

    @ConfigurationProperties("spring.datasource.one")

    DataSource dsOne(){

        return DruidDataSourceBuilder.create().build();

    }

    @Bean

    @ConfigurationProperties("spring.datasource.two")

    DataSource dsTwo(){

        return DruidDataSourceBuilder.create().build();

    }

}
第五步:配置JdbcTemplate


package com.example.demo.config;

import org.springframework.beans.factory.annotation.Qualifier;

import org.springframework.context.annotation.Bean;

import org.springframework.context.annotation.Configuration;

import org.springframework.jdbc.core.JdbcTemplate;

import javax.sql.DataSource;

@Configuration

public class JdbcTemplateConfig {

    //根据不同的DataSource实例来创建jdbcTemplate的实例

    @Bean

    JdbcTemplate jdbcTemplateOne(@Qualifier("dsOne")DataSource dataSource){

        return new JdbcTemplate(dataSource);

    }

    @Bean

    JdbcTemplate jdbcTemplateTwo(@Qualifier("dsTwo")DataSource dataSource){

        return new JdbcTemplate(dataSource);

    }

}
第六步:创建类BookController
为了简单化,这里就直接使用controller来注入JdbcTemplate,在实际开发中需规范化。


package com.example.demo.controller;

import com.example.demo.entity.Book;

import com.example.demo.service.BookService;

import org.springframework.beans.factory.annotation.Autowired;

import org.springframework.beans.factory.annotation.Qualifier;

import org.springframework.boot.autoconfigure.quartz.QuartzProperties;

import org.springframework.jdbc.core.BeanPropertyRowMapper;

import org.springframework.jdbc.core.JdbcTemplate;

import org.springframework.web.bind.annotation.GetMapping;

import org.springframework.web.bind.annotation.RequestMapping;

import org.springframework.web.bind.annotation.RestController;

import javax.annotation.Resource;

import java.util.HashMap;

import java.util.List;

import java.util.Map;

@RestController

@RequestMapping("/book")

public class BookController {

    //以下使用两种不同的方法注入JdbcTemplate

    @Resource(name = "jdbcTemplateOne")

    private JdbcTemplate jdbcTemplateOne;

    @Autowired

    @Qualifier("jdbcTemplateTwo")

    private JdbcTemplate jdbcTemplateTwo;

    @GetMapping("/find")

    public Map find(){

        Map<String,Object> map=new HashMap<>();

        String sql="select * from book";

        List<Book> query1 = jdbcTemplateOne.query(sql, new BeanPropertyRowMapper<>(Book.class));

        List<Book> query2 = jdbcTemplateTwo.query(sql, new BeanPropertyRowMapper<>(Book.class));

        map.put("datasouce1",query1);

        map.put("datasouce2",query2);

        return map;

    }

}
第七步:测试
启动项目,在浏览器输入localhost:8080/book/get即可看到查询的两个数据库的所有结果。
2)Mybatis多数据源
第一步:上面已经详细的介绍了一些配置信息,这里就不再赘述。两个数据库同上,数据库配置同上,多数据源配置同上。依赖也只是把Spring-boot-starter-jdbc替换成mybatis的依赖即可,mybatis的依赖如下:


  <dependency>

            <groupId>org.mybatis.spring.boot</groupId>

            <artifactId>mybatis-spring-boot-starter</artifactId>

            <version>1.3.2</version>

        </dependency>
第二步:配置Mybatis
第一个配置类


package com.example.demo.config;

import org.apache.ibatis.session.SqlSessionFactory;

import org.mybatis.spring.SqlSessionFactoryBean;

import org.mybatis.spring.SqlSessionTemplate;

import org.mybatis.spring.annotation.MapperScan;

import org.springframework.context.annotation.Bean;

import org.springframework.context.annotation.Configuration;

import javax.annotation.Resource;

import javax.sql.DataSource;

@Configuration

//指定接口所在的位置,它下面的接口将使用SqlSessionFactory实例

@MapperScan(value = "com.example.demo.dao",sqlSessionFactoryRef = "sqlSessionFactoryBean1")

public class MybatisConfigOne {

    @Resource(name="dsOne")

    private DataSource dsOne;

    @Bean

    SqlSessionFactoryBean sqlSessionFactoryBean1() throws Exception {

        SqlSessionFactoryBean factoryBean=new SqlSessionFactoryBean();

        factoryBean.setDataSource(dsOne);

        return (SqlSessionFactoryBean) factoryBean.getObject();

    }

    @Bean

    SqlSessionTemplate sqlSessionTemplate1() throws Exception {

        return new SqlSessionTemplate((SqlSessionFactory) sqlSessionFactoryBean1());

    }

}
第二个配置类


package com.example.demo.config;

import org.apache.ibatis.session.SqlSessionFactory;

import org.mybatis.spring.SqlSessionFactoryBean;

import org.mybatis.spring.SqlSessionTemplate;

import org.mybatis.spring.annotation.MapperScan;

import org.springframework.context.annotation.Bean;

import org.springframework.context.annotation.Configuration;

import javax.annotation.Resource;

import javax.sql.DataSource;

@Configuration

//指定接口所在的位置,它下面的接口将使用SqlSessionFactory实例

@MapperScan(value = "com.example.demo.dao",sqlSessionFactoryRef = "sqlSessionFactoryBean2")

public class MybatisConfigTwo {

    @Resource(name="dsTwo")

    private DataSource dsTwo;

    @Bean

    SqlSessionFactoryBean sqlSessionFactoryBean2() throws Exception {

        SqlSessionFactoryBean factoryBean=new SqlSessionFactoryBean();

        factoryBean.setDataSource(dsTwo);

        return (SqlSessionFactoryBean) factoryBean.getObject();

    }

    @Bean

    SqlSessionTemplate sqlSessionTemplate1() throws Exception {

        return new SqlSessionTemplate((SqlSessionFactory) sqlSessionFactoryBean2());

    }

}
第三步:在包com.example.demo.dao和com.example.demo.dao2分别创建接口BookMapper和BookMapper2


package com.example.demo.dao;

import com.example.demo.entity.Book;

import java.util.List;

public interface BookMapper {

    List<Book> getAllBook();

}


package com.example.demo.dao2;

import com.example.demo.entity.Book;

import java.util.List;

public interface BookMapper2 {

    List<Book> getAllBook();

}
第四步:在上面两个包中分别创建BookMapper.xml,BookMapper2.xml


<?xml version="1.0" encoding="uTF-8" ?>

<!DOCTYPE mapper PUBLIC "-//mybatis.org//DTD Mapper 3.0//EN"

        "http://mybatis.org/dtd/mybatis-3-mapper.dtd">

<mapper namespace="com.example.demo.dao.BookMapper">

    <select id="getAllBook" resultType="com.example.demo.entity.Book">

        select * from book

    </select>

</mapper>


<?xml version="1.0" encoding="uTF-8" ?>

<!DOCTYPE mapper PUBLIC "-//mybatis.org//DTD Mapper 3.0//EN"

        "http://mybatis.org/dtd/mybatis-3-mapper.dtd">

<mapper namespace="com.example.demo.dao2.BookMapper2">

    <select id="getAllBook" resultType="com.example.demo.entity.Book">

        select * from book

    </select>

</mapper>
第五步:创建BookController


package com.example.demo.controller;

import com.example.demo.dao.BookMapper;

import com.example.demo.dao2.BookMapper2;

import com.example.demo.entity.Book;

import org.springframework.beans.factory.annotation.Autowired;

import org.springframework.web.bind.annotation.GetMapping;

import org.springframework.web.bind.annotation.RequestMapping;

import org.springframework.web.bind.annotation.RestController;

import java.util.HashMap;

import java.util.List;

import java.util.Map;

@RestController

@RequestMapping("/book")

public class BookController {

    @Autowired

    private BookMapper mapper;

    @Autowired

    private BookMapper2 mapper2;

    @GetMapping("/find")

    public Map find(){

        Map<String,Object> map=new HashMap<>();

        List<Book> query1 = mapper.getAllBook();

        List<Book> query2 = mapper2.getAllBook();

        map.put("datasouce1",query1);

        map.put("datasouce2",query2);

        return map;

    }

}
第六步:启动项目,进行测试。
4.6.SpringBoot整合Mybatis出现属性为null不能插入的情况处理(无完整代码)
当前端传入的数据给后台,一个对象中有的属性为null时mybatis是不能进行插入操作的,但是需求是这些为null的值得转换为空字符串存入到数据库,其中的一个解决办法如下:
第一步:创建一个类,用于转换类型是字符串,值为null的属性


package com.kanq.framework.util;

import org.apache.ibatis.type.JdbcType;

import org.apache.ibatis.type.TypeHandler;

import org.springframework.context.annotation.Configuration;

import java.sql.CallableStatement;

import java.sql.PreparedStatement;

import java.sql.ResultSet;

import java.sql.SQLException;

/**

 * 当值为null时设置为"",用于mybatis的数据插入

 */

@Configuration

public class NullValueHandler implements TypeHandler<String> {

    @Override

    public void setParameter(PreparedStatement preparedStatement, int i, String s, JdbcType jdbcType) throws SQLException {

        if(s==null&&jdbcType==JdbcType.VARCHAR){//判断传入的参数值是否为null

            preparedStatement.setString(i,"");//设置当前参数的值为空字符串

       }else{

            preparedStatement.setString(i,s);//如果不为null,则直接设置参数的值为value

       }

    }

    @Override

    public String getResult(ResultSet resultSet, String s) throws SQLException {

        return resultSet.getString(s);

    }

    @Override

    public String getResult(ResultSet resultSet, int i) throws SQLException {

        return resultSet.getString(i);

    }

    @Override

    public String getResult(CallableStatement callableStatement, int i) throws SQLException {

        return callableStatement.getString(i);

    }

}
第二步:在mybatis的BookMapper.xml中修改如下


insert into xcjhb values(null, #{xczrr,jdbcType=VARCHAR,typeHandler=com.kanq.framework.util.NullValueHandler},.....)
typeHandler的值是NullValueHandler所在的路径,这样当前台传入的值为null时后台就可以正常插入了。
5.SpringBoot整合NoSQL
5.1整合Redis
在整合之前,默认redis已经在虚拟机上安装完成,并且允许外网访问。
第一步:导入依赖


  <dependency>

            <groupId>org.springframework.boot</groupId>

            <artifactId>spring-boot-starter-data-redis</artifactId>

            <!-- 排除lettuce,使用jredis-->

            <exclusions>

                <exclusion>

                    <groupId>io.lettuce</groupId>

                    <artifactId>lettuce-core</artifactId>

                </exclusion>

            </exclusions>

        </dependency>

        <dependency>

            <groupId>redis.clients</groupId>

            <artifactId>jedis</artifactId>

        </dependency>
第二步:配置数据库连接


#配置redis连接信息

spring:

  redis:

    #配置redis的编号,redis有16个database,0~15

    database: 0

    #配置主机地址

    host: 192.168.6.128

    #配置redis端口号,默认是6379

    port: 6379

    #配置redis登录密码

    password: 1234

    #配置连接池信息

    jedis:

      pool:

        #配置最大连接数

        max-active: 8

        #配置最大空闲连接数

        max-idle: 8

        #配置最大阻塞等待时间

        max-wait: -1ms

        #配置最小空闲连接数

        min-idle: 0
第三步:创建实体类Book


package com.example.demo.entity;

import lombok.Getter;

import lombok.Setter;

import lombok.ToString;

import java.io.Serializable;

@Getter

@Setter

@ToString

public class Book implements Serializable {

    private Integer id;

    private String name;

    private String author;

}
第四步:创建BookController


package com.example.demo.controller;

import com.example.demo.entity.Book;

import org.springframework.beans.factory.annotation.Autowired;

import org.springframework.data.redis.core.RedisTemplate;

import org.springframework.data.redis.core.StringRedisTemplate;

import org.springframework.data.redis.core.ValueOperations;

import org.springframework.web.bind.annotation.GetMapping;

import org.springframework.web.bind.annotation.RequestMapping;

import org.springframework.web.bind.annotation.RestController;

@RestController

@RequestMapping("/book")

public class BookController {

    //RedisTemplate使用时,对象一定要实现Serializable接口

    @Autowired

    private RedisTemplate redisTemplate;

    //StringRedisTemplate是RedisTemplate的子类,它的key和value都是字符串

    @Autowired

    private StringRedisTemplate stringRedisTemplate;

    @GetMapping("/test1")

    public String test1(){

        //获取操作对象

        ValueOperations<String, String> ops = stringRedisTemplate.opsForValue();

        //存储记录

        ops.set("name","三国演义");

        //取出记录

        String name=ops.get("name");

        return name;

    }

    @GetMapping("/test2")

    public Book test2(){

        ValueOperations ops1 = redisTemplate.opsForValue();

        Book book=new Book();

        book.setId(12);

        book.setAuthor("曹雪芹");

        book.setName("红楼梦");

        ops1.set("book",book);

        Book book1 = (Book) ops1.get("book");

        return book1;

    }

}
第五步:测试。启动项目,在浏览器输入localhost:8080/book/test1即可看到test1方法存的数据,同理可以访问test2。
6.SpringBoot缓存
6.1Ehcache缓存
这里使用mybatis进行数据的查询,mybatis的部分配置这里略。
第一步:导入依赖,除了mybatis依赖其他依赖如下


  <dependency>

            <groupId>org.springframework.boot</groupId>

            <artifactId>spring-boot-starter-cache</artifactId>

        </dependency>

        <dependency>

            <groupId>net.sf.ehcache</groupId>

            <artifactId>ehcache</artifactId>

        </dependency>
第二步:添加缓存的配置文件ehcache.xml,这个文件可以直接放在资源目录下


<?xml version="1.0" encoding="UTF-8"?>

<ehcache xmlns:xsi="http://www.w3.org/2001/XMLSchema-instance"

         xsi:noNamespaceSchemaLocation="http://ehcache.org/ehcache.xsd"

         updateCheck="false">

    <!--配置默认的缓存-->

    <defaultCache

            eternal="false"

            maxElementsInMemory="10000"

            overflowToDisk="false"

            diskPersistent="false"

            timeToIdleSeconds="120"

            timeToLiveSeconds="120"

            memoryStoreEvictionPolicy="LRU"/>

    <cache

            name="book_cache"

            eternal="false"

            maxElementsInMemory="5000"

            overflowToDisk="false"

            diskPersistent="false"

            timeToIdleSeconds="180"

            timeToLiveSeconds="180"

            memoryStoreEvictionPolicy="LRU"/>

</ehcache>
如果需要将这个配置文件放在其他目录下,可以指定位置,比如放在资源目录下的config目录中


#配置缓存的配置文件位置

spring:

  cache:

    ehcache:

      config: classpath:config/ehcache.xml
第三步:添加mybatis的配置,根据需要,可以设置mybatis的日志级别是debug,那么可以在控制台打印执行的sql语句


logging:

  level:

    #下面先指定包名,再指定等级

    com:

      example:

        demo:

          dao: debug
第四步:开启缓存
修改启动类,添加代码如下
@SpringBootApplication

@EnableCaching//开启缓存

public class DemoApplication {

    public static void main(String[] args) {

       SpringApplication.run(DemoApplication.class, args);

        System.out.println("-----------启动成功------------");

    }

}
第五步:创建实体类Book,这里必须实现Serializable接口


package com.example.demo.entity;

import lombok.Getter;

import lombok.Setter;

import lombok.ToString;

import java.io.Serializable;

@Getter

@Setter

@ToString

public class Book implements Serializable {

    private Integer id;

    private String name;

    private String author;

}
第六步:创建BookController


package com.example.demo.controller;

import com.example.demo.dao.BookMapper;

import com.example.demo.entity.Book;

import org.springframework.beans.factory.annotation.Autowired;

import org.springframework.cache.annotation.CacheConfig;

import org.springframework.cache.annotation.CacheEvict;

import org.springframework.cache.annotation.CachePut;

import org.springframework.cache.annotation.Cacheable;

import org.springframework.web.bind.annotation.PathVariable;

import org.springframework.web.bind.annotation.RequestMapping;

import org.springframework.web.bind.annotation.RestController;

@RestController

@RequestMapping("/book")

public class BookController {

    @Autowired

    private BookMapper mapper;

    @RequestMapping("/query")

    public Book findById(int id){

        return mapper.findById(id);

    }

    @RequestMapping("/update")

    public int update(Book book){

        return mapper.update(book);

    }

    @RequestMapping("/delete")

    public int delete(int id){

        return mapper.delete(id);

    }

}
第七步:创建BookMapepr


package com.example.demo.dao;

import com.example.demo.entity.Book;

import org.apache.ibatis.annotations.Mapper;

import org.springframework.cache.annotation.CacheConfig;

import org.springframework.cache.annotation.CacheEvict;

import org.springframework.cache.annotation.Cacheable;

@Mapper

@CacheConfig(cacheNames = "book_cache")

public interface BookMapper {

   //对这个方法缓存,默认缓存的key是参数,value是方法的返回值

   @Cacheable

   public Book findById(int id);

   @CacheEvict(key = "#book.id")

   public int update(Book book);

   @CacheEvict(key= "#id")

   public int delete(int id);

}
BookMapepr.xml在这里略。在浏览器输入对应的路径即可测试。
注:当执行同一个条件的查询多次时,只会去查询一次,然后把参数作为key,返回值作为value存到缓存中。当修改或删除后,就把对应的数据从缓存中删除。
@Cacheable : Spring在每次执行前都会检查Cache中是否存在相同key的缓存元素,如果存在就不再执行该方法,而是直接从缓存中获取结果进行返回,否则才会执行并将返回结果存入指定的缓存中。

@CacheEvict : 清除缓存。

@CachePut标注的方法在执行前不会去检查缓存中是否存在之前执行过的结果,而是每次都会执行该方法,并将执行结果以键值对的形式存入指定的缓存中。 这三个方法中都有两个主要的属性:value 指的是 ehcache.xml 中的缓存策略空间;key 指的是缓存的标识,同时可以用 # 来引用参数。
7.SpringBoot整合SpringSecurity
7.1基本原理
spring security的核心是用户认证(Authentication)和用户授权(Authorization)。
用户认证指的是验证某个用户是否为系统中的合法主体,也就是说用户能否访问该系统。一般要求用户提供用户名和密码。
用户授权指的是验证某个用户是否有权限执行某个操作。在一个系统中,不同用户所具有的权限是不同的。

认证原理图
7.2基本配置
这里使用Mybatis和SpringSecurity共同开发,除了Mybatis的配置,其他配置如下
第一步:导入依赖


  <dependency>

            <groupId>org.springframework.boot</groupId>

            <artifactId>spring-boot-starter-security</artifactId>

        </dependency>
第二步:创建使用的页面
在资源目录的static目录下创建几个页面


***********add.html************

<!DOCTYPE html>

<html lang="en">

<head>

    <meta charset="UTF-8">

    <title>Title</title>

</head>

<body>

<h2>添加订单!!!!!!!</h2>

</body>

</html>

***********look.html************

<!DOCTYPE html>

<html lang="en">

<head>

    <meta charset="UTF-8">

    <title>Title</title>

</head>

<body>

<h2>查看订单!!!!!!!</h2>

</body>

</html>

***********delete.html************

<!DOCTYPE html>

<html lang="en">

<head>

    <meta charset="UTF-8">

    <title>Title</title>

</head>

<body>

<h2>删除订单!!!!!!!</h2>

</body>

</html>

***********update.html************

<!DOCTYPE html>

<html lang="en">

<head>

    <meta charset="UTF-8">

    <title>Title</title>

</head>

<body>

<h2>修改订单!!!!!!!</h2>

</body>

</html>

***********index.html************

<!DOCTYPE html>

<html lang="en">

<head>

    <meta charset="UTF-8">

    <title>首页</title>

</head>

<body>

    <p><a href="/look">查看订单</a></p>

    <p><a href="/add">添加订单</a></p>

    <p><a href="/delete">删除订单</a></p>

    <p><a href="/update">修改订单</a></p>

</body>

</html>
配置application.properties,其他配置在这里略,参考所讲配置


spring.mvc.view.prefix=/

spring.mvc.view.suffix=.html

spring.resources.static-locations=classpath:/static
第三步:创建UserController类


package com.example.springsecurity.controller;

import org.springframework.stereotype.Controller;

import org.springframework.web.bind.annotation.GetMapping;

import org.springframework.web.bind.annotation.RequestMapping;

import org.springframework.web.bind.annotation.RestController;

@Controller

public class UserController {

    @RequestMapping("/")

    public String index(){

        return "index";

    }

    @RequestMapping("/add")

    public String add(){

        return "add";

    }

    @RequestMapping("/look")

    public String look(){

        return "look";

    }

    @RequestMapping("/delete")

    public String delete(){

        return "delete";

    }

    @RequestMapping("/update")

    public String update(){

        return "update";

    }

}
7.3 httpBaisc的方式
1)在config包下创建SecurityConfig的配置类:


package com.example.springsecurity.config;

import org.springframework.context.annotation.Bean;

import org.springframework.security.config.annotation.authentication.builders.AuthenticationManagerBuilder;

import org.springframework.security.config.annotation.web.builders.HttpSecurity;

import org.springframework.security.config.annotation.web.configuration.EnableWebSecurity;

import org.springframework.security.config.annotation.web.configuration.WebSecurityConfigurerAdapter;

import org.springframework.security.crypto.password.NoOpPasswordEncoder;

import org.springframework.security.crypto.password.PasswordEncoder;

import org.springframework.stereotype.Component;

@Component

@EnableWebSecurity

public class SecurityConfig extends WebSecurityConfigurerAdapter {

    //配置加密的方式

    @Bean

    PasswordEncoder passwordEncoder(){

        //设置不加密

        return NoOpPasswordEncoder.getInstance();

    }

    //配置认证用户信息和授权

    @Override

    protected void configure(AuthenticationManagerBuilder auth) throws Exception {

        //基于内存的认证

       auth.inMemoryAuthentication().withUser("user").password("1234").authorities("addUser");

    }

    //配置拦截请求资源

    @Override

    protected void configure(HttpSecurity http) throws Exception {

       http

               //开启HttpSecurity配置

               .authorizeRequests()

               //指定路径

               .antMatchers("/**")

               //拦截所有

               .fullyAuthenticated()

               //配置认证模式

               .and().httpBasic();

    }

}
启动项目在浏览器输入localhost:8080,就会出现如下界面,需要进行登录。

这里没有配置加密,登录成功后才能进行访问其他的资源。
7.4 使用FormLogin的方式
1)只需要在7.3的基础上把configure(HttpSecurity http)的.httpBasic()换成formLogin()即可,就会出现登录页面。
2)示例:admin用户可以访问所有的资源,user用户只能添加和查询订单的资源,SecurityConfig配置如下:


package com.example.springsecurity.config;

import org.springframework.context.annotation.Bean;

import org.springframework.security.config.annotation.authentication.builders.AuthenticationManagerBuilder;

import org.springframework.security.config.annotation.web.builders.HttpSecurity;

import org.springframework.security.config.annotation.web.configuration.EnableWebSecurity;

import org.springframework.security.config.annotation.web.configuration.WebSecurityConfigurerAdapter;

import org.springframework.security.crypto.password.NoOpPasswordEncoder;

import org.springframework.security.crypto.password.PasswordEncoder;

import org.springframework.stereotype.Component;

@Component

@EnableWebSecurity

public class SecurityConfig extends WebSecurityConfigurerAdapter {

    //配置加密的方式

    @Bean

    PasswordEncoder passwordEncoder(){

        //设置不加密

        return NoOpPasswordEncoder.getInstance();

    }

    //配置认证用户信息和授权

    @Override

    protected void configure(AuthenticationManagerBuilder auth) throws Exception {

        //基于内存的认证

        //配置user拥有权限

       auth.inMemoryAuthentication().

               withUser("user").password("1234").authorities("add","look");

       //配置admin拥有所有的权限

        auth.inMemoryAuthentication().

                withUser("admin").password("1234").authorities("add","look","delete","update");

    }

    //配置拦截请求资源

    @Override

    protected void configure(HttpSecurity http) throws Exception {

       http

               //开启HttpSecurity配置

               .authorizeRequests()

               //配置权限的授权

               .antMatchers("/add").hasAuthority("add")

               .antMatchers("/look").hasAuthority("look")

               .antMatchers("/delete").hasAuthority("delete")

               .antMatchers("/update").hasAuthority("update")

               .antMatchers("/**").fullyAuthenticated()

               //配置认证模式

               .and().formLogin();

    }

}
启动项目,使用admin登录可访问所有的资源,而user登录后访问look和add以外的资源时会出现403,这就是权限分配。
3)更改403权限不足页面
在static目录下新建error/403.html,内容如下


<!DOCTYPE html>

<html lang="en">

<head>

    <meta charset="UTF-8">

    <title>Title</title>

</head>

<body>

权限不足!无法访问

</body>

</html>
新建一个配置类WebServerAutoConfiguration


package com.example.springsecurity.config;

import org.springframework.boot.web.embedded.tomcat.TomcatServletWebServerFactory;

import org.springframework.boot.web.server.ErrorPage;

import org.springframework.boot.web.servlet.server.ConfigurableServletWebServerFactory;

import org.springframework.context.annotation.Bean;

import org.springframework.context.annotation.Configuration;

import org.springframework.http.HttpStatus;

/**

 * 配置发生错误的请求路径

 */

@Configuration

public class WebServerAutoConfiguration {

    @Bean

    public ConfigurableServletWebServerFactory webServerFactory(){

        TomcatServletWebServerFactory factory=new TomcatServletWebServerFactory();

        ErrorPage errorPage400=new ErrorPage(HttpStatus.BAD_REQUEST,"error/400");

        ErrorPage errorPage401=new ErrorPage(HttpStatus.UNAUTHORIZED,"error/401");

        ErrorPage errorPage403=new ErrorPage(HttpStatus.FORBIDDEN,"error/403");

        ErrorPage errorPage404=new ErrorPage(HttpStatus.NOT_FOUND,"error/404");

        ErrorPage errorPage415=new ErrorPage(HttpStatus.UNSUPPORTED_MEDIA_TYPE,"error/415");

        ErrorPage errorPage500=new ErrorPage(HttpStatus.INTERNAL_SERVER_ERROR,"error/500");

        factory.addErrorPages(errorPage400,errorPage401,errorPage403,errorPage404,errorPage415,errorPage500);

        return factory;

    }

}
新建错误的controller处理类ErrorController


package com.example.springsecurity.controller;

import org.springframework.stereotype.Controller;

import org.springframework.web.bind.annotation.RequestMapping;

/**

 * 错误的controller

 */

@Controller

public class ErrorController {

    @RequestMapping("/error/403")

    public String error(){

        return "error/403";

    }

}
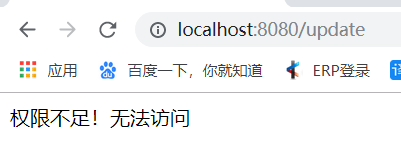
这里是以403错误为例,自定义其他的错误页面雷同。启动项目,当使用user用户登录访问look和add以外的资源时会显示自定义的403页面的内容。
4)更换自定义登录页面
在资源目录下新建login.html


<!DOCTYPE html>

<html lang="en">

<head>

    <meta charset="UTF-8">

    <title>登录</title>

</head>

<body>

    <form method="post" action="/login">

        <p>

            <input type="text" id="username" name="username"  placeholder="用户名">

        </p>

        <p>

            <input type="password" id="password" name="password"  placeholder="密码">

        </p>

        <button  type="submit">登录</button>

    </form>

</body>

</html>
修改security的配置类,指定自定义的登录页面以及登录成功或失败的处理


package com.example.springsecurity.config;

import com.example.springsecurity.handler.MyAuthenticationFailureHandler;

import com.example.springsecurity.handler.MyAuthenticationSuccessHandler;

import org.springframework.beans.factory.annotation.Autowired;

import org.springframework.context.annotation.Bean;

import org.springframework.security.config.annotation.authentication.builders.AuthenticationManagerBuilder;

import org.springframework.security.config.annotation.web.builders.HttpSecurity;

import org.springframework.security.config.annotation.web.configuration.WebSecurityConfigurerAdapter;

import org.springframework.security.core.Authentication;

import org.springframework.security.core.AuthenticationException;

import org.springframework.security.crypto.password.NoOpPasswordEncoder;

import org.springframework.security.crypto.password.PasswordEncoder;

import org.springframework.security.web.authentication.AuthenticationFailureHandler;

import org.springframework.security.web.authentication.AuthenticationSuccessHandler;

import org.springframework.security.web.authentication.logout.LogoutHandler;

import org.springframework.security.web.authentication.logout.LogoutSuccessHandler;

import org.springframework.stereotype.Component;

import javax.servlet.ServletException;

import javax.servlet.http.HttpServletRequest;

import javax.servlet.http.HttpServletResponse;

import java.io.IOException;

@Component

public class SecurityConfig extends WebSecurityConfigurerAdapter {

    /**

     * 登录成功的处理

     */

    @Autowired

    private MyAuthenticationSuccessHandler successHandler;

    /**

     * 登录失败的处理

     */

    @Autowired

    private MyAuthenticationFailureHandler failureHandler;

    //配置加密的方式

    @Bean

    PasswordEncoder passwordEncoder() {

        //设置不加密

        return NoOpPasswordEncoder.getInstance();

    }

    //配置认证用户信息和授权

    @Override

    protected void configure(AuthenticationManagerBuilder auth) throws Exception {

        //配置user拥有权限

        auth.inMemoryAuthentication().

                withUser("user").password("1234").authorities("add","look");

        //配置admin拥有所有的权限

        auth.inMemoryAuthentication().

                withUser("admin").password("1234").authorities("add","look","delete","update");

    }

    //配置拦截请求资源

    @Override

    protected void configure(HttpSecurity http) throws Exception {

        http

                //开启HttpSecurity配置

                .authorizeRequests()

                //指定路径

                //配置权限的授权

                .antMatchers("/add").hasAuthority("add")

                .antMatchers("/look").hasAuthority("look")

                .antMatchers("/delete").hasAuthority("delete")

                .antMatchers("/update").hasAuthority("update")

                .antMatchers("/login.html").permitAll()

                .antMatchers("/**").fullyAuthenticated()

                //配置认证模式

                .and().formLogin()

                .loginPage("/login.html")

                .loginProcessingUrl("/login")

                //登录成功的操作

                .successHandler(successHandler)

                //登录失败的操作

                .failureHandler(failureHandler)

                .and()

                //关闭cors

                .csrf()

                .disable();

    }

}
创建登录成功的处理类MyAuthenticationSuccessHandler


package com.example.springsecurity.handler;

import com.fasterxml.jackson.databind.ObjectMapper;

import org.springframework.security.core.Authentication;

import org.springframework.security.web.authentication.AuthenticationSuccessHandler;

import org.springframework.stereotype.Component;

import javax.servlet.ServletException;

import javax.servlet.http.HttpServletRequest;

import javax.servlet.http.HttpServletResponse;

import java.io.IOException;

/**

 * @Author: yushizhong

 * @Date: 2020/1/7 10:11

 * @Title: 登录成功处理

 */

@Component

public class MyAuthenticationSuccessHandler implements AuthenticationSuccessHandler {

    @Override

    public void onAuthenticationSuccess(HttpServletRequest req, HttpServletResponse resp, Authentication authentication) throws IOException, ServletException {

        System.out.println("登录成功");

        resp.sendRedirect("/");

    }

}
创建登录失败的处理类MyAuthenticationFailureHandler


package com.example.springsecurity.handler;

import com.fasterxml.jackson.databind.ObjectMapper;

import org.springframework.security.authentication.*;

import org.springframework.security.core.AuthenticationException;

import org.springframework.security.web.authentication.AuthenticationFailureHandler;

import org.springframework.stereotype.Component;

import javax.servlet.ServletException;

import javax.servlet.http.HttpServletRequest;

import javax.servlet.http.HttpServletResponse;

import java.io.IOException;

/**

 * @Author: yushizhong

 * @Date: 2020/1/7 10:10

 * @Title: 验证失败处理

 */

@Component

public class MyAuthenticationFailureHandler implements AuthenticationFailureHandler {

    @Override

    public void onAuthenticationFailure(HttpServletRequest req, HttpServletResponse resp, AuthenticationException e) throws IOException, ServletException {

        System.out.println("登录失败");

        resp.sendRedirect("/login.html");

    }

}
启动项目,访问localhost:8080,当登录成功时控制台会打印登录成功,并跳转到首页;登录失败时会打印登录失败,回到登录页面。
7.5 使用数据库的方式验证
第一步:创建实体类


package com.example.springsecurity.domain;

import lombok.Data;

import org.springframework.security.core.GrantedAuthority;

import org.springframework.security.core.authority.SimpleGrantedAuthority;

import org.springframework.security.core.userdetails.UserDetails;

import java.util.ArrayList;

import java.util.Collection;

import java.util.List;

@Data

public class User implements UserDetails {

    private Integer id;

    private String username;

    private String name;

    private String password;

    private boolean enabled;

    private boolean locked;

    private String role;

    private List<SimpleGrantedAuthority> authorities = new ArrayList<>();

    //获取用户的角色信息

    @Override

    public Collection<? extends GrantedAuthority> getAuthorities() {

        return authorities;

    }

    //获取用户的密码

    @Override

    public String getPassword() {

        return password;

    }

    //获取用户的用户名

    @Override

    public String getUsername() {

        return username;

    }

    //当前账户是否未过期

    @Override

    public boolean isAccountNonExpired() {

        return true;

    }

    //当前账户是否锁定

    @Override

    public boolean isAccountNonLocked() {

        return !locked;

    }

    //当前账户密码是否未过期

    @Override

    public boolean isCredentialsNonExpired() {

        return true;

    }

    //当前账户是否可用

    @Override

    public boolean isEnabled() {

        return enabled;

    }

}
User类


package com.example.springsecurity.domain;

import lombok.Data;

@Data

public class Role {

    private Integer id;

    private String role;

    private String explain;

}
Role类


package com.example.springsecurity.domain;

import lombok.Data;

@Data

public class Auth {

    private Integer id;

    private String auth;

    private String url;

    private String permission;

}
Auth类
第二步:创建接口


package com.example.springsecurity.mapper;

import com.example.springsecurity.domain.Auth;

import com.example.springsecurity.domain.User;

import org.apache.ibatis.annotations.Mapper;

import java.util.List;

@Mapper

public interface UserMapper {

    User loadUserByUsername(String username);

    List<Auth> findAuthByUsername(String username);

}
UserMapper


package com.example.springsecurity.mapper;

import org.apache.ibatis.annotations.Mapper;

@Mapper

public interface RoleMapper {

}
RoleMapper


package com.example.springsecurity.mapper;

import com.example.springsecurity.domain.Auth;

import org.apache.ibatis.annotations.Mapper;

import java.util.List;

@Mapper

public interface AuthMapper {

    List<Auth> findAll();

}
AuthMapper
第三步:创建xml


<?xml version="1.0" encoding="UTF-8" ?>

<!DOCTYPE mapper PUBLIC "-//mybatis.org//DTD Mapper 3.0//EN"

        "http://mybatis.org/dtd/mybatis-3-mapper.dtd">

<mapper namespace="com.example.springsecurity.mapper.UserMapper">

    <!--查询用户-->

    <select id="loadUserByUsername" resultType="com.example.springsecurity.domain.User">

        select * from user where username=#{username}

    </select>

    <!--查询用户的权限-->

    <select id="findAuthByUsername" resultType="com.example.springsecurity.domain.Auth">

        select auth.* from user u inner join user_role on user_role.user_id=u.id

            inner join role on role.id=user_role.user_id

            inner join role_auth on role_auth.role_id=role.id

            inner join auth on auth.id=role_auth.auth_id

            where u.username=#{username}

    </select>

</mapper>
UserMapper.xml


<?xml version="1.0" encoding="UTF-8" ?>

<!DOCTYPE mapper PUBLIC "-//mybatis.org//DTD Mapper 3.0//EN"

        "http://mybatis.org/dtd/mybatis-3-mapper.dtd">

<mapper namespace="com.example.springsecurity.mapper.RoleMapper">

</mapper>
RoleMapper.xml


<?xml version="1.0" encoding="UTF-8" ?>

<!DOCTYPE mapper PUBLIC "-//mybatis.org//DTD Mapper 3.0//EN"

        "http://mybatis.org/dtd/mybatis-3-mapper.dtd">

<mapper namespace="com.example.springsecurity.mapper.AuthMapper">

    <!--查询所有的权限-->

    <select id="findAll" resultType="com.example.springsecurity.domain.Auth">

        select * from auth

    </select>

</mapper>
AuthMapper.xml
第三步:修改配置类SecurityConfig,md5加密的工具类在此略(可在工具类的博客中查看)


package com.example.springsecurity.config;

import com.example.springsecurity.domain.Auth;

import com.example.springsecurity.handler.MyAuthenticationFailureHandler;

import com.example.springsecurity.handler.MyAuthenticationSuccessHandler;

import com.example.springsecurity.mapper.AuthMapper;

import com.example.springsecurity.service.UserService;

import com.example.springsecurity.util.Md5Utils;

import org.springframework.beans.factory.annotation.Autowired;

import org.springframework.context.annotation.Bean;

import org.springframework.security.config.annotation.authentication.builders.AuthenticationManagerBuilder;

import org.springframework.security.config.annotation.web.builders.HttpSecurity;

import org.springframework.security.config.annotation.web.configuration.WebSecurityConfigurerAdapter;

import org.springframework.security.config.annotation.web.configurers.ExpressionUrlAuthorizationConfigurer;

import org.springframework.security.core.Authentication;

import org.springframework.security.core.AuthenticationException;

import org.springframework.security.crypto.bcrypt.BCryptPasswordEncoder;

import org.springframework.security.crypto.password.NoOpPasswordEncoder;

import org.springframework.security.crypto.password.PasswordEncoder;

import org.springframework.security.web.authentication.AuthenticationFailureHandler;

import org.springframework.security.web.authentication.AuthenticationSuccessHandler;

import org.springframework.security.web.authentication.logout.LogoutHandler;

import org.springframework.security.web.authentication.logout.LogoutSuccessHandler;

import org.springframework.stereotype.Component;

import javax.servlet.ServletException;

import javax.servlet.http.HttpServletRequest;

import javax.servlet.http.HttpServletResponse;

import java.io.IOException;

import java.util.List;

@Component

public class SecurityConfig extends WebSecurityConfigurerAdapter {

    /**

     * 登录成功的处理

     */

    @Autowired

    private MyAuthenticationSuccessHandler successHandler;

    /**

     * 登录失败的处理

     */

    @Autowired

    private MyAuthenticationFailureHandler failureHandler;

    /**

     * 数据库验证用户信息

     */

    @Autowired

    private UserService userService;

    /**

     * 查询权限

     */

    @Autowired

    private AuthMapper authMapper;

    //配置加密的方式

    @Bean

    PasswordEncoder passwordEncoder() {

        return NoOpPasswordEncoder.getInstance();

    }

    //配置认证用户信息和授权

    @Override

    protected void configure(AuthenticationManagerBuilder auth) throws Exception {

        auth.userDetailsService(userService).passwordEncoder(new PasswordEncoder() {

            //对输入的密码加密,这里暂时不用

            @Override

            public String encode(CharSequence charSequence) {

                return null;

            }

            //加密密码与传入的密码对比

            @Override

            public boolean matches(CharSequence charSequence, String encodePassword) {

                //encodePassword是数据库的密码,charSequence是输入的密码

                return Md5Utils.md5((String)charSequence).equals(encodePassword);

            }

        });

    }

    //配置拦截请求资源

    @Override

    protected void configure(HttpSecurity http) throws Exception {

        ExpressionUrlAuthorizationConfigurer<HttpSecurity>.ExpressionInterceptUrlRegistry authorizeRequests = http

                //开启HttpSecurity配置

                .authorizeRequests();

                //指定路径

                //动态配置权限的授权

        List<Auth> authList = authMapper.findAll();

        for (Auth auth : authList) {

            authorizeRequests.antMatchers(auth.getUrl()).hasAuthority(auth.getAuth());

        }

        authorizeRequests.antMatchers("/login.html").permitAll()

                .antMatchers("/**").fullyAuthenticated()

                //配置认证模式

                .and().formLogin()

                .loginPage("/login.html")

                .loginProcessingUrl("/login")

                //登录成功的操作

                .successHandler(successHandler)

                //登录失败的操作

                .failureHandler(failureHandler)

                .and()

                .logout()

                .logoutUrl("/logout")

                //清除身份认证信息

                .clearAuthentication(true)

                //设置session失效

                .invalidateHttpSession(true)

                .addLogoutHandler(new LogoutHandler() {

                    @Override

                    public void logout(HttpServletRequest req, HttpServletResponse resp, Authentication auth) {}

                })

                .logoutSuccessHandler(new LogoutSuccessHandler() {

                    @Override

                    public void onLogoutSuccess(HttpServletRequest req, HttpServletResponse resp, Authentication auth) throws IOException, ServletException {

                        //退出成功后跳转到登录

                        resp.sendRedirect("/login.html");

                    }

                })

                //配置和登录相关的接口不需要认证

                .permitAll()

                .and()

                //关闭cors

                .csrf()

                .disable();

    }

}
也可以使用默认的加密方式,与md5的配置对比,关键代码如下


 //配置加密的方式

    @Bean

    PasswordEncoder passwordEncoder() {

        return new BCryptPasswordEncoder();

    }

    //配置认证用户信息和授权

    @Override

    protected void configure(AuthenticationManagerBuilder auth) throws Exception {

        auth.userDetailsService(userService);

    }
默认加密方式
第四步:创建UserService类


package com.example.springsecurity.service;

import com.example.springsecurity.domain.Auth;

import com.example.springsecurity.domain.User;

import com.example.springsecurity.mapper.UserMapper;

import org.springframework.beans.factory.annotation.Autowired;

import org.springframework.security.core.authority.SimpleGrantedAuthority;

import org.springframework.security.core.userdetails.UserDetails;

import org.springframework.security.core.userdetails.UserDetailsService;

import org.springframework.security.core.userdetails.UsernameNotFoundException;

import org.springframework.stereotype.Service;

import java.util.ArrayList;

import java.util.List;

@Service

public class UserService implements UserDetailsService {

    @Autowired

    private UserMapper mapper;

    @Override

    public UserDetails loadUserByUsername(String username) throws UsernameNotFoundException {

        //根据用户名查询用户的信息

        User user=mapper.loadUserByUsername(username);

        if(user==null){

            throw  new UsernameNotFoundException("用户不存在");

        }

        List<Auth> authList = mapper.findAuthByUsername(username);

        //赋予用户权限

        if(authList!=null&&authList.size()>0){

            List<SimpleGrantedAuthority> authorities = new ArrayList<>();

            for (Auth auth : authList) {

                authorities.add(new SimpleGrantedAuthority(auth.getAuth()));

            }

            user.setAuthorities(authorities);

        }

        //底层会根据数据库来查询用户信息,判断密码是否正确

        return user;

    }

}
第五步:这里使用了数据库验证,就可以对用户的登录信息进行细化,比如登录失败的原因。登录成功的处理和失败的处理配置修改如下:


package com.example.springsecurity.handler;

import com.example.springsecurity.domain.User;

import com.fasterxml.jackson.databind.ObjectMapper;

import org.springframework.security.core.Authentication;

import org.springframework.security.web.authentication.AuthenticationSuccessHandler;

import org.springframework.stereotype.Component;

import javax.servlet.ServletException;

import javax.servlet.http.HttpServletRequest;

import javax.servlet.http.HttpServletResponse;

import java.io.IOException;

import java.io.PrintWriter;

import java.util.HashMap;

import java.util.Map;

/**

 * @Author: yushizhong

 * @Date: 2020/1/7 10:11

 * @Title: 登录成功处理

 */

@Component

public class MyAuthenticationSuccessHandler implements AuthenticationSuccessHandler {

    @Override

    public void onAuthenticationSuccess(HttpServletRequest req, HttpServletResponse resp, Authentication auth) throws IOException, ServletException {

        //这里可以进行页面的跳转或返回json数据给客户端浏览器

        User principal = (User) auth.getPrincipal();//获取登录用户的信息

        principal.setPassword(null);

        resp.setContentType("application/json;charset=utf-8");

        PrintWriter out=resp.getWriter();

        resp.setStatus(200);

        Map<String,Object> map=new HashMap<>();

        map.put("status",200);

        map.put("msg",principal);

        ObjectMapper objectMapper = new ObjectMapper();

        out.write(objectMapper.writeValueAsString(map));

        out.flush();;

        out.close();

//        resp.sendRedirect("/");

    }

}
登录成功的处理


package com.example.springsecurity.handler;

import com.fasterxml.jackson.databind.ObjectMapper;

import org.springframework.security.authentication.*;

import org.springframework.security.core.AuthenticationException;

import org.springframework.security.web.authentication.AuthenticationFailureHandler;

import org.springframework.stereotype.Component;

import javax.servlet.ServletException;

import javax.servlet.http.HttpServletRequest;

import javax.servlet.http.HttpServletResponse;

import java.io.IOException;

import java.io.PrintWriter;

import java.util.HashMap;

import java.util.Map;

/**

 * @Author: yushizhong

 * @Date: 2020/1/7 10:10

 * @Title: 验证失败处理

 */

@Component

public class MyAuthenticationFailureHandler implements AuthenticationFailureHandler {

    @Override

    public void onAuthenticationFailure(HttpServletRequest req, HttpServletResponse resp, AuthenticationException e) throws IOException, ServletException {

        resp.setContentType("application/json;charset=utf-8");

        PrintWriter out=resp.getWriter();

        resp.setStatus(401);

        Map<String,Object> map=new HashMap<>();

        map.put("status",401);

        if(e instanceof LockedException){

            map.put("msg","账户被锁定,无法登录");

        }else if(e instanceof BadCredentialsException){

            map.put("msg","用户名或密码错误");

        }else if(e instanceof DisabledException){

            map.put("msg","账户被禁用,无法登录");

        }else if(e instanceof AccountExpiredException){

            map.put("msg","账户已过期,无法登录");

        }else if(e instanceof CredentialsExpiredException){

            map.put("msg","密码已过期,无法登录");

        }else{

            map.put("msg","登录异常,请联系管理员");

        }

        ObjectMapper objectMapper = new ObjectMapper();

        out.write(objectMapper.writeValueAsString(map));

        out.flush();;

        out.close();

//        resp.sendRedirect("/login.html");

    }

}
登录失败的处理
有了这些,不仅可以返回给用户具体的信息,也可以把这些信息记录到日志中。
第六步:由于这里对密码进行了加密,所有数据库中的密码也需要加密。启动项目进行测试,动态的配置和之前静态的配置的效果一样。
表数据如下,表结构可参考实体类:
*****************user表********************

*****************role表********************

*****************auth表********************
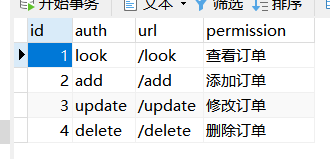
*****************user-role表********************

*****************role-auth表********************
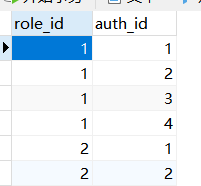
7.6 获取表单额外的参数
首先,在7.5的基础上,往login.html中添加一个输入框,name是identity


<p>

         <input type="text"  name="identify"  placeholder="身份">

</p>
接着,创建类MyAuthenticationDetails来获取额外的参数


package com.example.springsecurity.filter;

import org.springframework.security.web.authentication.WebAuthenticationDetails;

import javax.servlet.http.HttpServletRequest;

/**

 * @Author: yushizhong

 * @Date: 2020/1/7 16:05

 * @Title: 在登录什获取表单的其他参数,存到session中,方便后面使用

 */

public class MyAuthenticationDetails extends WebAuthenticationDetails {

    private String identify;

    public MyAuthenticationDetails(HttpServletRequest request) {

        super(request);

        identify = request.getParameter("identify");

        request.getSession().setAttribute("identify", identify);

        System.out.println("identify:" + identify);

    }

}
然后,在SecurityConfig类的登录失败的操作后面添加一行
.authenticationDetailsSource(authenticationDetailsSource)
最后,启动项目,进行测试,输入的额外信息在控制台打印了,对于这个信息可以存入redis,在登录验证的时候使用。
7.7 自定义图片验证码验证
图片验证码的在页面显示需要调用生成图片验证码的工具类,验证码生成后会先存入redis,在此略,这里只介绍如何进行验证。
首先定义一个图片验证码验证的过滤器ImgCodeFilter


package com.example.springsecurity.filter;

import com.example.springsecurity.exception.ImgException;

import com.example.springsecurity.handler.MyAuthenticationFailureHandler;

import org.springframework.beans.factory.annotation.Autowired;

import org.springframework.stereotype.Component;

import org.springframework.web.filter.OncePerRequestFilter;

import javax.servlet.FilterChain;

import javax.servlet.ServletException;

import javax.servlet.http.HttpServletRequest;

import javax.servlet.http.HttpServletResponse;

import java.io.IOException;

/**

 * @Author: yushizhong

 * @Date: 2020/1/9 10:24

 * @Title: 数字验证过滤器,可用在图片验证码验证

 */

@Component

public class ImgCodeFilter extends OncePerRequestFilter {

    @Autowired

    MyAuthenticationFailureHandler authenticationFailureHandler;

    @Override

    protected void doFilterInternal(HttpServletRequest request, HttpServletResponse response, FilterChain filterChain) throws ServletException, IOException {

        //从请求中获取请求地址和方式进行判断是否是登录请求验证图片验证码

        if("/login".equals(request.getRequestURI())&&"post".equalsIgnoreCase(request.getMethod())){

            try{

                verityCode(request);

            }catch (ImgException e){

                authenticationFailureHandler.onAuthenticationFailure(request,response,e);

            }

        }

        doFilter(request,response,filterChain);

    }

    //验证图片验证码

    public void verityCode(HttpServletRequest request) throws ImgException {

        //图片验证码的在页面显示需要调用生成图片验证码的工具类,验证码生成后会先存入redis,在此略

        //这里的1234是自定义的,在实际开发中是从redis获取

        if(!"1234".equals(request.getParameter("code"))){

            throw new ImgException("验证码错误");

        }

    }

}
定义一个图片验证的异常类


package com.example.springsecurity.exception;

import org.springframework.security.core.AuthenticationException;

/**

 * @Author: yushizhong

 * @Date: 2020/1/9 10:59

 * @Title: 验证码异常类

 */

public class ImgException extends AuthenticationException {

    public ImgException(String explanation) {

        super(explanation);

    }

}
在SecurityConfig配置类中注入过滤器,并把过滤器加入security


*********注入图片验证的过滤器

@Autowired

    private ImgCodeFilter imgCodeFilter;

**********在configure(HttpSecurity http)方法中把过滤器加到security

 //验证用户名密码之前进行过滤验证

        http.addFilterBefore(imgCodeFilter, UsernamePasswordAuthenticationFilter.class);
修改登录失败处理类,添加一个异常的判断,异常判断的代码如下


if(e instanceof LockedException){

            map.put("msg","账户被锁定,无法登录");

        }else if(e instanceof BadCredentialsException){

            map.put("msg","用户名或密码错误");

        }else if(e instanceof DisabledException){

            map.put("msg","账户被禁用,无法登录");

        }else if(e instanceof AccountExpiredException){

            map.put("msg","账户已过期,无法登录");

        }else if(e instanceof CredentialsExpiredException){

            map.put("msg","密码已过期,无法登录");

        }else if(e instanceof ImgException){

            map.put("msg",e.getMessage());

        }else{

            map.put("msg","登录异常,请联系管理员");

        }
修改登录页面,表单中加入输入框,name是code


  <p>

        <input type="text" name="code"  placeholder="验证码">

    </p>
启动项目进行测试,当输入验证码不是1234时会显示验证码错误,验证码就验证成功了。在这里的过滤器中从请求中获取了请求的部分参数,对参数进行处理,这个方法可以借鉴,同上7.6。
7.7 短信登录开发
1)表单登录与短信登录的认证流程图比对
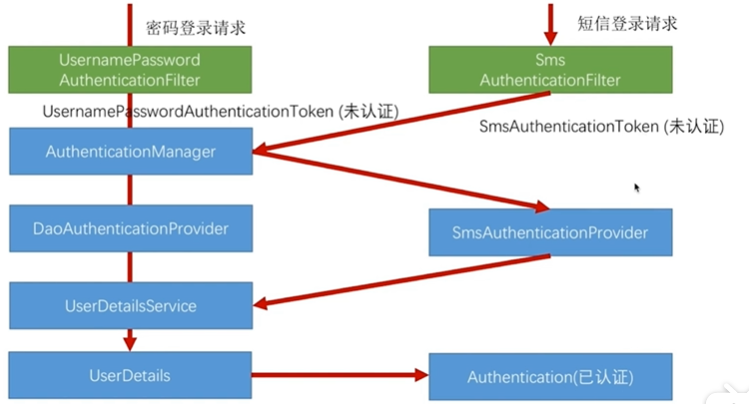
2)创建类SmsCodeAuthenticationToken,对应的是UsernamePasswordAuthenticationToken


package com.example.springsecurity.handler;

import org.springframework.security.authentication.AbstractAuthenticationToken;

import org.springframework.security.core.GrantedAuthority;

import java.util.Collection;

/**

 * @Author: yushizhong

 * @Date: 2020/1/9 14:38

 * @Title: 短信验证码token,对应UsernamePasswordAuthenticationToken

 */

public class SmsCodeAuthenticationToken extends AbstractAuthenticationToken {

    private static final long serialVersionUID = 500L;

    private final Object principal;

    public SmsCodeAuthenticationToken(Object mobile) {

        super((Collection)null);

        this.principal = mobile;

        this.setAuthenticated(false);

    }

    public SmsCodeAuthenticationToken(Object principal, Collection<? extends GrantedAuthority> authorities) {

        super(authorities);

        this.principal = principal;

        super.setAuthenticated(true);

    }

    public Object getCredentials() {

        return null;

    }

    public Object getPrincipal() {

        return this.principal;

    }

    public void setAuthenticated(boolean isAuthenticated) throws IllegalArgumentException {

        if (isAuthenticated) {

            throw new IllegalArgumentException("Cannot set this token to trusted - use constructor which takes a GrantedAuthority list instead");

        } else {

            super.setAuthenticated(false);

        }

    }

    public void eraseCredentials() {

        super.eraseCredentials();

    }

}
3)创建过滤器SmsCodeAuthenticationFilter,对应的是UsernamePasswordAuthenticationFilter


package com.example.springsecurity.filter;

import com.example.springsecurity.handler.SmsCodeAuthenticationToken;

import org.springframework.lang.Nullable;

import org.springframework.security.authentication.AuthenticationServiceException;

import org.springframework.security.core.Authentication;

import org.springframework.security.core.AuthenticationException;

import org.springframework.security.web.authentication.AbstractAuthenticationProcessingFilter;

import org.springframework.security.web.util.matcher.AntPathRequestMatcher;

import org.springframework.stereotype.Component;

import org.springframework.util.Assert;

import javax.servlet.http.HttpServletRequest;

import javax.servlet.http.HttpServletResponse;

/**

 * @Author: yushizhong

 * @Date: 2020/1/9 14:40

 * @Title: 短信验证码认证过滤器,对应UsernamePasswordAuthenticationFilter

 */

public class SmsCodeAuthenticationFilter extends AbstractAuthenticationProcessingFilter  {

    public static final String SPRING_SECURITY_FORM_MOBILE_KEY = "mobile";

    private String mobileParameter = "mobile";

    private boolean postOnly = true;

    public SmsCodeAuthenticationFilter() {

        super(new AntPathRequestMatcher("/mobile", "POST"));

    }

    public Authentication attemptAuthentication(HttpServletRequest request, HttpServletResponse response) throws AuthenticationException {

        if (this.postOnly && !request.getMethod().equals("POST")) {

            throw new AuthenticationServiceException("Authentication method not supported: " + request.getMethod());

        } else {

            String mobile = this.obtainMobile(request);

            if (mobile == null) {

                mobile = "";

            }

            mobile = mobile.trim();

            SmsCodeAuthenticationToken authRequest = new SmsCodeAuthenticationToken(mobile);

            this.setDetails(request, authRequest);

            return this.getAuthenticationManager().authenticate(authRequest);

        }

    }

    @Nullable

    protected String obtainMobile(HttpServletRequest request) {

        return request.getParameter(this.mobileParameter);

    }

    protected void setDetails(HttpServletRequest request, SmsCodeAuthenticationToken authRequest) {

        authRequest.setDetails(this.authenticationDetailsSource.buildDetails(request));

    }

    public void setMobileParameter(String mobileParameter) {

        Assert.hasText(mobileParameter, "Username parameter must not be empty or null");

        this.mobileParameter = mobileParameter;

    }

    public void setPostOnly(boolean postOnly) {

        this.postOnly = postOnly;

    }

    public final String getMobileParameter() {

        return this.mobileParameter;

    }

}
4)创建认证器SmsCodeAuthenticationProvider,对应的是DaoAuthenticationProvider


package com.example.springsecurity.handler;

import com.example.springsecurity.service.UserService;

import org.springframework.security.authentication.AuthenticationProvider;

import org.springframework.security.authentication.InternalAuthenticationServiceException;

import org.springframework.security.core.Authentication;

import org.springframework.security.core.AuthenticationException;

import org.springframework.security.core.userdetails.UserDetails;

/**

 * @Author: yushizhong

 * @Date: 2020/1/9 14:43

 * @Title: 短信验证码认证校验器,对应DaoAuthenticationProvider

 */

public class SmsCodeAuthenticationProvider implements AuthenticationProvider {

    private UserService userService;

    public UserService getUserService() {

        return userService;

    }

    public void setUserService(UserService userService) {

        this.userService = userService;

    }

    @Override

    public Authentication authenticate(Authentication authentication) throws AuthenticationException {

        SmsCodeAuthenticationToken smsCodeAuthenticationToken = (SmsCodeAuthenticationToken)authentication;

        UserDetails user = userService.loadUserByUsername((String)smsCodeAuthenticationToken.getPrincipal());

        if (user == null) {

            throw new InternalAuthenticationServiceException("无法获取用户信息");

        }

        //构造认证结果

        SmsCodeAuthenticationToken result = new SmsCodeAuthenticationToken(user, user.getAuthorities());

        result.setDetails(smsCodeAuthenticationToken.getDetails());

        return result;

    }

    @Override

    public boolean supports(Class<?> authentication) {

        return SmsCodeAuthenticationToken.class.isAssignableFrom(authentication);

    }

}
5)创建短信验证码过滤器SmsCodeFilter,用于验证短信验证码是否正确


package com.example.springsecurity.filter;

import com.example.springsecurity.exception.SmsCodeException;

import org.springframework.beans.factory.InitializingBean;

import org.springframework.beans.factory.annotation.Autowired;

import org.springframework.security.web.authentication.AuthenticationFailureHandler;

import org.springframework.stereotype.Component;

import org.springframework.util.AntPathMatcher;

import org.springframework.web.filter.OncePerRequestFilter;

import javax.servlet.FilterChain;

import javax.servlet.ServletException;

import javax.servlet.http.HttpServletRequest;

import javax.servlet.http.HttpServletResponse;

import java.io.IOException;

import java.util.HashSet;

import java.util.Set;

/**

 * @Author: yushizhong

 * @Date: 2020/1/9 15:00

 * @Title: 用于验证短信验证码是否正确

 */

@Component

public class SmsCodeFilter extends OncePerRequestFilter implements InitializingBean {

    @Autowired

    private AuthenticationFailureHandler authenticationFailureHandler;

    private Set<String> urls = new HashSet<>();

    private AntPathMatcher antPathMatcher = new AntPathMatcher();

    @Override

    public void afterPropertiesSet() throws ServletException {

        super.afterPropertiesSet();

        // 这里配置需要拦截的地址

        urls.add("/mobile");

    }

    @Override

    protected void doFilterInternal(HttpServletRequest httpServletRequest, HttpServletResponse httpServletResponse, FilterChain filterChain) throws ServletException, IOException {

        boolean action = false;

        //判断请求地址

        for (String url : urls) {

            if (antPathMatcher.match(url, httpServletRequest.getRequestURI())) {

                action = true;

                break;

            }

        }

        if (action) {

            try {

                validate(httpServletRequest);

            } catch (SmsCodeException e) {

                authenticationFailureHandler.onAuthenticationFailure(httpServletRequest, httpServletResponse, e);

                return;

            }

        }

        filterChain.doFilter(httpServletRequest, httpServletResponse);

    }

    private void validate(HttpServletRequest request) {

       String code= (String) request.getSession().getAttribute("code");

        String smsCodeRequest = request.getParameter("smsCode");

        if (code == null) {

            throw new SmsCodeException("短信验证码不存在");

        }

        if(!smsCodeRequest.equalsIgnoreCase(code)) {

            throw new SmsCodeException("短信验证码错误");

        }

        //清除session

//        request.getSession().removeAttribute("code");

    }

}
6)创建配置类SmsCodeAuthenticationSecurityConfig,将短信验证码认证的各个组件组合起来


package com.example.springsecurity.config;

import com.example.springsecurity.filter.SmsCodeAuthenticationFilter;

import com.example.springsecurity.handler.MyAuthenticationFailureHandler;

import com.example.springsecurity.handler.MyAuthenticationSuccessHandler;

import com.example.springsecurity.handler.SmsCodeAuthenticationProvider;

import com.example.springsecurity.service.UserService;

import org.springframework.beans.factory.annotation.Autowired;

import org.springframework.security.authentication.AuthenticationManager;

import org.springframework.security.config.annotation.SecurityConfigurerAdapter;

import org.springframework.security.config.annotation.web.builders.HttpSecurity;

import org.springframework.security.core.userdetails.UserDetailsService;

import org.springframework.security.web.DefaultSecurityFilterChain;

import org.springframework.security.web.authentication.UsernamePasswordAuthenticationFilter;

import org.springframework.stereotype.Component;

/**

 * @Author: yushizhong

 * @Date: 2020/1/9 14:57

 * @Title: 短信验证码认证安全设置,重写configure方法

 */

@Component

public class SmsCodeAuthenticationSecurityConfig extends SecurityConfigurerAdapter<DefaultSecurityFilterChain, HttpSecurity> {

    @Autowired

    private MyAuthenticationFailureHandler myAuthenticationFailHandler;

    @Autowired

    private MyAuthenticationSuccessHandler myAuthenticationSuccessHandler;

    @Autowired

    private UserService userService;

    @Override

    public void configure(HttpSecurity http) throws Exception {

        SmsCodeAuthenticationFilter smsCodeAuthenticationFilter = new SmsCodeAuthenticationFilter();

        smsCodeAuthenticationFilter.setAuthenticationManager(http.getSharedObject(AuthenticationManager.class));

        smsCodeAuthenticationFilter.setAuthenticationSuccessHandler(myAuthenticationSuccessHandler);

        smsCodeAuthenticationFilter.setAuthenticationFailureHandler(myAuthenticationFailHandler);

        SmsCodeAuthenticationProvider smsCodeAuthenticationProvider = new SmsCodeAuthenticationProvider();

        smsCodeAuthenticationProvider.setUserService(userService);

        http.authenticationProvider(smsCodeAuthenticationProvider)

               .addFilterBefore(smsCodeAuthenticationFilter, UsernamePasswordAuthenticationFilter.class);

    }

}
7)创建配置类 SecurityConfig


package com.example.springsecurity.config;

import com.example.springsecurity.domain.Auth;

import com.example.springsecurity.filter.ImgCodeFilter;

import com.example.springsecurity.filter.SmsCodeFilter;

import com.example.springsecurity.handler.MyAuthenticationFailureHandler;

import com.example.springsecurity.handler.MyAuthenticationSuccessHandler;

import com.example.springsecurity.mapper.AuthMapper;

import com.example.springsecurity.service.UserService;

import org.springframework.beans.factory.annotation.Autowired;

import org.springframework.context.annotation.Bean;

import org.springframework.context.annotation.Configuration;

import org.springframework.security.config.annotation.authentication.builders.AuthenticationManagerBuilder;

import org.springframework.security.config.annotation.web.builders.HttpSecurity;

import org.springframework.security.config.annotation.web.configuration.WebSecurityConfigurerAdapter;

import org.springframework.security.config.annotation.web.configurers.ExpressionUrlAuthorizationConfigurer;

import org.springframework.security.core.Authentication;

import org.springframework.security.crypto.password.NoOpPasswordEncoder;

import org.springframework.security.crypto.password.PasswordEncoder;

import org.springframework.security.web.authentication.UsernamePasswordAuthenticationFilter;

import org.springframework.security.web.authentication.logout.LogoutHandler;

import org.springframework.security.web.authentication.logout.LogoutSuccessHandler;

import org.springframework.stereotype.Component;

import javax.servlet.ServletException;

import javax.servlet.http.HttpServletRequest;

import javax.servlet.http.HttpServletResponse;

import java.io.IOException;

import java.util.List;

@Configuration

public class SecurityConfig extends WebSecurityConfigurerAdapter {

    /**

     * 登录成功的处理

     */

    @Autowired

    private MyAuthenticationSuccessHandler successHandler;

    /**

     * 登录失败的处理

     */

    @Autowired

    private MyAuthenticationFailureHandler failureHandler;

    /**

     * 数据库验证用户信息

     */

    @Autowired

    private UserService userService;

    @Autowired

    private SmsCodeFilter smsCodeFilter;

    @Autowired

    private SmsCodeAuthenticationSecurityConfig codeAuthenticationSecurityConfig;

    //配置加密的方式

    @Bean

    PasswordEncoder passwordEncoder() {

        return NoOpPasswordEncoder.getInstance();

    }

    //配置认证用户信息和授权

    @Override

    protected void configure(AuthenticationManagerBuilder auth) throws Exception {

        auth.userDetailsService(userService);

    }

    //配置拦截请求资源

    @Override

    protected void configure(HttpSecurity http) throws Exception {

        http

                //开启HttpSecurity配置

                .authorizeRequests()

                //指定路径

                .antMatchers("/login.html").permitAll()

                .antMatchers("/sendCode").permitAll()

                .antMatchers("/mobile").permitAll()

                .antMatchers("/**").fullyAuthenticated()

                //配置认证模式

                .and().formLogin()

                .loginPage("/login.html")

                .loginProcessingUrl("/mobile")

                //登录成功的操作

                .successHandler(successHandler)

                //登录失败的操作

                .failureHandler(failureHandler)

                .and()

                .logout()

                .logoutUrl("/logout")

                //清除身份认证信息

                .clearAuthentication(true)

                //设置session失效

                .invalidateHttpSession(true)

                .addLogoutHandler(new LogoutHandler() {

                    @Override

                    public void logout(HttpServletRequest req, HttpServletResponse resp, Authentication auth) {

                    }

                })

                .logoutSuccessHandler(new LogoutSuccessHandler() {

                    @Override

                    public void onLogoutSuccess(HttpServletRequest req, HttpServletResponse resp, Authentication auth) throws IOException, ServletException {

                        //退出成功后跳转到登录

                        resp.sendRedirect("/login.html");

                    }

                })

                //配置和登录相关的接口不需要认证

                .permitAll()

                .and()

                //关闭cors

                .csrf()

                .disable();

                //加载自己的配置

        http.apply(codeAuthenticationSecurityConfig);

        http.addFilterBefore(smsCodeFilter, UsernamePasswordAuthenticationFilter.class);

    }

}
8)创建登录成功和失败的处理类、异常类


package com.example.springsecurity.handler;

import com.example.springsecurity.domain.User;

import com.fasterxml.jackson.databind.ObjectMapper;

import org.springframework.security.core.Authentication;

import org.springframework.security.web.authentication.AuthenticationSuccessHandler;

import org.springframework.stereotype.Component;

import javax.servlet.ServletException;

import javax.servlet.http.HttpServletRequest;

import javax.servlet.http.HttpServletResponse;

import java.io.IOException;

import java.io.PrintWriter;

import java.util.HashMap;

import java.util.Map;

/**

 * @Author: yushizhong

 * @Date: 2020/1/7 10:11

 * @Title: 登录成功处理

 */

@Component

public class MyAuthenticationSuccessHandler implements AuthenticationSuccessHandler {

    @Override

    public void onAuthenticationSuccess(HttpServletRequest req, HttpServletResponse resp, Authentication auth) throws IOException, ServletException {

        //这里可以进行页面的跳转或返回json数据给客户端浏览器

        User principal = (User) auth.getPrincipal();//获取登录用户的信息

        principal.setPassword(null);

        resp.setContentType("application/json;charset=utf-8");

        PrintWriter out=resp.getWriter();

        resp.setStatus(200);

        Map<String,Object> map=new HashMap<>();

        map.put("status",200);

        map.put("msg",principal);

        ObjectMapper objectMapper = new ObjectMapper();

        out.write(objectMapper.writeValueAsString(map));

        out.flush();;

        out.close();

//        resp.sendRedirect("/");

    }

}
MyAuthenticationSuccessHandler


package com.example.springsecurity.handler;

import com.example.springsecurity.exception.ImgException;

import com.example.springsecurity.exception.SmsCodeException;

import com.fasterxml.jackson.databind.ObjectMapper;

import org.springframework.security.authentication.*;

import org.springframework.security.core.AuthenticationException;

import org.springframework.security.web.authentication.AuthenticationFailureHandler;

import org.springframework.stereotype.Component;

import javax.servlet.ServletException;

import javax.servlet.http.HttpServletRequest;

import javax.servlet.http.HttpServletResponse;

import java.io.IOException;

import java.io.PrintWriter;

import java.util.HashMap;

import java.util.Map;

/**

 * @Author: yushizhong

 * @Date: 2020/1/7 10:10

 * @Title: 验证失败处理

 */

@Component

public class MyAuthenticationFailureHandler implements AuthenticationFailureHandler {

    @Override

    public void onAuthenticationFailure(HttpServletRequest req, HttpServletResponse resp, AuthenticationException e) throws IOException, ServletException {

        resp.setContentType("application/json;charset=utf-8");

        PrintWriter out=resp.getWriter();

        resp.setStatus(401);

        Map<String,Object> map=new HashMap<>();

        map.put("status",401);

        if(e instanceof LockedException){

            map.put("msg","账户被锁定,无法登录");

        }else if(e instanceof BadCredentialsException){

            map.put("msg","用户名或密码错误");

        }else if(e instanceof DisabledException){

            map.put("msg","账户被禁用,无法登录");

        }else if(e instanceof AccountExpiredException){

            map.put("msg","账户已过期,无法登录");

        }else if(e instanceof CredentialsExpiredException){

            map.put("msg","密码已过期,无法登录");

        }else if(e instanceof SmsCodeException){

            map.put("msg",e.getMessage());

        }else{

            map.put("msg","登录异常,请联系管理员");

        }

        ObjectMapper objectMapper = new ObjectMapper();

        out.write(objectMapper.writeValueAsString(map));

        out.flush();;

        out.close();

//        resp.sendRedirect("/login.html");

    }

}
MyAuthenticationFailureHandler


package com.example.springsecurity.exception;

import org.springframework.security.core.AuthenticationException;

import org.springframework.stereotype.Component;

/**

 * @Author: yushizhong

 * @Date: 2020/1/9 15:03

 * @Title: 短信验证码异常类

 */

public class SmsCodeException  extends AuthenticationException {

    public SmsCodeException(String msg) {

        super(msg);

    }

}
SmsCodeException
9)创建登录页面login.html


<!DOCTYPE html>

<html lang="en">

<head>

    <meta charset="UTF-8">

    <title>登录</title>

</head>

<body>

<h3>手机号登录</h3>

<form method="post" action="/mobile">

    <p>

        <input type="text" name="mobile"  placeholder="手机号" value="15623637827">

    </p>

    <a href="/sendCode?mobile=15623637827">发送</a>

    <p>

        <input type="text" name="smsCode"  placeholder="短信验证码" >

    </p>

    <button  type="submit">登录</button>

</form>

</body>

</html>
10)创建短信发送的接口,这里的短信发送是模拟是,实际开发中改为短信发送即可。


package com.example.springsecurity.controller;

import com.example.springsecurity.util.CodeUtil;

import com.example.springsecurity.util.SendSms;

import org.springframework.stereotype.Controller;

import org.springframework.web.bind.annotation.RequestMapping;

import javax.servlet.http.HttpServletRequest;

@Controller

public class UserController {

    @RequestMapping("/sendCode")

    public void sendCode(HttpServletRequest request,String mobile){

        String code = CodeUtil.getCode(6);

        System.out.println("验证码:"+code);

//        SendSms.sendMsg(mobile,code);

       request.getSession().setAttribute("code",code);

    }

}
11)创建User类


package com.example.springsecurity.domain;

import lombok.Data;

import org.springframework.security.core.GrantedAuthority;

import org.springframework.security.core.authority.SimpleGrantedAuthority;

import org.springframework.security.core.userdetails.UserDetails;

import java.util.ArrayList;

import java.util.Collection;

import java.util.List;

@Data

public class User implements UserDetails {

    private Integer id;

    private String username;

    private String name;

    private String password;

    private boolean enabled;

    private boolean locked;

    private String role;

    private String mobile;

    private List<SimpleGrantedAuthority> authorities = new ArrayList<>();

    //获取用户的角色信息

    @Override

    public Collection<? extends GrantedAuthority> getAuthorities() {

        return authorities;

    }

    //获取用户的密码

    @Override

    public String getPassword() {

        return password;

    }

    //获取用户的用户名

    @Override

    public String getUsername() {

        return username;

    }

    //当前账户是否未过期

    @Override

    public boolean isAccountNonExpired() {

        return true;

    }

    //当前账户是否锁定

    @Override

    public boolean isAccountNonLocked() {

        return !locked;

    }

    //当前账户密码是否未过期

    @Override

    public boolean isCredentialsNonExpired() {

        return true;

    }

    //当前账户是否可用

    @Override

    public boolean isEnabled() {

        return enabled;

    }

}
12)创建UserService类,重写验证的方法loadUserByUsername。Usermapper和UserMapper.xml的代码也附加在下面。


package com.example.springsecurity.service;

import com.example.springsecurity.domain.Auth;

import com.example.springsecurity.domain.User;

import com.example.springsecurity.mapper.UserMapper;

import org.springframework.beans.factory.annotation.Autowired;

import org.springframework.security.core.authority.SimpleGrantedAuthority;

import org.springframework.security.core.userdetails.UserDetails;

import org.springframework.security.core.userdetails.UserDetailsService;

import org.springframework.security.core.userdetails.UsernameNotFoundException;

import org.springframework.stereotype.Service;

import java.util.ArrayList;

import java.util.List;

@Service

public class UserService implements UserDetailsService {

    @Autowired

    private UserMapper mapper;

    @Override

    public UserDetails loadUserByUsername(String mobile) throws UsernameNotFoundException {

        User user=mapper.loadUserByMobile(mobile);

        if(user==null){

            throw  new UsernameNotFoundException("用户不存在");

        }

        return user;

    }

}


package com.example.springsecurity.mapper;

import com.example.springsecurity.domain.Auth;

import com.example.springsecurity.domain.User;

import org.apache.ibatis.annotations.Mapper;

import java.util.List;

@Mapper

public interface UserMapper {

    User loadUserByMobile(String mobile);

}
UserMapper


<?xml version="1.0" encoding="UTF-8" ?>

<!DOCTYPE mapper PUBLIC "-//mybatis.org//DTD Mapper 3.0//EN"

        "http://mybatis.org/dtd/mybatis-3-mapper.dtd">

<mapper namespace="com.example.springsecurity.mapper.UserMapper">

    <select id="loadUserByMobile" resultType="com.example.springsecurity.domain.User">

         select * from user where mobile=#{mobile}

    </select>

</mapper>
UserMapper.xml
数据库中的表和数据参考User类填写即可。启动项目,点击发送按钮,在控制台复制验证码,进行登录测试。
8.SpringBoot整合WebSocket
8.1 WebSocket介绍和原理
WebSocket协议是一种全双工协议,服务端可以主动向客户端推送消息,可以是文本也可以是二进制数据,而且没有同源策略的限制,不存在跨域问题。这里主要介绍服务端向客户端推送消息。
第一步:导入依赖


 <dependency>

            <groupId>org.springframework.boot</groupId>

            <artifactId>spring-boot-starter-websocket</artifactId>

        </dependency>

        <dependency>

            <groupId>org.webjars</groupId>

            <artifactId>sockjs-client</artifactId>

            <version>1.1.2</version>

        </dependency>

        <dependency>

            <groupId>org.webjars</groupId>

            <artifactId>stomp-websocket</artifactId>

            <version>2.3.3</version>

        </dependency>

        <dependency>

            <groupId>org.webjars</groupId>

            <artifactId>jquery</artifactId>

            <version>3.3.1</version>

        </dependency>
第二步:创建WebSocket进行消息的推送


package com.example.websocket.controller;

import org.springframework.context.annotation.Bean;

import org.springframework.stereotype.Component;

import org.springframework.web.socket.server.standard.ServerEndpointExporter;

import javax.websocket.*;

import javax.websocket.server.ServerEndpoint;

import java.io.IOException;

import java.util.concurrent.CopyOnWriteArraySet;

/**

 * @Author: yushizhong

 * @Date: 2020/1/10 15:42

 * @Title: 描述

 */

@Component

@ServerEndpoint(value = "/ws/myWebSocket")

public class WebSocket {

    //每个客户端都会有相应的session,服务端可以发送相关消息

    private Session session;

    //J.U.C包下线程安全的类,主要用来存放每个客户端对应的webSocket连接,为什么说他线程安全。在文末做简单介绍

    private static CopyOnWriteArraySet<WebSocket> copyOnWriteArraySet = new CopyOnWriteArraySet<WebSocket>();

    @Bean

    public ServerEndpointExporter serverEndpointExporter() {

        return new ServerEndpointExporter();

    }

    /**

     * 打开连接。进入页面后会自动发请求到此进行连接

     * @param session

     */

    @OnOpen

    public void onOpen(Session session) {

        this.session = session;

        copyOnWriteArraySet.add(this);

        System.out.println("websocket有新的连接, 总数:"+ copyOnWriteArraySet.size());

    }

    /**

     * 用户关闭页面,即关闭连接

     */

    @OnClose

    public void onClose() {

        copyOnWriteArraySet.remove(this);

        System.out.println("websocket连接断开, 总数:"+ copyOnWriteArraySet.size());

    }

    /**

     * 测试客户端发送消息,测试是否联通

     * @param message

     */

    @OnMessage

    public void onMessage(String message) {

        System.out.println("websocket收到客户端发来的消息:"+message);

        sendMessage(message);

    }

    /**

     * 出现错误

     * @param session

     * @param error

     */

    @OnError

    public void onError(Session session, Throwable error) {

        System.out.println("发生错误:" + error.getMessage()+session.getId());

        error.printStackTrace();

    }

    /**

     * 用于发送给客户端消息(群发)

     * @param message

     */

    public void sendMessage(String message) {

        //遍历客户端

        for (WebSocket webSocket : copyOnWriteArraySet) {

            System.out.println("websocket广播消息:" + message);

            try {

                //服务器主动推送

                webSocket.session.getBasicRemote().sendText(message);

            } catch (Exception e) {

                e.printStackTrace();

            }

        }

    }

    /**

     * 用于发送给指定客户端消息,

     *

     * @param message

     */

    public void sendMessage(String sessionId, String message) throws IOException {

        Session session = null;

        WebSocket tempWebSocket = null;

        for (WebSocket webSocket : copyOnWriteArraySet) {

            if (webSocket.session.getId().equals(sessionId)) {

                tempWebSocket = webSocket;

                session = webSocket.session;

                break;

            }

        }

        if (session != null) {

            tempWebSocket.session.getBasicRemote().sendText(message);

        } else {

            System.out.println("没有找到你指定ID的会话:{}"+sessionId);

        }

    }

}

第三步:创建页面chat.html,导入相关的js文件


<!DOCTYPE html>

<html lang="en">

<head>

    <meta charset="UTF-8">

    <title>websocket</title>

    <script src="stomp.min.js"></script>

    <script src="sockjs.min.js"></script>

</head>

<body>

    <h2>测试连接websocket</h2>

    <p>

        连接url:

        <input type="text" value="ws://localhost:8080/ws/myWebSocket" id="url">

        <button onclick="openWeb()">打开连接</button>

    </p>

    <p>

        发送信息内容:

        <input type="text" id="message"><button onclick="send()">发送信息</button>

    </p>

    <hr>

    <p>消息区域</p>

    <p id="show"></p>

</body>

<script type="text/javascript">

    var url="";//socket所需要的地址

    var socket;//socket对象

    function openWeb(){

        createWebSocket(document.getElementById("url").value)

    }

    //创建WebSocket连接

    function createWebSocket(url){

        if ('WebSocket' in window) {

            socket = new WebSocket(url);

        } else {

            socket = new SockJS(url);

        }

        //连接打开事件

        socket.onopen = function() {

            console.log("Socket已连接到"+url);

        };

        //收到服务器消息后响应

        socket.onmessage = function(e) {

            console.log("收到服务端消息:"+e.data)

            document.getElementById("show").innerHTML+="<br>"+e.data

        };

        //连接关闭事件

        socket.onclose = function() {

            console.log("Socket已关闭连接");

        };

        //发生了错误事件

        socket.onerror = function() {

            console.log("Socket发生了错误");

        }

        //窗口关闭时,关闭连接

        window.unload=function() {

            socket.close();

        };

    }

    function send(){

        socket.send(document.getElementById("message").value)

    }

</script>

</html>
第四步:测试
启动项目,在浏览器输入localhost:8080/chat.html,然后点击连接wensocket进行连接,接着输入要发送的信息,点击发送就可以在下面看到发送的信息。
9.邮件发送
这里使用QQ邮箱进行发送邮件,所以要先开启POP3/SMTP服务或IMAP/SMTP服务,登陆网页版QQ邮箱,在设置中找到账户,在下面开启服务即可。
邮件发送使用SpringBoot的环境,所以下面在SpringBoot的环境中演示。
9.1准备工作
第一步:导入依赖


   <dependency>

            <groupId>org.springframework.boot</groupId>

            <artifactId>spring-boot-starter-mail</artifactId>

        </dependency>
第二步:配置邮件的基本信息


spring:

  mail:

    #邮件服务器的地址

    host: smtp.qq.com

    #邮件服务器的端口号,465或587

    port: 465

    #用户账号

    username: 1916008067@qq.com

    #用户密码,这个密码是开启服务后系统显示的密码

    password: zysferigqzobxqkfcej

    default-encoding: UTF-8

    properties:

      mail:

        #配置SSL连接

        smtp:

          socketFactory.class: javax.net.ssl.SSLSocketFactory

        #开启dubug

        debug: true
9.2简单邮件
第一步:创建一个MailService类


package com.example.demo;

import org.springframework.beans.factory.annotation.Autowired;

import org.springframework.core.io.FileSystemResource;

import org.springframework.mail.SimpleMailMessage;

import org.springframework.mail.javamail.JavaMailSender;

import org.springframework.mail.javamail.MimeMessageHelper;

import org.springframework.stereotype.Component;

import javax.mail.MessagingException;

import javax.mail.internet.MimeMessage;

import java.io.File;

@Component

public class MailService {

    @Autowired

    JavaMailSender javaMailSender;

    //简单邮件

    public void sendSimpleMail(String sender,String recipient,String cc,String title,String content){

        SimpleMailMessage message=new SimpleMailMessage();

        message.setFrom(sender);//发送者

        message.setTo(recipient);//收件人

        message.setCc(cc);//抄送人

        message.setSubject(title);//邮件主题

        message.setText(content);//邮件内容

        javaMailSender.send(message);

    }

}
第二步:在测试目录创建一个测试类Demo2ApplicationTests


package com.example.demo;

import freemarker.template.Configuration;

import freemarker.template.Template;

import org.junit.jupiter.api.Test;

import org.junit.runner.RunWith;

import org.springframework.beans.factory.annotation.Autowired;

import org.springframework.boot.test.context.SpringBootTest;

import org.springframework.test.context.junit4.SpringJUnit4ClassRunner;

import org.thymeleaf.TemplateEngine;

import org.thymeleaf.context.Context;

import java.io.File;

import java.io.StringWriter;

@RunWith(SpringJUnit4ClassRunner.class)

@SpringBootTest

class Demo2ApplicationTests {

    @Autowired

    private MailService mailService;

    @Test

    public void sendSimpleMail(){

        mailService.sendSimpleMail(

                "1916008067@qq.com","1953090026@qq.com",

                "1953090026@qq.com","通知","今天加班");

    }

}
第三步:运行测试方法,即可在收件人的邮箱看到邮件的信息。
9.3带附件的邮件
第一步:在MailService中添加一个方法


 //带附件的邮件

    public void sendAttachFileMail(String sender, String recipient, String cc,

                                   String title, String content, File file) {

        try {

            MimeMessage message = javaMailSender.createMimeMessage();

            MimeMessageHelper helper = new MimeMessageHelper(message, true);

            helper.setFrom(sender);//发送者

            helper.setTo(recipient);//收件人

            helper.setCc(cc);//抄送人

            helper.setSubject(title);//邮件主题

            helper.setText(content);//邮件内容

            helper.addAttachment(file.getName(),file);//文件

            javaMailSender.send(message);

        } catch (MessagingException e) {

            e.printStackTrace();

        }

    }
第二步:在测试类中添加方法


@Test

    public void sendAttachFileMail(){

        mailService.sendAttachFileMail(

                "1916008067@qq.com","1953090026@qq.com",

                "1953090026@qq.com","通知","今天加班",

                new File("D:\\layui-v2.5.5\\layui\\layui.js"));

    }
第三步:运行测试方法,即可在收件人的邮箱看到邮件的信息。
9.4带图片的附件
第一步:在MailService中添加一个方法


 //带图片的邮件

    public void sendMailWithImage(String sender, String recipient, String cc,String title,

                                  String content, String[] srcPath,String[] resId){

        if(srcPath.length!=resId.length){

            System.out.println("发送失败");

            return;

        }

        try{

            MimeMessage message = javaMailSender.createMimeMessage();

            MimeMessageHelper helper = new MimeMessageHelper(message, true);

            helper.setFrom(sender);//发送者

            helper.setTo(recipient);//收件人

            helper.setCc(cc);//抄送人

            helper.setSubject(title);//邮件主题

            helper.setText(content,true);//邮件内容,设置为true说明正文是html格式

            for (int i = 0; i <srcPath.length ; i++) {

                FileSystemResource res=new FileSystemResource(new File(srcPath[i]));

                helper.addInline(resId[i],res);

            }

            javaMailSender.send(message);

        }catch (MessagingException e){

            e.printStackTrace();

            System.out.println("发送失败");

        }

    }
第二步:在测试类中添加方法


 @Test

    public void sendMailWithImage(){

        mailService.sendMailWithImage(

                "1916008067@qq.com","1953090026@qq.com",

                "1953090026@qq.com","带图片的邮件",

                "<div><img src='cid:p01'/><img src='cid:p02'/></div>",

                new String[]{"D:\\1.png","D:\\2.png"},new String[]{"p01","p02"});

    }
第三步:运行测试方法,即可在收件人的邮箱看到邮件的信息。
9.5使用Freemarker模板的邮件
第一步:导入依赖


  <dependency>

            <groupId>org.springframework.boot</groupId>

            <artifactId>spring-boot-starter-freemarker</artifactId>

        </dependency>
第二步:在MailService中添加一个方法


//模板邮件

    public void sendHtmlMail(String sender, String recipient, String cc,

                                   String title, String content) {

        try {

            MimeMessage message = javaMailSender.createMimeMessage();

            MimeMessageHelper helper = new MimeMessageHelper(message, true);

            helper.setFrom(sender);//发送者

            helper.setTo(recipient);//收件人

            helper.setCc(cc);//抄送人

            helper.setSubject(title);//邮件主题

            helper.setText(content,true);//邮件内容

            javaMailSender.send(message);

        } catch (MessagingException e) {

            e.printStackTrace();

        }

    }
第三步:创建邮件模板
在资源目录下的static目录下新建一个名字为mailtemplate.ftl的模板文件


<div>邮箱激活</div>

<div>你的注册信息

    <table>

        <tr>

            <td>用户名</td>

            <td>${username}</td>

        </tr>

        <tr>

            <td>用户性别</td>

            <td>${sex}</td>

        </tr>

    </table>

    <div><a href="http://www.baidu.com">点击激活邮箱</a></div>

</div>
第四步:创建实体类User


package com.example.demo;

public class User {

    private String username;

    private String sex;

    public String getUsername() {

        return username;

    }

    public void setUsername(String username) {

        this.username = username;

    }

    public String getSex() {

        return sex;

    }

    public void setSex(String sex) {

        this.sex = sex;

    }

}
第五步:在测试类中添加方法


 @Test

    public void sendHtmlMail() {

        try {

            Configuration configuration = new Configuration(Configuration.VERSION_2_3_0);

            ClassLoader loader = Demo2Application.class.getClassLoader();

            configuration.setClassLoaderForTemplateLoading(loader,"static");

            Template template = configuration.getTemplate("mailtemplate.ftl");

            StringWriter writer = new StringWriter();

            User user=new User();

            user.setSex("男");

            user.setUsername("张三哈哈哈");

            template.process(user,writer);

            mailService.sendHtmlMail(

                    "1916008067@qq.com","1953090026@qq.com",

                    "1953090026@qq.com","模板文件",writer.toString()

            );

        } catch (Exception e) {

            e.printStackTrace();

        }

    }
第六步:运行测试方法,即可在收件人的邮箱看到邮件的信息。
9.6使用Thymeleaf模板的邮件
第一步:导入依赖


  <dependency>

            <groupId>org.springframework.boot</groupId>

            <artifactId>spring-boot-starter-thymeleaf</artifactId>

        </dependency>
第二步:创建模板文件
在资源目录的templates目录下新建一个名为mailtemplate.html的模板文件


<!DOCTYPE html>

<html lang="en" xmlns:th="http://www.thymeleaf.com">

<head>

    <meta charset="UTF-8">

    <title>邮件</title>

</head>

<body>

<div>邮箱激活</div>

<div>你的注册信息

    <table>

        <tr>

            <td>用户名</td>

            <td th:text="${username}"></td>

        </tr>

        <tr>

            <td>用户性别</td>

            <td th:text="${sex}"></td>

        </tr>

    </table>

    <div><a href="http://www.baidu.com">点击激活邮箱</a></div>

</div>

</body>

</html>
第三步:在测试类中添加方法
这里没有在MailService类中添加方法,而是直接使用了9.5里面新建的方法。


 @Autowired

    private TemplateEngine templateEngine;

    @Test

    public void sendHtmlMail2(){

        Context context = new Context();

        context.setVariable("username","赵柳");

        context.setVariable("sex","女");

        String mail=templateEngine.process("mailtemplate.html",context);

        mailService.sendHtmlMail(

                "1916008067@qq.com","1953090026@qq.com",

                "1953090026@qq.com","模板文件2",mail

        );

    }
第四步:运行测试方法,即可在收件人的邮箱看到邮件的信息。
10.定时任务
10.1使用@Schedule
SpringBoot中自带有定时任务,所以用法很简单。
第一步:在启动类上面开启定时任务的注解
@SpringBootApplication

@EnableScheduling//开启定时任务

public class Demo2Application {

    public static void main(String[] args) {

        SpringApplication.run(Demo2Application.class, args);

    }

}
第二步:配置定时任务。
1)fixedDelay
表示这个方法上一次执行完成后再过多少秒后再次执行,或者这次执行完毕后,距离下次执行需要多少秒。
创建两个定时任务,如下


package com.example.demo;

import org.springframework.scheduling.annotation.Scheduled;

import org.springframework.stereotype.Component;

import java.text.SimpleDateFormat;

import java.util.Date;

@Component

public class MyScheduleTask1 {

    SimpleDateFormat sdf=new SimpleDateFormat("yyyy-MM-dd HH:mm:ss");

    // fixedDelay:上一次执行完毕之后再过6秒再执行,或者这次执行完毕后,距离下次执行需要6s

    @Scheduled(fixedDelay = 6000)

    public void fixedDelay(){

        System.out.println("我是定时任务1,我6s后被再次执行,现在时间"+sdf.format(new Date()));

    }

    // fixedDelay:这次执行完毕后,距离下次执行需要10s

    @Scheduled(fixedDelay = 10000)

    public void fixedDelay2(){

        System.out.println("我是定时任务2,我10s后被再次执行,现在时间"+sdf.format(new Date()));

    }

}
运行结果如下
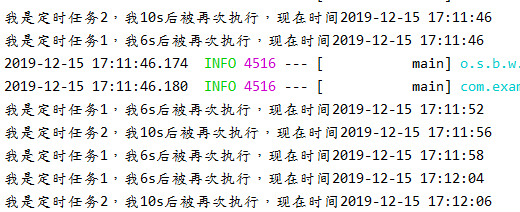
结果分析:创建了两个定时任务,首先fixedDelay的任务在首次启动时都会先执行一次,然后定时任务1执行完成后再过6秒再次执行,定时任务2执行完成后再过10秒再次执行,就这样一直循环执行。
2)fixedRate
上一次开始执行后每隔多少秒执行一次,可能再次执行时这个方法的上一次执行还没有完毕,代码如下


    // fixedDelay:上一次执行完毕之后再过6秒再执行,或者这次执行完毕后,距离下次执行需要6s

    @Scheduled(fixedDelay = 6000)

    public void fixedDelay(){

        System.out.println("我是定时任务1,我6s后被再次执行,现在时间"+sdf.format(new Date()));

    }

   // fixedRate:上一次开始执行后每隔8秒执行一次,可能再次执行时这个方法的上一次执行还没有完毕。

    @Scheduled(fixedRate = 8000)

    public void fixedRate(){

        System.out.println("我是定时任务2,我8s后被再次执行,现在时间"+sdf.format(new Date()));

    }
运行结果如下
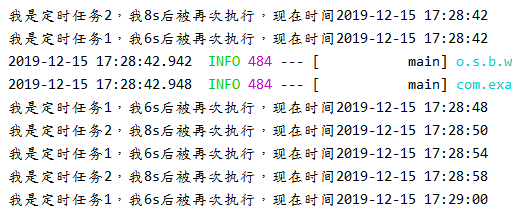
结果分析:创建了两个定时任务,首先fixedDelay和fixedRate的任务在首次启动时都会先执行一次,然后定时任务1执行完成后再过6秒再次执行,定时任务2首次执行后每隔8秒再次执行,此时这个方法可能还没有执行完毕,就这样一直循环执行。
3)initialDelay
在首次启动后延迟多少秒去执行,后面根据fixedDelay区执行,代码如下


   // fixedDelay:上一次执行完毕之后再过6秒再执行,或者这次执行完毕后,距离下次执行需要6s

    @Scheduled(fixedDelay = 6000)

    public void fixedDelay(){

        System.out.println("我是定时任务1,我6s后被再次执行,现在时间"+sdf.format(new Date()));

    }

    // initialDelay:在首次启动后延迟5s去执行,后面根据fixedDelay区执行

    int i=1;

    @Scheduled(initialDelay = 5000,fixedDelay = 10000)

    public void initialDelay(){

        if(i==1){

            System.out.println("我是定时任务2,我首次启动延迟5秒执行,现在时间"+sdf.format(new Date()));

            i++;

        }else{

            System.out.println("我是定时任务2,我不是首次启动,我执行完成后再过10秒执行,现在时间"+sdf.format(new Date()));

        }

    }
运行结果如下
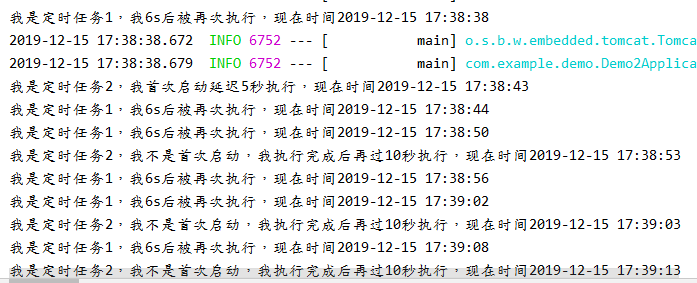
结果分析:创建了两个定时任务,首先fixedDelay的任务在首次启动时会先执行一次,然后定时任务1执行完成后再过6秒再次执行,定时任务2首次启动延迟5秒执行,然后执行完成后过10秒再次执行,就这样一直循环执行。
4)cron
隔某一段时间或在某个时间段触发,这个可以设置较长的时间,如一天触发一次、每个月15号触发等。
具体参数如下
完整字段:秒 分 小时 日 月 周 年。注意中间用空格隔开。
| 字段 | 允许值 | 允许的字符 | 解释 |
| 秒 | 0-59 | , - * / | *表示所有值,在分钟里表示每一分钟触发。在小时,日期,月份等里面表示每一小时,每一日,每一月。 |
| 分 | 0-59 | , - * / | ?表示不指定值。表示不关心当前位置设置的值。 比如不关心是周几,则周的位置填写?。 主要是由于日期跟周是有重复的所以两者必须有一者设置为? |
| 小时 | 0-23 | , - * / | - 表示区间。小时设置为10-12表示10,11,12点均会触发。 |
| 日 | 1-31 | , - * ? / L W C | ,表示多个值。 小时设置成10,12表示10点和12点会触发。 |
| 月 | 1-7或SUN-SAT | , - * / | / 表示递增触发。 5/15表示从第5秒开始,每隔15秒触发。 |
| 周 | 1-7或SUN-SAT | , - * ? / L C # |
L 表示最后的意思。 日上表示最后一天。星期上表示星期六或7。 L前加数据,表示该数据的最后一个。 星期上设置6L表示最后一个星期五。 6表示星期五 |
| 年 | 不写或1970-2099 | , - * / |
W表示离指定日期最近的工作日触发。15W离该月15号最近的工作日触发。 #表示每月的第几个周几。 6#3表示该月的第三个周五。 |
示例:


"0 0 12 * * ?" 每天中午12点触发

"0 15 10 ? * *" 每天上午10:15触发

"0 15 10 * * ?" 每天上午10:15触发

"0 15 10 * * ? *" 每天上午10:15触发

"0 15 10 * * ? 2005" 2005年的每天上午10:15触发

"0 * 14 * * ?" 在每天下午2点到下午2:59期间的每1分钟触发

"0 0/5 14 * * ?" 在每天下午2点到下午2:55期间的每5分钟触发

"0 0/5 14,18 * * ?" 在每天下午2点到2:55期间和下午6点到6:55期间的每5分钟触发

"0 0-5 14 * * ?" 在每天下午2点到下午2:05期间的每1分钟触发

"0 10,44 14 ? 3 WED" 每年三月的星期三的下午2:10和2:44触发

"0 15 10 ? * MON-FRI" 周一至周五的上午10:15触发

"0 15 10 15 * ?" 每月15日上午10:15触发

"0 15 10 L * ?" 每月最后一日的上午10:15触发

"0 15 10 ? * 6L" 每月的最后一个星期五上午10:15触发

"0 15 10 ? * 6L 2002-2005" 2002年至2005年的每月的最后一个星期五上午10:15触发

"0 15 10 ? * 6#3" 每月的第三个星期五上午10:15触发

每天早上6点     0 6 * * *

每两个小时     0 */2 * * *

晚上11点到早上8点之间每两个小时,早上八点    0 23-7/2,8 * * *

每个月的4号和每个礼拜的礼拜一到礼拜三的早上11点     0 11 4 * 1-3

1月1日早上4点     0 4 1 1 *
下面的定时任务是每一分钟触发一次


//cron:在某一段时间后触发,这个可以设置较长的时间,如一天、一年等

    @Scheduled(cron = "0 * * * * ?")

    public void cron(){

        System.out.println("我是定时任务,我每一分钟都触发,现在时间"+sdf.format(new Date()));

    }
运行结果如下

10.2使用Quartz
动态执行quartz的代码地址:https://github.com/zhongyushi-git/quartz-mange.git
Quartz可以创建简单或复杂的执行计划,支持数据库、集群、邮件等。
10.2.1导入依赖

10.2.2第一种方式(无参数)
1)创建定时任务类


package com.zys.mybatisplusdemo.config;

import org.springframework.stereotype.Component;

import java.text.SimpleDateFormat;

import java.util.Date;

@Component

public class MyJob {

    SimpleDateFormat sdf=new SimpleDateFormat("yyyy-MM-dd HH:mm:ss");

    public void sayHello(){

        System.out.println("MyJob:sayHello now "+sdf.format(new Date()));

    }

}
2)配置定时任务


package com.zys.mybatisplusdemo.config;

import org.quartz.SimpleTrigger;

import org.springframework.context.annotation.Bean;

import org.springframework.context.annotation.Configuration;

import org.springframework.scheduling.quartz.MethodInvokingJobDetailFactoryBean;

import org.springframework.scheduling.quartz.SchedulerFactoryBean;

import org.springframework.scheduling.quartz.SimpleTriggerFactoryBean;

@Configuration

public class QuartzConfig {

    @Bean

    public MethodInvokingJobDetailFactoryBean jobDetail(){

        MethodInvokingJobDetailFactoryBean bean=new MethodInvokingJobDetailFactoryBean();

        bean.setTargetBeanName("myJob");//指定job的实例名

        bean.setTargetMethod("sayHello");//指定要调用的方法

        return bean;

    }

    @Bean

    public SimpleTriggerFactoryBean simpleTrigger(){

        SimpleTriggerFactoryBean bean = new SimpleTriggerFactoryBean();

        bean.setJobDetail(jobDetail().getObject());

        bean.setRepeatCount(5);//任务循环次数

        bean.setStartDelay(6000);//任务启动延迟时间

        bean.setRepeatInterval(3000);//任务时间间隔

        return bean;

    }

    @Bean

    public SchedulerFactoryBean schedulerFactory(){

        SchedulerFactoryBean bean=new SchedulerFactoryBean();

        SimpleTrigger simpleTrigger = simpleTrigger().getObject();

        bean.setTriggers(simpleTrigger);

        return bean;

    }

}
运行结果是在启动后延迟6秒执行,然后每隔3秒再重复执行5次就不执行了。
10.2.3第二种方式(有参数)
1)创建定时任务类


package com.zys.mybatisplusdemo.config;

import org.quartz.JobExecutionContext;

import org.quartz.JobExecutionException;

import org.springframework.scheduling.quartz.QuartzJobBean;

import org.springframework.stereotype.Component;

import java.text.SimpleDateFormat;

import java.util.Date;

@Component

public class MyJob  extends QuartzJobBean {

    SimpleDateFormat sdf=new SimpleDateFormat("yyyy-MM-dd HH:mm:ss");

    private String name;

    public void setName(String name) {

        this.name = name;

    }

    @Override

    protected void executeInternal(JobExecutionContext jobExecutionContext) throws JobExecutionException {

        System.out.println("hello:"+name+",现在的时间是"+sdf.format(new Date()));

    }

}
2)配置定时任务


package com.zys.mybatisplusdemo.config;

import org.quartz.CronTrigger;

import org.quartz.JobDataMap;

import org.springframework.context.annotation.Bean;

import org.springframework.context.annotation.Configuration;

import org.springframework.scheduling.quartz.*;

@Configuration

public class QuartzConfig {

    @Bean

    public JobDetailFactoryBean jobDetail2(){

        JobDetailFactoryBean bean = new JobDetailFactoryBean();

        bean.setJobClass(MyJob.class);

        JobDataMap map=new JobDataMap();

        map.put("name","嘻嘻嘻");//传递参数

        bean.setJobDataMap(map);

        return  bean;

    }

    @Bean

    public CronTriggerFactoryBean cronTrigger(){

        CronTriggerFactoryBean bean=new CronTriggerFactoryBean();

        bean.setJobDetail(jobDetail2().getObject());

        bean.setCronExpression("* * * * * ?");//配置cron的表达式

        return bean;

    }

    @Bean

    public SchedulerFactoryBean schedulerFactory(){

        SchedulerFactoryBean bean=new SchedulerFactoryBean();

        CronTrigger cronTrigger= cronTrigger().getObject();

        bean.setTriggers(cronTrigger);

        return bean;

    }

}
运行结果是启动的时候就开始循环执行,每一秒执行一次。
11.批处理
Spring Batch是一个开源的、全面的、轻量级的批处理框架。
Spring Boot整合Spring Batch的步骤如下
第一步:导入相关的依赖,这里使用jdbc来插入数据


       <dependency>

            <groupId>org.springframework.boot</groupId>

            <artifactId>spring-boot-starter-batch</artifactId>

        </dependency>

        <dependency>

            <groupId>org.springframework.boot</groupId>

            <artifactId>spring-boot-starter-jdbc</artifactId>

        </dependency>

        <dependency>

            <groupId>com.alibaba</groupId>

            <artifactId>druid</artifactId>

            <version>1.1.10</version>

        </dependency>

        <dependency>

            <groupId>mysql</groupId>

            <artifactId>mysql-connector-java</artifactId>

        </dependency>
第二步:配置数据库基本信息


#数据源配置

spring.datasource.type: com.alibaba.druid.pool.DruidDataSource

spring.datasource.username: root

spring.datasource.password: root

spring.datasource.url: jdbc:mysql://localhost:3306/batch?useUnicode=true&useJDBCCompliantTimezoneShift=true&useLegacyDatetimeCode=false&serverTimezone=UTC

#项目启动时创建数据库的sql脚本

spring.datasource.schema=classpath:/org/springframework/batch/core/schema-mysql.sql

#项目启动时执行建表sql

spring.batch.initialize-schema=always

#禁止Spring Batch自动执行

spring.batch.job.enabled=false
第三步:在启动类加注解开启Spring Batch支持
@SpringBootApplication

@EnableBatchProcessing//开启Spring Batch支持

public class Demo2Application {

    public static void main(String[] args) {

        SpringApplication.run(Demo2Application.class, args);

    }

}
第四步:创建实体类User


package com.example.demo;

public class User {

    private Integer id;

    private String username;

    private String address;

    public Integer getId() {

        return id;

    }

    public void setId(Integer id) {

        this.id = id;

    }

    public String getUsername() {

        return username;

    }

    public void setUsername(String username) {

        this.username = username;

    }

    public String getAddress() {

        return address;

    }

    public void setAddress(String address) {

        this.address = address;

    }

}
第五步:在资源目录下创建data.csv文件,内容如下


id    username    address

1    张三    安徽

2    李四    武汉

3    赵武    十堰

4    李刘    河南

5    鹏程    黄石
第六步:创建数据库和表
创建一个数据库batch,然后在里面创建user表。
第七步:创建批处理配置类


package com.example.demo;

import org.springframework.batch.core.Job;

import org.springframework.batch.core.Step;

import org.springframework.batch.core.configuration.annotation.EnableBatchProcessing;

import org.springframework.batch.core.configuration.annotation.JobBuilderFactory;

import org.springframework.batch.core.configuration.annotation.StepBuilderFactory;

import org.springframework.batch.core.configuration.annotation.StepScope;

import org.springframework.batch.item.database.BeanPropertyItemSqlParameterSourceProvider;

import org.springframework.batch.item.database.JdbcBatchItemWriter;

import org.springframework.batch.item.file.FlatFileItemReader;

import org.springframework.batch.item.file.mapping.BeanWrapperFieldSetMapper;

import org.springframework.batch.item.file.mapping.DefaultLineMapper;

import org.springframework.batch.item.file.mapping.FieldSetMapper;

import org.springframework.batch.item.file.transform.DelimitedLineTokenizer;

import org.springframework.batch.item.file.transform.LineTokenizer;

import org.springframework.beans.factory.annotation.Autowired;

import org.springframework.context.annotation.Bean;

import org.springframework.context.annotation.Configuration;

import org.springframework.core.io.ClassPathResource;

import org.springframework.core.io.PathResource;

import javax.sql.DataSource;

@Configuration

public class CsvBatchJobConfig {

    @Autowired

    private JobBuilderFactory jobBuilderFactory;

    @Autowired

    private StepBuilderFactory stepBuilderFactory;

    @Autowired

    private DataSource dataSource;

    @Bean

    @StepScope

    public FlatFileItemReader<User> itemReader(){

        FlatFileItemReader<User> reader=new FlatFileItemReader<>();//加载文件

        reader.setLinesToSkip(1);//跳过data.csv的第一行

        reader.setResource(new ClassPathResource("data.csv"));//配置data.csv的位置

        reader.setLineMapper(new DefaultLineMapper<User>(){{

            setLineTokenizer(new DelimitedLineTokenizer(){{

                setNames("id","username","address");

                setDelimiter("\t");//列之间的分隔符

            }});

            setFieldSetMapper(new BeanWrapperFieldSetMapper<User>(){{

                 setTargetType(User.class);

            }});

        }});

        return reader;

    }

    @Bean

    public JdbcBatchItemWriter jdbcBatchItemWriter(){

        JdbcBatchItemWriter writer=new JdbcBatchItemWriter();//将数据写到数据库中

        writer.setDataSource(dataSource);

        writer.setSql("insert into user(id,username,address) values(:id,:username,:address)");//占位符格式 :属性名

        writer.setItemSqlParameterSourceProvider(new BeanPropertyItemSqlParameterSourceProvider());//属性和占位符映射

        return  writer;

    }

    @Bean

    public Step csvStep(){

        //2表示每读取两行就执行一次write操作

        return stepBuilderFactory.get("csvStep").<User,User>chunk(2)

                .reader(itemReader()).writer(jdbcBatchItemWriter()).build();

    }

    @Bean

    public Job csvJob(){

        return jobBuilderFactory.get("csvJob").start(csvStep()).build();

    }

}
第八步:创建HelloController类


package com.example.demo;

import org.springframework.batch.core.Job;

import org.springframework.batch.core.JobParametersBuilder;

import org.springframework.batch.core.JobParametersInvalidException;

import org.springframework.batch.core.launch.JobLauncher;

import org.springframework.batch.core.repository.JobExecutionAlreadyRunningException;

import org.springframework.batch.core.repository.JobInstanceAlreadyCompleteException;

import org.springframework.batch.core.repository.JobRestartException;

import org.springframework.beans.factory.annotation.Autowired;

import org.springframework.web.bind.annotation.GetMapping;

import org.springframework.web.bind.annotation.RestController;

@RestController

public class HelloController {

    @Autowired

    private JobLauncher jobLauncher;

    @Autowired

    private Job job;

    @GetMapping("/hello")

    public void hello(){

        try {

            jobLauncher.run(job,new JobParametersBuilder().toJobParameters());

        } catch (Exception e) {

            e.printStackTrace();

        }

    }

}
第九步:测试。
启动项目,在浏览器输入localgost:8080/hello,会发现数据库中多了好几张表,这些是用来记录批处理的执行状态的表。同时data.csv的数据也插入到了user表中。
12.Swagger2
Swagger是测试文档Api接口,方便团队之间的交流。Swagger2整合Spring Boot步骤如下:
第一步:导入依赖


      <dependency>

            <groupId>io.springfox</groupId>

            <artifactId>springfox-swagger2</artifactId>

            <version>2.9.2</version>

        </dependency>

        <dependency>

            <groupId>io.springfox</groupId>

            <artifactId>springfox-swagger-ui</artifactId>

            <version>2.9.2</version>

        </dependency>
第二步:创建配置类


package com.example.demo;

import org.springframework.context.annotation.Bean;

import org.springframework.context.annotation.Configuration;

import springfox.documentation.builders.ApiInfoBuilder;

import springfox.documentation.builders.PathSelectors;

import springfox.documentation.builders.RequestHandlerSelectors;

import springfox.documentation.service.Contact;

import springfox.documentation.spi.DocumentationType;

import springfox.documentation.spring.web.plugins.Docket;

import springfox.documentation.swagger2.annotations.EnableSwagger2;

@Configuration

@EnableSwagger2//开启Swagger2

public class SwaggerConfig {

    @Bean

    public Docket docket(){

        return new Docket(DocumentationType.SWAGGER_2).select()

                //配置apis要扫描的controlelr的位置

                .apis(RequestHandlerSelectors.basePackage("com.example.demo.controller"))

                //配置路径

                .paths(PathSelectors.any())

                //构建文件的基本信息

                .build().apiInfo(

                        new ApiInfoBuilder().description("微微一笑接口测试文档")

                                .contact(new Contact("哈哈哈","https://github.com.lenve","1916008067@qq.com"))

                        .version("v1.1.0")

                        .title("API测试文档")

                        .license("Apache2.0")

                        .licenseUrl("http://www.apache.org.licenses/LICENSE-2.0")

                        .build());

    }

}
第三步:创建开发接口


package com.example.demo.controller;

import com.example.demo.User;

import io.swagger.annotations.*;

import org.springframework.web.bind.annotation.*;

import springfox.documentation.annotations.ApiIgnore;

@RestController

@Api(tags = "用户接口")//描述UserController的信息

public class UserController {

    @ApiOperation(value = "查询用户",notes = "根据id查询用户")

    @ApiImplicitParam(paramType = "path",name="id",value = "用户id",required = true)

    @GetMapping("/user/query/{id}")

    public String getUserById(@PathVariable Integer id) {

        return "/user/"+id;

    }

    @ApiResponses({

            @ApiResponse(code=200,message="删除成功"),

            @ApiResponse(code=500,message="删除失败")})

    @ApiOperation(value = "删除用户",notes = "根据id删除用户")

    @DeleteMapping("/user/delete/{id}")

    public Integer deleteUserById(@PathVariable Integer id) {

        return id;

    }

    @ApiOperation(value = "添加用户",notes = "添加一个用户,传入用户名和性别")

    @ApiImplicitParams({

            @ApiImplicitParam(paramType = "query",name="username",value = "用户名",required = true,defaultValue = "张三"),

            @ApiImplicitParam(paramType = "query",name="sex",value = "性别",required = true,defaultValue = "女")

    })

    @PostMapping("/user")

    public String addUser(@RequestParam String username,@RequestParam String sex){

        return username+","+sex;

    }

    @ApiOperation(value="修改用户",notes = "根据传入的用户信息修改用户")

    @PutMapping("/user")

    public String updateUser(@RequestBody User user){

        return user.toString();

    }

    @GetMapping("/ignore")

    @ApiIgnore

    public void ignoreMethod(){}

}
第四步:测试。
启动项目,在浏览器输入http://localhost:8080/swagger-ui.html就可以看到接口的信息,展开接口,就能看到所有的接口详细信息。
说明:
@ApiOperation 描述方法的基本信息,value对方法简短描述,note对方法做备注
@ApiImplicitParam 描述方法的参数,paramType是参数类型,用path的获取方式是@PathVariable,query的获取方式是@RequestParam,header的获取方式是@RequestHeader、body、form;name表示参数名称,value是参数的描述,required是否必填,defaultValue是默认值;如果是多个参数,可以使用@ApiImplicitParams,里面放多个@ApiImplicitParam
@ApiResponses是响应结果,code是响应码,message是描述信息,@ApiResponses同上
@ApiIgnore 忽略某个接口文档
13.数据效验
除了前端要进行数据校验,后端也可能需要校验,与springboot整合步骤下面分别介绍。
1)普通校验
第一步:导入依赖


     <dependency>

            <groupId>org.springframework.boot</groupId>

            <artifactId>spring-boot-starter-validation</artifactId>

        </dependency>
第二步:在资源根目录下创建配置文件ValidationMessages.properties


user.name.size=用户名长度在5到10之间

user.address.notnull=用户地址不能为空

user.age.size=年龄输入不正确

user.email.notnull=邮箱不能为空

user.emali.pattern=邮箱格式不正确
第三步:创建实体类User


package com.example.demo;

import javax.validation.constraints.*;

public class User {

    @Size(min=5,max=10,message = "{user.name.size}")

    private String name;

    @NotNull(message = "{user.address.notnull}")

    private String address;

    @DecimalMin(value = "1",message = "{user.age.size}")

    @DecimalMax(value = "200",message = "{user.age.size}")

    private int age;

    @Email(message = "{user.email.pattern}")

    @NotNull(message = "{user.email.notnull}")

    private String email;

    public String getName() {

        return name;

    }

    public void setName(String name) {

        this.name = name;

    }

    public String getAddress() {

        return address;

    }

    public void setAddress(String address) {

        this.address = address;

    }

    public int getAge() {

        return age;

    }

    public void setAge(int age) {

        this.age = age;

    }

    public String getEmail() {

        return email;

    }

    public void setEmail(String email) {

        this.email = email;

    }

}
第四步:创建类UserController


package com.example.demo.controller;

import com.example.demo.User;

import org.springframework.validation.BindingResult;

import org.springframework.validation.ObjectError;

import org.springframework.validation.annotation.Validated;

import org.springframework.web.bind.annotation.RequestMapping;

import org.springframework.web.bind.annotation.RestController;

import java.util.ArrayList;

import java.util.List;

@RestController

public class UserController {

    @RequestMapping("/user")

    public List<String> addUser(@Validated User user, BindingResult result){

        //对user做数据校验,result保存出错信息

        List<String>  errors=new ArrayList<>();

        if(result.hasErrors()){

            List<ObjectError> allErrors = result.getAllErrors();

            for (ObjectError error : allErrors) {

                errors.add(error.getDefaultMessage());

            }

        }

        return errors;

    }

}
第五步:测试。
启动项目,在浏览器输入localhost:8080/user,后面可以自己拼接参数进行测试,如?name=1.
2)分组校验
第一步:在上面前两步的基础上,创建两个接口ValidationGroup1和2


package com.example.demo;

public interface ValidationGroup1 {

}

package com.example.demo;

public interface ValidationGroup2 {

}
第二步:修改User类


//不同的属性指定不同的分组来进行不同的验证

@Size(min=5,max=10,message = "{user.name.size}",groups = ValidationGroup1.class)

    private String name;

    @NotNull(message = "{user.address.notnull}",groups = ValidationGroup2.class)

    private String address;

    @DecimalMin(value = "1",message = "{user.age.size}")

    @DecimalMax(value = "200",message = "{user.age.size}")

    private int age;

    @Email(message = "{user.email.pattern}")

    @NotNull(message = "{user.email.notnull}",groups ={ValidationGroup1.class,ValidationGroup2.class,} )
第三步:修改UserController类


//设置使用ValidationGroup1分组的校验规则进行验证

public List<String> addUser(@Validated(ValidationGroup1.class) User user, BindingResult result)
第四步:测试。测试同上,自由测试。
14.SpringBoot项目打包与部署
springboot项目想要在tomcat服务器上运行,必须添加配置:
14.1继承并重写
让启动类继承SpringBootServletInitializer,并重写configure方法,关键代码如下
@SpringBootApplication

public class UploadDemoApplication extends SpringBootServletInitializer {

    public static void main(String[] args) {

        SpringApplication.run(UploadDemoApplication.class, args);

    }

    @Override

    protected SpringApplicationBuilder configure(SpringApplicationBuilder builder) {

        return builder.sources(this.getClass());

    }

}
14.2修改pom文件
第一步:在pom文件中添加打包方式为war
   <groupId>com.example</groupId>

    <artifactId>upload-demo</artifactId>

    <version>0.0.1-SNAPSHOT</version>

    <name>upload-demo</name>

    <!--配置打包方式war-->

    <packaging>war</packaging>

    <description>Demo project for Spring Boot</description>
第而步:修改tomcat依赖
由于springboot有内置的tomcat,所以在外部tomcat中部署时,必须对内置的tomcat进行设置,有两种方式:
1)移除内置的tomcat
在web的依赖中移除tomcat,并添加servlet依赖
      <dependency>

            <groupId>org.springframework.boot</groupId>

            <artifactId>spring-boot-starter-web</artifactId>

            <!--移除内嵌的tomcat-->

            <exclusions>

                <exclusion>

                    <groupId>org.springframework.boot</groupId>

                    <artifactId>spring-boot-starter-tomcat</artifactId>

                </exclusion>

            </exclusions>

        </dependency>

        <!--servlet的 api-->

        <dependency>

            <groupId>javax.servlet</groupId>

            <artifactId>javax.servlet-api</artifactId>

            <scope>provided</scope>

        </dependency>
2)修改tomcat的使用范围
我们在开发时需要内置的tomcat,而在部署时不需要,就可以设置tomcat只在编译和测试时生效。
<dependency>

    <groupId>org.springframework.boot</groupId>

    <artifactId>spring-boot-starter-tomcat</artifactId>

    <scope>provided</scope>

</dependency>
在打包时,在这两种方式选择一种即可,本人觉得第二种方式更简单。
第三步:在build中指定打包的项目名称
 <build>

        <finalName>upload-demo</finalName>

        <plugins>

            <plugin>

                <groupId>org.springframework.boot</groupId>

                <artifactId>spring-boot-maven-plugin</artifactId>

            </plugin>

        </plugins>

    </build>
要注意,tomcat进行部署的时候,访问需要带项目名称,所以就指定了打包后的名称。为了在开发环境和正式环境的一致性,请在application.properties文件中配置访问接口时带指定的路径(或项目名)。配置后在开发环境访问接口时,必须加配置的路径才能访问。
server.servlet.context-path=/upload-demo
14.3打包部署
清理项目,进行打包

第四步:把这个war包放到tomcat的webapps中,然后启动,访问即可。(需带项目名称)
SpringBoot整合开发的更多相关文章
- springboot整合mybaits注解开发
springboot整合mybaits注解开发时,返回json或者map对象时,如果一个字段的value为空,需要更改springboot的配置文件 mybatis: configuration: c ...
- 基于SpringBoot从零构建博客网站 - 技术选型和整合开发环境
技术选型和整合开发环境 1.技术选型 博客网站是基于SpringBoot整合其它模块而开发的,那么每个模块选择的技术如下: SpringBoot版本选择目前较新的2.1.1.RELEASE版本 持久化 ...
- Springboot整合elasticsearch以及接口开发
Springboot整合elasticsearch以及接口开发 搭建elasticsearch集群 搭建过程略(我这里用的是elasticsearch5.5.2版本) 写入测试数据 新建索引book( ...
- SpringBoot 整合 Mybatis 进行CRUD测试开发
今天来和大家分享下 Spring Boot 整合 MyBatis 的 CRUD 测试方法开发.因为 MyBaits 有两种开发形式,一种基于注解,一种基于 xml . SpringBoot配置文件也有 ...
- 小D课堂-SpringBoot 2.x微信支付在线教育网站项目实战_1-1.SpringBoot整合微信支付开发在线教育视频站点介绍
笔记 第一章项目介绍和前期准备 1.SpringBoot整合微信支付开发在线教育视频站点介绍 简介: 课程介绍,和小D课堂在线教育项目搭建开发 1.课程大纲介绍 2.微信支付项 ...
- Springboot整合MongoDB的Docker开发,其它应用也类似
1 前言 Docker是容器开发的事实标准,而Springboot是Java微服务常用框架,二者必然是会走到一起的.本文将讲解如何开发Springboot项目,把它做成Docker镜像,并运行起来. ...
- springboot整合mybatis(SSM开发环境搭建)
0.项目结构: ---------------------方法一:使用mybatis官方提供的Spring Boot整合包实现--------------------- 1.application.p ...
- springboot整合elasticJob实战(纯代码开发三种任务类型用法)以及分片系统,事件追踪详解
一 springboot整合 介绍就不多说了,只有这个框架是当当网开源的,支持分布式调度,分布式系统中非常合适(两个服务同时跑不会重复,并且可灵活配置分开分批处理数据,贼方便)! 这里主要还是用到zo ...
- Java开发学习(三十九)----SpringBoot整合mybatis
一.回顾Spring整合Mybatis Spring 整合 Mybatis 需要定义很多配置类 SpringConfig 配置类 导入 JdbcConfig 配置类 导入 MybatisConfig ...
随机推荐
- Flink-v1.12官方网站翻译-P021-State & Fault Tolerance-overview
状态和容错 在本节中,您将了解Flink为编写有状态程序提供的API.请看一下Stateful Stream Processing来了解有状态流处理背后的概念. 下一步去哪里? Working wit ...
- Python3内置类型有哪些?
摘要:Python3目前已经成为主流,和版本2天壤之别,关于Python3的内置类型你了解吗? 本文将专注于解释器支持的内置类型,基于版本3.9.1进行讲解. 内置的主要类型是numerics.seq ...
- Jenkins 持续集成测试工具
一.Jenkins(hudson)流程 创建job 执行job 通知机制 二.两种执行策略 定时执行:每隔一段时间执行一下(适合UI和接口测试的执行) 监控代码库执行:单元测试的执行模式(适合单元测试 ...
- ASP.NET 部署IIS后如何访问共享目录文件
1.我的电脑-->管理-->系统工具-->本地用户和组-->用户-->右键新建用户-->创建一个与远程文件夹相同的账号密码! 如下图: 以上为部署接口服务器中的用户 ...
- Kibana 地标图可视化
ElasticSearch 可以使用 ingest-geoip 插件可以在 Kibana 上对 IP 进行地理位置分析, 这个插件需要 Maxmind 的 GeoLite2 City,GeoLite2 ...
- Chapter Zero 0.1.3 其他单元设备以及运作流程
其他单元设备 五大单元中的控制单元.算数逻辑段元都被整合到CPU的封装中, 但其实系统单元中,不止有CPU(控制单元.算数逻辑单元), 计算机单元还有哪些? 系统单元:系统单元包括CPU.主存储器(内 ...
- Linux系统CentOS进入单用户模式和救援模式详解
一.概述 目前在运维日常工作中,经常会遇到服务器异常断电.忘记root密码.系统引导文件损坏无法进入系统等等操作系统层面的问题,给运维带来诸多不便,现将上述现象的解决方法和大家分享一下,本次主要以Ce ...
- C++:Process returned -1073741571 (0xC00000FD)
启动程序无法输入,然后崩溃报错Process returned -1073741571 (0xC00000FD) 原因: 栈溢出了 栈的默认内存空间为1M,如果函数中定义的数组太大会导致内存溢出. 解 ...
- Codeforces 11D A Simple Task 统计简单无向图中环的个数(非原创)
太难了,学不会.看了两天都会背了,但是感觉题目稍微变下就不会了.dp还是摸不到路子. 附ac代码: 1 #include<iostream> 2 #include<cstdio> ...
- HDU2837 Calculation(指数循环节)题解
题意: 已知\(f(0)=1,f(n)=(n\%10)^{f(n/10)}\),求\(f(n)\mod m\) 思路: 由扩展欧拉定理可知:当\(b>=m\)时,\(a^b\equiv a^{b ...
