spring的AspectJ基于XML和注解(前置、后置、环绕、抛出异常、最终通知)
1、概念
(1)AspectJ是一个基于Java语言的AOP框架
(2)Spring2.0以后新增了对AspectJ切入点表达式的支持
(3)AspectJ是AspectJ1.5的新增功能,通过JDK5注解技术,允许在Bean类中定义切面。新版本的Spring框架建议使用AspectJ方式来开发AOP
2、切入点表达式
(1)execution():用语描述方法
语法:execution(修饰符、返回值、包、类、方法(参数)、异常)
修饰符:一般省略
public:公共方法
*:任意
返回值
void:没有返回值
String:返回值为字符串
*:返回值任意
方法:不能省略
参数
(..)参数任意
(2)案例:
<aop:pointcut id="myPointCut" expression="execution(* pers.zhb.proxy.*.*(..))"></aop:pointcut>
(3)其他表达式
within:匹配包或者子包中的方法
this:匹配接口中代理对象中的方法
target:匹配实现接口的目标对象的方法
args:匹配参数格式符合标准的方法
bean:对指定bean所有的方法
2、AspectJ通知类型
(1)aop联盟定义通知类型:具有特性接口,必须实现,从而确定方法名称。
(2)aspectj通知类型:只定义类型名称。已经方法格式。
before:前置通知(应用:各种校验)
在方法执行前执行,如果通知抛出异常,阻止方法运行
afterRetuming:后置通知(应用:常规数据处理)
方法正常返回后执行,如果方法中抛出异常,通知无法执行
必须在方法执行后才执行,所以可以获得方法的返回值
around:环统通知(应用:十分强大,可以做任何事情)
方法执行前后分别执行,可以阻止方法的执行。
必须手动执行目标方法
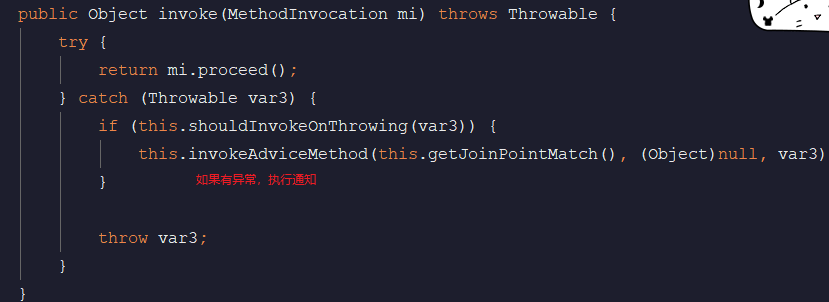
afterThrowing:抛出异常通知(应用:包装异常信息)
方法抛出异常后执行,如果方法没有抛出异常,无法执行
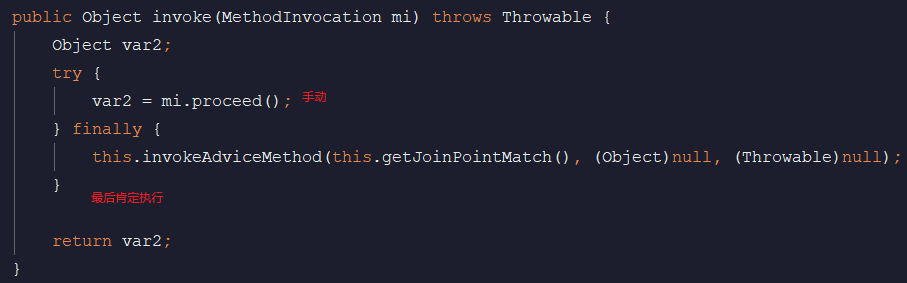
after最终通知(应用:清理现场)
方法执行完毕后执行,无论方法中是否出现异常
3、导入jar包(四个)
aop联盟规范

spring aop实现

aspect规范

spring aspect实现

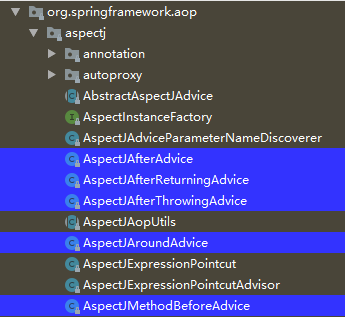
4、源码
(1)AspectJAfterThrowingAdvice
(2)AspectJAfterAdvice
5、基于XML文件的配置(前置通知)
(1)目标类的接口和实现类:
public interface StudentService {

     void addStudent();

     void updateStudent();

     void deleteStudent();

}
public class StudentServiceImpl implements StudentService {

    @Override

    public void addStudent() {

        System.out.println("addStudent");

    }

    @Override

    public void updateStudent() {

        System.out.println("updateStudent");

    }

    @Override

    public void deleteStudent() {

        System.out.println("deleteStudent");

    }

}
(2)切面类(含有通知):
public class MyAspect {

    public void before(JoinPoint joinPoint){

        System.out.println("前置通知:"+ joinPoint.getSignature().getName());

    }

}
(3)配置文件:
<?xml version="1.0" encoding="UTF-8"?>

<beans xmlns:xsi="http://www.w3.org/2001/XMLSchema-instance"

       xmlns:aop="http://www.springframework.org/schema/aop"

       xmlns="http://www.springframework.org/schema/beans"

       xsi:schemaLocation="http://www.springframework.org/schema/beans

       http://www.springframework.org/schema/beans/spring-beans.xsd

       http://www.springframework.org/schema/aop

       http://www.springframework.org/schema/aop/spring-aop.xsd">

    <!--目标类-->

    <bean id="studentService" class="pers.zhb.aspectxml.StudentServiceImpl"></bean>

    <!--切面类-->

    <bean id="myAspect" class="pers.zhb.aspectxml.MyAspect"></bean>

    <!--aop编程

    将切面类声明为切面,从而获得通知(方法)

    ref:切面类引用

    -->

    <aop:config>

        <aop:aspect ref="myAspect">

            <!--引入切面类,从中获得通知(方法)

                expression:切入点表达式

                id:名称,用于其他通知引用

            -->

            <aop:pointcut id="myPointCut" expression="execution(* pers.zhb.aspectxml.StudentServiceImpl.*(..))"></aop:pointcut>

            <!--

            method:通知,即方法名

            pointcut:切入点表达式,此表达式只能当前通知使用

            pointcut-ref:切入点的引用,可以和其它通知共享切入点

            -->

            <aop:before method="before" pointcut-ref="myPointCut"></aop:before>

        </aop:aspect>

    </aop:config>

</beans>
(4)测试类:
public class TestAspectXml {

    public static void main(String[] args) {

        ApplicationContext applicationContext=new

                ClassPathXmlApplicationContext("applicationContext.xml");

        //获得目标类

        pers.zhb.aspectxml.StudentService studentService= (StudentService) applicationContext.getBean("studentService");

        studentService.addStudent();

        studentService.deleteStudent();

        studentService.updateStudent();

    }

}
前置通知:addStudent

addStudent

前置通知:deleteStudent

deleteStudent

前置通知:updateStudent

updateStudent
6、基于XML文件的配置(后置通知)
(1)定义接口和接口的实现类:
public interface StudentService {

     void addStudent();

     void updateStudent();

     String deleteStudent();

}
public class StudentServiceImpl implements StudentService {

    @Override

    public void addStudent() {

        System.out.println("addStudent");

    }

    @Override

    public void updateStudent() {

        System.out.println("updateStudent");

    }

    @Override

    public String deleteStudent() {

        System.out.println("deleteStudent");

        return "nihao";

    }

}
(2)切面类:
public class MyAspect {

    public void before(JoinPoint joinPoint){

        System.out.println("前置通知:"+ joinPoint.getSignature().getName());

    }

    public void after(JoinPoint joinPoint,Object ret){//参数一:连接点描述

        //参数二:类型Object,参数名returning配置的

        System.out.println("后置通知:"+ joinPoint.getSignature().getName()+"   "+ret);

    }

}
(3)配置文件:
<?xml version="1.0" encoding="UTF-8"?>

<beans xmlns:xsi="http://www.w3.org/2001/XMLSchema-instance"

       xmlns:aop="http://www.springframework.org/schema/aop"

       xmlns="http://www.springframework.org/schema/beans"

       xsi:schemaLocation="http://www.springframework.org/schema/beans

       http://www.springframework.org/schema/beans/spring-beans.xsd

       http://www.springframework.org/schema/aop

       http://www.springframework.org/schema/aop/spring-aop.xsd">

    <!--目标类-->

    <bean id="studentService" class="pers.zhb.aspectxml.StudentServiceImpl"></bean>

    <!--切面类-->

    <bean id="myAspect" class="pers.zhb.aspectxml.MyAspect"></bean>

    <!--aop编程

    将切面类声明为切面,从而获得通知(方法)

    ref:切面类引用

    -->

    <aop:config>

        <aop:aspect ref="myAspect">

            <!--引入切面类,从中获得通知(方法)

                expression:切入点表达式

                id:名称,用于其他通知引用

            -->

            <aop:pointcut id="myPointCut" expression="execution(* pers.zhb.aspectxml.StudentServiceImpl.*(..))"></aop:pointcut>

            <!--

            method:通知,即方法名

            pointcut:切入点表达式,此表达式只能当前通知使用

            pointcut-ref:切入点的引用,可以和其它通知共享切入点

            returning:通知方法第二个参数的名称

            -->

            <aop:before method="before" pointcut-ref="myPointCut"></aop:before>

            <aop:after-returning method="after" pointcut-ref="myPointCut" returning="ret"></aop:after-returning>

        </aop:aspect>

    </aop:config>

</beans>
(4)测试类:
public class TestAspectXml {

    public static void main(String[] args) {

        ApplicationContext applicationContext=new

                ClassPathXmlApplicationContext("applicationContext.xml");

        //获得目标类

        pers.zhb.aspectxml.StudentService studentService= (StudentService) applicationContext.getBean("studentService");

        studentService.addStudent();

        studentService.deleteStudent();

        studentService.updateStudent();

    }

}
前置通知:addStudent

addStudent

后置通知:addStudent   null

前置通知:deleteStudent

deleteStudent

后置通知:deleteStudent   nihao

前置通知:updateStudent

updateStudent

后置通知:updateStudent   null
7、基于XML文件的配置(环绕通知)
(1)切面类:
public class MyAspect {

    public void before(JoinPoint joinPoint){

        System.out.println("前置通知:"+ joinPoint.getSignature().getName());

    }

    public void after(JoinPoint joinPoint,Object ret){//参数一:连接点描述

        //参数二:类型Object,参数名returning配置的

        System.out.println("后置通知:"+ joinPoint.getSignature().getName()+"   "+ret);

    }

    public Object around(ProceedingJoinPoint proceedingJoinPoint)throws Throwable{

        //手动执行目标方法

        System.out.println("前");

        Object object=proceedingJoinPoint.proceed();

        System.out.println("后");

        return null;

    }

}
(2)配置文件:
<aop:around method="around" pointcut-ref="myPointCut"></aop:around>
(3)测试结果:
前置通知:addStudent

前

addStudent

后

后置通知:addStudent   null

前置通知:deleteStudent

前

deleteStudent

后

后置通知:deleteStudent   null

前置通知:updateStudent

前

updateStudent

后

后置通知:updateStudent   null
8、基于XML文件的配置(抛出异常)
(1)定义目标类的接口和接口的实现类:
public interface StudentService {

     void addStudent();

     void updateStudent();

     String deleteStudent();

}
在方法中制造异常:
public class StudentServiceImpl implements StudentService {

    @Override

    public void addStudent() {

        System.out.println("addStudent");

    }

    @Override

    public void updateStudent() {

        int num=9/0;

        System.out.println("updateStudent");

    }

    @Override

    public String deleteStudent() {

        System.out.println("deleteStudent");

        return "nihao";

    }

}
(2)切面类:
public class MyAspect {

    public void before(JoinPoint joinPoint){

        System.out.println("前置通知:"+ joinPoint.getSignature().getName());

    }

    public void after(JoinPoint joinPoint,Object ret){//参数一:连接点描述

        //参数二:类型Object,参数名returning配置的

        System.out.println("后置通知:"+ joinPoint.getSignature().getName()+"   "+ret);

    }

    public Object around(ProceedingJoinPoint proceedingJoinPoint)throws Throwable{

        //手动执行目标方法

        System.out.println("前");

        Object object=proceedingJoinPoint.proceed();

        System.out.println("后");

        return null;

    }

    public void AfterThrowing(JoinPoint joinPoint,Throwable throwable){

        System.out.println("抛出异常的通知:"+throwable.getMessage());

    }

}
(3)配置文件:
<aop:after-throwing method="AfterThrowing" pointcut-ref="myPointCut" throwing="throwable"></aop:after-throwing>
(4)测试:
前置通知:addStudent

前

addStudent

后

后置通知:addStudent   null

前置通知:deleteStudent

前

deleteStudent

后

后置通知:deleteStudent   null

前置通知:updateStudent

前

抛出异常的通知:/ by zero

Exception in thread "main" java.lang.ArithmeticException: / by zero
9、基于XML文件的配置(最终通知)
(1)目标类的接口和接口的实现类:
public interface StudentService {

     void addStudent();

     void updateStudent();

     String deleteStudent();

}
public class StudentServiceImpl implements StudentService {

    @Override

    public void addStudent() {

        System.out.println("addStudent");

    }

    @Override

    public void updateStudent() {

        int num=9/0;

        System.out.println("updateStudent");

    }

    @Override

    public String deleteStudent() {

        System.out.println("deleteStudent");

        return "nihao";

    }

}
(2)切面类:
public class MyAspect {

    public void before(JoinPoint joinPoint){

        System.out.println("前置通知:"+ joinPoint.getSignature().getName());

    }

    public void after(JoinPoint joinPoint,Object ret){//参数一:连接点描述

        //参数二:类型Object,参数名returning配置的

        System.out.println("后置通知:"+ joinPoint.getSignature().getName()+"   "+ret);

    }

    public Object around(ProceedingJoinPoint proceedingJoinPoint)throws Throwable{

        //手动执行目标方法

        System.out.println("前");

        Object object=proceedingJoinPoint.proceed();

        System.out.println("后");

        return null;

    }

    public void AfterThrowing(JoinPoint joinPoint,Throwable throwable){

        System.out.println("抛出异常的通知:"+throwable.getMessage());

    }

    public void myafter(JoinPoint joinPoint){

        System.out.println("最终通知");

    }

}
(3)配置文件:
<aop:after method="myafter" pointcut-ref="myPointCut"></aop:after>
(4)测试结果:
前置通知:addStudent

前

addStudent

最终通知

后


后置通知:addStudent   null

前置通知:deleteStudent

前

deleteStudent

最终通知

后


后置通知:deleteStudent   null

前置通知:updateStudent

前

最终通知

抛出异常的通知:/ by zero

Exception in thread "main" java.lang.ArithmeticException: / by zero
不管有没有异常都会执行最终通知。
10、基于注解的配置
(1)目标类的接口和接口的实现类:
public interface StudentService {

     void addStudent();

     void updateStudent();

     String deleteStudent();

}
import org.springframework.stereotype.Service;

@Service("studentService")

public class StudentServiceImpl implements StudentService {

    @Override

    public void addStudent() {

        System.out.println("addStudent");

    }

    @Override

    public void updateStudent() {

        int num=9/0;

        System.out.println("updateStudent");

    }

    @Override

    public String deleteStudent() {

        System.out.println("deleteStudent");

        return "nihao";

    }

}
(2)配置文件:
<?xml version="1.0" encoding="UTF-8"?>

<beans xmlns:xsi="http://www.w3.org/2001/XMLSchema-instance"

       xmlns:aop="http://www.springframework.org/schema/aop"

       xmlns:context="http://www.springframework.org/schema/context"

       xmlns="http://www.springframework.org/schema/beans"

       xsi:schemaLocation="http://www.springframework.org/schema/beans

       http://www.springframework.org/schema/beans/spring-beans.xsd

       http://www.springframework.org/schema/aop

       http://www.springframework.org/schema/aop/spring-aop.xsd

       http://www.springframework.org/schema/context

       http://www.springframework.org/schema/context/spring-context.xsd">

    <!--扫描注解-->

    <context:component-scan base-package="pers.zhb.aspectxml"></context:component-scan>

    <!--确定aop注解生效-->

    <aop:aspectj-autoproxy></aop:aspectj-autoproxy>

</beans>
(3)切面:
@Component

@Aspect//声明切面

public class MyAspect {

    @Before("execution(* pers.zhb.aspectxml.StudentServiceImpl.*(..))")

    public void before(JoinPoint joinPoint){

        System.out.println("前置通知:"+ joinPoint.getSignature().getName());

    }

    //声明公共切入点

    @Pointcut("execution(* pers.zhb.aspectxml.StudentServiceImpl.*(..))")

    private void myPointCut(){

    }

    @AfterReturning(value = "myPointCut()",returning = "ret")

    public void after(JoinPoint joinPoint,Object ret){//参数一:连接点描述

        //参数二:类型Object,参数名returning配置的

        System.out.println("后置通知:"+ joinPoint.getSignature().getName()+"   "+ret);

    }

    @Around(value = "myPointCut()")

    public Object around(ProceedingJoinPoint proceedingJoinPoint)throws Throwable{

        //手动执行目标方法

        System.out.println("前");

        Object object=proceedingJoinPoint.proceed();

        System.out.println("后");

        return null;

    }

@AfterThrowing(value = "execution(* pers.zhb.aspectxml.StudentServiceImpl.*(..))",throwing = "throwable")

    public void AfterThrowing(JoinPoint joinPoint,Throwable throwable){

        System.out.println("抛出异常的通知:"+throwable.getMessage());

    }

    @After(value = "myPointCut()")

    public void myafter(JoinPoint joinPoint){

        System.out.println("最终通知");

    }

}
(4)测试:
public class TestAspectXml {

    public static void main(String[] args) {

        ApplicationContext applicationContext=new

                ClassPathXmlApplicationContext("applicationContext.xml");

        //获得目标类

        pers.zhb.aspectxml.StudentService studentService= (StudentService) applicationContext.getBean("studentService");

        studentService.addStudent();

        studentService.deleteStudent();

        studentService.updateStudent();

    }

}
前

前置通知:addStudent

addStudent

后

最终通知

后置通知:addStudent   null

前

前置通知:deleteStudent

deleteStudent

后

最终通知

后置通知:deleteStudent   null

前

前置通知:updateStudent

最终通知

抛出异常的通知:/ by zero

Exception in thread "main" java.lang.ArithmeticException: / by zero
spring的AspectJ基于XML和注解(前置、后置、环绕、抛出异常、最终通知)的更多相关文章
- Spring -- aop(面向切面编程),前置&后置&环绕&抛异常通知,引入通知,自动代理
1.概要 aop:面向方面编程.不改变源代码,还为类增加新的功能.(代理) 切面:实现的交叉功能. 通知:切面的实际实现(通知要做什么,怎么做). 连接点:应用程序执行过程期间,可以插入切面的地点. ...
- spring之AspectJ基于xml AOP编程
一.引言: AspectJ框架不仅实现了面向切面编程,而且还支持注解,spring将它引入自己的规范之中. 二.需要了解: AspectJ是基于java语言的AOP框架 spring2.0之后支持As ...
- MyBatis 项目开发中是基于 XML 还是注解?
只要你对 MyBatis 有所认识和了解,想必知道 MyBatis 有两种 SQL 语句映射模式,一种是基于注解,一种是基于XML. 基于 XML <mapper namespace=" ...
- spring 切面 前置后置通知 环绕通知demo
环绕通知: <?xml version="1.0" encoding="UTF-8"?> <beans xmlns="http:// ...
- Spring Bean前置后置处理器的使用
Spirng中BeanPostProcessor和InstantiationAwareBeanPostProcessorAdapter两个接口都可以实现对bean前置后置处理的效果,那这次先讲解一下B ...
- AOP 环绕通知 集成了前置 后置 返回通知等功能
AOP 环绕通知 集成了前置 后置 返回通知等功能
- pytest_前置后置
今天总结下pytest,pytest简直就是python自动化中的高富帅,各种操作,哈哈 这次总结主要涉及到了以下几点: 1.unittest中的setUp.tearDown.setUpClass.t ...
- unittest的前置后置,pytest的fixture和共享机制conftest.py
Unittest setUp/tearDown setUp当中得到的变量,用self.xxx = value传递给测试用例 setUpClass/tearDownClass setupClass当中得 ...
- spring之AspectJ基于注解 AOP编程
一.前言 使用注解代替之前在spring配置文件中配置目标类.切面类和aop配置. 二.注意 需要注意的是,需要在spring配置文件中引入如下,如果不添加,切面类中的@Aspect注解将不起作用 & ...
随机推荐
- c++: internal compiler error: Killed (program cc1plus)
转自https://blog.csdn.net/qq_27148893/article/details/88936044 这是在开发板上编译opencv的时候报了一个错,主要是在编译过程中,内存不够造 ...
- IDEA创建动态Web项目
1.IDEA创建动态Web项目 1.1.使用IDEA创建动态Web项目,选择Java Enterprise,记得选择服务器,我这里使用的时tomcat 1.2记得勾选Web Application,其 ...
- new操作符创建对象的四个步骤
new操作符创建对象可以分为以下四个步骤: 创建一个空对象 将所创建对象的__proto__属性值设为构造函数的prototype的属性值 执行构造函数中的代码,构造函数中的this指向该对象 返回对 ...
- Windows servers 2008 环境下,域控DC和DNS,分离搭建过程。
近来做有关于window服务器方面运维的实验,正好借此记录下来,便于日后回顾. 通常情况下,域控DC服务器和DNS服务器一般不在一起,所以需要将其分开建立.而这个时候两个服务器的建立有先后顺序,本文会 ...
- Node.js 学习笔记之四:使用数据库
这部分示例将示范SQLite3.MongoDB这两种不同类型的数据库在 Node.js 中的使用方法.首先,我们要在code目录下执行mkdir 06_database命令来创建用于存放这一组示例的目 ...
- Android开发java开发之常用英文词汇汇总。程序员必备英语单词
ANR (Application Not Response ) bundle 捆, entire 整个的,完整的 lifetime 生命周期 entire lifetime 完整生命周期 visi ...
- WebStorm下ReactNative代码提示设置
ReactNative 代码智能提醒 (Webstrom live template) https://github.com/virtoolswebplayer/ReactNative-LiveTe ...
- CVPR2020 面向密集多角度物体检测的动态修正网络(DRN)
论文链接:https://arxiv.org/pdf/2005.09973.pdf code:https://github.com/Anymake/DRN_CVPR2020 文章概要: 本文是中科院自 ...
- C002:计算球体体积(半径固化)
程序: #include "stdafx.h" int _tmain(int argc, _TCHAR* argv[]) { float sphereRadius=10.0f; f ...
- python连接websocket wss
def websocket_wss(): try: wss = create_connection(wss_url, timeout=10) if wss.status == 101: wss.sen ...