Python web框架 Tornado(一)基础学习
概述
Tornado 是 FriendFeed 使用的可扩展的非阻塞式 web 服务器及其相关工具的开源版本。这个 Web 框架看起来有些像web.py 或者 Google 的 webapp,不过为了能有效利用非阻塞式服务器环境,这个 Web 框架还包含了一些相关的有用工具 和优化。
Tornado 和现在的主流 Web 服务器框架(包括大多数 Python 的框架)有着明显的区别:它是非阻塞式服务器,而且速度相当快。得利于其 非阻塞的方式和对 epoll 的运用,Tornado 每秒可以处理数以千计的连接,这意味着对于实时 Web 服务来说,Tornado 是一个理想的 Web 框架。我们开发这个 Web 服务器的主要目的就是为了处理 FriendFeed 的实时功能 ——在 FriendFeed 的应用里每一个活动用户都会保持着一个服务器连接。(关于如何扩容 服务器,以处理数以千计的客户端的连接的问题,请参阅 C10K problem。)
下载安装:
pip3 install tornado

源码安装

https://pypi.python.org/packages/source/t/tornado/tornado-4.3.tar.gz
框架使用
一、快速上手
#!/usr/bin/env python

# -*- coding:utf-8 -*-

import tornado.ioloop

import tornado.web

class MainHandler(tornado.web.RequestHandler):

    def get(self):

        self.write("Hello, world")

application = tornado.web.Application([

    (r"/index", MainHandler),

])

if __name__ == "__main__":

    application.listen(8888)

    tornado.ioloop.IOLoop.instance().start()
执行过程:
- 第一步:执行脚本,监听 8888 端口
- 第二步:浏览器客户端访问 /index --> http://127.0.0.1:8888/index
- 第三步:服务器接受请求,并交由对应的类处理该请求
- 第四步:类接受到请求之后,根据请求方式(post / get / delete ...)的不同调用并执行相应的方法
- 第五步:方法返回值的字符串内容发送浏览器
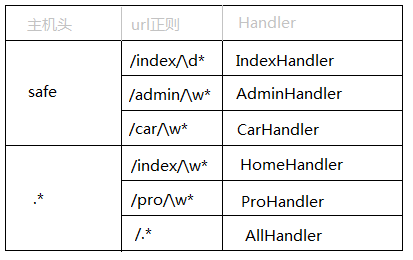
二、路由系统
路由系统其实就是 url 和 类 的对应关系,这里不同于其他框架,其他很多框架均是 url 对应 函数,Tornado中每个url对应的是一个类。
PS:路由元组中,第一个参数是url,第二个是要执行的类,第三个是字典,第四个参数是name:" "。
#!/usr/bin/env python

# -*- coding:utf-8 -*-

import tornado.ioloop

import tornado.web

class MainHandler(tornado.web.RequestHandler):

    def get(self):

        self.write("Hello, world")

class StoryHandler(tornado.web.RequestHandler):

    def get(self, story_id):

        self.write("You requested the story " + story_id)

class BuyHandler(tornado.web.RequestHandler):

    def get(self):

        self.write("buy.wupeiqi.com/index")

application = tornado.web.Application([

    (r"/index", MainHandler),

    (r"/story/([0-9]+)", StoryHandler),

])

application.add_handlers('buy.wupeiqi.com$', [

    (r'/index',BuyHandler),

])

if __name__ == "__main__":

    application.listen(80)

    tornado.ioloop.IOLoop.instance().start()
路由系统举例
Tornado中原生支持二级域名的路由,如:
三、模板引擎
Tornao中的模板语言和django中类似,模板引擎将模板文件载入内存,然后将数据嵌入其中,最终获取到一个完整的字符串,再将字符串返回给请求者。
Tornado 的模板支持“控制语句”和“表达语句”,控制语句是使用 {% 和 %} 包起来的 例如 {% if len(items) > 2 %}。表达语句是使用 {{ 和 }} 包起来的,例如 {{ items[0] }}。
控制语句和对应的 Python 语句的格式基本完全相同。我们支持 if、for、while 和 try,这些语句逻辑结束的位置需要用 {% end %} 做标记。还通过 extends 和 block 语句实现了模板继承。这些在 template 模块 的代码文档中有着详细的描述。
注:在使用模板前需要在setting中设置模板路径:"template_path" : "tpl"
1、基本使用
#!/usr/bin/env python

# -*- coding:utf-8 -*-

import tornado.ioloop

import tornado.web

class MainHandler(tornado.web.RequestHandler):

    def get(self):

        self.render("index.html", list_info = [11,22,33])

application = tornado.web.Application([

    (r"/index", MainHandler),

])

if __name__ == "__main__":

    application.listen(8888)

    tornado.ioloop.IOLoop.instance().start()
app.py
<!DOCTYPE html>

<html>

<head>

    <meta http-equiv="Content-Type" content="text/html; charset=UTF-8"/>

    <title>老男孩</title>

    <link href="{{static_url("css/common.css")}}" rel="stylesheet" />

</head>

<body>

    <div>

        <ul>

            {% for item in list_info %}

                <li>{{item}}</li>

            {% end %}

        </ul>

    </div>

    <script src="{{static_url("js/jquery-1.8.2.min.js")}}"></script>

</body>

</html>
index.html
在模板中默认提供了一些函数、字段、类以供模板使用:

escape: tornado.escape.xhtml_escape 的別名

xhtml_escape: tornado.escape.xhtml_escape 的別名

url_escape: tornado.escape.url_escape 的別名

json_encode: tornado.escape.json_encode 的別名

squeeze: tornado.escape.squeeze 的別名

linkify: tornado.escape.linkify 的別名

datetime: Python 的 datetime 模组

handler: 当前的 RequestHandler 对象

request: handler.request 的別名

current_user: handler.current_user 的別名

locale: handler.locale 的別名

_: handler.locale.translate 的別名

static_url: for handler.static_url 的別名

xsrf_form_html: handler.xsrf_form_html 的別名
其他方法
2、母版
<!DOCTYPE html>

<html>

<head>

    <meta http-equiv="Content-Type" content="text/html; charset=UTF-8"/>

    <title>老男孩</title>

    <link href="{{static_url("css/common.css")}}" rel="stylesheet" />

    {% block CSS %}{% end %}

</head>

<body>

    <div class="pg-header">

    </div>

    {% block RenderBody %}{% end %}

    <script src="{{static_url("js/jquery-1.8.2.min.js")}}"></script>

    {% block JavaScript %}{% end %}

</body>

</html>
layout.html
{% extends 'layout.html'%}

{% block CSS %}

    <link href="{{static_url("css/index.css")}}" rel="stylesheet" />

{% end %}

{% block RenderBody %}

    <h1>Index</h1>

    <ul>

    {%  for item in li %}

        <li>{{item}}</li>

    {% end %}

    </ul>

{% end %}

{% block JavaScript %}

{% end %}
index.html
3、导入
<div>

    <ul>

        <li>1024</li>

        <li>42区</li>

    </ul>

</div>
header.html
<!DOCTYPE html>

<html>

<head>

    <meta http-equiv="Content-Type" content="text/html; charset=UTF-8"/>

    <title>Test</title>

    <link href="{{static_url("css/common.css")}}" rel="stylesheet" />

</head>

<body>

    <div class="pg-header">

        {% include 'header.html' %}

    </div>

    <script src="{{static_url("js/jquery-1.8.2.min.js")}}"></script>

</body>

</html>
index.html
4、自定义UIMethod以UIModule,自定义模版函数
a、定义
# uimethods.py

def tab(self):

    return 'UIMethod'
uimethods.py
#!/usr/bin/env python

# -*- coding:utf-8 -*-

from tornado.web import UIModule

from tornado import escape

class custom(UIModule):

    def render(self, *args, **kwargs):

        return escape.xhtml_escape('<h1>wupeiqi</h1>')

        #return escape.xhtml_escape('<h1>wupeiqi</h1>')
uimodules.py
b、注册
#!/usr/bin/env python

# -*- coding:utf-8 -*-

#!/usr/bin/env python

# -*- coding:utf-8 -*-

import tornado.ioloop

import tornado.web

from tornado.escape import linkify

import uimodules as md

import uimethods as mt

class MainHandler(tornado.web.RequestHandler):

    def get(self):

        self.render('index.html')

settings = {

    'template_path': 'template',

    'static_path': 'static',

    'static_url_prefix': '/static/',

    'ui_methods': mt,

    'ui_modules': md,

}

application = tornado.web.Application([

    (r"/index", MainHandler),

], **settings)

if __name__ == "__main__":

    application.listen(8009)

    tornado.ioloop.IOLoop.instance().start()
注册使用示例
c、使用
<!DOCTYPE html>

<html>

<head lang="en">

    <meta charset="UTF-8">

    <title></title>

    <link href="{{static_url("commons.css")}}" rel="stylesheet" />

</head>

<body>

    <h1>hello</h1>

    {% module custom(123) %}

    {{ tab() }}

</body>
应用页面
四、静态文件
对于静态文件,可以配置静态文件的目录和前段使用时的前缀,并且Tornaodo还支持静态文件缓存。
#!/usr/bin/env python

# -*- coding:utf-8 -*-

import tornado.ioloop

import tornado.web

class MainHandler(tornado.web.RequestHandler):

    def get(self):

        self.render('home/index.html')

settings = {

    'template_path': 'template',

    'static_path': 'static',

    'static_url_prefix': '/static/',

}

application = tornado.web.Application([

    (r"/index", MainHandler),

], **settings)

if __name__ == "__main__":

    application.listen(80)

    tornado.ioloop.IOLoop.instance().start()
app.py
<!DOCTYPE html>

<html>

<head lang="en">

    <meta charset="UTF-8">

    <title></title>

    <link href="{{static_url("commons.css")}}" rel="stylesheet" />

</head>

<body>

    <h1>hello</h1>

</body>

</html>
index.html
注:静态文件缓存的实现
import hashlib

def get_content_version(cls, abspath):

        """Returns a version string for the resource at the given path.

        This class method may be overridden by subclasses.  The

        default implementation is a hash of the file's contents.

        .. versionadded:: 3.1

        """

        data = cls.get_content(abspath)

        hasher = hashlib.md5()

        if isinstance(data, bytes):

            hasher.update(data)

        else:

            for chunk in data:

                hasher.update(chunk)

        return hasher.hexdigest()
view code
五、cookie
Tornado中可以对cookie进行操作,并且还可以对cookie进行签名以防止伪造。
1、基本操作
from tornado.web import RequestHandler

class MainHandler(tornado.web.RequestHandler):

    def get(self):

        if not self.get_cookie("mycookie"): # 取不到cookies

            self.set_cookie("mycookie", "myvalue") # 设置cookies

            self.write("Your cookie was not set yet!")

        else:

            self.write("Your cookie was set!")
基本操作(定义Handler类,在其中完成操作)
2、加密cookie(签名)
Cookie 很容易被恶意的客户端伪造。加入你想在 cookie 中保存当前登陆用户的 id 之类的信息,你需要对 cookie 作签名以防止伪造。Tornado 通过 set_secure_cookie 和 get_secure_cookie 方法直接支持了这种功能。 要使用这些方法,你需要在创建应用时提供一个密钥,名字为 cookie_secret。 你可以把它作为一个关键词参数传入应用的设置中:
class MainHandler(tornado.web.RequestHandler):

    def get(self):

        if not self.get_secure_cookie("mycookie"):

            self.set_secure_cookie("mycookie", "myvalue")

            self.write("Your cookie was not set yet!")

        else:

            self.write("Your cookie was set!")

application = tornado.web.Application([

    (r"/", MainHandler),

], cookie_secret="61oETzKXQAGaYdkL5gEmGeJJFuYh7EQnp2XdTP1o/Vo=")
def _create_signature_v1(secret, *parts):

    hash = hmac.new(utf8(secret), digestmod=hashlib.sha1)

    for part in parts:

        hash.update(utf8(part))

    return utf8(hash.hexdigest())

# 加密

def _create_signature_v2(secret, s):

    hash = hmac.new(utf8(secret), digestmod=hashlib.sha256)

    hash.update(utf8(s))

    return utf8(hash.hexdigest())

def create_signed_value(secret, name, value, version=None, clock=None,

                        key_version=None):

    if version is None:

        version = DEFAULT_SIGNED_VALUE_VERSION

    if clock is None:

        clock = time.time

    timestamp = utf8(str(int(clock())))

    value = base64.b64encode(utf8(value))

    if version == 1:

        signature = _create_signature_v1(secret, name, value, timestamp)

        value = b"|".join([value, timestamp, signature])

        return value

    elif version == 2:

        # The v2 format consists of a version number and a series of

        # length-prefixed fields "%d:%s", the last of which is a

        # signature, all separated by pipes.  All numbers are in

        # decimal format with no leading zeros.  The signature is an

        # HMAC-SHA256 of the whole string up to that point, including

        # the final pipe.

        #

        # The fields are:

        # - format version (i.e. 2; no length prefix)

        # - key version (integer, default is 0)

        # - timestamp (integer seconds since epoch)

        # - name (not encoded; assumed to be ~alphanumeric)

        # - value (base64-encoded)

        # - signature (hex-encoded; no length prefix)

        def format_field(s):

            return utf8("%d:" % len(s)) + utf8(s)

        to_sign = b"|".join([

            b"",

            format_field(str(key_version or 0)),

            format_field(timestamp),

            format_field(name),

            format_field(value),

            b''])

        if isinstance(secret, dict):

            assert key_version is not None, 'Key version must be set when sign key dict is used'

            assert version >= 2, 'Version must be at least 2 for key version support'

            secret = secret[key_version]

        signature = _create_signature_v2(secret, to_sign)

        return to_sign + signature

    else:

        raise ValueError("Unsupported version %d" % version)

# 解密

def _decode_signed_value_v1(secret, name, value, max_age_days, clock):

    parts = utf8(value).split(b"|")

    if len(parts) != 3:

        return None

    signature = _create_signature_v1(secret, name, parts[0], parts[1])

    if not _time_independent_equals(parts[2], signature):

        gen_log.warning("Invalid cookie signature %r", value)

        return None

    timestamp = int(parts[1])

    if timestamp < clock() - max_age_days * 86400:

        gen_log.warning("Expired cookie %r", value)

        return None

    if timestamp > clock() + 31 * 86400:

        # _cookie_signature does not hash a delimiter between the

        # parts of the cookie, so an attacker could transfer trailing

        # digits from the payload to the timestamp without altering the

        # signature.  For backwards compatibility, sanity-check timestamp

        # here instead of modifying _cookie_signature.

        gen_log.warning("Cookie timestamp in future; possible tampering %r",

                        value)

        return None

    if parts[1].startswith(b""):

        gen_log.warning("Tampered cookie %r", value)

        return None

    try:

        return base64.b64decode(parts[0])

    except Exception:

        return None

def _decode_fields_v2(value):

    def _consume_field(s):

        length, _, rest = s.partition(b':')

        n = int(length)

        field_value = rest[:n]

        # In python 3, indexing bytes returns small integers; we must

        # use a slice to get a byte string as in python 2.

        if rest[n:n + 1] != b'|':

            raise ValueError("malformed v2 signed value field")

        rest = rest[n + 1:]

        return field_value, rest

    rest = value[2:]  # remove version number

    key_version, rest = _consume_field(rest)

    timestamp, rest = _consume_field(rest)

    name_field, rest = _consume_field(rest)

    value_field, passed_sig = _consume_field(rest)

    return int(key_version), timestamp, name_field, value_field, passed_sig

def _decode_signed_value_v2(secret, name, value, max_age_days, clock):

    try:

        key_version, timestamp, name_field, value_field, passed_sig = _decode_fields_v2(value)

    except ValueError:

        return None

    signed_string = value[:-len(passed_sig)]

    if isinstance(secret, dict):

        try:

            secret = secret[key_version]

        except KeyError:

            return None

    expected_sig = _create_signature_v2(secret, signed_string)

    if not _time_independent_equals(passed_sig, expected_sig):

        return None

    if name_field != utf8(name):

        return None

    timestamp = int(timestamp)

    if timestamp < clock() - max_age_days * 86400:

        # The signature has expired.

        return None

    try:

        return base64.b64decode(value_field)

    except Exception:

        return None

def get_signature_key_version(value):

    value = utf8(value)

    version = _get_version(value)

    if version < 2:

        return None

    try:

        key_version, _, _, _, _ = _decode_fields_v2(value)

    except ValueError:

        return None

    return key_version
内部算法
签名Cookie的本质是:
写cookie过程:

    将值进行base64加密

    对除值以外的内容进行签名,哈希算法(无法逆向解析)

    拼接 签名 + 加密值

读cookie过程:

    读取 签名 + 加密值

    对签名进行验证

    base64解密,获取值内容
注:许多API验证机制和安全cookie的实现机制相同。
#!/usr/bin/env python

# -*- coding:utf-8 -*-

import tornado.ioloop

import tornado.web

class MainHandler(tornado.web.RequestHandler):

    def get(self):

        login_user = self.get_secure_cookie("login_user", None)

        if login_user:

            self.write(login_user)

        else:

            self.redirect('/login')

class LoginHandler(tornado.web.RequestHandler):

    def get(self):

        self.current_user()

        self.render('login.html', **{'status': ''})

    def post(self, *args, **kwargs):

        username = self.get_argument('name')

        password = self.get_argument('pwd')

        if username == 'aaa' and password == '':

            self.set_secure_cookie('login_user', 'aaa')

            self.redirect('/')

        else:

            self.render('login.html', **{'status': '用户名或密码错误'})

settings = {

    'template_path': 'template',

    'static_path': 'static',

    'static_url_prefix': '/static/',

    'cookie_secret': 'aiuasdhflashjdfoiuashdfiuh'

}

application = tornado.web.Application([

    (r"/index", MainHandler),

    (r"/login", LoginHandler),

], **settings)

if __name__ == "__main__":

    application.listen(8888)

    tornado.ioloop.IOLoop.instance().start()
基于Cookie实现用户验证-Demo
#!/usr/bin/env python

# -*- coding:utf-8 -*-

import tornado.ioloop

import tornado.web

class BaseHandler(tornado.web.RequestHandler):

    def get_current_user(self):

        return self.get_secure_cookie("login_user")

class MainHandler(BaseHandler):

    @tornado.web.authenticated

    def get(self):

        login_user = self.current_user

        self.write(login_user)

class LoginHandler(tornado.web.RequestHandler):

    def get(self):

        self.current_user()

        self.render('login.html', **{'status': ''})

    def post(self, *args, **kwargs):

        username = self.get_argument('name')

        password = self.get_argument('pwd')

        if username == 'aaa' and password == '':

            self.set_secure_cookie('login_user', 'aaa')

            self.redirect('/')

        else:

            self.render('login.html', **{'status': '用户名或密码错误'})

settings = {

    'template_path': 'template',

    'static_path': 'static',

    'static_url_prefix': '/static/',

    'cookie_secret': 'aiuasdhflashjdfoiuashdfiuh', # 签名cookies

    'login_url': '/login'

}

application = tornado.web.Application([

    (r"/index", MainHandler),

    (r"/login", LoginHandler),

], **settings)

if __name__ == "__main__":

    application.listen(8888)

    tornado.ioloop.IOLoop.instance().start()
基于签名Cookie实现用户验证-Demo
3、JavaScript操作Cookie
由于Cookie保存在浏览器端,所以在浏览器端也可以使用JavaScript来操作Cookie。
/*

设置cookie,指定秒数过期

 */

function setCookie(name,value,expires){

    var temp = [];

    var current_date = new Date();

    current_date.setSeconds(current_date.getSeconds() + 5);

    document.cookie = name + "= "+ value +";expires=" + current_date.toUTCString();

}
对于参数:
- domain 指定域名下的cookie
- path 域名下指定url中的cookie
- secure https使用
六、CSRF
Tornado中的跨站请求伪造和Django中的相似,跨站伪造请求(Cross-site request forgery)
settings = {

    "xsrf_cookies": True,

}

application = tornado.web.Application([

    (r"/", MainHandler),

    (r"/login", LoginHandler),

], **settings)
配置
<form action="/new_message" method="post">

  {{ xsrf_form_html() }}

  <input type="text" name="message"/>

  <input type="submit" value="Post"/>

</form>
使用 - 普通表单
function getCookie(name) {

    var r = document.cookie.match("\\b" + name + "=([^;]*)\\b");

    return r ? r[1] : undefined;

}

jQuery.postJSON = function(url, args, callback) {

    args._xsrf = getCookie("_xsrf");

    $.ajax({url: url, data: $.param(args), dataType: "text", type: "POST",

        success: function(response) {

        callback(eval("(" + response + ")"));

    }});

};
使用 - AJAX
注:Ajax使用时,本质上就是去获取本地的cookie,携带cookie再来发送请求。
七、上传文件
1、Form表单上传
<!DOCTYPE html>

<html>

<head>

    <meta http-equiv="Content-Type" content="text/html; charset=UTF-8"/>

    <title>上传文件</title>

</head>

<body>

    <form id="my_form" name="form" action="/index" method="POST"  enctype="multipart/form-data" >

        <input name="fff" id="my_file"  type="file" />

        <input type="submit" value="提交"  />

    </form>

</body>

</html>
HTML
#!/usr/bin/env python

# -*- coding:utf-8 -*-

import tornado.ioloop

import tornado.web

class MainHandler(tornado.web.RequestHandler):

    def get(self):

        self.render('index.html')

    def post(self, *args, **kwargs):

        file_metas = self.request.files["fff"]

        # print(file_metas)

        for meta in file_metas:

            file_name = meta['filename']

            with open(file_name,'wb') as up:

                up.write(meta['body'])

settings = {

    'template_path': 'template',

}

application = tornado.web.Application([

    (r"/index", MainHandler),

], **settings)

if __name__ == "__main__":

    application.listen(8000)

    tornado.ioloop.IOLoop.instance().start()
Tornado框架
2、AJAX上传
<!DOCTYPE html>

<html>

<head lang="en">

    <meta charset="UTF-8">

    <title></title>

</head>

<body>

    <input type="file" id="img" />

    <input type="button" onclick="UploadFile();" />

    <script>

        function UploadFile(){

            var fileObj = document.getElementById("img").files[0];

            var form = new FormData();

            form.append("k1", "v1");

            form.append("fff", fileObj);

            var xhr = new XMLHttpRequest();

            xhr.open("post", '/index', true);

            xhr.send(form);

        }

    </script>

</body>

</html>
HTML - XMLHttpRequest
<!DOCTYPE html>

<html>

<head lang="en">

    <meta charset="UTF-8">

    <title></title>

</head>

<body>

    <input type="file" id="img" />

    <input type="button" onclick="UploadFile();" />

    <script>

        function UploadFile(){

            var fileObj = $("#img")[0].files[0];

            var form = new FormData();

            form.append("k1", "v1");

            form.append("fff", fileObj);

            $.ajax({

                type:'POST',

                url: '/index',

                data: form,

                processData: false,  // tell jQuery not to process the data

                contentType: false,  // tell jQuery not to set contentType

                success: function(arg){

                    console.log(arg);

                }

            })

        }

    </script>

</body>

</html>
HTML - jQuery
<!DOCTYPE html>

<html>

<head lang="en">

    <meta charset="UTF-8">

    <title></title>

</head>

<body>

    <form id="my_form" name="form" action="/index" method="POST"  enctype="multipart/form-data" >

        <div id="main">

            <input name="fff" id="my_file"  type="file" />

            <input type="button" name="action" value="Upload" onclick="redirect()"/>

            <iframe id='my_iframe' name='my_iframe' src=""  class="hide"></iframe>

        </div>

    </form>

    <script>

        function redirect(){

            document.getElementById('my_iframe').onload = Testt;

            document.getElementById('my_form').target = 'my_iframe';

            document.getElementById('my_form').submit();

        }

        function Testt(ths){

            var t = $("#my_iframe").contents().find("body").text();

            console.log(t);

        }

    </script>

</body>

</html>
HTML - iframe
#!/usr/bin/env python

# -*- coding:utf-8 -*-

import tornado.ioloop

import tornado.web

class MainHandler(tornado.web.RequestHandler):

    def get(self):

        self.render('index.html')

    def post(self, *args, **kwargs):

        file_metas = self.request.files["fff"]

        # print(file_metas)

        for meta in file_metas:

            file_name = meta['filename']

            with open(file_name,'wb') as up:

                up.write(meta['body'])

settings = {

    'template_path': 'template',

}

application = tornado.web.Application([

    (r"/index", MainHandler),

], **settings)

if __name__ == "__main__":

    application.listen(8000)

    tornado.ioloop.IOLoop.instance().start()
Tornado框架
<script type="text/javascript">

    $(document).ready(function () {

        $("#formsubmit").click(function () {

            var iframe = $('<iframe name="postiframe" id="postiframe" style="display: none"></iframe>');

            $("body").append(iframe);

            var form = $('#theuploadform');

            form.attr("action", "/upload.aspx");

            form.attr("method", "post");

            form.attr("encoding", "multipart/form-data");

            form.attr("enctype", "multipart/form-data");

            form.attr("target", "postiframe");

            form.attr("file", $('#userfile').val());

            form.submit();

            $("#postiframe").load(function () {

                iframeContents = this.contentWindow.document.body.innerHTML;

                $("#textarea").html(iframeContents);

            });

            return false;

        });

    });

</script>

<form id="theuploadform">

    <input id="userfile" name="userfile" size="" type="file" />

    <input id="formsubmit" type="submit" value="Send File" />

</form>

<div id="textarea">

</div>
扩展:基于iframe实现Ajax上传示例
$('#upload_iframe').load(function(){

                    var iframeContents = this.contentWindow.document.body.innerText;

                    iframeContents = JSON.parse(iframeContents);

                })
function bindChangeAvatar1() {

            $('#avatarImg').change(function () {

                var file_obj = $(this)[0].files[0];

                $('#prevViewImg')[0].src = window.URL.createObjectURL(file_obj)

            })

        }

        function bindChangeAvatar2() {

            $('#avatarImg').change(function () {

                var file_obj = $(this)[0].files[0];

                var reader = new FileReader();

                reader.readAsDataURL(file_obj);

                reader.onload = function (e) {

                    $('#previewImg')[0].src = this.result;

                };

            })

        }

        function bindChangeAvatar3() {

            $('#avatarImg').change(function () {

                var file_obj = $(this)[0].files[0];

                var form = new FormData();

                form.add('img_upload', file_obj);

                $.ajax({

                    url: '',

                    data: form,

                    processData: false,  // tell jQuery not to process the data

                    contentType: false,  // tell jQuery not to set contentType

                    success: function (arg) {

                    }

                })

            })

        }

        function bindChangeAvatar4() {

            $('#avatarImg').change(function () {

                $(this).parent().submit();

                $('#upload_iframe').load(function () {

                    var iframeContents = this.contentWindow.document.body.innerText;

                    iframeContents = JSON.parse(iframeContents);

                    if (iframeContents.status) {

                        $('#previewImg').attr('src', '/' + iframeContents.data);

                    }

                })

            })

        }
其他
八、验证码
验证码原理在于后台自动创建一张带有随机内容的图片,然后将内容通过img标签输出到页面。
个人学习总结
Tornado学习 总结

a. 问题:Web框架中都有什么?

	Django:

		socket: 无,wsgiref

		中间件: 有

	  路由系统: 有

	  视图函数: 有

	   ORM操作: 有

	  模板引擎: 有

	simple_tag:  有

		cookie:  有

	   session: 有

		  csrf: 有

		   xss: 有

		  其他:缓存,信号,Form,ModelForm,Admin

	tornado:

		socket: 有,有wsgiref

	  路由系统: 有

	  视图函数: 有

	   ORM操作: 无

	  模板引擎: 有

	simple_tag:  有,uimethod,uimodule

		cookie:  有

	   session: 无

		  csrf: 有

		   xss: 有

		   其他:无

	总结:路由系统,视图函数,模板引擎,cookie,csrf,xss

b. Tornado安装

	pip3 install tornado

c. 基本使用

		import tornado.ioloop

		import tornado.web

		from tornado.web import RequestHandler

		class IndexHandler(RequestHandler):

			def get(self):

				self.write("Hello, world")

		application = tornado.web.Application([

			(r"/index", IndexHandler),

		])

		if __name__ == "__main__":

			application.listen(8888)

			tornado.ioloop.IOLoop.instance().start()

	支持通过域名进行匹配

	路由元组中,第一个参数是url,第二个是要执行的类,第三个是字典,第四个参数是name:""

	self.request 中封装了所有的请求信息

也有csrf_token

配置文件中:

	"xsrf_cookies": True,

模版语言中:

	{{ raw xsrf_form_html() }} #把字符串类型的标签,转成标签

关于cookies

明文:

	self.set_cookie("name","value传入cookies的值",expires=time.time()+10(失效时间))#设置cookies

	name = self.get_cookie("name") #获取cookies

密文:写入标签

	配置文件中:"cookie_secret": "asdf",#配置加密cookies的信息

	设置:

	self.set_secure_cookie("nnn",user,expires=time.time()+10) #设置带标签的cookies

	name = self.get_secure_cookie("nnn") #获取带标签的cookies

配置文件中,可以指定跳转的url。

装饰器登录授权认证  给需要登录验证的函数加上装饰器:@authenticated

	@authenticated  在self中执行current_user,他本质是让我们进行自定制的函数。

	查看关键函数的源码发现

	if not hasattr(self, "_current_user"):

		self._current_user = self.get_current_user()

	return self._current_user

	是去判断没有方法的话,去执行get_current_user()函数,而这个函数内什么内容都没写,所以说我们可以使用它自定义 get_current_user 函数,获取加密的cookies并返回。

	# 应用

	from tornado.web import RequestHandler

	from tornado.web import authenticated

	#多继承,获取cookies,以装饰器的形式 实现登录认证

	class BaseRequestHandler(object):

		def get_current_user(self):

			return self.get_secure_cookie("nnn")

	#注意继承顺序的问题

	class SeedHandler(BaseRequestHandler,RequestHandler):

		@authenticated

		def get(self, *args, **kwargs):

			seed_list = [

				{"title":"小麦","price":12},

				{"title":"大麦","price":14},

				{"title":"荞麦","price":16},

				{"title":"麦麸","price":2},

			]

			self.render("seed.html",seed_list=seed_list)

自定义模版函数	UIMethod以UIModule

	UIMethod

	创建一个文件,编写自定制的函数方法

	有个默认参数:self,包含了当前调用的类的所有东西

	使用的话,需要在配置文件注册

	页面 {{ 函数名() }} 执行调用。如果是HTML标签类型 {% raw 函数名() %} 把字符串转成标签

	UIModule

	调用方法

	{% module 类名(传值) %}

	在后台返回一个css的列表,渲染成多个导入css文件的link标签

	返回嵌入类型的css是在页面的头文件中加入 style 标签,里边是我们写的属性

	不仅能返回内容还能定制css和js。

模版语言中:

	也支持母板继承的方式。与Django框架中的方法完全一致。

tornado框架 内部执行流程

	程序运行,会执行自定义类内的方法(GET,POST......),在类定义的时候,肯定是走了__init__的方法。最后在这个__init__函数中最后执行了一个钩子函数  self.initialize(**kwargs)

	重点是这个函数内部 没有定义任何方法。所以我们可以在我们自己写的方法中重写这个函数[self.initialize(**kwargs)]。

	在get,post等函数之前,肯定是先执行这个函数。

	在路由系统中,第三个参数是个字典,用于初始化传值,传递到的位置就是self.initialize(**kwargs)这个函数。
Tornado框架
#!/usr/bin/env python

# _*_ coding:utf-8 _*_

import tornado.ioloop

import tornado.web

from tornado.web import RequestHandler  # 请求处理

#路由对应执行的请求处理方法 (类,继承Tornado的requesthander方法)

class IndexHandler(RequestHandler):

    #对于get请求

    def get(self):

        #在请求操作中反向生成url

        # url1 = self.application.reverse_url('n1')

        # print(url1)

        # url2 = self.application.reverse_url('n2',666)

        # print(url2)

        #返回页面内容,相当于Django中的HttpResponse

        self.write("Hello, world")

        #返回模版页面,相当于Django中的render

        # self.render("*.html模版路径","返回值")

        # 返回值参数位置是 **kwargs,所以传值的时候可以写一个字典,也可以写成一个个的k=v的传参;

        # 有一点需要注意,模版中是通过传值的key去渲染结果的【{{ key }}】 如果需要传参的话,不管是GET请求或是POST,都需要对应的写上返回的参数信息,

        # GET返回为空,POST返回是真正的信息,否则会因模版渲染是找不到对应的key值而报错。

        #跳转页面,相当于Django中的redirect

        # self.redirect("url路由地址")

        #关于GET/POST取值

        # self.get_query_argument("key") #获取get某个key的一个传参

        # self.get_query_arguments("key") #获取get某个key的多个传参

        #

        # self.get_argument("key") #从get和POST请求中获取key的传参,会去两个请求中查找,

        # self.get_arguments("key") #从get和POST请求中获取key的多个传参,会去两个请求中查找

class HomeHandler(RequestHandler):

    def get(self,*args,**kwargs):

        import time

        #获取设置的cookies

        # self.set_cookie("name","value传入cookies的值",expires=time.time()+10(失效时间))#设置cookies

        # name = self.get_cookie("name") #获取cookies

        #获取加密cookies

        # self.set_secure_cookie("name","value设置的cookies值",expires="超时时间") #设置加密的cookies

        # self.get_secure_cookie("name") #获取加密的cookies

        self.write("Hello, world")

#配置文件,字典类型

settings = {

    "template_path":"模版文件名",

    "static_path":"静态文件目录",

    "static_url_prefix":"找静态文件的前缀",

    "xsrf_cookies": True, #启用csrf_token  默认 模版页面中引用方法 {% raw xsrf_form_html() %}

    "cookie_secret": "asdf",#用于配置加密cookies的信息

    'login_url': '/login.html', #起始的url

    "ui_methods":"导入的自定义模版函数文件的函数名", #自定制函数 函数类型

    "ui_modules":"导入的自定义模版类文件的类名",#自定制函数 类

}

#创建web项目

application = tornado.web.Application([

    #路由系统

    (r"/index", IndexHandler,{},"n1"),

    (r"/home/(\d+)", HomeHandler,{},'n2'),

],**settings) #项目下第一个参数是路由系统,第二个为配置信息

#也可以额外添加路由,当访问的时候会先在这里查找,如果没有再去上边的路由中去找。

application.add_handlers("域名网址",[

    #路由

])

#主函数执行

if __name__ == "__main__":

    #项目启动,监听8888端口

    application.listen(8888)

    #IO复用开始执行

    tornado.ioloop.IOLoop.instance().start()

#模版语言引用静态文件的方法

# 1、href=直接路由指定

# 2、href="{{static_url('样式文件名')}}" 在页面查看会发现,url地址后文件有一串随机字符串(md5值),是后台通过md5生成。好处,防止浏览器有静态文件的缓存

# 模版语言与Django一样也支持母板继承,继承方式一模一样。
Tornado框架 基础学习示例
Python web框架 Tornado(一)基础学习的更多相关文章
- Python Web框架 tornado 异步原理
Python Web框架 tornado 异步原理 参考:http://www.jb51.net/article/64747.htm 待整理
- Python web框架 Tornado异步非阻塞
Python web框架 Tornado异步非阻塞 异步非阻塞 阻塞式:(适用于所有框架,Django,Flask,Tornado,Bottle) 一个请求到来未处理完成,后续一直等待 解决方案: ...
- 异步非阻塞IO的Python Web框架--Tornado
Tornado的全称是Torado Web Server,从名字上就可知它可用作Web服务器,但同时它也是一个Python Web的开发框架.最初是在FriendFeed公司的网站上使用,FaceBo ...
- Python Web框架Tornado的异步处理代码演示样例
1. What is Tornado Tornado是一个轻量级但高性能的Python web框架,与还有一个流行的Python web框架Django相比.tornado不提供操作数据库的ORM接口 ...
- Python web框架——Tornado
Tornado是一个Python Web框架和异步网络库,最初由FriendFeed开发.通过使用非阻塞网络I / O,Tornado可以扩展到数万个开放连接,使其成为需要长时间连接每个用户的长轮询, ...
- 关于Python Web框架——Tornado
关于Tornado的入门看这篇文章,写的非常好: https://zhuanlan.zhihu.com/p/37382503 Tornado 是一个Python web框架和异步网络库,使用非阻塞网络 ...
- Python web框架 Tornado(三)自定义session组件
我们在学习Django框架的过程中,内部封装了session组件,以方便于我们使用进行验证.但是Tornado框架是没有session的,所以如果想使用session的话,就需要我们自己定制相对应的组 ...
- Python web框架 Tornado(二)异步非阻塞
异步非阻塞 阻塞式:(适用于所有框架,Django,Flask,Tornado,Bottle) 一个请求到来未处理完成,后续一直等待 解决方案:多线程,多进程 异步非阻塞(存在IO请求): Torna ...
- Python web 框架之 Django 基础搭建服务
1. 需要安装 Python 和 Django 环境,Python 环境的安装我就不在多说了 2. 安装框架 Django Django 安装,推荐先装个 pip吧,easyinstall也可以,然后 ...
随机推荐
- 激活函数之softmax介绍及C++实现
下溢(underflow):当接近零的数被四舍五入为零时发生下溢.许多函数在其参数为零而不是一个很小的正数时才会表现出质的不同.例如,我们通常要避免被零除或避免取零的对数. 上溢(overflow): ...
- php 路径问题
今天迁移网站服务器时,路径出错: 解决办法: 在网站首页根目录 设置define 全局变量 ——根目录: 在涉及目录的地方,统统替换为 根目录:
- linux 系统优化+定时任务
安装软件 通过yum安装 自动补全工具:yum completion yum install -y tree bash-completion wget vim find -[TAB] 更改系统的yum ...
- admin- 源码解析(流程)
首先我们需要了解一个知识点:---单例模式--- 单例模式 单例模式(Singleton Pattern)是一种常用的软件设计模式,该模式的主要目的是确保某一个类只有一个实例存在.当你希望在整个系统中 ...
- 【sklearn】性能度量指标之ROC曲线(二分类)
原创博文,转载请注明出处! 1.ROC曲线介绍 ROC曲线适用场景 二分类任务中,positive和negtive同样重要时,适合用ROC曲线评价 ROC曲线的意义 TPR的增长是以FPR的增长为代价 ...
- Adobe Flash Builder 4.6 Premium 安装破解
1.到Adobe官网下载FlashBuilder 4.6,有简体中文版: 语言:简体中文(Simplified)http://trials3.adobe.com/AdobeProducts/FLBR/ ...
- HihoCoder 1055 : 刷油漆 树形DP第一题(对象 点)
刷油漆 时间限制:10000ms 单点时限:1000ms 内存限制:256MB 描述 上回说到,小Ho有着一棵灰常好玩的树玩具!这棵树玩具是由N个小球和N-1根木棍拼凑而成,这N个小球都被小Ho标上了 ...
- 重温CLR(十) 字符、字符串和文本处理
本章将介绍.net中处理字符和字符串的机制 字符 在.NET Framewole中,字符总是表示成16位Unicode代码值,这简化了国际化应用程序的开发. 每个字符都表示成System.Char结构 ...
- selenium 上传文件方法补充——SendKeys、win32gui
之前和大家说了input标签的上传文件的方式: <selenium2 python 自动化测试实战>(13)——上传文件 现在好多网站上传的标签并不是input,而是div之类的比如: 全 ...
- 分享Win7 将svn增加系统服务并成功启动的方法
版权声明:本文为博主原创文章,未经博主同意不得转载. https://blog.csdn.net/default7/article/details/32728717 依照网上搜索到的方法,结果一直提示 ...