How to install cacti on centos 6
Cacti – Network and performance monitoring tool
Cacti is one of best monitoring tool used to monitor network, CPU load, memory, Disk and other services.
Cacti uses PHP for front end, RRDTool for graphing and mysql for storage.
Cacti installation on centos requires LAMP setup and SNMP.
Install cacti on centos 6.
Before installing cacti, first we need to setup apache with php, mysql and SNMP services. you can also refer this post (Installing Apache2 , Mysql server and PHP on Centos 6 (LAMP)) for complete LAMP setup.
Install apache, php and mysql
注意 : 新版本Cacti要求版本在5.6以上
Install cacti on centos 6.
Step 1 » Issue the below command to install apache, php and mysql.#####[root@krizna ~]# yum install mysql-server mysql php php-mysql httpd
[root@krizna ~]# yum install httpd
下载安装最新的rpm文件
rpm -Uvh http://repo.mysql.com/mysql-community-release-el6-5.noarch.rpm

- 6
安装MySQL,输入命令:
yum install mysql-community-server
Step 2 » Start mysql and apache service[root@krizna ~]# chkconfig --level 235 httpd on
[root@krizna ~]# service httpd start
[root@krizna ~]# chkconfig --level 235 mysqld on
[root@krizna ~]# service mysqld start
Setup mysql server
Step 3 » Issue the below command to create mysql root password.[root@krizna ~]# mysqladmin -u root password 'newpassword'
[and]
issue this command to secure your mysql database.[root@krizna ~]# /usr/bin/mysql_secure_installation
Step 4 » Create new database “cactidb” and username/password to access “cactidb” database .[root@krizna ~]# mysql -u root -pmysql> create database cactidb;
Query OK, 1 row affected (0.00 sec)mysql> GRANT ALL ON cactidb.* TO usercacti@localhost IDENTIFIED BY 'passwordcacti';
Query OK, 0 rows affected (0.00 sec)
mysql> quit
Here “usercacti” is the username and “passwordcacti” is the password to access “cactidb” database.
Install SNMP
Step 5 » Now install SNMP by typing the below command.[root@krizna ~]# yum install net-snmp-utils php-snmp net-snmp-libs
Step 6 » Rename the original snmpd.conf file and create a new one .[root@krizna ~]# mv /etc/snmp/snmpd.conf snmpd.conf.org
[root@krizna ~]# touch /etc/snmp/snmpd.conf
Step 7 » Add the below lines to /etc/snmp/snmpd.conf ( New file ).
|
1
2
3
4
5
6
7
8
|
com2sec local localhost public
group MyRWGroup v1 local
group MyRWGroup v2c local
group MyRWGroup usm local
view all included .1 80
access MyRWGroup "" any noauth exact all all none
syslocation srvroom , linux monitor
syscontact krizna (admin@krizna.com)
|
Step 8 » Now start the snmp service[root@krizna ~]# chkconfig --level 235 snmpd on
[root@krizna ~]# service snmpd start
Step 9 » Issue the below command to test your snmp config[root@krizna ~]# snmpwalk -v 1 -c public localhost IP-MIB::ipAdEntIfIndex
IP-MIB::ipAdEntIfIndex.127.0.0.1 = INTEGER: 1
IP-MIB::ipAdEntIfIndex.192.168.1.10 = INTEGER: 2
You should able to get your ip details .
Install Cacti
For installing cacti through yum , you must enable EPEL repository. you can find latest EPEL repository rpm here ( http://ftp.jaist.ac.jp/pub/Linux/Fedora/epel/6/i386/repoview/epel-release.html )
Step 10 »Install the latest EPEL rpm .[root@krizna ~]# rpm -ivh http://ftp.jaist.ac.jp/pub/Linux/Fedora/epel/6/i386/epel-release-6-8.noarch.rpm
Step 11 » Install cacti through yum[root@krizna ~]# yum install cacti
Configure cacti
Step 12 » Now import cacti database tables from the file cacti.sql . Issue the below command to find the location of cacti.sql file.[root@krizna ~]# rpm -ql cacti | grep cacti.sql
/usr/share/doc/cacti-0.8.8a/cacti.sql
Issue the below command to import tables to cactidb[root@krizna ~]# mysql -u root -p cactidb < /usr/share/doc/cacti-0.8.8a/cacti.sql
Step 13 » Now open /etc/cacti/db.php file and edit the below lines .
|
1
2
3
4
|
$database_default = "cactidb";
$database_hostname = "localhost";
$database_username = "usercacti";
$database_password = "passwordcacti";
|
Step 14 » Open /etc/httpd/conf.d/cacti.conf file and comment all “Deny from all” lines.
Step 15 » open /etc/cron.d/cacti file and uncomment the line .*/5 * * * * cacti /usr/bin/php /usr/share/cacti/poller.php > /dev/null 2>&1
Step 16» Now restart apache and cron services[root@krizna ~]# service httpd restart
[root@krizna ~]# service crond restart
Step 17» Now open http://serverip/cacti in your browser , you can see the cacti installation page.
if you are not getting installation page , Disable the firewall ( iptables ) and selinux service on your server .
Disable firewall ( Iptables ) »[root@krizna ~]# service iptables stop
[root@krizna ~]# chkconfig iptables off
Disable Selinux » open the file /etc/selinux/config and find the lineSELINUX=enforcing
and replace withSELINUX=disabled
now reboot the server and try again.
After getting installation page, proceed with the default values and make sure all the binary paths are found as per the below image.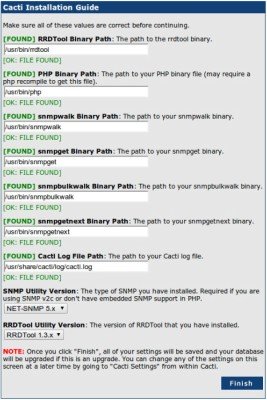
upon completion, you can see the login prompt .
Step 18» The default username and password for cacti is admin/admin. you will be forced to change the password at first login.
Step 19» After login . Choose – > Devices – > Localhost and find “SNMP Options“. select SNMP Version -> “Version 2” and SNMP Community -> public and click the “save” button at the bottom.
Step 20» Now you can see the SNMP information at the TOP . Click “Create Graphs for this Host” and choose Graph Types:-> ALL and choose all the check boxes as below and press “create“. Now choose the colour option ( Leave as it is ) and press “create“.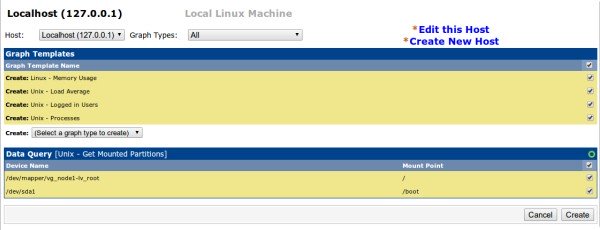
After few minutes , you can see the initial stage of graphs for localhost in the Graphs section . after few hours you can see the graphs like below .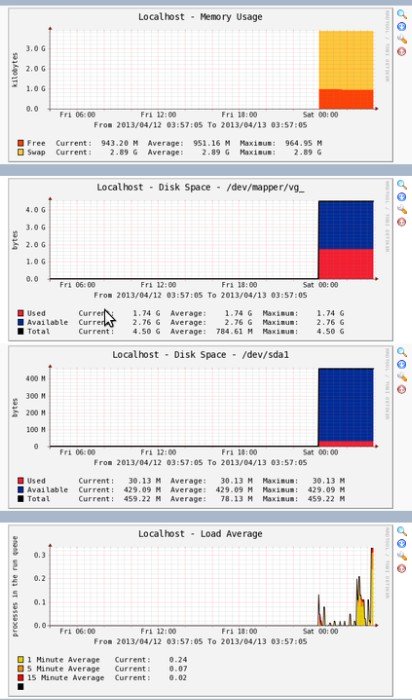
Adding linux machines
» Follow steps 5,6,7,8 and 9 ( In client ).
» Now in cacti , “Create devices” and Add description and hostname (or) IP .
» Choose “Host Template” as “Local linux machine”.
» Under SNMP Options select SNMP Version -> “Version 2” and SNMP Community -> public and click the “save” button at the bottom.
» Follow step 20
» Add the device to the Graph tree.
Adding Windows machines
» Enable SNMP service ( Refer this post)
» Make sure you added community name “public” and allowed your Cacti server IP.
» Now in cacti , “Create devices” and Add description and hostname (or) IP .
» Choose “Host Template” as “Windows 2000/XP host”.
» Under SNMP Options select SNMP Version -> “Version 2” and SNMP Community -> public and click the “save” button at the bottom.
» Follow step 20
» Add the device to the Graph tree.
Good luck
How to install cacti on centos 6的更多相关文章
- How To Install Java on CentOS and Fedora
PostedDecember 4, 2014 453.8kviews JAVA CENTOS FEDORA Introduction This tutorial will show you how ...
- Install Redis on CentOS 6.4--转
Install Redis on CentOS 6.4 source:http://thoughts.z-dev.org/2013/05/27/install-redis-on-centos-6-4/ ...
- Install ssdb-rocks on CentOS 6
Install ssdb-rocks on CentOS 6 C.C. 发表于 2014年08月10日 20:14 | Hits: 649 为了优化节操精选的弹幕系统,打算更换到Facebook的R ...
- How to install cacti With Nginx
转载于:https://github.com/blackyboy/Ubuntu-Linux-Stuffs/blob/master/How-to-install-Cacti-Monitoring-Ser ...
- Steps to Install Hadoop on CentOS/RHEL 6---reference
http://tecadmin.net/steps-to-install-hadoop-on-centosrhel-6/# The Apache Hadoop software library is ...
- How to install MP4box on CentOS 6
How to install MP4box on CentOS 6 MP4Box is a MP4 multiplexer. It can import MPEG-4 video, DivX, Xvi ...
- How to Install MySQL on CentOS 7
CentOS 7的yum源中貌似没有正常安装mysql时的mysql-sever文件,需要去官网上下载 # wget http://dev.mysql.com/get/mysql-communit ...
- How to install Jenkins on CentOS 7
How to install Jenkins on CentOS 7 on March 3, 2018 by AmirLeave a comment Introduction Jenkins is a ...
- How To Install Cacti On Ubuntu 14
How To Install Cacti On Ubuntu 14.04/14.10 by anismaj Cacti is an open source web based network moni ...
随机推荐
- HIVE学习(待更新)
1 安装hive 下载 http://mirrors.shu.edu.cn/apache/hive/hive-1.2.2/,红框中的不需要编译. 由于hive是默认将元数据保存在本地内嵌的 Derby ...
- MongoDB 3.4 分片集群副本集 认证
连接到router所在的MongoDB Shell 我本机端口设置在50000上 mongo --port 接下来的流程和普通数据库添加用户权限一样 db.createUser({user:&quo ...
- halcon中你不知道的标定板细节
本人文着重阐述以下问题: halcon是否只能使用halcon专用的标定板? halcon标定板如何生成? halcon标定板如何摆放,拍照数量有无限制? halcon是否只能使用halcon专用的标 ...
- 【Seajs源码分析】3. 工具方法2
util-request.js 动态加载模块 /** * util-request.js - The utilities for requesting script and style files * ...
- APUE学习笔记——10.11~10.13 信号集、信号屏蔽字、未决信号
如有转载,请注明出处:Windeal专栏 首先简述下几个概念的关系: 我们通过信号集建立信号屏蔽字,使得信号发生阻塞,被阻塞的信号即未决信号. 信号集: 信号集:其实就是一系列的信号.用sigset_ ...
- L152
For the first time, one of the new immunotherapy drugs has shown promise against breast cancer in a ...
- Git 配置ssh key的步骤
First start by setting up your own public/private key pair set. This can use either DSA or RSA, so b ...
- 《Effective Java》读书笔记(一)之创建和销毁对象
最近在研读<Effective Java>一书,读书不做点笔记,感觉很容易就忘掉,于是用本篇博客来记录阅读此书的笔记. 郑重声明: 由于是<Effective Java>一书的 ...
- caffe学习3——layers
1 layer是模型的本质,是计算的基本单元.Layers convolve filters, pool, take inner products, apply nonlinearities like ...
- Ubuntu网络代理问题
问题描述 新开机的电脑,不开lantern就上不了网.很气. 解决过程 首先当然是寻求解决方案了.未果 然后就是妥协,每次先开一次lantern.(其实也不是很麻烦是吧,哎,是的是的) 今天早晨友人来 ...