65、Spark Streaming:数据接收原理剖析与源码分析
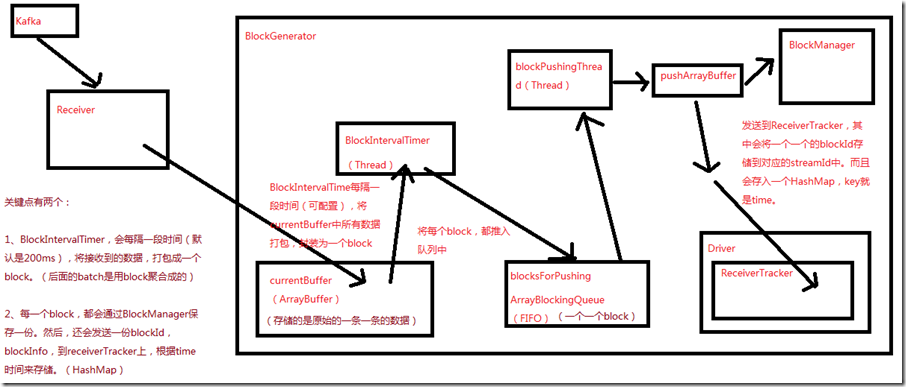
一、数据接收原理
二、源码分析
入口包org.apache.spark.streaming.receiver下ReceiverSupervisorImpl类的onStart()方法
###

 override protected def onStart() {

    // 这里的blockGenerator很重要,和数据接收有关,其运行在worker的executor端负责数据接收后的一些存取工作,以及配合ReceiverTracker

    // 在Executor上,启动Receiver之前,就会先启动这个Receiver相关的一个blockGenerator,该组件,在数据接收中,极其重要

    blockGenerator.start()

  }
ReceiverSupervisorImpl类的onStart()方法,调用了blockGenerator.start()方法,跟进去看看
###org.apache.spark.streaming.receiver/BlockGenerator.scala

  def start() {

    // BlockGenerator.start()方法,其实就是启动内部两个关键的后台线程,

    // 一个是blockIntervalTimer,负责将currentBuffer中的原始数据,打包成一个个的block

    // 另一个是blockPushingThread,负责将blocksForPushing中的block,调用pushArrayBuffer()方法

    blockIntervalTimer.start()

    blockPushingThread.start()

    logInfo("Started BlockGenerator")

  }
blockGenerator.start()方法,调用了blockIntervalTimer.start()和blockPushingThread.start()方法
先看看有关变量的定义
###org.apache.spark.streaming.receiver/BlockGenerator.scala

private val blockInterval = conf.getLong("spark.streaming.blockInterval", 200)

  // blockInterval,是有一个默认值的,spark.streaming.blockInterval,默认是200ms,每隔200ms,就会调用updateCurrentBuffer函数

  private val blockIntervalTimer =

    new RecurringTimer(clock, blockInterval, updateCurrentBuffer, "BlockGenerator")

  // blocksForPushing队列的长度,可以调节的,spark.streaming.blockQueueSize,默认10个,可大可小

  private val blockQueueSize = conf.getInt("spark.streaming.blockQueueSize", 10)

  // blocksForPushing队列,

  private val blocksForPushing = new ArrayBlockingQueue[Block](blockQueueSize)

  // blockPushingThread,后台线程,启动之后,就会调用keepPushingBlocks()方法,这个方法中,就会每隔一段时间,去blocksForPushing队列中取block

  private val blockPushingThread = new Thread() { override def run() { keepPushingBlocks() } }

  // 这个currentBuffer,就是用于存放原始的数据

  @volatile private var currentBuffer = new ArrayBuffer[Any]
blockIntervalTimer.start()就是一个线程,这个方法就不看了
重点看下blockPushingThread.start()方法,这个线程开始运行,会调用keepPushingBlocks()方法,代码如下
###org.apache.spark.streaming.receiver/BlockGenerator.scala

  private val blockPushingThread = new Thread() { override def run() { keepPushingBlocks() } }
看keepPushingBlocks()方法
###org.apache.spark.streaming.receiver/BlockGenerator.scala

private def keepPushingBlocks() {

    logInfo("Started block pushing thread")

    try {

      while(!stopped) {

        // 从blocksForPushing这个队列中,poll出来当前队列队首的block,对于阻塞队列,默认设置100ms的超时

        Option(blocksForPushing.poll(100, TimeUnit.MILLISECONDS)) match {

            // 如果拿到了block,调用pushBlock去推送block

          case Some(block) => pushBlock(block)

          case None =>

        }

      }

      // Push out the blocks that are still left

      logInfo("Pushing out the last " + blocksForPushing.size() + " blocks")

      while (!blocksForPushing.isEmpty) {

        logDebug("Getting block ")

        val block = blocksForPushing.take()

        pushBlock(block)

        logInfo("Blocks left to push " + blocksForPushing.size())

      }

      logInfo("Stopped block pushing thread")

    } catch {

      case ie: InterruptedException =>

        logInfo("Block pushing thread was interrupted")

      case e: Exception =>

        reportError("Error in block pushing thread", e)

    }

  }
可以看到keepPushingBlocks()方法,如果拿到了block,调用pushBlock()方法
看看pushBlock()方法
###org.apache.spark.streaming.receiver/BlockGenerator.scala

  private def pushBlock(block: Block) {

    listener.onPushBlock(block.id, block.buffer)

    logInfo("Pushed block " + block.id)

  }
pushBlock()方法会调用listener.onPushBlock()方法,这个listener是BlockGeneratorListener,onPushBlock()在ReceiverSupervisorImpl类中,
看ReceiverSupervisorImpl类的onPushBlock()方法:
###org.apache.spark.streaming.receiver/ReceiverSupervisorImpl.scala

    // onPushBlock就会去调用pushArrayBuffer去推送block

    def onPushBlock(blockId: StreamBlockId, arrayBuffer: ArrayBuffer[_]) {

      pushArrayBuffer(arrayBuffer, None, Some(blockId))

    }
onPushBlock就会去调用pushArrayBuffer()方法
看pushArrayBuffer()方法:
###org.apache.spark.streaming.receiver/ReceiverSupervisorImpl.scala

  def pushArrayBuffer(

      arrayBuffer: ArrayBuffer[_],

      metadataOption: Option[Any],

      blockIdOption: Option[StreamBlockId]

    ) {

    pushAndReportBlock(ArrayBufferBlock(arrayBuffer), metadataOption, blockIdOption)

  }
接着看pushAndReportBlock()方法:
###org.apache.spark.streaming.receiver/ReceiverSupervisorImpl.scala

  def pushAndReportBlock(

      receivedBlock: ReceivedBlock,

      metadataOption: Option[Any],

      blockIdOption: Option[StreamBlockId]

    ) {

    val blockId = blockIdOption.getOrElse(nextBlockId)

    val numRecords = receivedBlock match {

      case ArrayBufferBlock(arrayBuffer) => arrayBuffer.size

      case _ => -1

    }

    val time = System.currentTimeMillis

    // 还用receivedBlockHandler,去调用storeBlock方法,存储block到BlockManager中,这里,也可以看出预写日志的机制

    val blockStoreResult = receivedBlockHandler.storeBlock(blockId, receivedBlock)

    logDebug(s"Pushed block $blockId in ${(System.currentTimeMillis - time)} ms")

    // 封装一个ReceiverBlockInfo对象,里面有一个streamId

    val blockInfo = ReceivedBlockInfo(streamId, numRecords, blockStoreResult)

    // 调用了ReceiverTracker的Acrot的ask方法,发送AddBlock消息

    val future = trackerActor.ask(AddBlock(blockInfo))(askTimeout)

    Await.result(future, askTimeout)

    logDebug(s"Reported block $blockId")

  }
这里主要看receivedBlockHandler.storeBlock()方法和trackerActor.ask(AddBlock(blockInfo))(askTimeout)
首先看receivedBlockHandler.storeBlock(),看看receivedBlockHandler是什么
###org.apache.spark.streaming.receiver/ReceiverSupervisorImpl.scala

private val receivedBlockHandler: ReceivedBlockHandler = {

    // 如果开启了预写日志机制,spark.streaming.receiver.writeAheadLog.enable,默认false

    // 如果为true,那么receivedBlockHandler就是WriteAheadLogBasedBlockHandler

    // 如果没有开启预写日志机制,那么receivedBlockHandler就是BlockManagerBasedBlockHandler

    if (env.conf.getBoolean("spark.streaming.receiver.writeAheadLog.enable", false)) {

      if (checkpointDirOption.isEmpty) {

        throw new SparkException(

          "Cannot enable receiver write-ahead log without checkpoint directory set. " +

            "Please use streamingContext.checkpoint() to set the checkpoint directory. " +

            "See documentation for more details.")

      }

      new WriteAheadLogBasedBlockHandler(env.blockManager, receiver.streamId,

        receiver.storageLevel, env.conf, hadoopConf, checkpointDirOption.get)

    } else {

      new BlockManagerBasedBlockHandler(env.blockManager, receiver.storageLevel)

    }
接着分别看BlockManagerBasedBlockHandler和WriteAheadLogBasedBlockHandler的storeBlock()方法
先看WriteAheadLogBasedBlockHandler
###org.apache.spark.streaming.receiver/ReceivedBlockHandler.scala

def storeBlock(blockId: StreamBlockId, block: ReceivedBlock): ReceivedBlockStoreResult = {

    // Serialize the block so that it can be inserted into both

    // 先用BlockManager序列化数据

    val serializedBlock = block match {

      case ArrayBufferBlock(arrayBuffer) =>

        blockManager.dataSerialize(blockId, arrayBuffer.iterator)

      case IteratorBlock(iterator) =>

        blockManager.dataSerialize(blockId, iterator)

      case ByteBufferBlock(byteBuffer) =>

        byteBuffer

      case _ =>

        throw new Exception(s"Could not push $blockId to block manager, unexpected block type")

    }

    // Store the block in block manager

    // 将数据保存到BlockManager中去,默认的持久化策略,StorageLevel,是带_SER,_2的,会序列化,复制一份副本到其他Executor的BlockManager,以供容错

    val storeInBlockManagerFuture = Future {

      val putResult =

        blockManager.putBytes(blockId, serializedBlock, effectiveStorageLevel, tellMaster = true)

      if (!putResult.map { _._1 }.contains(blockId)) {

        throw new SparkException(

          s"Could not store $blockId to block manager with storage level $storageLevel")

      }

    }

    // Store the block in write ahead log

    // 将block存入预写日志,通过logManager的writeToLog()方法

    val storeInWriteAheadLogFuture = Future {

      logManager.writeToLog(serializedBlock)

    }

    // Combine the futures, wait for both to complete, and return the write ahead log segment

    val combinedFuture = storeInBlockManagerFuture.zip(storeInWriteAheadLogFuture).map(_._2)

    val segment = Await.result(combinedFuture, blockStoreTimeout)

    WriteAheadLogBasedStoreResult(blockId, segment)

  }
再看BlockManagerBasedBlockHandler
###org.apache.spark.streaming.receiver/ReceivedBlockHandler.scala

 // 直接将数据保存到BlockManager中,就可以了

  def storeBlock(blockId: StreamBlockId, block: ReceivedBlock): ReceivedBlockStoreResult = {

    val putResult: Seq[(BlockId, BlockStatus)] = block match {

      case ArrayBufferBlock(arrayBuffer) =>

        blockManager.putIterator(blockId, arrayBuffer.iterator, storageLevel, tellMaster = true)

      case IteratorBlock(iterator) =>

        blockManager.putIterator(blockId, iterator, storageLevel, tellMaster = true)

      case ByteBufferBlock(byteBuffer) =>

        blockManager.putBytes(blockId, byteBuffer, storageLevel, tellMaster = true)

      case o =>

        throw new SparkException(

          s"Could not store $blockId to block manager, unexpected block type ${o.getClass.getName}")

    }

    if (!putResult.map { _._1 }.contains(blockId)) {

      throw new SparkException(

        s"Could not store $blockId to block manager with storage level $storageLevel")

    }

    BlockManagerBasedStoreResult(blockId)

  }
接着看trackerActor.ask(AddBlock(blockInfo))(askTimeout),会发一个AddBlock消息到ReceiverTracker,进入看一下:
###org.apache.spark.streaming.scheduler/ReceiverTracker.scala

  private def addBlock(receivedBlockInfo: ReceivedBlockInfo): Boolean = {

    receivedBlockTracker.addBlock(receivedBlockInfo)

  }
接着看receivedBlockTracker的addBlock方法,除了这个方法之外,还看receivedBlockTracker的几个重要变量,
先看方法:
###org.apache.spark.streaming.scheduler/ReceivedBlockTracker.scala

  def addBlock(receivedBlockInfo: ReceivedBlockInfo): Boolean = synchronized {

    try {

      writeToLog(BlockAdditionEvent(receivedBlockInfo))

      getReceivedBlockQueue(receivedBlockInfo.streamId) += receivedBlockInfo

      logDebug(s"Stream ${receivedBlockInfo.streamId} received " +

        s"block ${receivedBlockInfo.blockStoreResult.blockId}")

      true

    } catch {

      case e: Exception =>

        logError(s"Error adding block $receivedBlockInfo", e)

        false

    }

  }
再看变量
###org.apache.spark.streaming.scheduler/ReceivedBlockTracker.scala

// 封装了streamId到block的映射

  private val streamIdToUnallocatedBlockQueues = new mutable.HashMap[Int, ReceivedBlockQueue]

  // 封装了time到block的映射

  private val timeToAllocatedBlocks = new mutable.HashMap[Time, AllocatedBlocks]

  // 如果开启了预写机制机制,这还有LogManager,ReceiverTracker接收到数据时,也会判断,

  // 如果开启了预写日志机制,写一份到预写日志中

  private val logManagerOption = createLogManager()
65、Spark Streaming:数据接收原理剖析与源码分析的更多相关文章
- 66、Spark Streaming:数据处理原理剖析与源码分析(block与batch关系透彻解析)
一.数据处理原理剖析 每隔我们设置的batch interval 的time,就去找ReceiverTracker,将其中的,从上次划分batch的时间,到目前为止的这个batch interval ...
- 64、Spark Streaming:StreamingContext初始化与Receiver启动原理剖析与源码分析
一.StreamingContext源码分析 ###入口 org.apache.spark.streaming/StreamingContext.scala /** * 在创建和完成StreamCon ...
- 22、BlockManager原理剖析与源码分析
一.原理 1.图解 Driver上,有BlockManagerMaster,它的功能,就是负责对各个节点上的BlockManager内部管理的数据的元数据进行维护, 比如Block的增删改等操作,都会 ...
- 21、Shuffle原理剖析与源码分析
一.普通shuffle原理 1.图解 假设有一个节点上面运行了4个 ShuffleMapTask,然后这个节点上只有2个 cpu core.假如有另外一台节点,上面也运行了4个ResultTask,现 ...
- 20、Task原理剖析与源码分析
一.Task原理 1.图解 二.源码分析 1. ###org.apache.spark.executor/Executor.scala /** * 从TaskRunner开始,来看Task的运行的工作 ...
- 18、TaskScheduler原理剖析与源码分析
一.源码分析 ###入口 ###org.apache.spark.scheduler/DAGScheduler.scala // 最后,针对stage的task,创建TaskSet对象,调用taskS ...
- 23、CacheManager原理剖析与源码分析
一.图解 二.源码分析 ###org.apache.spark.rdd/RDD.scalal ###入口 final def iterator(split: Partition, context: T ...
- 19、Executor原理剖析与源码分析
一.原理图解 二.源码分析 1.Executor注册机制 worker中为Application启动的executor,实际上是启动了这个CoarseGrainedExecutorBackend进程: ...
- 16、job触发流程原理剖析与源码分析
一.以Wordcount为例来分析 1.Wordcount val lines = sc.textFile() val words = lines.flatMap(line => line.sp ...
随机推荐
- apache中的vhosts的配置。
<VirtualHost *:80>ServerAdmin wangjiemengya@foxmail.comDocumentRoot "E:\wordDocument\www& ...
- springcolud 的学习(四)服务治理. Eureka
什么是服务治理在传统rpc远程调用中,服务与服务依赖关系,管理比较复杂,所以需要使用服务治理,管理服务与服务之间依赖关系,可以实现服务调用.负载均衡.容错等,实现服务发现与注册.服务注册与发现 在服务 ...
- The underlying connection was closed: An unexpected error occurred on a rece
服务器问题,在后台访问外网了,特别是https的网站,容易出这个问题. 修改服务器配置,或修改代码解决.
- Windows 7 下安装 docker
Windows 7 下需要安装docker toolbox即可(里面打包了docker.oracle virtualbox.Git) 1. 下载 1. 下载路径https://github.com/d ...
- 2019 竞技世界java面试笔试题 (含面试题解析)
本人3年开发经验.18年年底开始跑路找工作,在互联网寒冬下成功拿到阿里巴巴.今日头条.竞技世界等公司offer,岗位是Java后端开发,最终选择去了竞技世界. 面试了很多家公司,感觉大部分公司考察的点 ...
- DNS原理及劫持问题
对于互联网,人们总是高谈阔论,却很少有人愿意去了解电脑.手机.电视这些设备到底是如何被“连接”起来的.本文通过“我”,一个普通的网络请求的视角,给大家介绍下“我”的工作流程是如何的. 人们动动手指,点 ...
- pandas-06 Series和Dataframe的排序操作
pandas-06 Series和Dataframe的排序操作 对pandas中的Series和Dataframe进行排序,主要使用sort_values()和sort_index(). DataFr ...
- HTML实用文本框样式
输入框景背景透明: <input style="background:transparent;border:1px solid #ffffff"> 鼠标划过输入框,输入 ...
- react学习记录(二)
JSX 在render中return标签的部分可以插入字符串,数字,数组 class Welcome extends React.Component { render(){ return ( < ...
- css-博客样式初体验
css学习一周后,写了个基础博客样式. 样式是出来了,但是在写的过程中感觉css写的杂乱无章,可能是写的太少了吧,条例不是很清除,只是在写的过程 中一个点一个点的套,感觉样式出来即可,没有做到由全局出 ...