SuperWebSocket实现服务端和WebSocket4Net实现客户端
SuperWebSocket实现服务端和WebSocket4Net实现客户端具体实现如下:
SuperWebSocket实现服务端
注:本作者是基于vs2019 enterprise版本,所有项目均为.Net Framwork4.7版本(因为WebSocket需求是.Net Framwork4.0以上版本)
1、新建控制台项目ConsoleAppWebsocketServer,作为服务端,选择项目右键管理Nuget程序包,搜索 SuperWebSocket ,选择SuperWebSocketNETServer,点击右侧 安装,
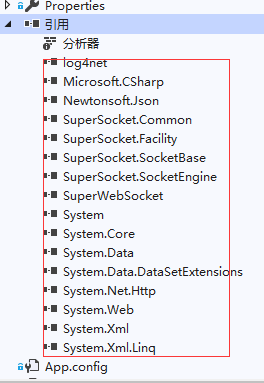
等待安装完成,安装完成以后,项目会多出很多引用库,如下
,
项目的Program.cs内容如下:
using SuperWebSocket;
using System;
using System.Collections.Generic;
using System.Linq;
using System.Text;
using System.Threading.Tasks;
using System.Web;
namespace ConsoleAppWebsocketServer
{
class Program
{
static void Main(string[] args)
{
Console.WriteLine("服务端");
WebSocketServer webSocketServer = new WebSocketServer();
webSocketServer.NewSessionConnected += WebSocketServer_NewSessionConnected;
webSocketServer.NewMessageReceived += WebSocketServer_NewMessageReceived;
webSocketServer.SessionClosed += WebSocketServer_SessionClosed;
if (!webSocketServer.Setup("127.0.0.1", 1234))
{
Console.WriteLine("设置服务监听失败!");
}
if (!webSocketServer.Start())
{
Console.WriteLine("启动服务监听失败!");
}
Console.WriteLine("启动服务监听成功!");
Console.WriteLine("按任意键结束。。。");
Console.ReadKey();
webSocketServer.Dispose();
}
private static void WebSocketServer_NewSessionConnected(WebSocketSession session)
{
string msg = $"{DateTime.Now.ToString("HH:mm:ss")} 客户端:{GetwebSocketSessionName(session)} 加入";
Console.WriteLine($"{msg}");
SendToAll(session, msg);
}
private static void WebSocketServer_NewMessageReceived(WebSocketSession session, string value)
{
string msg = $"{DateTime.Now.ToString("HH:mm:ss")} 服务端收到客户端:{GetwebSocketSessionName(session)}发送数据:{value}";
Console.WriteLine($"{msg}");
SendToAll(session, value);
}
private static void WebSocketServer_SessionClosed(WebSocketSession session, SuperSocket.SocketBase.CloseReason value)
{
string msg = $"{DateTime.Now.ToString("HH:mm:ss")} 客户端:{GetwebSocketSessionName(session)}关闭,原因:{value}";
Console.WriteLine($"{msg}");
SendToAll(session, msg);
}
/// <summary>
/// 获取webSocketSession的名称
/// </summary>
/// <param name="webSocketSession"></param>
public static string GetwebSocketSessionName(WebSocketSession webSocketSession)
{
return HttpUtility.UrlDecode(webSocketSession.SessionID);
}
/// <summary>
/// 广播,同步推送消息给所有的客户端
/// </summary>
/// <param name="webSocketSession"></param>
/// <param name="msg"></param>
public static void SendToAll(WebSocketSession webSocketSession, string msg)
{
foreach (var item in webSocketSession.AppServer.GetAllSessions())
{
item.Send(msg);
}
}
}
}
WebSocket4Net实现客户端
2、新建控制台项目ConsoleAppWebsocketClient,作为客户端,选择项目右键管理Nuget程序包,为了测试SuperWebSocket作为服务端的功能,本文客户端使用了WebSocket4Net,同样也可以使用 SuperWebSocket ,本项目选择WebSocket4Net,点击右侧 安装,等待安装完成,安装完成之后,同样项目下会多一些引用库,如下:

项目的Program.cs内容如下:
using System;
using System.Collections.Generic;
using System.Linq;
using System.Text;
using System.Threading.Tasks;
using WebSocket4Net;
using System.Threading;
namespace ConsoleAppWebsocketClient
{
class Program
{
public static WebSocket webSocket4Net = null;
static void Main(string[] args)
{
Console.WriteLine("客户端");
webSocket4Net = new WebSocket("ws://127.0.0.1:1234");
webSocket4Net.Opened += WebSocket4Net_Opened;
webSocket4Net.MessageReceived += WebSocket4Net_MessageReceived;
webSocket4Net.Open();
Console.WriteLine("客户端连接成功!");
Thread thread = new Thread(ClientSendMsgToServer);
thread.IsBackground = true;
thread.Start();
Console.WriteLine("按任意键结束。。。");
Console.ReadKey();
webSocket4Net.Dispose();
}
public static void ClientSendMsgToServer()
{
int i = 88;
while (true)
{
//Console.WriteLine($"客户端发送数据{i++}");
webSocket4Net.Send($"{i++}");
Thread.Sleep(TimeSpan.FromSeconds(5));
}
}
private static void WebSocket4Net_MessageReceived(object sender, MessageReceivedEventArgs e)
{
Console.WriteLine($"服务端回复数据:{e.Message}!");
}
private static void WebSocket4Net_Opened(object sender, EventArgs e)
{
webSocket4Net.Send($"客户端准备发送数据!");
}
}
}
3、测试
为了更好的看到测试效果,又多使用了js客户端来测试,添加html文件,命名websockettest.html,内容如下:
<!DOCTYPE HTML>
<html>
<head>
<meta http-equiv="content-type" content="text/html" />
<meta name="author" content="https://www.baidu.com" />
<title>websocket test</title>
<script>
var socket;
function Connect(){
try{
socket=new WebSocket('ws://127.0.0.1:1234');
}catch(e){
alert('error');
return;
}
socket.onopen = sOpen;
socket.onerror = sError;
socket.onmessage= sMessage;
socket.onclose= sClose;
}
function sOpen(){
alert('connect success!');
}
function sError(e){
alert("error " + e);
}
function sMessage(msg){
document.getElementById("msgrecv").value = msg.data;
}
function sClose(e){
alert("connect closed:" + e.code);
}
function Send(){
socket.send(document.getElementById("msg").value);
}
function Close(){
socket.close();
}
</script>
</head>
<body>
<input id="msg" type="text" size = "200" >
<input id="msgrecv" type="text" size = "200">
<button id="connect" onclick="Connect();">Connect</button>
<button id="send" onclick="Send();">Send</button>
<button id="close" onclick="Close();">Close</button>
</body>
</html>
4、运行结果
到此位置所有的准备工作都完成了,一个服务端ConsoleAppWebsocketServer,两个客户端(ConsoleAppWebsocketClient,websockettest.html),那么接下来运行项目
解决方案 右键,属性,设置启动项目如下:

启动服务端ConsoleAppWebsocketServer,客户端ConsoleAppWebsocketClient之后,再去手动点击websockettest.html,
运行效果:

SuperWebSocket实现服务端和WebSocket4Net实现客户端的更多相关文章
- WebSocket——SuperWebSocket实现服务端和客户端
WebSocket——SuperWebSocket实现服务端和客户端具体实现如下: 注:本作者是基于vs2019 enterprise版本,所有项目均为.Net Framwork4.7版本(因为Web ...
- git的CentOS服务端安装和windows客户端的使用
git的CentOS服务端安装和windows客户端的使用 此教程以 搬瓦工vps CentOS 6 x64 的系统为环境,搭建 git 服务端.windows 7 系统为客户端. git客户端 在W ...
- Identity4实现服务端+api资源控制+客户端请求
准备写一些关于Identity4相关的东西,最近也比较对这方面感兴趣.所有做个开篇笔记记录一下,以便督促自己下一个技术方案方向 已经写好的入门级别Identity4的服务+api资源访问控制和简单的客 ...
- windows10 64位 安装mysql服务端 并使用navicat客户端链接 掉的一堆坑
1.目的 安装mysql服务端 并使用navicat客户端链接 2.过程 1)下载mysql服务端 下载过程(参考https://blog.csdn.net/youxianzide/article/d ...
- thrift 服务端linux C ++ 与客户端 windows python 环境配置(thrift 自带tutorial为例)
关于Thrift文档化的确是做的不好.摸索了很久才终于把跨linux与windows跨C++与python语言的配置成功完成.以下是步骤: 1) Linux下环境配置 ...
- C# WebSocket 服务端示例代码 + HTML5客户端示例代码
WebSocket服务端 C#示例代码 using System; using System.Collections.Generic; using System.Linq; using System. ...
- 自己实现FormsAuthentication.SetAuthCookie方法,怎样在ASP.NET服务端代码中删除客户端Cookie
如何手动设置AuthCookie ASP.NET中实现可以自己实现FormsAuthentication.SetAuthCookie方法,控制更为灵活 /// <summary> /// ...
- FireFly 服务端 Unity3D黑暗世界 客户端 问题
启动服务端成功截图: 连接成功截图: 测试服务端是否启动成功: 在Web输入:http://localhost:11009/ 按回车 (查看cmd启动的服务端 是否多出如下显示) 服务端启动成功.P ...
- python摸爬滚打之day29----socketserver实现服务端和多个客户端通信
什么是socketserver? TCP协议下的socket实现了服务端一次只能和一个客户端进行通信, 而socketserver实现了服务端一次能和多个客户端进行通信, 底层调用的还是socket. ...
随机推荐
- Redis配置文件详情
# Redis 配置文件 # 当配置中需要配置内存大小时,可以使用 1k, 5GB, 4M 等类似的格式,其转换方式如下(不区分大小写) # # 1k => bytes # 1kb => ...
- 使用Cloudera Manager搭建zookeeper集群及HDFS HA实战篇
使用Cloudera Manager搭建zookeeper集群及HDFS HA实战篇 作者:尹正杰 版权声明:原创作品,谢绝转载!否则将追究法律责任. 一.使用Cloudera Manager搭建zo ...
- NTP时间服务器+DHCP服务器的搭建
一.构建NTP时间服务器 ntp服务器监控端口UDP:123 安装ntp和ntpdate 命令:yum -y install ntp netdate 修改配置文件/etc/ntp.conf 启动nt ...
- 自定义jsr-269注解处理器 Error:服务配置文件不正确,或构造处理程序对象javax.annotation.processing.Processor: Provider not found
出现的原因 自定义处理器还没有被编译就被调用,所以报 not found在根据配置寻找自定义的注解处理器时,自定义处理器还未被编译12解决方式 maven项目可以配置编译插件,在编译项目之前先编译处理 ...
- 移动App性能评测与优化-Android内存测试 ,DVM原理
常见的测试方法包括Monkey/UIAutomator类的常规压力测试,大数据/操作的峰值压力测试,长时间运行的稳定性测试等. 前提: 测试准备:版本是纯净版本,不应该附加多余的log和调试用组件. ...
- machine learning (6)---how to choose features, polynomial regression
how to choose features, polynomial regression:通过定义更适合我们的feature,选择更好的模型,使我们的曲线与数据更好的拟合(而不仅仅是一条直线) 可以 ...
- placeholder这个属性 input
input是一个很常见的标签,大家使用的也很常见,但是我在具体的工作中发现要想完美的使用这个标签还是任重而道远,下面是我碰到的几个问题. 1.我们在使用这个标签的时候会习惯的加上placeholder ...
- go内置的反向代理
package main import ( "log" "net/http" "net/http/httputil" "net/u ...
- Linux 颜色设置
echo显示带颜色,需要使用参数-e格式如下:echo -e "\033[字背景颜色;文字颜色m字符串\033[0m"例如: echo -e "\033[41;37m T ...
- mysql 5.7.21, for Linux (i686) 权限配置
配置权限参数: GRANT语法: GRANT 权限 ON 数据库.* TO 用户名@'登录主机' IDENTIFIED BY '密码' 权限: ALL,ALTER,CREATE,DROP,SELECT ...
