使用vue搭建应用二加入element
安装使用 element
1.安装
yarn add element-ui
2.使用
(1)在 main.js 中引入 element
main.js 为修改
import Vue from 'vue'

import App from './App'

import router from './router'

import ElementUI from 'element-ui'

import 'element-ui/lib/theme-chalk/index.css'

Vue.config.productionTip = false

Vue.use(ElementUI)

/* eslint-disable no-new */

new Vue({

  el: '#app',

  router,

  render: h => h(App)

})
(2)简单应用
修改 src/components/HelloWorld.vue
<template>

  <div class="hello">

    <h1>{{ msg }}</h1>

    <el-row>

      <el-button icon="el-icon-search" circle></el-button>

      <el-button type="primary" icon="el-icon-edit" circle></el-button>

      <el-button type="success" icon="el-icon-check" circle></el-button>

      <el-button type="info" icon="el-icon-message" circle></el-button>

      <el-button type="warning" icon="el-icon-star-off" circle></el-button>

      <el-button type="danger" icon="el-icon-delete" circle></el-button>

    </el-row>

  </div>

</template>

<script>

export default {

  name: 'HelloWorld',

  data () {

    return {

      msg: 'Welcome to Your Vue.js App'

    }

  }

}

</script>

<!-- Add "scoped" attribute to limit CSS to this component only -->

<style scoped>

h1, h2 {

  font-weight: normal;

}

</style>
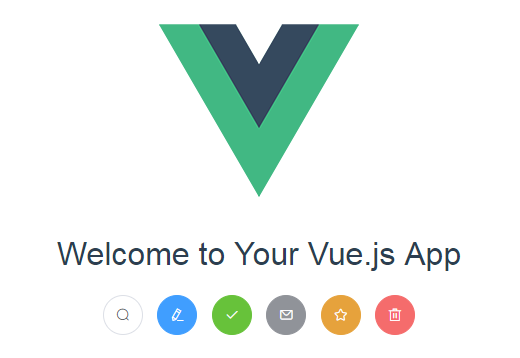
重新启动,预览 http://localhost:8080,变为

(3)修改路由
将src下的components改为views,在views下添加页面Login.vue、Home.vue、404.vue
Login.vue
Home.vue
404.vue
修改src/router/index.js,添加对应的路由
import Vue from 'vue'

import Router from 'vue-router'

import Login from '@/views/Login'

import Home from '@/views/Home'

import NotFound from '@/views/404'

Vue.use(Router)

export default new Router({

  routes: [

    {

      path: '/',

      name: 'Home',

      component: Home

    }, {

      path: '/login',

      name: 'Login',

      component: Login

    }

    , {

      path: '/404',

      name: 'NotFound',

      component: NotFound

    }

  ]

})
重新启动服务
http://localhost:8080/#/

http://localhost:8080/#/login显示Login页面
使用vue搭建应用二加入element的更多相关文章
- vue项目搭建 (二) axios 封装篇
vue项目搭建 (二) axios 封装篇 项目布局 vue-cli构建初始项目后,在src中进行增删修改 // 此处是模仿github上 bailicangdu 的 ├── src | ├── ap ...
- 二、Electron + Webpack + Vue 搭建开发环境及打包安装
目录 Webpack + Vue 搭建开发环境及打包安装 ------- 打包渲染进程 Electron + Webpack 搭建开发环境及打包安装 ------- 打包主进程 Electron + ...
- Electron-vue实战(一)—搭建项目与安装Element UI
Electron-vue实战—搭建项目与安装Element UI 作者:狐狸家的鱼 本文链接 GitHub:sueRimn 一.新建项目1.初始化项目打开cmd,新建一个项目,我使用的是electro ...
- Vue小项目二手书商城:(一)准备工作、组件和路由
本项目基于vue2.5.2,与低版本部分不同之处会在(五)参考资料中提出 完整程序:https://github.com/M-M-Monica/bukesi 实现内容: 资源准备(mock数据) 组件 ...
- 深入浅出的webpack构建工具--webpack4+vue搭建环境 (十三)
深入浅出的webpack构建工具--webpack4+vue搭建环境 (十三) 从上面一系列的webpack配置的学习,我们现在来使用webpack来搭建vue的开发环境.首先我们来设想下我们的项目的 ...
- vue搭建骨架屏步骤配置
1.什么是骨架屏幕? 在页面加载数据之前,有一段空白时间,要么用loading加载,要么就用骨架屏. 在开发webapp的时候总是会受到首屏加载时间过长的影响,主流的解决方法是在载入完成之前显示loa ...
- Vue 搭建项目
Vue 搭建项目 一.node下载安装: 1.下载:https://nodejs.org/en/download/ 2.安装默认许选择,下一步就行: 3.安装完之后就可以使用npm命令 二.通过@v ...
- (原创)LAMP搭建之二:apache配置文件详解(中英文对照版)
LAMP搭建之二:apache配置文件详解(中英文对照版) # This is the main Apache server configuration file. It contains the # ...
- Selenium终极自动化测试环境搭建(二)Selenium+Eclipse+Python
Selenium终极自动化测试环境搭建(二)Selenium+Eclipse+Python 前面举例了Selenium+Eclipse+Junit+TestNG自动化测试环境的搭建,在前一篇的基础上, ...
随机推荐
- sublime中文解决
1.写好文件sublime_imfix.c并保存. #include <gtk/gtkimcontext.h> void gtk_im_context_set_client_window ...
- springMVC(2)
SpringMVC_JSR303数据校验 1.需要加入hibernate validator验证框架 2.在springMVC配置文件中添加<mvc:annotation-driven/> ...
- Spring启动,constructor,@PostConstruct,afterPropertiesSet,onApplicationEvent执行顺序
package com.xx; import javax.annotation.PostConstruct; import javax.annotation.Resource; import org. ...
- UI与数据的绑定
核心是数据变化跟踪与UI更新的问题 概念整理: 供业务使用的叫数据: 供UI使用的叫状态: UI的变化能被监听到: 数据的变化能实时反映到UI上: 数据变化—>拦截—〉UI状态重置—>UI ...
- Internal.Cryptography.CryptoThrowHelper+WindowsCryptographicException 拒绝访问 / 出现了内部错误 c# – 当使用X509Certificate2加载p12/pfx文件时出现
环境:iis/netcore 2.2 初始调用:X509Certificate2 certificate = new X509Certificate2(input.Path, CER_PASSWORD ...
- SpringBoot整合ActiveMQ发送邮件
虽然ActiveMQ以被其他MQ所替代,但仍有学习的意义,本文采用邮件发送的例子展示ActiveMQ 1. 生产者1.1 引入maven依赖1.2 application.yml配置1.3 创建配置类 ...
- Spring中静态方法中使用@Resource注解的变量
开发中,有些时候可能会工具类的静态方法,而这个静态方法中又使用到了@Resource注解后的变量.如果要直接使用 Utils.staticMethod(),项目会报异常:如果不直接使用,还要先 new ...
- Android Studio 之 LiveData 的配合使用,底层数据变化,自动通知界面
Android Studio 之 LiveData 的配合使用,底层数据变化,自动通知界面 viewModelWithLikeData.getLikeNumber().observe(this, ne ...
- 深度学习最全优化方法总结比较及在tensorflow实现
版权声明:本文为博主原创文章,遵循 CC 4.0 BY-SA 版权协议,转载请附上原文出处链接和本声明. 本文链接:https://blog.csdn.net/u010899985/article/d ...
- How to Install Ruby on CentOS/RHEL 7/6
How to Install Ruby on CentOS/RHEL 7/6 . Ruby is a dynamic, object-oriented programming language foc ...
