微信小程序连接低功率蓝牙控制单片机上硬件设备
1.软件部分介绍
微信小程序是一种新的应用,用户不需要下载应用只用通过扫二维码或者打开链接就能使用,使用完后不需要卸载,直接关闭就行了。微信在2017年初推出微信小程序开发环境。任何企业,媒体,个人都可以注册开发。是一种全新的 开发模式。微信也因此受到许多程序员的一致好评,尤其是微信小程序的云开发,提供大量数据处理接口,让初学者也可以很快入手。不需要后端数据库的支持,自己一个人就可以开发前端和后台。
微信小程序为蓝牙模块提供了18个API。其中低功率蓝牙9个,传统蓝牙9个。本次设计使用了其中的9个接口:
(1) openBluetoothAdapter,这个API用来初始化蓝牙适配器;
(2) startBluetoothDevicesDiscovery,开始搜索蓝牙设备;
(3) onBluetoothDeviceFound,判断搜索到的蓝牙设备的信号强度;
(4) createBLEConnection,连接搜索到的蓝牙设备;
(5) stopBluetoothDevicesDiscovery,关闭搜索蓝牙设备;
(6) getBLEDeviceServices,获取蓝牙的deviceId;
(7) getBLEDeviceCharacteristics,获取蓝牙设备服务的所有特征值;
(8) notycharacteristicsId,启用低功耗蓝牙特征值的notify功能;
(9) writeBLECharacteristicValue,通过微信小程序向蓝牙模块发送命令。
js源代码
Page({

    /**

     * 页面的初始数据

     */

    data: {

        connect: false,

        send_hex: false,

        send_string: true,

        send_string_val: 'Hex',

        recv_string: true,

        recv_string_val: 'Hex',

        recv_value: '',

        send_number: 0,

        recv_number: 0,

        recv_hex: true,

        wendu: 30,

        yanwu: 60

    },

    /*** 生命周期函数--监听页面加载 */

    onLoad: function (options) {

        wx.stopBluetoothDevicesDiscovery({

            success: function (res) {

                console.log('停止搜索设备', res)

            }

        })

        console.log(options);

        this.setData({

            deviceId: options.id,

            deviceName: options.name

        });

        console.log('设备的ID', this.data.deviceId);

    },

    /*** 生命周期函数--监听页面显示 */

    onShow: function () {

        wx.stopBluetoothDevicesDiscovery({

            success: function (res) {

                console.log('停止搜索设备', res)

            }

        })

        var that = this;

        /* 连接中动画 */

        wx.showLoading({

            title: '连接中...',

        });

        /* 开始连接蓝牙设备 */

        wx.createBLEConnection({

            deviceId: that.data.deviceId,

            success: function (res) {

                console.log('连接成功', res);

                wx.hideLoading();

                /* 获取设备的服务UUID */

                wx.getBLEDeviceServices({

                    deviceId: that.data.deviceId,

                    success: function (service) {

                        that.setData({

                            serviceId: "0000FFE0-0000-1000-8000-00805F9B34FB" //确定需要的服务UUID

                        });

                        console.log('需要的服务UUID', that.data.serviceId)

                        that.Characteristics(); //调用获取特征值函数

                    },

                });

                that.setData({

                    connect: true

                })

            },

        })

    },

    Characteristics: function () {

        var that = this;

        var device_characteristics = [];

        var characteristics_uuid = {};

        wx.getBLEDeviceCharacteristics({

            deviceId: that.data.deviceId,

            serviceId: that.data.serviceId,

            success: function (res) {

                var characteristics = res.characteristics; //获取到所有特征值

                var characteristics_length = characteristics.length; //获取到特征值数组的长度

                console.log('获取到特征值', characteristics);

                console.log('获取到特征值数组长度', characteristics_length);

                that.setData({

                    notycharacteristicsId: "0000FFE1-0000-1000-8000-00805F9B34FB", //需确定要的使能UUID

                    characteristicsId: "0000FFE1-0000-1000-8000-00805F9B34FB" //暂时确定的写入UUID

                });

                console.log('使能characteristicsId', that.data.notycharacteristicsId);

                console.log('写入characteristicsId', that.data.characteristicsId);

                that.notycharacteristicsId(); //使能事件

            },

        })

    },

    /* 使能函数 */

    notycharacteristicsId: function () {

        var that = this;

        var recv_value_ascii = "";

        var string_value = "";

        var recve_value = "";

        wx.notifyBLECharacteristicValueChange({

            deviceId: that.data.deviceId,

            serviceId: that.data.serviceId,

            characteristicId: that.data.notycharacteristicsId,

            state: true,

            success: function (res) {

                console.log('使能成功', res);

                /* 设备返回值 */

                wx.onBLECharacteristicValueChange(function (res) {

                    var length_hex = [];

                    var turn_back = "";

                    var result = res.value;

                    var hex = that.buf2hex(result);

                    console.log('返回的值', hex);

                    if (that.data.recv_string == true) {

                        /* 成功接收到的值的展示 */

                        that.setData({

                            recv_value: that.data.recv_value + hex

                        });

                        /* 接收成功的值的字节 */

                        var recv_number_1 = that.data.recv_number + hex.length / 2;

                        var recv_number = Math.round(recv_number_1);

                        that.setData({

                            recv_number: recv_number

                        });

                    } else {

                        console.log('设备返回来的值', hex);

                        var f_hex = hex;

                        var length_soy = f_hex.length / 2;

                        var length = Math.round(length_soy);

                        for (var i = 0; i < length; i++) {

                            var hex_spalit = f_hex.slice(0, 2);

                            length_hex.push(hex_spalit);

                            f_hex = f_hex.substring(2);

                        }

                        console.log('length_hex', length_hex);

                        for (var j = 0; j < length_hex.length; j++) {

                            var integar = length_hex[j]; //十六进制

                            recve_value = parseInt(integar, 16); //十进制

                            console.log('recve_value', recve_value);

                            turn_back = turn_back + String.fromCharCode(recve_value);

                            console.log('turn_back', turn_back);

                        }

                        console.log('最终转回来的值', turn_back)

                        var recv_number_1 = that.data.recv_number + turn_back.length;

                        var recv_number = Math.round(recv_number_1);

                        that.setData({

                            recv_number: recv_number,

                            recv_value: that.data.recv_value + turn_back

                        })

                    }

                });

            },

            fail: function (res) {

                console.log('使能失败', res);

            }

        })

    },

    /* 断开连接 */

    DisConnectTap: function () {

        var that = this;

        wx.closeBLEConnection({

            deviceId: that.data.deviceId,

            success: function (res) {

                console.log('断开设备连接', res);

                wx.reLaunch({

                    url: '../index/index',

                })

            }

        });

    },

    /*** 生命周期函数--监听页面卸载  */

    onUnload: function () {

        var that = this;

        wx.closeBLEConnection({

            deviceId: that.data.deviceId,

            success: function (res) {

                console.log('断开设备连接', res);

            }

        });

    },

    /* 清除Recv Bytes */

    CleanNumberRecv: function () {

        this.setData({

            recv_number: 0

        })

    },

    /* ArrayBuffer类型数据转为16进制字符串 */

    buf2hex: function (buffer) { // buffer is an ArrayBuffer

        var hexArr = Array.prototype.map.call(

            new Uint8Array(buffer),

            function (bit) {

                return ('00' + bit.toString(16)).slice(-2)

            }

        )

        return hexArr.join('');

    },

    switch1Change: function (e) {

        var that = this;

        let buffer = new ArrayBuffer(1)

        let dataView = new DataView(buffer)

        if (e.detail.value) {

            dataView.setUint8(0, 0)

        } else {

            dataView.setUint8(0, 1)

        }

        wx.writeBLECharacteristicValue({

            deviceId: that.data.deviceId,

            serviceId: that.data.serviceId,

            characteristicId: that.data.characteristicsId,

            value: buffer,

            success: function (res) {

                console.log('数据发送成功', res);

                console.log(buffer);

            },

            fail: function (res) {

                console.log('调用失败', res);

                /* 调用失败时,再次调用 */

                wx.writeBLECharacteristicValue({

                    deviceId: that.data.deviceId,

                    serviceId: that.data.serviceId,

                    characteristicId: that.data.characteristicsId,

                    value: buffer,

                    success: function (res) {

                        console.log('第2次数据发送成功', res);

                    }

                })

            }

        })

    },

    switch1Change1: function (e) {

        var that = this;

        let buffer = new ArrayBuffer(1)

        let dataView = new DataView(buffer)

        if (e.detail.value) {

            dataView.setUint8(0, 2)

        } else {

            dataView.setUint8(0, 3)

        }

        wx.writeBLECharacteristicValue({

            deviceId: that.data.deviceId,

            serviceId: that.data.serviceId,

            characteristicId: that.data.characteristicsId,

            value: buffer,

            success: function (res) {

                console.log('数据发送成功', res);

                console.log(buffer);

            },

            fail: function (res) {

                console.log('调用失败', res);

                /* 调用失败时,再次调用 */

                wx.writeBLECharacteristicValue({

                    deviceId: that.data.deviceId,

                    serviceId: that.data.serviceId,

                    characteristicId: that.data.characteristicsId,

                    value: buffer,

                    success: function (res) {

                        console.log('第2次数据发送成功', res);

                    }

                })

            }

        })

    },

    add: function (e) {

        var id = e.target.id;

        if (this.data[id] > 98) {

            wx.showToast({

                title: '已超过最大数值',

                icon: 'loading',

                duration: 2000

            })

            return;

        }

        this.setData({

      [id]: +this.data[id] + 1

        });

        this.numbers(id)

    },

    lessen: function (e) {

        var id = e.target.id;

        if (this.data[id] < 1) {

            wx.showToast({

                title: '已小于最小数值',

                icon: 'loading',

                duration: 2000

            })

            return;

        }

        this.setData({

       [id]: +this.data[id] - 1

        });

        this.numbers(id)

    },

    changeVal: function (e) {

        var id = e.target.id;

        if (e.detail.value < 1 || e.detail.value > 100) {

            wx.showToast({

                title: '请输入有效数值',

                icon: 'loading',

                duration: 2000

            })

            return;

        }

        this.setData({

      [id]: e.detail.value

        });

        this.numbers(id)

    },

    numbers: function (id) {

        var that = this;

        var number = '9';

        let buffer = new ArrayBuffer(1)

        let dataView = new DataView(buffer)

        console.log(id)

        if (id == 'wendu') {

            number = '8' + that.data[id];

            dataView.setUint8(0, 8)

        } else {

            number = number + that.data[id];

            dataView.setUint8(0, number)

        }

        wx.writeBLECharacteristicValue({

            deviceId: that.data.deviceId,

            serviceId: that.data.serviceId,

            characteristicId: that.data.characteristicsId,

            value: buffer,

            success: function (res) {

                console.log('数据发送成功', res);

                console.log(buffer);

            }

        })

    }

})
wxss源代码
.connect_box {

    width: 100%;

    height: 30px;

    line-height: 30px;

    font-size: 32rpx;

    color: #666;

    font-family: "Microsoft YaHei";

}

.connect_device_name{

    float: left;

    padding-left: 10px;

    color: #39beff;

}

.connect_state {

    float: right;

    padding-right: 10px;

    text-decoration: underline;

    color: #39beff;

}

.fan{

  width: 2rem;

  height: 2rem;

  vertical-align: middle;

  margin-left: 2.25rem;

  margin-right: 0.25rem;

}

.water{

  width: 2.5rem;

  height: 2rem;

  vertical-align: middle;

  margin-left: 2rem;

}

.name{

  display: inline-block;

  width: 22%;

  margin-left: 1.5rem;

  font-size: 0.9rem;

}

.key{

  float: right;

  margin-right: 2rem;

  margin-top: 0.2rem;

}

.detail_box{

  padding: 1.5rem 0;

  border-bottom: 1px solid #ccc;

}

.num {

  display: inline-block;

  width: 45%;

  text-align: right;

  vertical-align: middle;

}

.num input {

  display: inline-block;

  width: 2rem;

  text-align: center;

  border: 1px solid #f2f2f2;

  border-left: none;

  border-right: none;

  color: #a2a2a2;

}

.num text {

  display: inline-block;

  width: 1.4rem;

  height: 1.4rem;

  line-height: 1.4rem;

  text-align: center;

  border: 1px solid #f2f2f2;

  vertical-align: top;

  color: #dcdcdc;

}

.wendu{

  width:1.9rem;

  height:2rem;

  vertical-align:middle;

  margin-left:2.3rem;

  margin-right:.3rem;

}
wxml源代码
<view class="connect_box">

    <text class='connect_device_name'>{{deviceName}}</text>

    <text wx:if="{{connect}}" class="connect_state" catchtap="DisConnectTap">已连接</text>

    <text wx:else class="connect_state">未连接</text>

</view>

<view >

  <view class="detail_box">

   <image src='../../images/airFan.png' class="fan"></image>

   <view class='name'>风扇</view>

   <switch bindchange="switch1Change" class='key' />

  </view>

    <view class="detail_box">

    <image src='../../images/waterPump.png' class="water"></image>

    <view class='name'>水泵</view>

    <switch  bindchange="switch1Change1" class='key' />

  </view>

  <view class="detail_box">

    <image src='../../images/temperature.png' class="wendu"></image>

    <view class='name'>温度阀值</view>

    <view class='num'>

      <text style='border-radius: 3px 0 0 3px;' id='wendu' bindtap='lessen'>-</text>

      <input type='number' value='{{wendu}}' name='piece' id='wendu' bindblur="changeVal" />

      <text style='border-radius: 0 3px 3px 0;' id='wendu' bindtap='add'>+</text>

    </view>

  </view>

  <view class="detail_box">

    <image src='../../images/smog.png' class="water"></image>

    <view class='name'>烟雾阀值</view>

    <view class='num'>

      <text style='border-radius: 3px 0 0 3px;' id='yanwu' bindtap='lessen'>-</text>

      <input type='number' value='{{yanwu}}' name='piece' id='yanwu' bindblur="changeVal" />

      <text style='border-radius: 0 3px 3px 0;' id='yanwu' bindtap='add'>+</text>

    </view>

  </view>

</view>
微信小程序展示页面
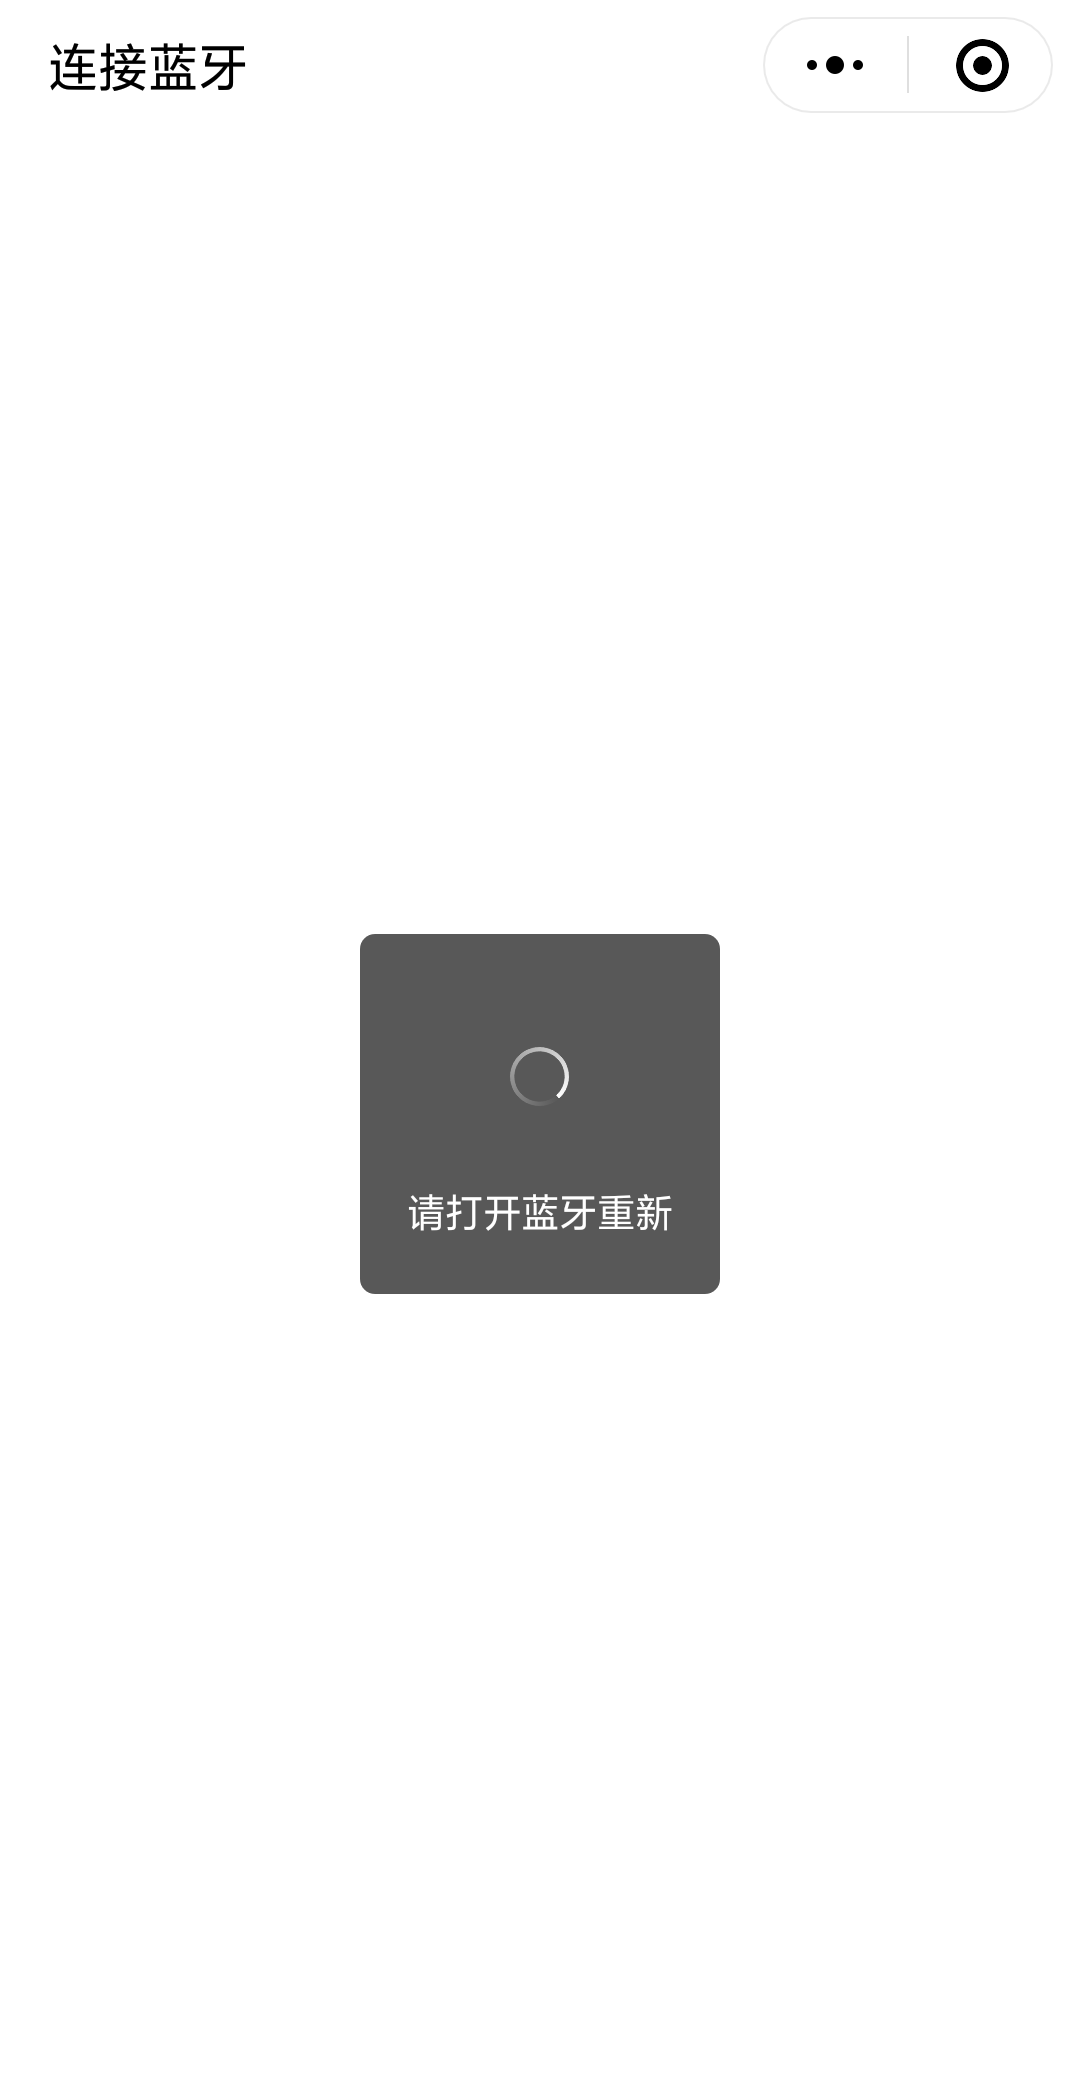


微信小程序不能在电脑上模拟,智能用手机操作,我们需要用手机打开我们的微信小程序。首先如果手机蓝牙没有打开回提醒打开蓝牙重新加载。如果手机蓝牙打开了就会去搜索附近的蓝牙模块,搜索到自己的低功率蓝牙,点击就可以连接到自己的蓝牙。我们就到了控制页面。
我们可以通过微信小程序风扇和水泵。点击开关时会调用writeBLECharacteristicValue接口通过蓝牙模块给单片机发送指令,控制单片机上的风扇和水泵等硬件设备。
2.硬件设备介绍
硬件部分主要介绍单片机、低功率蓝牙、风扇和水泵。单片机用什么型号的都行,都能与蓝牙模块正常通信,收发数据。低功率蓝牙主要优点是功率低,寿命长,价格便宜。多用于硬件连接上位机软件。风扇和水泵是外接设备,由单片机控制。
1.单片机
单片机的型号是stc89c52rc,STC89C52RC是STC公司生产的一种低功耗、高性能CMOS8位微控制器,具有8K字节系统可编程Flash存储器。STC89C52使用经典的MCS-51内核,但是做了很多的改进使得芯片具有传统的方法51单片机不具备的功能。在单芯片上,拥有灵巧的8 位CPU 和在系统可编程Flash,使得STC89C52为众多嵌入式控制应用系统提供高灵活、超有效的解决方案。
2.蓝牙模块
我用的是蓝牙型号是HC-06,给HC-06上电之后,HC-06的指示灯会不停地闪烁,这个时候就标志着进入AT模式了,配置的时候,HC-06的Rx和Tx 接到 51单片机的 Rx和 Tx,一般是P3.0,和P3.1,正常工作时,HC-06的Rx和Tx 接到 51单片机的 Tx和 Rx,8位数据位,1位结束位,无奇偶校验。一般HC-06模块的默认名称就是hc-06,默认配对密码是1234或0000。我们如果连接微信小程序,我们要把密码取消,这样微信小程序才能直接来连接。
3.风扇和水泵
风扇和水泵是直接供电就可以使用,我们只需要一个继电器就可以控制这两个设备,我选择了P3.5,P3.4这两个引脚来控制,高电平驱动,低电平关闭,这两个外接设备主要是测试数据有没有接受成功。
单片机程序主程序
void ctrl(unsigned char a)    //单字节数据接收

{                            //注意:若单片机TXD(P3.1)无上拉能力,必须在P3.1端接上拉电阻。本次测试需要接上拉电阻

    TI=;

    SBUF=a;

    while(TI==);

    TI=;

    Mode=;

    if(SBUF==){

        LED_yanwu=;

        baojing=;

        fs=;

        led1=;

        led2=;

      }else if(SBUF==){

        LED_yanwu=;

        baojing=;

        fs=;

        Mode=;

      }else if(SBUF==){

        baojing=;

        LED_wendu=;

        fs1=;

      }else if(SBUF==){

        baojing=;

        LED_wendu=;

        fs1=;

        led1=;

        led2=;

        Mode=;

      }

}

void main()

{

    check_wendu();

    check_wendu();

    Init1602();

    ES=;                                  //关中断

    SCON = 0x50;                        // REN=1允许串行接受状态,串口工作模式1,

                                          //10位UART(1位起始位,8位数据位,1位停止位,无奇偶校验),波特率可变

    TMOD = 0x20;                        // 定时器1工作于方式2,8位自动重载模式, 用于产生波特率

    TH1=TL1=0xFD;                       // 波特率9600 (本次测试采用晶振为11.0592)

    PCON &= 0x7f;                       // 波特率不倍增

    TR1 = ;                              //定时器1开始工作,产生波特率

    TI=;                                  //接收标志位置0

    RI=;

    ES=;

    while()

    {

        temp=ADC0809();

        check_wendu();

        Key();

        if(RI==)                     // 是否有数据到来

        {

          RI = ;

          ctrl(SBUF);

        }

        Display_1602(yushe_wendu,yushe_yanwu,c,temp); //c温度值,temp烟雾值

        if(Mode==)

        {

            if(temp>=yushe_yanwu)

            {

                LED_yanwu=;

                baojing=;

                fs=;

            }

            else

            {

                LED_yanwu=;

            }

            if(c>){

                c = ;

            }

            if(c>=(yushe_wendu*))

            {

                baojing=;

                LED_wendu=;

                fs1=;

            }

            else

            {

                LED_wendu=;

            }

            if((temp<yushe_yanwu)&&(c<(yushe_wendu*)))

            {

                baojing=;

                fs=;

                fs1=;

            }

        }

    }

}
硬件实物图
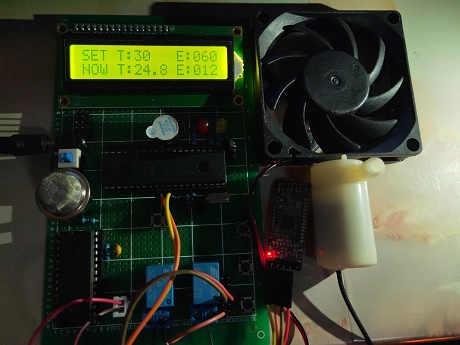
数据采集显示正常,微信小程序可以正常控制单片机的水泵和风扇,通信正常无异常。硬件部分我就简单的拿出来说了一下,所涉及到的知识肯定比我展示到的多,软件部分主要是对低功率蓝牙的搜索,连接,发送数据比较麻烦。
微信小程序连接低功率蓝牙控制单片机上硬件设备的更多相关文章
- 微信小程序电商实战-首页(上)
嗨,大家好!经过近两周的精心准备终于开始微信小程序电商实战之路喽.那么最终会做成什么样呢?当然可以肯定不会只做一个静态demo哦,先把我们小程序电商实战的整体架构发出来晒一下,请看下图: 架构图. ...
- 微信小程序把玩(三十八)获取设备信息 API
原文:微信小程序把玩(三十八)获取设备信息 API 获取设备信息这里分为四种, 主要属性: 网络信息wx.getNetWorkType, 系统信息wx.getSystemInfo, 重力感应数据wx. ...
- 用微信小程序连接WordPress网站
随着微信小程序的功能越来越强,特别对个人开发者的开放,让个人开发者有机会尝试微信小程序.如果你有自己的个人网站,就可以把个人网站搬到微信小程序里,通过小程序直接访问网站的内容. 要想微信小程序可以获取 ...
- 微信小程序连接本地接口(转)
原文地址 最近的一个项目就是微信小程序 第一次接触微信开发者工具,并进行小程序的后端开发, 于是想看一下小程序如何请求本地的后台服务接口 wx.request({ url: 'http://local ...
- 微信小程序里如何用阿里云上传视频,图片。。
纯手写,踩了半天多的坑干出来了... 网上也有对于阿里云如何在微信小程序里使用,但是很不全,包括阿里云文档的最佳实践里. 话不多说上代码了. upvideo(){ var aliOssParams = ...
- 微信小程序开发注意事项总结:上拉加载失效、转义字符等
1.上拉加载失效 问题背景:部分页面上拉加载失效.当使用flex布局,底部固定,中间采用自适应撑满全屏实现滚动时,发现上拉加载失效,不知道是什么原因. 解决问题: 在小程序中,官方为我们提供了原生的下 ...
- 转:【微信小程序】 微信小程序-拍照或选择图片并上传文件
调用拍照API:https://mp.weixin.qq.com/debug/wxadoc/dev/api/media-picture.html?t=20161222#wxchooseimageobj ...
- [转]微信小程序开发(二)图片上传+服务端接收
本文转自:http://blog.csdn.net/sk719887916/article/details/54312573 文/YXJ 地址:http://blog.csdn.net/sk71988 ...
- 微信小程序连接Java后台
有人问我小程序怎么连后台,这里直接贴代码 在app.js里 // api request request(url, params) { return new Promise((resolve, rej ...
随机推荐
- es6 babel 安装以及使用
1,安装好node(需要使用npm包管理工具) 2,在本地项目路径下npm init,格式化成功后会在项目下生成一个配置文件package.json 3,本地安装bable npm install - ...
- DWVA-关于SQL注入的漏洞详解
low等级 代码如下: <?php if( isset( $_REQUEST[ 'Submit' ] ) ) { // Get input $id = $_REQUEST[ 'id' ]; // ...
- 阿里巴巴的26款Java开源项目
阿里巴巴的26款Java开源项目 开源展示了人类共同协作,成果分享的魅力.没有任何一家网络公司可以不使用开源技术,仅靠自身技术发展起来.“取之于开源,用之于开源,才能促进开源的良性发展”,阿里巴巴各个 ...
- CodeForces - 1073D Berland Fair
XXI Berland Annual Fair is coming really soon! Traditionally fair consists of nnbooths, arranged in ...
- 2016/10/13 oracle中的round()
语法: ROUND(number,num_digits) 其中Number是需要进行四舍五入的数字:Num_digits为指定的位数,按此位数进行四舍五入,如果 num_digits 大于 0,则四舍 ...
- Python高级应用程序设计任务
Python高级应用程序设计任务要求 用Python实现一个面向主题的网络爬虫程序,并完成以下内容:(注:每人一题,主题内容自选,所有设计内容与源代码需提交到博客园平台) 一.主题式网络爬虫设计方案( ...
- 函数式响应式编程 - Functional Reactive Programming
我们略过概念,直接看函数式响应式编程解决了什么问题. 从下面这个例子展开: 两个密码输入框,一个提交按钮. 密码.确认密码都填写并一致,允许提交:不一致提示错误. HTML 如下: <input ...
- 人工智能技术导论——使用PROLOG逻辑语言解决爱因斯坦斑马文件
一.背景 在上一篇博客https://www.cnblogs.com/wkfvawl/p/12056951.html上,我简单介绍了一下Prolog的一些基本语法,这篇博客主要通过老师课上讲过的一个问 ...
- System.InvalidOperationException: The binary operator NotEqual is not defined for the types 'Microsoft.EntityFrameworkCore.Storage.ValueBuffer' and 'Microsoft.EntityFrameworkCore.Storage.ValueBuffer'.
.netcore 2.1使用左表连接时报错,原因是对数据库中实体 DateTimeOffset date做查询判断时,将数据库中date转为string进行了判断,这样判断是错误的,并且效率低,应该是 ...
- FlowPortal:流程节点定义有误,合流节点"合流"没有对应的聚焦节点
FB版本:6.00c 报错: 流程节点定义有误,合流节点"合流"没有对应的聚焦节点 解决办法:分流和合流之间的节点不能有其他节点汇入.调整如下后,成功保存.