02·nginx进阶·服务优化配置管理
企业场景常用的Nginx http功能模块汇总
|
ngx_ http_ core_ module |
包括-些核心的http 参数配置,对应Nginx的配置为HTTP区块部分 |
|
ngx_ http _access_ module |
访问控制模块,用来控制网站用户对Nginx的访问 |
|
ngx_ http_ gzip_ module |
压缩模块,对Nginx返回的数据压缩,属于性能优化模块 |
|
ngx_ http_fastcgi_ module |
FastCGI模块,和动态应用相关的模块,例如PHP |
|
ngx_ http_ proxy_ module |
proxy代理模块 |
|
ngx_ http_upstream_ module |
负载均衡模块,可以实现网站的负载均衡功能及节点的健康检查 |
|
ngx_ http_ rewrite_module |
URL地址重写模块 |
|
ngx_ http_ limit_conn_module |
限制用户并发连接数及请求数模块 |
|
ngx_ http_ limit req module |
根据定义的key限制Nginx请求过程的速率 |
|
ngx_ http_ log_ module |
访问8志模块,以指定的格式记录Nginx客户访问8志等信息 |
|
ngx_ http_ auth_basic_module |
Web认证模块,设置Web用户通过账号、密码访问Nginx |
|
ngx_ http_ ssl_ module |
ssI模块,用于加密的http连接,如httpts |
|
ngx_ http _stub_ status_ module |
记录Nginx基本访问状态信息等的模块 |
核心配置文件 nginx.conf
worker_processes  1;

events {

    worker_connections  1024;

}

http {

    include       mime.types;

    default_type  application/octet-stream;

    sendfile        on;

    keepalive_timeout  65;

    server {

        listen       80;

        server_name  localhost;

        location / {

            root   html;

            index  index.html index.htm;

        }

        error_page   500 502 503 504  /50x.html;

        location = /50x.html {

            root   html;

        }

    }

}
nginx中一个server就是一个虚拟主机,分为域名,端口,ip三种类型的虚拟主机
基于域名的虚拟主机实战
1、配置基于域名的nginx.conf
#diff nginx.conf nginx.conf.default  #有些重要文件它本身就有备份文件

#egrep -v "^$|^#|..#" nginx.conf>nginx.conf2/egrep -v "^$|#" nginx.conf>nginx.conf2

 server {

        listen       ;

        server_name  www.ram.shop;

        location / {

            root   html/www;

            index  index.html index.htm;

        }
2、创建域名对应的站点目录和文件
[root@moban conf]# mkdir ../html/www -p #在html目录下新建www文件夹和server中root html/www对应
[root@moban conf]# echo "http://www.ram.shop" >../html/www/index.html
[root@moban conf]# cat ../html/www/index.html
3、检查语法,并重新加载nginx文件
[root@moban conf]#../sbin/nginx -t
nginx: the configuration file /application/nginx/conf/nginx.conf syntax is ok
nginx: configuration file /application/nginx/conf/nginx.conf test is successful
[root@moban conf]# ../sbin/nginx -s reload
[root@moban conf]# ps -ef |grep nginx
root 8078 1978 0 05:59 pts/0 00:00:00 grep nginx
[root@moban conf]# echo "192.168.2.60 www.ram.shop" >>/etc/hosts
[root@moban conf]# tail -1 /etc/hosts
192.168.2.60 www.ram.shop
客户端hosts文件及配置
C:\Windows\System32\drivers\etc\hosts 添加192.168.2.60 www.ram.shop

4、配置多个基于域名的虚拟主机
在nginx.conf的http区中添加一个server区,就是增加一个虚拟主机,修改域名和对应的文件夹,重新加载服务,在hosts文件中添加域名,在客户端hosts文件中添加dns配置,over
添加zm的server区
server {
listen 80;
server_name www.ram.com;
location / {
root html/www;
index index.html index.htm;
}
error_page 500 502 503 504 /50x.html;
location = /50x.html {
root html;
}
}
server {
listen 80;
server_name www.zm.com;
location / {
root html/zm;
index index.html index.htm;
}
error_page 500 502 503 504 /50x.html;
location = /50x.html {
root html;
}
}
检测一下文件格式是否正确
重新加载nginx服务 /sbin/nginx -s reload
添加hosts
浏览器测试

基于端口的虚拟主机配置实战
修改每个虚拟主机的监听端口
修改nginx.conf
server {
listen 81;
server_name www.ram.com;
location / {
root html/www;
index index.html index.htm;
}
error_page 500 502 503 504 /50x.html;
location = /50x.html {
root html;
}
}
server {
listen 82;
server_name www.zm.com;
检查文件格式,重启服务,查看端口
[root@moban nginx]# netstat -lntup |grep nginx
tcp 0 0 0.0.0.0:81 0.0.0.0:* LISTEN 1666/nginx
tcp 0 0 0.0.0.0:82 0.0.0.0:* LISTEN 1666/nginx
tcp 0 0 0.0.0.0:83 0.0.0.0:* LISTEN 1666/nginx
测试

端口只有不和已有服务冲突,就可以随意改,原则上是大于1024,小于65535
基于IP地址的虚拟主机配置实战
操作也类似,都是修改nginx.conf文件,你得提前给主机添加几个地址,使用较少

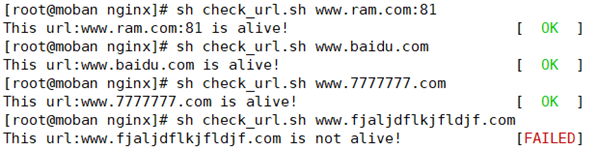
用脚本检查网站是否存活
脚本内容
#!/bin/bash

# 检查网站是否存活,加入定时任务,每分钟检查3次

#by authors patrick

. /etc/init.d/functions

check(){

  if (( $a ==  "" ));then

    action "This url:$b is alive!"  /bin/true

    exit

  else

    action  "This url:$b is not alive!" /bin/false

    exit 1

  fi

}

main(){

  b=$

  wget -O /dev/null -q $

  a=`echo $?`

  check

  exit

}

main $
测试
nginx常用功能配置实战
优化nginx配置文件:主配置和各个虚拟主机配置文件分离
把nginx.conf中的server模块拿出来放到一个目录下,方便管理,在主配置文件中使用include file;来声明文件的去处就可以了
include写法

配置
#mkdir extra
#sed -n '11,22p' nginx.conf >extra/www.conf
#sed -n '23,34p' nginx.conf > extra/nginx.conf
#sed -n '35,46p' nginx.conf > extra/bbs.conf
#sed -i '11,46d' nginx.conf
#sbin/nginx -t
#sbin/nginx -s reload
nginx.conf文件配置
http {
include mime.types;
include extra/www.conf;
include extra/nginx.conf;
include extra/bbs.conf;
default_type application/octet-stream;
sendfile on;
keepalive_timeout 65;
}
或者使用sed -i '10 i include extra/www.conf;\ninclude extra/nginx.conf' nginx.conf
[root@moban extra]# pwd
/application/nginx/conf/extra
[root@moban extra]# ls
bbs.conf nginx.conf www.conf
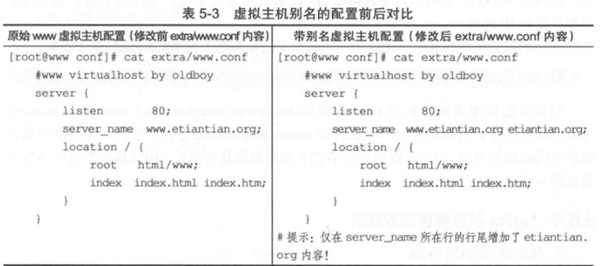
虚拟主机的别名配置
给虚拟主机设置出了主域名以外的一个或多个域名名字,实现用户访问多个域名对应同一个虚拟主机网站的功能
状态信息功能实战
|
记录Nginx基本访问状态信息等的模块 |
nginx version: nginx/1.17.4[root@moban conf]# ../sbin/nginx -V
built by gcc 4.4.7 20120313 (Red Hat 4.4.7-4) (GCC)
built with OpenSSL 1.0.1e-fips 11 Feb 2013
TLS SNI support enabled
configure arguments: --user=nginx --group=nginx --prefix=/application/nginx --with-http_stub_status_module --with-http_ssl_module <==有这个就对了
[root@moban conf]# cat extra/status.conf
##STATUS
server{
listen 80;
server_name status.ram.com;
location / {
stub_status on;
access_log off;
}
}
给主配置文件添加include信息
include extra/status.conf;
给window添加hosts解析 status.ram.com
检查语法,重启服务
[root@moban conf]# ../sbin/nginx -t
root@moban conf]# ../sbin/nginx -s reload
测试:随着连接数的增加,会自动统计连接数
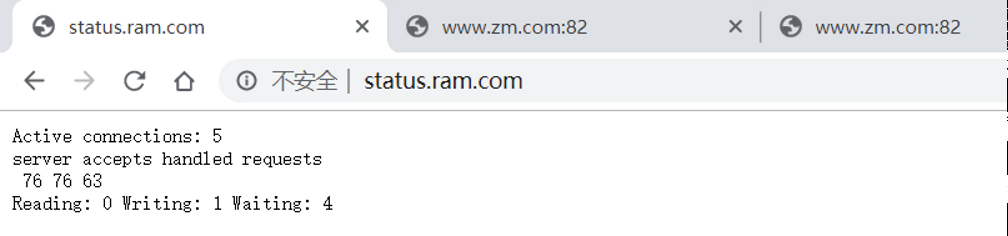
Active connections: 5 ==>正处理的活动链接数为5个
server accepts handled requests
76 76 63
第一个server表示nginx从启动到现在处理了76个连接
第二个server表示nginx从启动到现在共计成功处理了76个连接,相等这说明没有丢失请求
第三个server表示nginx从启动到现在处理了63个请求
Reading: 0 Writing: 1 Waiting: 4
nginx读取客户端的header信息数
nginx返回给客户端的header信息数
等待需要处理的连接数
nginx增加错误日志配置
error_log是核心功能模块的参数
配置主配置文件,增加错误日志的位置就可以了
error_log logs/error.log
-->nginx.conf
访问日志(access_log)配置在http标签内
|
ngx_ http_ log_ module |
访问8志模块,以指定的格式记录Nginx客户访问8志等信息 |
主配置文件 添加log_format的主格式,可以从默认文件中找到复制出来
http {
include mime.types;
default_type application/octet-stream;
log_format main
'$remote_addr - $remote_user [$time_local] "$request" '
'$status
$body_bytes_sent "$http_referer" '
'"$http_user_agent" "$http_x_forwarded_for"';
sendfile on;
keepalive_timeout 65;
server {
listen 81;
server_name www.ram.com;
location / {
root html/www;
index index.html index.htm;
}
access_log logs/access_www.log main;
查看原来网站日志,访问一下,在查看日志文件,
[root@moban logs]# cat access_www.log
192.168.2.2 - - [10/Oct/2019:02:44:18 +0800] "GET / HTTP/1.1"
304 0 "-" "Mozilla/5.0 (Windows NT 10.0; Win64; x64)
AppleWebKit/537.36 (KHTML, like Gecko) Chrome/76.0.3809.132 Safari/537.36"
"-"
[root@moban logs]# curl www.ram.com:81
[root@moban logs]# cat access_www.log
192.168.2.2 - - [10/Oct/2019:02:44:18 +0800] "GET / HTTP/1.1"
304 0 "-" "Mozilla/5.0 (Windows NT 10.0; Win64; x64)
AppleWebKit/537.36 (KHTML, like Gecko) Chrome/76.0.3809.132 Safari/537.36"
"-"
192.168.2.60 - - [10/Oct/2019:02:44:54 +0800] "GET / HTTP/1.1"
200 19 "-" "curl/7.19.7 (i386-redhat-linux-gnu) libcurl/7.19.7
NSS/3.14.0.0 zlib/1.2.3 libidn/1.18 libssh2/1.4.2" "-"
访问日志轮询切割
#!/bin/sh
Dateformat= `date +%Y%m%d`
Basedir=" /applicat ion/nginx"
Nginxlogdir=$Basedir/logs"
Logname=”access www ”
[ -d $Nginxlogdir ] && cd $Nginxlogdir llexit 1
[ -f ${Logname} .1og ]|| lexit 1
/bin/mv ${Logname).1og
${Dateformat)_${Logname}.1og
$Basedir/sbin/nginx -S reload
02·nginx进阶·服务优化配置管理的更多相关文章
- Nginx web服务优化 (一)
1.Nginx基本安全优化 a.更改配置文件参数隐藏版本 编辑nginx.conf配置文件增加参数,实现隐藏Nginx版本号的方式如下.在nginx配置文件nginx.conf中的http标签段内加入 ...
- nginx web服务优化
nginx基本安全优化 1. 调整参数隐藏nginx软件版本号信息 软件的漏洞和版本有关,我们应尽量隐藏或消除web服务对访问用户显示各类敏感信息(例如web软件名称及版本号等信息),这样恶意的用户就 ...
- Linux实战教学笔记38:企业级Nginx Web服务优化实战(下)
四,Nginx站点目录及文件URL访问控制 4.1 根据扩展名限制程序和文件访问 Web2.0时代,绝大多数网站都是以用户为中心多的,例如:bbs,blog,sns产品,这几个产品都有一个共同特点,就 ...
- Linux实战教学笔记37:企业级Nginx Web服务优化实战(上)
一,Nginx基本安全优化 1.1 调整参数隐藏Nginx软件版本号信息 一般来说,软件的漏洞都和版本有关,这个很像汽车的缺陷,同一批次的要有问题就都有问题,别的批次可能就都是好的.因此,我们应尽量隐 ...
- 企业级Nginx Web服务优化实战
web优化一览总结表 优化类型 优化说明 优化方法 安全优化 隐藏nginx版本信息优化 修改nginx配置文件实现优化 server_tokens off: 修改nginx版本信息优化 修改ngin ...
- 八.nginx网站服务实践应用
期中集群架构-第八章-期中架构nginx章节====================================================================== 01. web ...
- 【实战分享】又拍云 OpenResty / Nginx 服务优化实践
2018 年 11 月 17 日,由 OpenResty 主办的 OpenResty Con 2018 在杭州举行.本次 OpenResty Con 的主题涉及 OpenResty 的新开源特性.业界 ...
- Nginx服务优化详解
Nginx服务优化详解 1.隐藏Nginx版本信息 编辑主配置文件nginx.conf,在http标签中添加代码 server_tokens off;来隐藏软件版本号. 2.更改Nginx服务启动的默 ...
- 企业级Web Nginx 服务优化
企业级Web Nginx 服务优化 http://blog.51cto.com/search/result?q=%E4%BC%81%E4%B8%9A%E7%BA%A7Web+Nginx+%E6%9C% ...
随机推荐
- 你真的了解MyBatis中${}和#{}的区别吗?
动态sql是mybatis的主要特性之一.在mapper中定义的参数传到xml中之后,在查询之前mybatis会对其进行动态解析. mybatis提供了两种支持动态sql的语法:#{} 和 ${}. ...
- Windows 7 sometimes breaks FTP connections on Java 7 if firewall is enabled.
Solution: 用管理员身份,在cmd命令行输入: netsh advfirewall set global StatefulFTP disable 会关闭防火墙,从而解决问题.
- hihocoder #1609 : 数组分拆II(思维)
题目链接:http://hihocoder.com/problemset/problem/1609 题解:就先拿一个数组最多分成两部分来说吧 8 1 2 3 4 5 1 2 3 显然 输出时2 3 可 ...
- 使用FreePBX和第三方线路对接
首先搭建好相关环境 在FreePBX的web-gui控制界面进行操作. 通信接口连接--->中继 先创建一条中继线路: 创建中继 设置这条线路 优先级为0 中继名: 设置一个名字 Outgoi ...
- Nginx实现高可用(了解)
使用nginx实现反向代理和负载均衡时,nginx就是整个网站的入口了,所以需要保证nginx的高可用 主要资料包:链接:https://pan.baidu.com/s/1z_-xEM3uUICtZi ...
- JavaScrpt 介绍
什么是 JavaScript? JavaScript 是一种直译式脚本语言,一种轻量级的脚本语言 什么是脚本语言? Script language指的是它不具备开发操作系统的能力,而是只用来编写控制其 ...
- Android四大组件初识之Service
Service作为Android四大组件之一,可以与Activity建立双向连接(绑定模式),提供数据和功能.也能够接收Intent单方面请求(调用模式),进行数据处理和调度功能. Service与A ...
- android View的测量和绘制
本篇内容来源于android 群英传(徐易生著) 我写到这里,是觉得徐易生讲的确实很好, 另外加入了一些自己的理解,便于自己基础的提高. 另外参考:http://www.gcssloop.com/cu ...
- NTP服务器实现
时间服务器是一种计算机网络仪器,它从参考时钟获取实际时间,再利用计算机网络把时间信息传递给用户.虽然还有一些比较少用或过时的协议仍然在使用,但现时最重要及广泛使用,作为时间信息发送和同步化的协议是网络 ...
- Python--使用四种随机方法(Random)来产生随机价格
import random # 卖橘子的计算器:写一段代码,提示用户输入橘子的价格,# 然后随机生成购买的斤数(5到10斤之间),最后计算出应该支付的金额! # 第一种# orange_price = ...