OpenGL光照3:光源
本文是个人学习记录,学习建议看教程 https://learnopengl-cn.github.io/
非常感谢原作者JoeyDeVries和多为中文翻译者提供的优质教程
的内容为插入注释,可以先跳过
投光物(光源)
我们目前使用的光照都来自于空间中的一个点,它能给我们不错的效果,但现实世界中,我们有很多种类的光照,每种的表现都不同
将光投射(Cast)到物体的光源叫做投光物(Light Caster),我们将会讨论几种不同类型的投光物,学会模拟不同种类的光源是又一个能够进一步丰富场景的工具
我们首先将会讨论平行光(Directional Light),接下来是点光源(Point Light),它是我们之前学习的光源的拓展,最后我们将会讨论聚光(Spotlight)
之后我们将讨论如何将这些不同种类的光照类型整合到一个多光源场景之中
平行光
当一个光源处于很远的地方时,来自光源的每条光线就会近似于互相平行,不论物体和/或者观察者的位置,看起来好像所有的光都来自于同一个方向
当我们使用一个假设光源处于无限远处的模型时,它就被称为平行光,因为它的所有光线都有着相同的方向,它与光源的位置是没有关系的。
比如,太阳距离我们并不是无限远,但它已经远到在光照计算中可以把它视为无限远了,所以来自太阳的所有光线将被模拟为平行光线

因为所有的光线都是平行的,所以物体与光源的相对位置是不重要的,因为对场景中每一个物体光的方向都是一致的。由于光的位置向量保持一致,场景中每个物体的光照计算将会是类似的。
我们可以定义一个光线方向向量而不是位置向量来模拟一个平行光。着色器的计算基本保持不变,但这次我们将直接使用光的direction向量而不是通过direction来计算lightDir向量。
//片段着色器

struct Light {

    // vec3 position; // 使用平行光就不再需要了

    vec3 direction;

    vec3 ambient;

    vec3 diffuse;

    vec3 specular;

};

//main里

vec3 lightDir = normalize(-light.direction);
注意我们首先对light.direction向量取反。我们目前使用的光照计算需求一个从片段至光源的光线方向,但人们更习惯定义平行光为一个从光源出发的全局方向,所以我们需要对全局光照方向向量取反来改变它的方向,它现在是一个指向光源的方向向量了(记得对向量进行标准化)
最终的lightDir向量将和以前一样用在漫反射和镜面光计算中
为了清楚地展示平行光对多个物体具有相同的影响,我们将会再次使用坐标系统博客里最后的那个箱子派对的场景,我们先定义了十个不同的箱子位置
glm::vec3 cubePositions[] = {

    glm::vec3( 0.0f,  0.0f,  0.0f),

    glm::vec3( 2.0f,  5.0f, -15.0f),

    glm::vec3(-1.5f, -2.2f, -2.5f),

    glm::vec3(-3.8f, -2.0f, -12.3f),

    glm::vec3( 2.4f, -0.4f, -3.5f),

    glm::vec3(-1.7f,  3.0f, -7.5f),

    glm::vec3( 1.3f, -2.0f, -2.5f),

    glm::vec3( 1.5f,  2.0f, -2.5f),

    glm::vec3( 1.5f,  0.2f, -1.5f),

    glm::vec3(-1.3f,  1.0f, -1.5f)

};
并对每个箱子都生成了一个不同的模型矩阵,每个模型矩阵都包含了对应的局部-世界坐标变换:
for(unsigned int i = 0; i < 10; i++)

{

    glm::mat4 model;

    model = glm::translate(model, cubePositions[i]);

    float angle = 20.0f * i;

    model = glm::rotate(model, glm::radians(angle), glm::vec3(1.0f, 0.3f, 0.5f));

    lightingShader.setMat4("model", model);

    glDrawArrays(GL_TRIANGLES, 0, 36);

}
同时,不要忘记定义光源的方向(注意我们将方向定义为从光源出发的方向,你可以很容易看到光的方向朝下)。
lightingShader.setVec3("light.direction", -0.2f, -1.0f, -0.3f);
我们一直将光的位置和位置向量定义为vec3,一些人会喜欢将所有的向量都定义为vec4,当我们将位置向量定义为一个vec4时,很重要的一点是要将w分量设置为1.0,这样变换和投影才能正确应用,然而,当我们定义一个方向向量为vec4的时候,我们不想让位移有任何的效果(因为它仅仅代表的是方向),所以我们将w分量设置为0.0
方向向量就会像这样来表示:vec4(0.2f, 1.0f, 0.3f, 0.0f)
这也可以作为一个快速检测光照类型的工具:你可以检测w分量是否等于1.0,来检测它是否是光的位置向量;w分量等于0.0,则它是光的方向向量,这样就能根据这个来调整光照计算了:
if(lightVector.w == 0.0) // 注意浮点数据类型的误差

  // 执行平行光照计算

else if(lightVector.w == 1.0)

  // 根据光源的位置做光照计算(与上一节一样)
这正是旧OpenGL(固定函数式)决定光源是平行光还是位置光源(Positional Light Source)的方法,并根据它来调整光照
如果你现在编译程序,在场景中自由移动,你就可以看到好像有一个太阳一样的光源对所有的物体投光

部分源码如下
//平行光片段着色器

#version 330 core

struct Material {

    sampler2D diffuse;

    sampler2D specular;

    float     shininess;

};

struct Light {

    // vec3 position; // 使用平行光就不再需要了

    vec3 direction;

    vec3 ambient;

    vec3 diffuse;

    vec3 specular;

};

in vec2 TexCoords;

in vec3 Normal;

in vec3 FragPos;

out vec4 FragColor;

uniform Material material;

uniform Light light;

uniform vec3 objectColor;

uniform vec3 lightColor;

uniform vec3 lightPos;

uniform vec3 viewPos;

float specularStrength = 0.5;

void main()

{

    // 环境光

	vec3 ambient = light.ambient * vec3(texture(material.diffuse, TexCoords));

    // 漫反射

    vec3 norm = normalize(Normal);

    //vec3 lightDir = normalize(lightPos - FragPos);

	vec3 lightDir = normalize(-light.direction);

    float diff = max(dot(norm, lightDir), 0.0);

	vec3 diffuse = light.diffuse * diff * vec3(texture(material.diffuse, TexCoords));

    // 镜面光

    vec3 viewDir = normalize(viewPos - FragPos);

    vec3 reflectDir = reflect(-lightDir, norm);

    float spec = pow(max(dot(viewDir, reflectDir), 0.0), material.shininess);

	vec3 specular = light.specular * spec * vec3(texture(material.specular, TexCoords));

    vec3 result = ambient + diffuse + specular;

    FragColor = vec4(result, 1.0);

}
//平行光渲染循环

while (!glfwWindowShouldClose(window))

	{

		// 帧时间差

		float currentFrame = glfwGetTime();

		deltaTime = currentFrame - lastFrame;

		lastFrame = currentFrame;

		// 输入

		processInput(window);

		// 渲染指令

		glClearColor(0.2f, 0.3f, 0.3f, 1.0f);

		glClear(GL_COLOR_BUFFER_BIT | GL_DEPTH_BUFFER_BIT);

		lightingShader.use();

		lightingShader.setVec3("light.direction", -0.2f, -1.0f, -0.3f);

		lightingShader.setVec3("viewPos", camera.Position);

		// 光照属性

		lightingShader.setVec3("light.ambient", 0.2f, 0.2f, 0.2f);

		lightingShader.setVec3("light.diffuse", 0.7f, 0.7f, 0.7f);

		lightingShader.setVec3("light.specular", 1.0f, 1.0f, 1.0f);

		// 材质属性

		lightingShader.setFloat("material.shininess", 32.0f);

		// 初始化view transformations

		glm::mat4 projection = glm::perspective(glm::radians(camera.Zoom), (float)SCR_WIDTH / (float)SCR_HEIGHT, 0.1f, 100.0f);

		glm::mat4 view = camera.GetViewMatrix();

		lightingShader.setMat4("projection", projection);

		lightingShader.setMat4("view", view);

		// 初始化world transformations

		glm::mat4 model = glm::mat4();

		lightingShader.setMat4("model", model);

		// 绑定漫反射贴图

		glActiveTexture(GL_TEXTURE0);

		glBindTexture(GL_TEXTURE_2D, diffuseMap);

		// 绑定镜面贴图

		glActiveTexture(GL_TEXTURE1);

		glBindTexture(GL_TEXTURE_2D, specularMap);

		// 渲染方块

		//glBindVertexArray(cubeVAO);

		//glDrawArrays(GL_TRIANGLES, 0, 36);

		glBindVertexArray(cubeVAO);

		for (unsigned int i = 0; i < 10; i++)

		{

			glm::mat4 model = glm::mat4(1.0f);

			model = glm::translate(model, cubePositions[i]);

			float angle = 20.0f * i;

			model = glm::rotate(model, glm::radians(angle), glm::vec3(1.0f, 0.3f, 0.5f));

			lightingShader.setMat4("model", model);

			glDrawArrays(GL_TRIANGLES, 0, 36);

		}

		// 现在有了平行光,不需要光源立方体

		//lampShader.use();

		//// 设置模型、视图和投影矩阵uniform

		//lampShader.setMat4("projection", projection);

		//lampShader.setMat4("view", view);

		//model = glm::mat4(1.0f);

		//model = glm::translate(model, lightPos);

		//model = glm::scale(model, glm::vec3(0.2f)); // 小点的立方体

		//lampShader.setMat4("model", model);

		//// 绘制灯立方体对象

		//glBindVertexArray(lightVAO);

		//glDrawArrays(GL_TRIANGLES, 0, 36);

		// 交换缓冲并查询IO事件

		glfwSwapBuffers(window);

		glfwPollEvents();

	}

	glDeleteVertexArrays(1, &cubeVAO);

	glDeleteVertexArrays(1, &lightVAO);

	glDeleteBuffers(1, &VBO);

	glfwTerminate();

	return 0;

}
点光源
除了平行光之外我们也需要一些分散在场景中的点光源(Point Light),点光源是处于世界中某一个位置的光源,它会朝着所有方向发光,但光线会随着距离逐渐衰减,比如作为光源的灯泡和火把,它们都是点光源

在之前的教程中,我们一直都在使用一个(简化的)点光源,我们在给定位置有一个光源,它会从它的光源位置开始朝着所有方向散射光线,但我们之前定义的光源模拟的是永远不会衰减的光线
如果你将10个箱子加入到上一节光照场景中,你会注意到在最后面的箱子和在灯面前的箱子都以相同的强度被照亮,并没有定义一个公式来将光随距离衰减,我们希望点光源强度有适当的随着距离增加而衰减,才能更好的模拟真实环境
衰减
随着光线传播距离的增长逐渐削减光的强度通常叫做衰减(Attenuation),其中一种方式是使用一个线性方程,这样的方程能够随着距离的增长线性地减少光的强度
然而,这样的线性方程通常会看起来比较假,在现实世界中,灯在近处通常会非常亮,但随着距离的增加光源的亮度一开始会下降非常快,但在远处时剩余的光强度就会下降的非常缓慢了,所以,我们需要一个不同的公式来减少光的强度
幸运的是一些聪明的人已经帮我们解决了这个问题,下面这个公式根据片段距光源的距离计算了衰减值,之后我们会将它乘以光的强度向量:

在这里d代表了片段距光源的距离,接下来为了计算衰减值,我们定义3个可配置项:
常数项Kc、一次项Kl和二次项Kq
- 常数项Kc通常保持为1.0,它的主要作用是保证分母永远不会比1小,否则的话在某些距离上它反而会增加强度,这肯定不是我们想要的效果
- 一次项Kl会与距离值相乘,以线性的方式减少强度
- 二次项Kq会与距离的平方相乘,让光源以二次递减的方式减少强度,二次项在距离比较小的时候影响会比一次项小很多,但当距离值比较大的时候它就会比一次项更大了
由于二次项的存在,光线会在大部分时候以线性的方式衰退,直到距离变得足够大,让二次项超过一次项,光的强度会以更慢的速度下降
下面这张图显示了在100的距离内衰减的效果:
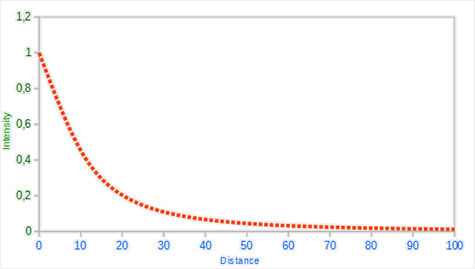
这正是我们想要的
但是,该对这三个项设置什么值呢?正确地设定它们的值取决于很多因素:环境、希望光覆盖的距离、光的类型等,在大多数情况下,这都是经验的问题
下面这个表格显示了模拟一个接近真实的,覆盖特定半径(距离)的光源时,这些项可能取的一些值
第一列指定的是在给定的三项时光所能覆盖的距离,这些值是大多数光源很好的起始点,它们由Ogre3D的Wiki所提供:
| 距离 | 常数项 | 一次项 | 二次项 |
|---|---|---|---|
| 7 | 1.0 | 0.7 | 1.8 |
| 13 | 1.0 | 0.35 | 0.44 |
| 20 | 1.0 | 0.22 | 0.20 |
| 32 | 1.0 | 0.14 | 0.07 |
| 50 | 1.0 | 0.09 | 0.032 |
| 65 | 1.0 | 0.07 | 0.017 |
| 100 | 1.0 | 0.045 | 0.0075 |
| 160 | 1.0 | 0.027 | 0.0028 |
| 200 | 1.0 | 0.022 | 0.0019 |
| 325 | 1.0 | 0.014 | 0.0007 |
| 600 | 1.0 | 0.007 | 0.0002 |
| 3250 | 1.0 | 0.0014 | 0.000007 |
你可以看到,常数项Kc在所有的情况下都是1.0,一次项Kl为了覆盖更远的距离通常都很小,二次项Kq甚至更小。尝试对这些值进行实验,看看它们在你的实现中有什么效果
在我们的环境中,32到100的距离对大多数的光源都足够了
代码实现
为了实现衰减,在片段着色器中我们还需要三个额外的值:也就是公式中的常数项、一次项和二次项
它们最好储存在之前定义的Light结构体中,注意我们使用上一篇博客中计算lightDir的方法,而不是上面平行光部分的
vec3 lightDir = normalize(lightPos - FragPos);
//片段着色器

struct Light {

    vec3 position;

    vec3 ambient;

    vec3 diffuse;

    vec3 specular;

    float constant;

    float linear;

    float quadratic;

};
然后我们将在OpenGL中设置这些项:我们希望光源能够覆盖50的距离,所以我们会使用表格中对应的常数项、一次项和二次项:
//main.cpp

lightingShader.setFloat("light.constant",  1.0f);

lightingShader.setFloat("light.linear",    0.09f);

lightingShader.setFloat("light.quadratic", 0.032f);
在片段着色器中实现衰减还是比较直接的:我们根据公式计算衰减值,之后再分别乘以环境光、漫反射和镜面光分量
我们仍需要公式中距光源的距离,还记得我们是怎么计算一个向量的长度的吗?我们可以通过获取片段和光源之间的向量差,并获取结果向量的长度作为距离项
我们可以使用GLSL内建的length函数来完成这一点:
//片段着色器

//衰减

float distance    = length(light.position - FragPos);

float attenuation = 1.0 / (light.constant + light.linear * distance +

                light.quadratic * (distance * distance));
接下来,我们将包含这个衰减值到光照计算中,将它分别乘以环境光、漫反射和镜面光颜色。
我们可以将环境光分量保持不变,让环境光照不会随着距离减少,但是如果我们使用多于一个的光源,所有的环境光分量将会开始叠加,所以在这种情况下我们也希望衰减环境光照。简单实验一下,看看什么才能在你的环境中效果最好。
ambient  *= attenuation;

diffuse  *= attenuation;

specular *= attenuation;
运行程序

部分源码
//点光源片段着色器

#version 330 core

struct Material {

    sampler2D diffuse;

    sampler2D specular;

    float shininess;

};

struct Light {

    vec3 position;

	//vec3 direction; 点光源就不需要了

	vec3 ambient;

    vec3 diffuse;

    vec3 specular;

	float constant;  //常数项Kc

    float linear;	 //一次项Kl

    float quadratic; //二次项Kq

};

in vec3 FragPos;

in vec3 Normal;

in vec2 TexCoords;

out vec4 FragColor;

uniform Material material;

uniform Light light;

//uniform vec3 objectColor;

//uniform vec3 lightColor;

//uniform vec3 lightPos;

uniform vec3 viewPos;

float specularStrength = 0.5;

void main()

{

    // 环境光

	vec3 ambient = light.ambient * vec3(texture(material.diffuse, TexCoords));

    // 漫反射

    vec3 norm = normalize(Normal);

    //vec3 lightDir = normalize(lightPos - FragPos);

	vec3 lightDir = normalize(light.position - FragPos);

    float diff = max(dot(norm, lightDir), 0.0);

	vec3 diffuse = light.diffuse * diff * vec3(texture(material.diffuse, TexCoords));

    // 镜面光

    vec3 viewDir = normalize(viewPos - FragPos);

    vec3 reflectDir = reflect(-lightDir, norm);

    float spec = pow(max(dot(viewDir, reflectDir), 0.0), material.shininess);

	vec3 specular = light.specular * spec * vec3(texture(material.specular, TexCoords));

	//衰减

	float distance    = length(light.position - FragPos);

	float attenuation = 1.0 / (light.constant + light.linear * distance + light.quadratic * (distance * distance));

	ambient  *= attenuation;

    diffuse   *= attenuation;

    specular *= attenuation;

	vec3 result = ambient + diffuse + specular;

    FragColor = vec4(result, 1.0);

}
//点光源渲染循环

glm::vec3 lightPos(1.2f, 1.0f, 2.0f);

while (!glfwWindowShouldClose(window))

	{

		// 帧时间差

		float currentFrame = glfwGetTime();

		deltaTime = currentFrame - lastFrame;

		lastFrame = currentFrame;

		// 输入

		processInput(window);

		// 渲染指令

		glClearColor(0.2f, 0.3f, 0.3f, 1.0f);

		glClear(GL_COLOR_BUFFER_BIT | GL_DEPTH_BUFFER_BIT);

		lightingShader.use();

		//lightingShader.setVec3("light.direction", -0.2f, -1.0f, -0.3f); //平行光

		lightingShader.setVec3("light.position", lightPos);

		lightingShader.setVec3("viewPos", camera.Position);

		// 光照属性

		lightingShader.setVec3("light.ambient", 0.2f, 0.2f, 0.2f);

		lightingShader.setVec3("light.diffuse", 0.7f, 0.7f, 0.7f);

		lightingShader.setVec3("light.specular", 1.0f, 1.0f, 1.0f);

		lightingShader.setFloat("light.constant", 1.0f);

		lightingShader.setFloat("light.linear", 0.09f);

		lightingShader.setFloat("light.quadratic", 0.032f);

		// 材质属性

		lightingShader.setFloat("material.shininess", 32.0f);

		// 初始化view transformations

		glm::mat4 projection = glm::perspective(glm::radians(camera.Zoom), (float)SCR_WIDTH / (float)SCR_HEIGHT, 0.1f, 100.0f);

		glm::mat4 view = camera.GetViewMatrix();

		lightingShader.setMat4("projection", projection);

		lightingShader.setMat4("view", view);

		// 初始化world transformations

		glm::mat4 model = glm::mat4();

		lightingShader.setMat4("model", model);

		// 绑定漫反射贴图

		glActiveTexture(GL_TEXTURE0);

		glBindTexture(GL_TEXTURE_2D, diffuseMap);

		// 绑定镜面贴图

		glActiveTexture(GL_TEXTURE1);

		glBindTexture(GL_TEXTURE_2D, specularMap);

		// 渲染方块

		//glBindVertexArray(cubeVAO);

		//glDrawArrays(GL_TRIANGLES, 0, 36);

		glBindVertexArray(cubeVAO);

		for (unsigned int i = 0; i < 10; i++)

		{

			glm::mat4 model = glm::mat4(1.0f);

			model = glm::translate(model, cubePositions[i]);

			float angle = 20.0f * i;

			model = glm::rotate(model, glm::radians(angle), glm::vec3(1.0f, 0.3f, 0.5f));

			lightingShader.setMat4("model", model);

			glDrawArrays(GL_TRIANGLES, 0, 36);

		}

		// 渲染点光源立方体

		lampShader.use();

		// 设置模型、视图和投影矩阵uniform

		lampShader.setMat4("projection", projection);

		lampShader.setMat4("view", view);

		model = glm::mat4(1.0f);

		model = glm::translate(model, lightPos);

		model = glm::scale(model, glm::vec3(0.2f)); // 小点的立方体

		lampShader.setMat4("model", model);

		// 绘制光源立方体对象

		glBindVertexArray(lightVAO);

		glDrawArrays(GL_TRIANGLES, 0, 36);

		// 交换缓冲并查询IO事件

		glfwSwapBuffers(window);

		glfwPollEvents();

	}

	glDeleteVertexArrays(1, &cubeVAO);

	glDeleteVertexArrays(1, &lightVAO);

	glDeleteBuffers(1, &VBO);

	glfwTerminate();

	return 0;

}
聚光
我们要讨论的最后一种类型的光是聚光(Spotlight)。聚光是位于环境中某个位置的光源,它只朝一个特定方向而不是所有方向照射光线。这样的结果就是只有在聚光方向的特定半径内的物体才会被照亮,其它的物体都会保持黑暗,比如路灯和手电筒
OpenGL中聚光是用一个世界空间位置、一个方向和一个切光角(Cutoff Angle)来表示的,切光角指定了聚光的半径(是圆锥的半径),对于每个片段,我们会计算片段是否位于聚光的切光方向之间(也就是在锥形内),如果是的话,我们就会相应地照亮片段
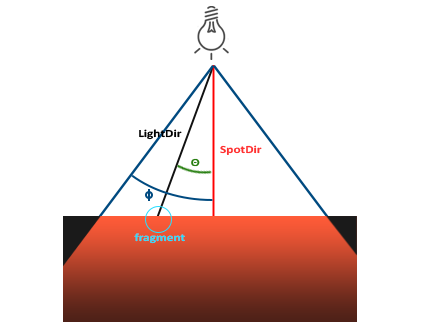
LightDir:从片段指向光源的向量SpotDir:聚光所指向的方向Phiϕ:指定了聚光半径的切光角,落在这个角度之外的物体都不会被这个聚光所照亮。Thetaθ:LightDir向量和SpotDir向量之间的夹角,在聚光内部的话θ值应该比ϕ值小
所以我们要做的就是计算LightDir向量和SpotDir向量之间的点积(返回两个单位向量夹角的余弦值),并将它与切光角ϕ值对比
你现在应该了解聚光究竟是什么了,下面我们将以手电筒的形式创建一个聚光
手电筒
手电筒(Flashlight)是一个位于观察者位置的聚光,通常它都会瞄准玩家视角的正前方
手电筒就是普通的聚光,但它的位置和方向会随着玩家的位置和朝向不断更新
所以,在片段着色器中我们需要的值有聚光的位置向量(来计算光的方向向量)、聚光的方向向量和一个切光角。我们可以将它们储存在Light结构体中:
//片段着色器

struct Light {

    vec3  position;

    vec3  direction;

    float cutOff;

    ...

};
接下来我们将合适的值传到着色器中:
lightingShader.setVec3("light.position",  camera.Position);

lightingShader.setVec3("light.direction", camera.Front);

lightingShader.setFloat("light.cutOff",   glm::cos(glm::radians(12.5f)));
你可以看到,我们并没有给切光角设置一个角度值,反而是用角度值计算了一个余弦值,将余弦结果传递到片段着色器中
这样做的原因是:在片段着色器中,我们会计算LightDir和SpotDir向量的点积,这个点积返回的将是一个余弦值而不是角度值,所以我们不能直接使用角度值和余弦值进行比较,为了获取角度值我们需要计算点积结果的反余弦,这是一个开销很大的计算
所以为了节约一点性能开销,我们将会计算切光角对应的余弦值,并将它的结果传入片段着色器中,由于这两个角度现在都由余弦角来表示了,我们可以直接对它们进行比较而不用进行任何开销高昂的计算
接下来就是计算θ值,并将它和切光角ϕ对比,来决定是否在聚光的内部:
float theta = dot(lightDir, normalize(-light.direction));

if(theta > light.cutOff)

{

  // 执行光照计算

}

else  // 否则,使用环境光,让场景在聚光之外时不至于完全黑暗

	color = vec4(light.ambient * vec3(texture(material.diffuse, TexCoords)), 1.0);
我们首先计算了lightDir和取反的direction向量(取反的是因为我们想让向量指向光源而不是从光源出发)之间的点积,记住要对所有的相关向量标准化
你可能奇怪为什么在if条件中使用的是 > 符号而不是 < 符号,theta不应该比光的切光角更小才是在聚光内部吗?这并没有错,但别忘了角度值现在都由余弦值来表示的

好了,运行程序

部分源码
//聚光片段着色器

#version 330 core

struct Material {

    sampler2D diffuse;

    sampler2D specular;

    float shininess;

};

struct Light {

    vec3 position;

	vec3 direction;

	float cutOff;

	vec3 ambient;

    vec3 diffuse;

    vec3 specular;

	float constant;  //常数项Kc

    float linear;	 //一次项Kl

    float quadratic; //二次项Kq

};

in vec3 FragPos;

in vec3 Normal;

in vec2 TexCoords;

out vec4 FragColor;

uniform Material material;

uniform Light light;

//uniform vec3 objectColor;

//uniform vec3 lightColor;

//uniform vec3 lightPos;

uniform vec3 viewPos;

float specularStrength = 0.5;

void main()

{

	vec3 lightDir = normalize(light.position - FragPos);

	// 检测是否在范围内

	float theta = dot(lightDir, normalize(-light.direction));

	if(theta > light.cutOff) // 执行光照计算

    {

		// 环境光

		vec3 ambient = light.ambient * vec3(texture(material.diffuse, TexCoords));

		// 漫反射

		vec3 norm = normalize(Normal);

		//vec3 lightDir = normalize(lightPos - FragPos);

		//vec3 lightDir = normalize(light.position - FragPos);

		float diff = max(dot(norm, lightDir), 0.0);

		vec3 diffuse = light.diffuse * diff * vec3(texture(material.diffuse, TexCoords));

		// 镜面光

		vec3 viewDir = normalize(viewPos - FragPos);

		vec3 reflectDir = reflect(-lightDir, norm);

		float spec = pow(max(dot(viewDir, reflectDir), 0.0), material.shininess);

		vec3 specular = light.specular * spec * vec3(texture(material.specular, TexCoords));

		//衰减

		float distance    = length(light.position - FragPos);

		float attenuation = 1.0 / (light.constant + light.linear * distance + light.quadratic * (distance * distance));

		//ambient  *= attenuation;

		diffuse   *= attenuation;

		specular *= attenuation;

		vec3 result = ambient + diffuse + specular;

        FragColor = vec4(result, 1.0);

	}

	else // 否则,使用环境光,让场景在聚光之外时不至于完全黑暗

    {

		FragColor = vec4(light.ambient * texture(material.diffuse, TexCoords).rgb, 1.0);

	}

}
//聚光渲染循环

while (!glfwWindowShouldClose(window))

	{

		// 帧时间差

		float currentFrame = glfwGetTime();

		deltaTime = currentFrame - lastFrame;

		lastFrame = currentFrame;

		// 输入

		processInput(window);

		// 渲染指令

		glClearColor(0.2f, 0.3f, 0.3f, 1.0f);

		glClear(GL_COLOR_BUFFER_BIT | GL_DEPTH_BUFFER_BIT);

		lightingShader.use();

		//lightingShader.setVec3("light.direction", -0.2f, -1.0f, -0.3f); //平行光

		lightingShader.setVec3("light.position", camera.Position);

		lightingShader.setVec3("light.direction", camera.Front);

		lightingShader.setFloat("light.cutOff", glm::cos(glm::radians(12.5f)));

		lightingShader.setVec3("viewPos", camera.Position);

		// 光照属性

		lightingShader.setVec3("light.ambient", 0.2f, 0.2f, 0.2f);

		lightingShader.setVec3("light.diffuse", 0.7f, 0.7f, 0.7f);

		lightingShader.setVec3("light.specular", 1.0f, 1.0f, 1.0f);

		lightingShader.setFloat("light.constant", 1.0f);

		lightingShader.setFloat("light.linear", 0.09f);

		lightingShader.setFloat("light.quadratic", 0.032f);

		// 材质属性

		lightingShader.setFloat("material.shininess", 32.0f);

		// 初始化view transformations

		glm::mat4 projection = glm::perspective(glm::radians(camera.Zoom), (float)SCR_WIDTH / (float)SCR_HEIGHT, 0.1f, 100.0f);

		glm::mat4 view = camera.GetViewMatrix();

		lightingShader.setMat4("projection", projection);

		lightingShader.setMat4("view", view);

		// 初始化world transformations

		glm::mat4 model = glm::mat4();

		lightingShader.setMat4("model", model);

		// 绑定漫反射贴图

		glActiveTexture(GL_TEXTURE0);

		glBindTexture(GL_TEXTURE_2D, diffuseMap);

		// 绑定镜面贴图

		glActiveTexture(GL_TEXTURE1);

		glBindTexture(GL_TEXTURE_2D, specularMap);

		// 渲染方块

		//glBindVertexArray(cubeVAO);

		//glDrawArrays(GL_TRIANGLES, 0, 36);

		glBindVertexArray(cubeVAO);

		for (unsigned int i = 0; i < 10; i++)

		{

			glm::mat4 model = glm::mat4(1.0f);

			model = glm::translate(model, cubePositions[i]);

			float angle = 20.0f * i;

			model = glm::rotate(model, glm::radians(angle), glm::vec3(1.0f, 0.3f, 0.5f));

			lightingShader.setMat4("model", model);

			glDrawArrays(GL_TRIANGLES, 0, 36);

		}

		//聚光,也不需要光源了

		//// 渲染点光源立方体

		//lampShader.use();

		//// 设置模型、视图和投影矩阵uniform

		//lampShader.setMat4("projection", projection);

		//lampShader.setMat4("view", view);

		//model = glm::mat4(1.0f);

		//model = glm::translate(model, lightPos);

		//model = glm::scale(model, glm::vec3(0.2f)); // 小点的立方体

		//lampShader.setMat4("model", model);

		//// 绘制光源立方体对象

		//glBindVertexArray(lightVAO);

		//glDrawArrays(GL_TRIANGLES, 0, 36);

		// 交换缓冲并查询IO事件

		glfwSwapBuffers(window);

		glfwPollEvents();

	}

	glDeleteVertexArrays(1, &cubeVAO);

	glDeleteVertexArrays(1, &lightVAO);

	glDeleteBuffers(1, &VBO);

	glfwTerminate();

	return 0;

}
平滑聚光边缘
我们的手电筒的光略显生硬,现在我们为了创建一种看起来边缘平滑的聚光,我们需要模拟聚光有一个内圆锥(Inner Cone)和一个外圆锥(Outer Cone),我们可以将内圆锥设置为上一部分中的那个圆锥,但我们也需要一个外圆锥,来让光从内圆锥逐渐减暗,直到外圆锥的边界
为了创建一个外圆锥,我们只需要再定义一个余弦值来代表聚光方向向量和外圆锥向量(等于它的半径)的夹角,然后,如果一个片段处于内外圆锥之间,将会给它计算出一个0.0到1.0之间的强度值,如果片段在内圆锥之内,它的强度就是1.0,如果在外圆锥之外强度值就是0.0
我们可以用下面这个公式来计算这个值:

这里ϵ是内(ϕ)和外圆锥(γ)之间的余弦值差(ϵ=ϕ−γ),最终的I值就是在当前片段聚光的强度。
很难去表现这个公式是怎么工作的,所以我们用一些实例值来看看:
θ |
θ(角度) |
ϕ(内光切) |
ϕ(角度) |
γ(外光切) |
γ(角度) |
ϵϵ | II |
|---|---|---|---|---|---|---|---|
| 0.87 | 30 | 0.91 | 25 | 0.82 | 35 | 0.91 - 0.82 = 0.09 | 0.87 - 0.82 / 0.09 = 0.56 |
| 0.9 | 26 | 0.91 | 25 | 0.82 | 35 | 0.91 - 0.82 = 0.09 | 0.9 - 0.82 / 0.09 = 0.89 |
| 0.97 | 14 | 0.91 | 25 | 0.82 | 35 | 0.91 - 0.82 = 0.09 | 0.97 - 0.82 / 0.09 = 1.67 |
| 0.83 | 34 | 0.91 | 25 | 0.82 | 35 | 0.91 - 0.82 = 0.09 | 0.83 - 0.82 / 0.09 = 0.11 |
| 0.64 | 50 | 0.91 | 25 | 0.82 | 35 | 0.91 - 0.82 = 0.09 | 0.64 - 0.82 / 0.09 = -2.0 |
| 0.966 | 15 | 0.9978 | 12.5 | 0.953 | 17.5 | 0.966 - 0.953 = 0.0448 | 0.966 - 0.953 / 0.0448 = 0.29 |
你可以看到,我们基本是在内外余弦值之间根据θ插值
如果你仍不明白发生了什么,不必担心,只需要记住这个公式就好了,在你更聪明的时候再回来看看
我们现在有了一个在聚光外是负的,在内圆锥内大于1.0的,在边缘处于两者之间的强度值了,如果我们正确地约束(Clamp)这个值,在片段着色器中就不再需要if-else了,我们能够使用计算出来的强度值直接乘以光照分量:
float theta     = dot(lightDir, normalize(-light.direction));

float epsilon   = light.cutOff - light.outerCutOff;

float intensity = clamp((theta - light.outerCutOff) / epsilon, 0.0, 1.0);

...

// 将不对环境光做出影响,让它总是能有一点光

diffuse  *= intensity;

specular *= intensity;

...
注意我们使用了clamp函数,它把第一个参数约束(Clamp)在了0.0到1.0之间,这保证强度值不会在[0, 1]区间之外
确定你将outerCutOff值添加到了Light结构体之中,并在程序中设置它的uniform值
我们使用的内切光角是12.5,外切光角是17.5:

部分源码
//片段着色器

#version 330 core

struct Material {

    sampler2D diffuse;

    sampler2D specular;

    float shininess;

};

struct Light {

    vec3 position;

	vec3 direction;

	float cutOff;

	float outerCutOff;

	vec3 ambient;

    vec3 diffuse;

    vec3 specular;

	float constant;  //常数项Kc

    float linear;	 //一次项Kl

    float quadratic; //二次项Kq

};

in vec3 FragPos;

in vec3 Normal;

in vec2 TexCoords;

out vec4 FragColor;

uniform Material material;

uniform Light light;

//uniform vec3 objectColor;

//uniform vec3 lightColor;

//uniform vec3 lightPos;

uniform vec3 viewPos;

float specularStrength = 0.5;

void main()

{

	// 环境光

	vec3 ambient = light.ambient * vec3(texture(material.diffuse, TexCoords));

	// 漫反射

	vec3 norm = normalize(Normal);

	//vec3 lightDir = normalize(lightPos - FragPos);

	vec3 lightDir = normalize(light.position - FragPos);

	float diff = max(dot(norm, lightDir), 0.0);

	vec3 diffuse = light.diffuse * diff * vec3(texture(material.diffuse, TexCoords));

	// 镜面光

	vec3 viewDir = normalize(viewPos - FragPos);

	vec3 reflectDir = reflect(-lightDir, norm);

	float spec = pow(max(dot(viewDir, reflectDir), 0.0), material.shininess);

	vec3 specular = light.specular * spec * vec3(texture(material.specular, TexCoords));

	// 聚光 (平滑边缘)

	float theta = dot(lightDir, normalize(-light.direction));

	float epsilon = (light.cutOff - light.outerCutOff);

	float intensity = clamp((theta - light.outerCutOff) / epsilon, 0.0, 1.0);

	diffuse  *= intensity;

	specular *= intensity;

	//衰减

	float distance    = length(light.position - FragPos);

	float attenuation = 1.0 / (light.constant + light.linear * distance + light.quadratic * (distance * distance));

	ambient  *= attenuation;

	diffuse   *= attenuation;

	specular *= attenuation;

	vec3 result = ambient + diffuse + specular;

    FragColor = vec4(result, 1.0);

}
多光源
现在我们将结合之前学过的所有知识,创建一个包含六个光源的场景,我们将模拟一个类似太阳的平行光光源,四个分散在场景中的点光源,以及一个手电筒
为了在场景中使用多个光源,我们希望将光照计算封装到GLSL函数中
GLSL中的函数和C函数很相似,它有一个函数名、一个返回值类型,如果函数不是在main函数之前声明的,我们还必须在代码文件顶部声明一个原型,我们对每个光照类型都创建一个不同的函数:平行光、点光源和聚光
当我们在场景中使用多个光源时,通常使用以下方法:我们需要有一个单独的颜色向量代表片段的输出颜色,对于每一个光源,它对片段的贡献颜色将会加到片段的输出颜色向量上,所以场景中的每个光源都会计算它们各自对片段的影响,并结合为一个最终的输出颜色
out vec4 FragColor;

void main()

{

  // 定义一个输出颜色值

  vec3 output;

  // 将平行光的贡献加到输出中

  output += someFunctionToCalculateDirectionalLight();

  // 对所有的点光源也做相同的事情

  for(int i = 0; i < nr_of_point_lights; i++)

    output += someFunctionToCalculatePointLight();

  // 也加上其它的光源(比如聚光)

  output += someFunctionToCalculateSpotLight();

  FragColor = vec4(output, 1.0);

}
实际的代码对每一种实现都可能不同,但大体的结构都是差不多的,我们定义了几个函数,用来计算每个光源的影响,并将最终的结果颜色加到输出颜色向量上,例如,如果两个光源都很靠近一个片段,那么它们所结合的贡献将会形成一个比单个光源照亮时更加明亮的片段
平行光
我么需要在片段着色器中定义一个函数来计算平行光对相应片段的贡献:它接受一些参数并计算一个平行光照颜色。
首先,我们需要定义一个平行光源最少所需要的变量,我们可以将这些变量储存在一个叫做DirLight的结构体中,并将它定义为一个uniform,和上面写的是基本一样的
struct DirLight {

    vec3 direction;

    vec3 ambient;

    vec3 diffuse;

    vec3 specular;

};

uniform DirLight dirLight;
接下来我们可以将dirLight传入一个有着一下原型的函数。
vec3 CalcDirLight(DirLight light, vec3 normal, vec3 viewDir);
和C/C++一样,如果我们想调用一个函数(这里是在main函数中调用),这个函数需要在调用者的行数之前被定义过,在这个例子中我们更喜欢在main函数以下定义函数,所以上面要求就不满足了。所以,我们需要在main函数之上定义函数的原型,这和C语言中是一样的
你可以看到,这个函数需要一个DirLight结构体和其它两个向量来进行计算。如果你认真完成了上一节的话,这个函数的内容应该理解起来很容易:
vec3 CalcDirLight(DirLight light, vec3 normal, vec3 viewDir)

{

    vec3 lightDir = normalize(-light.direction);

    // 漫反射着色

    float diff = max(dot(normal, lightDir), 0.0);

    // 镜面光着色

    vec3 reflectDir = reflect(-lightDir, normal);

    float spec = pow(max(dot(viewDir, reflectDir), 0.0), material.shininess);

    // 合并结果

    vec3 ambient  = light.ambient  * vec3(texture(material.diffuse, TexCoords));

    vec3 diffuse  = light.diffuse  * diff * vec3(texture(material.diffuse, TexCoords));

    vec3 specular = light.specular * spec * vec3(texture(material.specular, TexCoords));

    return (ambient + diffuse + specular);

}
我们基本上只是从上一节中复制了代码,并使用函数参数的两个向量来计算平行光的贡献向量,最终环境光、漫反射和镜面光的贡献将会合并为单个颜色向量返回
点光源
和平行光一样,我们也希望定义一个用于计算点光源对相应片段贡献,以及衰减,的函数。同样,我们定义一个包含了点光源所需所有变量的结构体:
struct PointLight {

    vec3 position;

    float constant;

    float linear;

    float quadratic;

    vec3 ambient;

    vec3 diffuse;

    vec3 specular;

};

#define NR_POINT_LIGHTS 4

uniform PointLight pointLights[NR_POINT_LIGHTS];
你可以看到,我们在GLSL中使用了预处理指令来定义了我们场景中点光源的数量,接着我们使用了这个NR_POINT_LIGHTS常量来创建了一个PointLight结构体的数组,GLSL中的数组和C数组一样,可以使用一对方括号来创建,现在我们有四个待填充数据的PointLight结构体
我们也可以定义一个大的结构体(而不是为每种类型的光源定义不同的结构体),包含所有不同种光照类型所需的变量,并将这个结构体用到所有的函数中,只需要忽略用不到的变量就行了
个人觉得当前的方法会更直观一点,不仅能够节省一些代码,而且由于不是所有光照类型都需要所有的变量,这样也能节省一些内存
点光源函数的原型如下:
vec3 CalcPointLight(PointLight light, vec3 normal, vec3 fragPos, vec3 viewDir);
这个函数从参数中获取所需的所有数据,并返回一个代表该点光源对片段的颜色贡献的vec3。我们再一次聪明地从之前的教程中复制粘贴代码,完成了下面这样的函数:
vec3 CalcPointLight(PointLight light, vec3 normal, vec3 fragPos, vec3 viewDir)

{

    vec3 lightDir = normalize(light.position - fragPos);

    // 漫反射着色

    float diff = max(dot(normal, lightDir), 0.0);

    // 镜面光着色

    vec3 reflectDir = reflect(-lightDir, normal);

    float spec = pow(max(dot(viewDir, reflectDir), 0.0), material.shininess);

    // 衰减

    float distance    = length(light.position - fragPos);

    float attenuation = 1.0 / (light.constant + light.linear * distance +

                 light.quadratic * (distance * distance));

    // 合并结果

    vec3 ambient  = light.ambient  * vec3(texture(material.diffuse, TexCoords));

    vec3 diffuse  = light.diffuse  * diff * vec3(texture(material.diffuse, TexCoords));

    vec3 specular = light.specular * spec * vec3(texture(material.specular, TexCoords));

    ambient  *= attenuation;

    diffuse  *= attenuation;

    specular *= attenuation;

    return (ambient + diffuse + specular);

}
将这些功能抽象到这样一个函数中的优点是,我们能够不用重复的代码而很容易地计算多个点光源的光照了。在main函数中,我们只需要创建一个循环,遍历整个点光源数组,对每个点光源调用CalcPointLight就可以了。
聚光
不再赘述,定义结构体:
struct SpotLight {

    vec3 position;

    vec3 direction;

    float cutOff;

    float outerCutOff;

    float constant;

    float linear;

    float quadratic;

    vec3 ambient;

    vec3 diffuse;

    vec3 specular;

};
vec3 CalcSpotLight(SpotLight light, vec3 normal, vec3 fragPos, vec3 viewDir)

{

    vec3 lightDir = normalize(light.position - fragPos);

    // 漫反射着色

    float diff = max(dot(normal, lightDir), 0.0);

    // 镜面光着色

    vec3 reflectDir = reflect(-lightDir, normal);

    float spec = pow(max(dot(viewDir, reflectDir), 0.0), material.shininess);

    // 衰减

    float distance = length(light.position - fragPos);

    float attenuation = 1.0 / (light.constant + light.linear * distance + light.quadratic * (distance * distance));

    // 聚光强度

    float theta = dot(lightDir, normalize(-light.direction));

    float epsilon = light.cutOff - light.outerCutOff;

    float intensity = clamp((theta - light.outerCutOff) / epsilon, 0.0, 1.0);

    // 合并结果

    vec3 ambient = light.ambient * vec3(texture(material.diffuse, TexCoords));

    vec3 diffuse = light.diffuse * diff * vec3(texture(material.diffuse, TexCoords));

    vec3 specular = light.specular * spec * vec3(texture(material.specular, TexCoords));

    ambient *= attenuation * intensity;

    diffuse *= attenuation * intensity;

    specular *= attenuation * intensity;

    return (ambient + diffuse + specular);

}
现在我们的片段着色器是这样的:
#version 330 core

out vec4 FragColor;

struct Material {

    sampler2D diffuse;

    sampler2D specular;

    float shininess;

};

struct DirLight {

    vec3 direction;

    vec3 ambient;

    vec3 diffuse;

    vec3 specular;

};

struct PointLight {

    vec3 position;

    float constant;

    float linear;

    float quadratic;

    vec3 ambient;

    vec3 diffuse;

    vec3 specular;

};

struct SpotLight {

    vec3 position;

    vec3 direction;

    float cutOff;

    float outerCutOff;

    float constant;

    float linear;

    float quadratic;

    vec3 ambient;

    vec3 diffuse;

    vec3 specular;

};

#define NR_POINT_LIGHTS 4

in vec3 FragPos;

in vec3 Normal;

in vec2 TexCoords;

uniform vec3 viewPos;

uniform DirLight dirLight;

uniform PointLight pointLights[NR_POINT_LIGHTS];

uniform SpotLight spotLight;

uniform Material material;

vec3 CalcDirLight(DirLight light, vec3 normal, vec3 viewDir);

vec3 CalcPointLight(PointLight light, vec3 normal, vec3 fragPos, vec3 viewDir);

vec3 CalcSpotLight(SpotLight light, vec3 normal, vec3 fragPos, vec3 viewDir);

void main()

{

	// 属性

    vec3 norm = normalize(Normal);

    vec3 viewDir = normalize(viewPos - FragPos);

	// 1.平行光

	vec3 result = CalcDirLight(dirLight, norm, viewDir);

    // 2.点光源

    for(int i = 0; i < NR_POINT_LIGHTS; i++)

        result += CalcPointLight(pointLights[i], norm, FragPos, viewDir);

    // 3.手电筒

    result += CalcSpotLight(spotLight, norm, FragPos, viewDir);

    FragColor = vec4(result, 1.0);

}

vec3 CalcDirLight(DirLight light, vec3 normal, vec3 viewDir)

{

    vec3 lightDir = normalize(-light.direction);

    // 漫反射着色

    float diff = max(dot(normal, lightDir), 0.0);

    // 镜面光着色

    vec3 reflectDir = reflect(-lightDir, normal);

    float spec = pow(max(dot(viewDir, reflectDir), 0.0), material.shininess);

    // 合并结果

    vec3 ambient  = light.ambient  * vec3(texture(material.diffuse, TexCoords));

    vec3 diffuse  = light.diffuse  * diff * vec3(texture(material.diffuse, TexCoords));

    vec3 specular = light.specular * spec * vec3(texture(material.specular, TexCoords));

    return (ambient + diffuse + specular);

}

vec3 CalcPointLight(PointLight light, vec3 normal, vec3 fragPos, vec3 viewDir)

{

    vec3 lightDir = normalize(light.position - fragPos);

    // 漫反射着色

    float diff = max(dot(normal, lightDir), 0.0);

    // 镜面光着色

    vec3 reflectDir = reflect(-lightDir, normal);

    float spec = pow(max(dot(viewDir, reflectDir), 0.0), material.shininess);

    // 衰减

    float distance    = length(light.position - fragPos);

    float attenuation = 1.0 / (light.constant + light.linear * distance +

                 light.quadratic * (distance * distance));

    // 合并结果

    vec3 ambient  = light.ambient  * vec3(texture(material.diffuse, TexCoords));

    vec3 diffuse  = light.diffuse  * diff * vec3(texture(material.diffuse, TexCoords));

    vec3 specular = light.specular * spec * vec3(texture(material.specular, TexCoords));

    ambient  *= attenuation;

    diffuse  *= attenuation;

    specular *= attenuation;

    return (ambient + diffuse + specular);

}

vec3 CalcSpotLight(SpotLight light, vec3 normal, vec3 fragPos, vec3 viewDir)

{

    vec3 lightDir = normalize(light.position - fragPos);

    // 漫反射着色

    float diff = max(dot(normal, lightDir), 0.0);

    // 镜面光着色

    vec3 reflectDir = reflect(-lightDir, normal);

    float spec = pow(max(dot(viewDir, reflectDir), 0.0), material.shininess);

    // 衰减

    float distance = length(light.position - fragPos);

    float attenuation = 1.0 / (light.constant + light.linear * distance + light.quadratic * (distance * distance));

    // 聚光强度

    float theta = dot(lightDir, normalize(-light.direction));

    float epsilon = light.cutOff - light.outerCutOff;

    float intensity = clamp((theta - light.outerCutOff) / epsilon, 0.0, 1.0);

    // 合并结果

    vec3 ambient = light.ambient * vec3(texture(material.diffuse, TexCoords));

    vec3 diffuse = light.diffuse * diff * vec3(texture(material.diffuse, TexCoords));

    vec3 specular = light.specular * spec * vec3(texture(material.specular, TexCoords));

    ambient *= attenuation * intensity;

    diffuse *= attenuation * intensity;

    specular *= attenuation * intensity;

    return (ambient + diffuse + specular);

}
合并结果
现在我们已经定义了一个计算平行光的函数和一个计算点光源的函数了,我们可以将它们合并放到main函数中。
void main()

{

    // 属性

    vec3 norm = normalize(Normal);

    vec3 viewDir = normalize(viewPos - FragPos);

	// 1.平行光

	vec3 result = CalcDirLight(dirLight, norm, viewDir);

    // 2.点光源

    for(int i = 0; i < NR_POINT_LIGHTS; i++)

        result += CalcPointLight(pointLights[i], norm, FragPos, viewDir);

    // 3.手电筒

    result += CalcSpotLight(spotLight, norm, FragPos, viewDir);

    FragColor = vec4(result, 1.0);

}
每个光源类型都将它们的贡献加到了最终的输出颜色上,直到所有的光源都处理完了,最终的颜色包含了场景中所有光源的颜色影响所合并的结果
设置平行光结构体的uniform应该非常熟悉了,但是你可能会在想我们该如何设置点光源的uniform值,因为点光源的uniform现在是一个PointLight的数组了,其实这并不复杂
lightingShader.setFloat("pointLights[0].constant", 1.0f);
在这里我们索引了pointLights数组中的第一个PointLight,并获取了constant变量的位置。但这也意味着不幸的是我们必须对这四个点光源手动设置uniform值,这让点光源本身就产生了28个uniform调用,非常冗长
你也可以尝试将这些抽象出去一点,定义一个点光源类,让它来为你设置uniform值,但最后你仍然要用这种方式设置所有光源的uniform值
别忘了,我们还需要为每个点光源定义一个位置向量,所以我们让它们在场景中分散一点,我们会定义另一个glm::vec3数组来包含点光源的位置:
glm::vec3 pointLightPositions[] = {

    glm::vec3( 0.7f,  0.2f,  2.0f),

    glm::vec3( 2.3f, -3.3f, -4.0f),

    glm::vec3(-4.0f,  2.0f, -12.0f),

    glm::vec3( 0.0f,  0.0f, -3.0f)

};
接下来我们从pointLights数组中索引对应的PointLight,将它的position值设置为刚刚定义的位置值数组中的其中一个,同时我们还要保证现在绘制的是四个灯立方体而不是仅仅一个,只要对每个灯物体创建一个不同的模型矩阵就可以了,和我们之前对箱子的处理类似
glBindVertexArray(lightVAO);

for (unsigned int i = 0; i < 4; i++)

{

    model = glm::mat4(1.0f);

    model = glm::translate(model, pointLightPositions[i]);

    model = glm::scale(model, glm::vec3(0.2f)); // Make it a smaller cube

    lampShader.setMat4("model", model);

    glDrawArrays(GL_TRIANGLES, 0, 36);

}
运行程序:

OpenGl光照基础学习到此结束
源码:
#include <glad/glad.h>

#include <GLFW/glfw3.h>

#include <iostream>

#include "shader_s.h"

#include "camera.h"

#define STB_IMAGE_IMPLEMENTATION

#include "stb_image.h"

#include <glm/glm.hpp>

#include <glm/gtc/matrix_transform.hpp>

#include <glm/gtc/type_ptr.hpp>

void framebuffer_size_callback(GLFWwindow* window, int width, int height);

void mouse_callback(GLFWwindow* window, double xpos, double ypos);

void scroll_callback(GLFWwindow* window, double xoffset, double yoffset);

void processInput(GLFWwindow *window);

unsigned int loadTexture(char const * path);

// settings

const unsigned int SCR_WIDTH = 800;

const unsigned int SCR_HEIGHT = 600;

// camera

Camera camera(glm::vec3(0.0f, 0.0f, 3.0f));

float lastX = SCR_WIDTH / 2.0f;

float lastY = SCR_HEIGHT / 2.0f;

bool firstMouse = true;

// timing

float deltaTime = 0.0f; // 当前帧与上一帧的时间差

float lastFrame = 0.0f; // 上一帧的时间

glm::vec3 lightPos(1.2f, 1.0f, 2.0f);

int main()

{

	// glfw初始化

	glfwInit();

	glfwWindowHint(GLFW_CONTEXT_VERSION_MAJOR, 3);

	glfwWindowHint(GLFW_CONTEXT_VERSION_MINOR, 3);

	glfwWindowHint(GLFW_OPENGL_PROFILE, GLFW_OPENGL_CORE_PROFILE);

	// glfw创建窗口

	GLFWwindow* window = glfwCreateWindow(SCR_WIDTH, SCR_HEIGHT, "LearnOpenGL", NULL, NULL);

	if (window == NULL)

	{

		std::cout << "Failed to create GLFW window" << std::endl;

		glfwTerminate();

		return -1;

	}

	glfwMakeContextCurrent(window);

	glfwSetFramebufferSizeCallback(window, framebuffer_size_callback);

	glfwSetCursorPosCallback(window, mouse_callback);

	glfwSetScrollCallback(window, scroll_callback);

	// 捕捉鼠标

	glfwSetInputMode(window, GLFW_CURSOR, GLFW_CURSOR_DISABLED);

	// glad加载所有OpenGL函数指针

	if (!gladLoadGLLoader((GLADloadproc)glfwGetProcAddress))

	{

		std::cout << "Failed to initialize GLAD" << std::endl;

		return -1;

	}

	glEnable(GL_DEPTH_TEST);

	Shader lightingShader("colorVertex.txt", "colorFragment.txt");// 起什么名字自己定

	Shader lampShader("lampVertex.txt", "lampFragment.txt");

	float vertices[] = {

		// positions          // normals           // texture coords

		-0.5f, -0.5f, -0.5f,  0.0f,  0.0f, -1.0f,  0.0f, 0.0f,

		 0.5f, -0.5f, -0.5f,  0.0f,  0.0f, -1.0f,  1.0f, 0.0f,

		 0.5f,  0.5f, -0.5f,  0.0f,  0.0f, -1.0f,  1.0f, 1.0f,

		 0.5f,  0.5f, -0.5f,  0.0f,  0.0f, -1.0f,  1.0f, 1.0f,

		-0.5f,  0.5f, -0.5f,  0.0f,  0.0f, -1.0f,  0.0f, 1.0f,

		-0.5f, -0.5f, -0.5f,  0.0f,  0.0f, -1.0f,  0.0f, 0.0f,

		-0.5f, -0.5f,  0.5f,  0.0f,  0.0f, 1.0f,   0.0f, 0.0f,

		 0.5f, -0.5f,  0.5f,  0.0f,  0.0f, 1.0f,   1.0f, 0.0f,

		 0.5f,  0.5f,  0.5f,  0.0f,  0.0f, 1.0f,   1.0f, 1.0f,

		 0.5f,  0.5f,  0.5f,  0.0f,  0.0f, 1.0f,   1.0f, 1.0f,

		-0.5f,  0.5f,  0.5f,  0.0f,  0.0f, 1.0f,   0.0f, 1.0f,

		-0.5f, -0.5f,  0.5f,  0.0f,  0.0f, 1.0f,   0.0f, 0.0f,

		-0.5f,  0.5f,  0.5f, -1.0f,  0.0f,  0.0f,  1.0f, 0.0f,

		-0.5f,  0.5f, -0.5f, -1.0f,  0.0f,  0.0f,  1.0f, 1.0f,

		-0.5f, -0.5f, -0.5f, -1.0f,  0.0f,  0.0f,  0.0f, 1.0f,

		-0.5f, -0.5f, -0.5f, -1.0f,  0.0f,  0.0f,  0.0f, 1.0f,

		-0.5f, -0.5f,  0.5f, -1.0f,  0.0f,  0.0f,  0.0f, 0.0f,

		-0.5f,  0.5f,  0.5f, -1.0f,  0.0f,  0.0f,  1.0f, 0.0f,

		 0.5f,  0.5f,  0.5f,  1.0f,  0.0f,  0.0f,  1.0f, 0.0f,

		 0.5f,  0.5f, -0.5f,  1.0f,  0.0f,  0.0f,  1.0f, 1.0f,

		 0.5f, -0.5f, -0.5f,  1.0f,  0.0f,  0.0f,  0.0f, 1.0f,

		 0.5f, -0.5f, -0.5f,  1.0f,  0.0f,  0.0f,  0.0f, 1.0f,

		 0.5f, -0.5f,  0.5f,  1.0f,  0.0f,  0.0f,  0.0f, 0.0f,

		 0.5f,  0.5f,  0.5f,  1.0f,  0.0f,  0.0f,  1.0f, 0.0f,

		-0.5f, -0.5f, -0.5f,  0.0f, -1.0f,  0.0f,  0.0f, 1.0f,

		 0.5f, -0.5f, -0.5f,  0.0f, -1.0f,  0.0f,  1.0f, 1.0f,

		 0.5f, -0.5f,  0.5f,  0.0f, -1.0f,  0.0f,  1.0f, 0.0f,

		 0.5f, -0.5f,  0.5f,  0.0f, -1.0f,  0.0f,  1.0f, 0.0f,

		-0.5f, -0.5f,  0.5f,  0.0f, -1.0f,  0.0f,  0.0f, 0.0f,

		-0.5f, -0.5f, -0.5f,  0.0f, -1.0f,  0.0f,  0.0f, 1.0f,

		-0.5f,  0.5f, -0.5f,  0.0f,  1.0f,  0.0f,  0.0f, 1.0f,

		 0.5f,  0.5f, -0.5f,  0.0f,  1.0f,  0.0f,  1.0f, 1.0f,

		 0.5f,  0.5f,  0.5f,  0.0f,  1.0f,  0.0f,  1.0f, 0.0f,

		 0.5f,  0.5f,  0.5f,  0.0f,  1.0f,  0.0f,  1.0f, 0.0f,

		-0.5f,  0.5f,  0.5f,  0.0f,  1.0f,  0.0f,  0.0f, 0.0f,

		-0.5f,  0.5f, -0.5f,  0.0f,  1.0f,  0.0f,  0.0f, 1.0f

	};

	// 立方体位置

	glm::vec3 cubePositions[] = {

		glm::vec3(0.0f,  0.0f,  0.0f),

		glm::vec3(2.0f,  5.0f, -15.0f),

		glm::vec3(-1.5f, -2.2f, -2.5f),

		glm::vec3(-3.8f, -2.0f, -12.3f),

		glm::vec3(2.4f, -0.4f, -3.5f),

		glm::vec3(-1.7f,  3.0f, -7.5f),

		glm::vec3(1.3f, -2.0f, -2.5f),

		glm::vec3(1.5f,  2.0f, -2.5f),

		glm::vec3(1.5f,  0.2f, -1.5f),

		glm::vec3(-1.3f,  1.0f, -1.5f)

	};

	// 点光源位置

	glm::vec3 pointLightPositions[] = {

		glm::vec3(0.7f,  0.2f,  2.0f),

		glm::vec3(2.3f, -3.3f, -4.0f),

		glm::vec3(-4.0f,  2.0f, -12.0f),

		glm::vec3(0.0f,  0.0f, -3.0f)

	};

	unsigned int VBO;

	glGenBuffers(1, &VBO);

	unsigned int cubeVAO;

	glGenVertexArrays(1, &cubeVAO);

	glBindVertexArray(cubeVAO);

	glBindBuffer(GL_ARRAY_BUFFER, VBO);

	glBufferData(GL_ARRAY_BUFFER, sizeof(vertices), vertices, GL_STATIC_DRAW);

	glVertexAttribPointer(0, 3, GL_FLOAT, GL_FALSE, 8 * sizeof(float), (void*)0);

	glEnableVertexAttribArray(0);

	glVertexAttribPointer(1, 3, GL_FLOAT, GL_FALSE, 8 * sizeof(float), (void*)(3 * sizeof(float)));

	glEnableVertexAttribArray(1);

	glVertexAttribPointer(2, 2, GL_FLOAT, GL_FALSE, 8 * sizeof(float), (void*)(6 * sizeof(float)));

	glEnableVertexAttribArray(2);

	unsigned int lightVAO;

	glGenVertexArrays(1, &lightVAO);

	glBindVertexArray(lightVAO);

	glBindBuffer(GL_ARRAY_BUFFER, VBO);

	glVertexAttribPointer(0, 3, GL_FLOAT, GL_FALSE, 8 * sizeof(float), (void*)0);

	glEnableVertexAttribArray(0);

	unsigned int diffuseMap = loadTexture("container2.png");

	unsigned int specularMap = loadTexture("container2_specular.png");

	lightingShader.use();

	lightingShader.setInt("material.diffuse", 0);

	lightingShader.setInt("material.specular", 1);

	//渲染循环

	while (!glfwWindowShouldClose(window))

	{

		// 帧时间差

		float currentFrame = glfwGetTime();

		deltaTime = currentFrame - lastFrame;

		lastFrame = currentFrame;

		// 输入

		processInput(window);

		// 渲染指令

		glClearColor(0.2f, 0.3f, 0.3f, 1.0f);

		glClear(GL_COLOR_BUFFER_BIT | GL_DEPTH_BUFFER_BIT);

		lightingShader.use();

		lightingShader.setVec3("light.position", camera.Position);

		lightingShader.setFloat("material.shininess", 32.0f);

		// 平行光

		lightingShader.setVec3("dirLight.direction", -0.2f, -1.0f, -0.3f);

		lightingShader.setVec3("dirLight.ambient", 0.05f, 0.05f, 0.05f);

		lightingShader.setVec3("dirLight.diffuse", 0.4f, 0.4f, 0.4f);

		lightingShader.setVec3("dirLight.specular", 0.5f, 0.5f, 0.5f);

		// 点光源 1

		lightingShader.setVec3("pointLights[0].position", pointLightPositions[0]);

		lightingShader.setVec3("pointLights[0].ambient", 0.05f, 0.05f, 0.05f);

		lightingShader.setVec3("pointLights[0].diffuse", 0.8f, 0.8f, 0.8f);

		lightingShader.setVec3("pointLights[0].specular", 1.0f, 1.0f, 1.0f);

		lightingShader.setFloat("pointLights[0].constant", 1.0f);

		lightingShader.setFloat("pointLights[0].linear", 0.09);

		lightingShader.setFloat("pointLights[0].quadratic", 0.032);

		// 点光源 2

		lightingShader.setVec3("pointLights[1].position", pointLightPositions[1]);

		lightingShader.setVec3("pointLights[1].ambient", 0.05f, 0.05f, 0.05f);

		lightingShader.setVec3("pointLights[1].diffuse", 0.8f, 0.8f, 0.8f);

		lightingShader.setVec3("pointLights[1].specular", 1.0f, 1.0f, 1.0f);

		lightingShader.setFloat("pointLights[1].constant", 1.0f);

		lightingShader.setFloat("pointLights[1].linear", 0.09);

		lightingShader.setFloat("pointLights[1].quadratic", 0.032);

		// 点光源 3

		lightingShader.setVec3("pointLights[2].position", pointLightPositions[2]);

		lightingShader.setVec3("pointLights[2].ambient", 0.05f, 0.05f, 0.05f);

		lightingShader.setVec3("pointLights[2].diffuse", 0.8f, 0.8f, 0.8f);

		lightingShader.setVec3("pointLights[2].specular", 1.0f, 1.0f, 1.0f);

		lightingShader.setFloat("pointLights[2].constant", 1.0f);

		lightingShader.setFloat("pointLights[2].linear", 0.09);

		lightingShader.setFloat("pointLights[2].quadratic", 0.032);

		// 点光源 4

		lightingShader.setVec3("pointLights[3].position", pointLightPositions[3]);

		lightingShader.setVec3("pointLights[3].ambient", 0.05f, 0.05f, 0.05f);

		lightingShader.setVec3("pointLights[3].diffuse", 0.8f, 0.8f, 0.8f);

		lightingShader.setVec3("pointLights[3].specular", 1.0f, 1.0f, 1.0f);

		lightingShader.setFloat("pointLights[3].constant", 1.0f);

		lightingShader.setFloat("pointLights[3].linear", 0.09);

		lightingShader.setFloat("pointLights[3].quadratic", 0.032);

		// 手电筒

		lightingShader.setVec3("spotLight.position", camera.Position);

		lightingShader.setVec3("spotLight.direction", camera.Front);

		lightingShader.setVec3("spotLight.ambient", 0.0f, 0.0f, 0.0f);

		lightingShader.setVec3("spotLight.diffuse", 1.0f, 1.0f, 1.0f);

		lightingShader.setVec3("spotLight.specular", 1.0f, 1.0f, 1.0f);

		lightingShader.setFloat("spotLight.constant", 1.0f);

		lightingShader.setFloat("spotLight.linear", 0.09);

		lightingShader.setFloat("spotLight.quadratic", 0.032);

		lightingShader.setFloat("spotLight.cutOff", glm::cos(glm::radians(12.5f)));

		lightingShader.setFloat("spotLight.outerCutOff", glm::cos(glm::radians(15.0f)));

		// 初始化view transformations

		glm::mat4 projection = glm::perspective(glm::radians(camera.Zoom), (float)SCR_WIDTH / (float)SCR_HEIGHT, 0.1f, 100.0f);

		glm::mat4 view = camera.GetViewMatrix();

		lightingShader.setMat4("projection", projection);

		lightingShader.setMat4("view", view);

		// 初始化world transformations

		glm::mat4 model = glm::mat4();

		lightingShader.setMat4("model", model);

		// 绑定漫反射贴图

		glActiveTexture(GL_TEXTURE0);

		glBindTexture(GL_TEXTURE_2D, diffuseMap);

		// 绑定镜面贴图

		glActiveTexture(GL_TEXTURE1);

		glBindTexture(GL_TEXTURE_2D, specularMap);

		// 渲染方块

		glBindVertexArray(cubeVAO);

		for (unsigned int i = 0; i < 10; i++)

		{

			glm::mat4 model = glm::mat4(1.0f);

			model = glm::translate(model, cubePositions[i]);

			float angle = 20.0f * i;

			model = glm::rotate(model, glm::radians(angle), glm::vec3(1.0f, 0.3f, 0.5f));

			lightingShader.setMat4("model", model);

			glDrawArrays(GL_TRIANGLES, 0, 36);

		}

		lampShader.use();

		lampShader.setMat4("projection", projection);

		lampShader.setMat4("view", view);;

		glBindVertexArray(lightVAO);

		for (unsigned int i = 0; i < 4; i++)

		{

			model = glm::mat4(1.0f);

			model = glm::translate(model, pointLightPositions[i]);

			model = glm::scale(model, glm::vec3(0.2f)); // Make it a smaller cube

			lampShader.setMat4("model", model);

			glDrawArrays(GL_TRIANGLES, 0, 36);

		}

		// 交换缓冲并查询IO事件

		glfwSwapBuffers(window);

		glfwPollEvents();

	}

	glDeleteVertexArrays(1, &cubeVAO);

	glDeleteVertexArrays(1, &lightVAO);

	glDeleteBuffers(1, &VBO);

	glfwTerminate();

	return 0;

}

void processInput(GLFWwindow *window)

{

	if (glfwGetKey(window, GLFW_KEY_ESCAPE) == GLFW_PRESS)//是否按下了返回键

		glfwSetWindowShouldClose(window, true);

	if (glfwGetKey(window, GLFW_KEY_W) == GLFW_PRESS)

		camera.ProcessKeyboard(FORWARD, deltaTime);

	if (glfwGetKey(window, GLFW_KEY_S) == GLFW_PRESS)

		camera.ProcessKeyboard(BACKWARD, deltaTime);

	if (glfwGetKey(window, GLFW_KEY_A) == GLFW_PRESS)

		camera.ProcessKeyboard(LEFT, deltaTime);

	if (glfwGetKey(window, GLFW_KEY_D) == GLFW_PRESS)

		camera.ProcessKeyboard(RIGHT, deltaTime);

}

void framebuffer_size_callback(GLFWwindow* window, int width, int height)

{

	glViewport(0, 0, width, height);

}

void mouse_callback(GLFWwindow* window, double xpos, double ypos)

{

	if (firstMouse)

	{

		lastX = xpos;

		lastY = ypos;

		firstMouse = false;

	}

	float xoffset = xpos - lastX;

	float yoffset = lastY - ypos; // reversed since y-coordinates go from bottom to top

	lastX = xpos;

	lastY = ypos;

	camera.ProcessMouseMovement(xoffset, yoffset);

}

void scroll_callback(GLFWwindow* window, double xoffset, double yoffset)

{

	camera.ProcessMouseScroll(yoffset);

}

unsigned int loadTexture(char const * path)

{

	unsigned int textureID;

	glGenTextures(1, &textureID);

	int width, height, nrComponents;

	unsigned char *data = stbi_load(path, &width, &height, &nrComponents, 0);

	if (data)

	{

		GLenum format;

		if (nrComponents == 1)

			format = GL_RED;

		else if (nrComponents == 3)

			format = GL_RGB;

		else if (nrComponents == 4)

			format = GL_RGBA;

		glBindTexture(GL_TEXTURE_2D, textureID);

		glTexImage2D(GL_TEXTURE_2D, 0, format, width, height, 0, format, GL_UNSIGNED_BYTE, data);

		glGenerateMipmap(GL_TEXTURE_2D);

		glTexParameteri(GL_TEXTURE_2D, GL_TEXTURE_WRAP_S, GL_REPEAT);

		glTexParameteri(GL_TEXTURE_2D, GL_TEXTURE_WRAP_T, GL_REPEAT);

		glTexParameteri(GL_TEXTURE_2D, GL_TEXTURE_MIN_FILTER, GL_LINEAR_MIPMAP_LINEAR);

		glTexParameteri(GL_TEXTURE_2D, GL_TEXTURE_MAG_FILTER, GL_LINEAR);

		stbi_image_free(data);

	}

	else

	{

		std::cout << "Texture failed to load at path: " << path << std::endl;

		stbi_image_free(data);

	}

	return textureID;

}
OpenGL光照3:光源的更多相关文章
- OpenGL光照和颜色
OpenGL光照和颜色 转自:http://www.cnblogs.com/kekec/archive/2011/08/16/2140789.html OpenGL场景中模型颜色的产生,大致为如下的流 ...
- 浅析OpenGL光照
浅析OpenGL光照 之前从来都没有涉及光照的内容,心想只要能通过常规的方法渲染出几何体甚至是模型就可以了,然而没有光照的日子注定是苦涩的,因为仅凭几何体和模型的颜色无法达到真是渲染的效果,在实际中有 ...
- OpenGL光照1:颜色和基础光照
本文是个人学习记录,学习建议看教程 https://learnopengl-cn.github.io/ 非常感谢原作者JoeyDeVries和多为中文翻译者提供的优质教程 的内容为插入注释,可以先跳过 ...
- OpenGL光照测试
OpenGL光照测试 花了大概半个月,研究了OpenGL的光照.请注意是固定管线渲染的光照,如果使用着色器的高手们请飘过.这个程序是通过光照对模型的照射,来研究OpenGL光照的性质.以后可以通过这个 ...
- 【狼】openGL 光照的学习
小狼学习原创,欢迎批评指正 http://www.cnblogs.com/zhanlang96/p/3859439.html 先上代码 #include "stdafx.h" #i ...
- OpenGL光照设置
一.设置光源 (1)光源的种类 环境光 环境光是一种无处不在的光.环境光源放出的光线被认为来自任何方向.因此,当你仅为场景指定环境光时,所有的物体无论法向量如何,都将表现为同样的明暗程度. 点光源 由 ...
- 实验7 OpenGL光照
一.实验目的: 了解掌握OpenGL程序的光照与材质,能正确使用光源与材质函数设置所需的绘制效果. 二.实验内容: (1)下载并运行Nate Robin教学程序包中的lightmaterial程序,试 ...
- OpenGL光照2:材质和光照贴图
本文是个人学习记录,学习建议看教程 https://learnopengl-cn.github.io/ 非常感谢原作者JoeyDeVries和多为中文翻译者提供的优质教程 的内容为插入注释,可以先跳过 ...
- 第07课 OpenGL 光照和键盘(1)
光照和键盘控制: 在这一课里,我们将添加光照和键盘控制,它让程序看起来更美观. 这一课我会教您如何使用三种不同的纹理滤波方式.教您如何使用键盘来移动场景中的对象,还会教您在OpenGL场景中应用简单的 ...
随机推荐
- 《工作笔记:移动web页面前端开发总结》
工作笔记:移动web页面前端开发总结 移动web在当今的发展速度是一日千里,作为移动领域的门外汉,在这段时间的接触后,发现前端开发这一块做一个小小的总结. 1.四大浏览器内核 1.Trident (I ...
- 埃氏筛法(求n以内有哪些个质数)
核心思想:从i=2开始,划去i的倍数,即剩下i为质数(如删去2的倍数后2为质数,再删去3的倍数后3为质数,4被删除则跳过,5未被删除则记录然后删除5的倍数...以此类推) #include <b ...
- Git - Git简介与客户端安装
简介 Git是目前世界上最先进的分布式版本控制系统(没有之一)! 集中式版本控制系统(CVS/SVN),版本库是集中存放在中央服务器的,而一般工作的时候,用的都是自己的电脑,所以要先从中央服务器取得最 ...
- fiddler抓包syntaxview窗口乱码
只需再fiddler界面GO往右第二个Decode点击一下,让他出现蓝色边框即可 注意:抓取前的他不会进行自动解码,要再重新刷新页面才能获取界面后的内容
- Go-for循环
一.第一种情况(死循环) package main import "fmt" func main() { for{ fmt.Println("fuck") } ...
- 微信小程序 wxml 文件中如何让多余文本省略号显示?
废话不多说,之前写小程序碰到了一个问题,如何在 wxml 页面中截取数据? 1.wxs 取数据想必大家都会,不就是 substring 吗?但是这种方法在 wxml 页面中是无效的. 那还有 cs ...
- jQuery学习笔记Fisrt Day
跳过JS直接JQUERY,“不愧是你”. 对就是我. 今天开始jQuery学习第一天. click事件方法: 鼠标点击 dbl事件方法: 双击鼠标 mouseenter事件方法: 鼠标进入 mouse ...
- Cobalt Strike系列教程第五章:截图与浏览器代理
Cobalt Strike系列教程分享如约而至,新关注的小伙伴可以先回顾一下前面的内容: Cobalt Strike系列教程第一章:简介与安装 Cobalt Strike系列教程第二章:Beacon详 ...
- Thymeleaf常用语法:模板注释
Thymeleaf模板注释分为标准HTML/XML注释.解析层注释.原型注释三种. 一.注释说明 1.标准HTML/XML注释 直接通过浏览器打开,不显示,Thymeleaf模板引擎解析也不处理,但查 ...
- android 对于asset和raw下文件的操作
Android 中资源分为两种,一种是res下可编译的资源文件, 这种资源文件系统会在R.Java里面自动生成该资源文件的ID,访问也很简单,只需要调用R.XXX.id即可;第二种就是放在assets ...