第二十节:Scrapy爬虫框架之使用Pipeline存储
在上两节当中,我们爬取了360图片,但是我们需要将图片下载下来,这将如何下载和存储呢?
下边叙述一下三种情况:1、将图片下载后存储到MongoDB数据库;2、将图片下载后存储在MySQL数据库;3、将图片下载到本地文件
话不多说,直接上代码:
1、通过item定义存储字段
 # item.py

 import scrapy

 class Bole_mode(scrapy.Item):

     collection = "images"     # collection为MongoDB储表名名称

     table = "images"           # table为MySQL的存储表名名称

     id    = scrapy.Field()      # id

     url   = scrapy.Field()      # 图片链接

     title = scrapy.Field()      # 标题

     thumb = scrapy.Field()  # 缩略图
2、配置settings文件获取数据库信息
 # -*- coding: utf-8 -*-

 # Scrapy settings for bole project

 #

 # For simplicity, this file contains only settings considered important or

 # commonly used. You can find more settings consulting the documentation:

 #

 #     https://doc.scrapy.org/en/latest/topics/settings.html

 #     https://doc.scrapy.org/en/latest/topics/downloader-middleware.html

 #     https://doc.scrapy.org/en/latest/topics/spider-middleware.html

 BOT_NAME = 'bole'

 SPIDER_MODULES = ['BLZX.spiders']

 NEWSPIDER_MODULE = 'BLZX.spiders'

 # Crawl responsibly by identifying yourself (and your website) on the user-agent

 #USER_AGENT = 'bole (+http://www.yourdomain.com)'

 # Obey robots.txt rules

 ROBOTSTXT_OBEY = False

 USER_AGENT = 'Mozilla/5.0 (Macintosh; Intel Mac OS X 10_8_3) AppleWebKit/536.5 (KHTML, like Gecko) Chrome/19.0.1084.54 Safari/536.5'

 # Configure maximum concurrent requests performed by Scrapy (default: 16)

 #CONCURRENT_REQUESTS = 32

 # Configure a delay for requests for the same website (default: 0)

 # See https://doc.scrapy.org/en/latest/topics/settings.html#download-delay

 # See also autothrottle settings and docs

 #DOWNLOAD_DELAY = 3

 # The download delay setting will honor only one of:

 #CONCURRENT_REQUESTS_PER_DOMAIN = 16

 #CONCURRENT_REQUESTS_PER_IP = 16

 # Disable cookies (enabled by default)

 #COOKIES_ENABLED = False

 # Disable Telnet Console (enabled by default)

 #TELNETCONSOLE_ENABLED = False

 # Override the default request headers:

 #DEFAULT_REQUEST_HEADERS = {

 #   'Accept': 'text/html,application/xhtml+xml,application/xml;q=0.9,*/*;q=0.8',

 #   'Accept-Language': 'en',

 #}

 # Enable or disable spider middlewares

 # See https://doc.scrapy.org/en/latest/topics/spider-middleware.html

 #SPIDER_MIDDLEWARES = {

 #    'bole.middlewares.BoleSpiderMiddleware': 543,

 #}

 # Enable or disable downloader middlewares

 # See https://doc.scrapy.org/en/latest/topics/downloader-middleware.html

 # DOWNLOADER_MIDDLEWARES = {

 #    'scrapy.contrib.downloadermiddleware.httpproxy.HttpProxyMiddleware':None,

 #    'bole.middlewares.ProxyMiddleware':125,

 #    'scrapy.downloadermiddlewares.defaultheaders.DefaultHeadersMiddleware':None

 # }

 # Enable or disable extensions

 # See https://doc.scrapy.org/en/latest/topics/extensions.html

 #EXTENSIONS = {

 #    'scrapy.extensions.telnet.TelnetConsole': None,

 #}

 # Configure item pipelines

 # See https://doc.scrapy.org/en/latest/topics/item-pipeline.html

 ITEM_PIPELINES = {

     "bole.pipelines.BoleImagePipeline":2,

     "bole.pipelines.ImagePipeline":300,

     "bole.pipelines.MongoPipeline":301,

     "bole.pipelines.MysqlPipeline":302,

 }

 # Enable and configure the AutoThrottle extension (disabled by default)

 # See https://doc.scrapy.org/en/latest/topics/autothrottle.html

 #AUTOTHROTTLE_ENABLED = True

 # The initial download delay

 #AUTOTHROTTLE_START_DELAY = 5

 # The maximum download delay to be set in case of high latencies

 #AUTOTHROTTLE_MAX_DELAY = 60

 # The average number of requests Scrapy should be sending in parallel to

 # each remote server

 #AUTOTHROTTLE_TARGET_CONCURRENCY = 1.0

 # Enable showing throttling stats for every response received:

 #AUTOTHROTTLE_DEBUG = False

 # Enable and configure HTTP caching (disabled by default)

 # See https://doc.scrapy.org/en/latest/topics/downloader-middleware.html#httpcache-middleware-settings

 #HTTPCACHE_ENABLED = True

 #HTTPCACHE_EXPIRATION_SECS = 0

 #HTTPCACHE_DIR = 'httpcache'

 #HTTPCACHE_IGNORE_HTTP_CODES = []

 #HTTPCACHE_STORAGE = 'scrapy.extensions.httpcache.FilesystemCacheStorage'

 # 爬取最大页数

 MAX_PAGE = 50

 # mongodb配置

 MONGODB_URL = "localhost"

 MONGODB_DB = "Images360"

 # MySQL配置

 MYSQL_HOST = "localhost"

 MYSQL_DATABASE = "images360"

 MYSQL_PORT = 3306

 MYSQL_USER = "root"

 MYSQL_PASSWORD = ""

 # 本地配置

 IMAGES_STORE = r"D:\spider\bole\image"
3、此处的Middlewares没有做任何修改
 # -*- coding: utf-8 -*-

 # Define here the models for your spider middleware

 #

 # See documentation in:

 # https://doc.scrapy.org/en/latest/topics/spider-middleware.html

 from scrapy import signals

 class BoleSpiderMiddleware(object):

     # Not all methods need to be defined. If a method is not defined,

     # scrapy acts as if the spider middleware does not modify the

     # passed objects.

     @classmethod

     def from_crawler(cls, crawler):

         # This method is used by Scrapy to create your spiders.

         s = cls()

         crawler.signals.connect(s.spider_opened, signal=signals.spider_opened)

         return s

     def process_spider_input(self, response, spider):

         # Called for each response that goes through the spider

         # middleware and into the spider.

         # Should return None or raise an exception.

         return None

     def process_spider_output(self, response, result, spider):

         # Called with the results returned from the Spider, after

         # it has processed the response.

         # Must return an iterable of Request, dict or Item objects.

         for i in result:

             yield i

     def process_spider_exception(self, response, exception, spider):

         # Called when a spider or process_spider_input() method

         # (from other spider middleware) raises an exception.

         # Should return either None or an iterable of Response, dict

         # or Item objects.

         pass

     def process_start_requests(self, start_requests, spider):

         # Called with the start requests of the spider, and works

         # similarly to the process_spider_output() method, except

         # that it doesn’t have a response associated.

         # Must return only requests (not items).

         for r in start_requests:

             yield r

     def spider_opened(self, spider):

         spider.logger.info('Spider opened: %s' % spider.name)

 class BoleDownloaderMiddleware(object):

     # Not all methods need to be defined. If a method is not defined,

     # scrapy acts as if the downloader middleware does not modify the

     # passed objects.

     @classmethod

     def from_crawler(cls, crawler):

         # This method is used by Scrapy to create your spiders.

         s = cls()

         crawler.signals.connect(s.spider_opened, signal=signals.spider_opened)

         return s

     def process_request(self, request, spider):

         # Called for each request that goes through the downloader

         # middleware.

         # Must either:

         # - return None: continue processing this request

         # - or return a Response object

         # - or return a Request object

         # - or raise IgnoreRequest: process_exception() methods of

         #   installed downloader middleware will be called

         return None

     def process_response(self, request, response, spider):

         # Called with the response returned from the downloader.

         # Must either;

         # - return a Response object

         # - return a Request object

         # - or raise IgnoreRequest

         return response

     def process_exception(self, request, exception, spider):

         # Called when a download handler or a process_request()

         # (from other downloader middleware) raises an exception.

         # Must either:

         # - return None: continue processing this exception

         # - return a Response object: stops process_exception() chain

         # - return a Request object: stops process_exception() chain

         pass

     def spider_opened(self, spider):

         spider.logger.info('Spider opened: %s' % spider.name)
4、通过Pipeline对爬取的数据进行存储,分为MongoDB数据库存储,MySQL数据库存储,本地文件夹存储
 # -*- coding: utf-8 -*-

 # ==========================MongoDB===========================

 import pymongo

 class MongoPipeline(object):

     def __init__(self,mongodb_url,mongodb_DB):

         self.mongodb_url = mongodb_url

         self.mongodb_DB = mongodb_DB

     @classmethod

     # 获取settings配置文件当中设置的MONGODB_URL和MONGODB_DB

     def from_crawler(cls,crawler):

         return cls(

                     mongodb_url=crawler.settings.get("MONGODB_URL"),

                     mongodb_DB=crawler.settings.get("MONGODB_DB")

                    )

     # 开启爬虫时连接MongoDB数据库

     def open_spider(self,spider):

         self.client = pymongo.MongoClient(self.mongodb_url)

         self.db = self.client[self.mongodb_DB]

     def process_item(self,item,spider):

         table_name = item.collection

         self.db[table_name].insert(dict(item))

         return item

     # 关闭爬虫时断开MongoDB数据库连接

     def close_spider(self,spider):

         self.client.close()

 # ============================MySQL===========================

 import pymysql

 class MysqlPipeline():

     def __init__(self,host,database,port,user,password):

         self.host = host

         self.database = database

         self.port = port

         self.user = user

         self.password = password

     @classmethod

     # 获取settings配置文件当中设置的MySQL各个参数

     def from_crawler(cls,crawler):

         return cls(

             host=crawler.settings.get("MYSQL_HOST"),

             database=crawler.settings.get("MYSQL_DATABASE"),

             port=crawler.settings.get("MYSQL_PORT"),

             user=crawler.settings.get("MYSQL_USER"),

             password=crawler.settings.get("MYSQL_PASSWORD")

         )

     # 开启爬虫时连接MongoDB数据库

     def open_spider(self,spider):

         self.db = pymysql.connect(host=self.host,database=self.database,user=self.user,password=self.password,port=self.port,charset="utf8")

         self.cursor = self.db.cursor()

     def process_item(self,item,spider):

         data = dict(item)

         keys = ",".join(data.keys())            # 字段名

         values =",".join(["%s"]*len(data))     # 值

         sql = "insert into %s(%s) values(%s)"%(item.table, keys, values)

         self.cursor.execute(sql, tuple(data.values()))

         self.db.commit()

         return item

     # 关闭爬虫时断开MongoDB数据库连接

     def close_spider(self,spider):

         self.db.close()

 # # ============================本地===========================

 import scrapy

 from scrapy.exceptions import DropItem

 from scrapy.pipelines.images import ImagesPipeline

 class ImagePipeline(ImagesPipeline):

     # 由于item里的url不是list,所以重写下面几个函数

     def file_path(self, request, response=None, info=None):

         url = request.url

         file_name = url.split("/")[-1]    # 将url连接的最后一部分作为文件名称

         return file_name

     # results为item对应的图片下载的结果,他是一个list,每个元素为元组,并包含了下载成功和失败的信息

     def item_completed(self, results, item, info):

         # 获取图片地址path

         image_paths = [x["path"] for ok,x in results if ok]

         if not image_paths:

             raise DropItem("图片下载失败!!")

         return item

     def get_media_requests(self, item, info):

         # 获取item文件里的url字段并加入队列等待被调用进行下载图片

         yield scrapy.Request(item["url"])
5、最后就是spider数据爬取了
 import scrapy

 import json

 import sys

 sys.path.append(r'D:\spider\bole\item.py')

 from bole.items import Bole_mode

 class BoleSpider(scrapy.Spider):

     name = 'boleSpider'

     def start_requests(self):

         url = "https://image.so.com/zj?ch=photography&sn={}&listtype=new&temp=1"

         page = self.settings.get("MAX_PAGE")

         for i in range(int(page)+1):

             yield scrapy.Request(url=url.format(i*30))

     def parse(self,response):

         photo_list = json.loads(response.text)

         item  = Bole_mode()

         for image in photo_list.get("list"):

             item["id"] = image["id"]

             item["url"] = image["qhimg_url"]

             item["title"] = image["group_title"]

             item["thumb"] = image["qhimg_thumb_url"]

             yield item
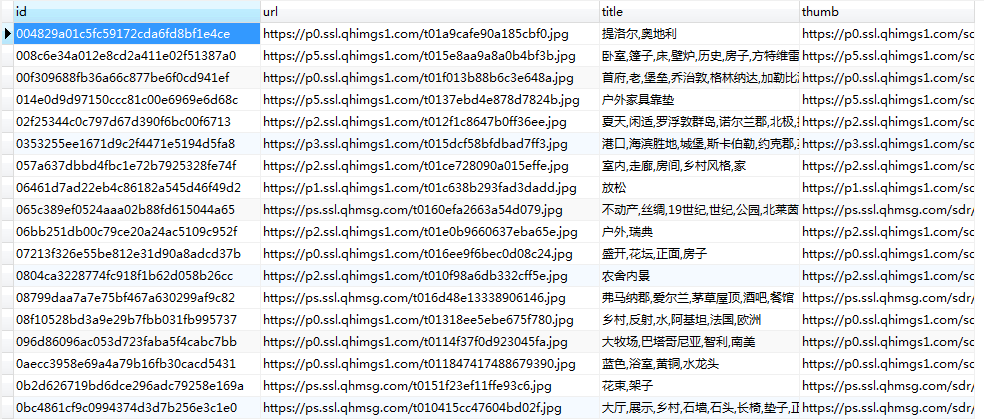
6、最最后就是对爬取的结果展示一下呗(只展示MySQL和本地,MongoDB没打开)
(1) MySQL存储

(2) 本地存储

第二十节:Scrapy爬虫框架之使用Pipeline存储的更多相关文章
- 第十七节:Scrapy爬虫框架之item.py文件以及spider中使用item
Scrapy原理图: item位于原理图的最左边 item.py文件是报存爬取数据的容器,他使用的方法和字典很相似,但是相比字典item多了额外的保护机制,可以避免拼写错误或者定义错误. 1.创建it ...
- scrapy爬虫框架教程(二)-- 爬取豆瓣电影TOP250
scrapy爬虫框架教程(二)-- 爬取豆瓣电影TOP250 前言 经过上一篇教程我们已经大致了解了Scrapy的基本情况,并写了一个简单的小demo.这次我会以爬取豆瓣电影TOP250为例进一步为大 ...
- Python-S9-Day126——Scrapy爬虫框架
01 今日内容概要 02 内容回顾和补充:scrapy 03 内容回顾和补充:网络和并发编程 04 Scrapy爬虫框架:pipeline做持久化(一) 05 Scrapy爬虫框架:pipeline做 ...
- 手把手教你如何新建scrapy爬虫框架的第一个项目(上)
前几天给大家分享了如何在Windows下创建网络爬虫虚拟环境及如何安装Scrapy,还有Scrapy安装过程中常见的问题总结及其对应的解决方法,感兴趣的小伙伴可以戳链接进去查看.关于Scrapy的介绍 ...
- scrapy爬虫框架教程(二)-- 爬取豆瓣电影
前言 经过上一篇教程我们已经大致了解了Scrapy的基本情况,并写了一个简单的小demo.这次我会以爬取豆瓣电影TOP250为例进一步为大家讲解一个完整爬虫的流程. 工具和环境 语言:python 2 ...
- Python之Scrapy爬虫框架安装及简单使用
题记:早已听闻python爬虫框架的大名.近些天学习了下其中的Scrapy爬虫框架,将自己理解的跟大家分享.有表述不当之处,望大神们斧正. 一.初窥Scrapy Scrapy是一个为了爬取网站数据,提 ...
- Scrapy爬虫框架(实战篇)【Scrapy框架对接Splash抓取javaScript动态渲染页面】
(1).前言 动态页面:HTML文档中的部分是由客户端运行JS脚本生成的,即服务器生成部分HTML文档内容,其余的再由客户端生成 静态页面:整个HTML文档是在服务器端生成的,即服务器生成好了,再发送 ...
- scrapy爬虫框架学习笔记(一)
scrapy爬虫框架学习笔记(一) 1.安装scrapy pip install scrapy 2.新建工程: (1)打开命令行模式 (2)进入要新建工程的目录 (3)运行命令: scrapy sta ...
- Scrapy爬虫框架中的两个流程
下面对比了Scrapy爬虫框架中的两个流程—— ① Scrapy框架的基本运作流程:② Spider或其子类的几个方法的执行流程. 这两个流程是互相联系的,可对比学习. 1 ● Scrapy框架的基本 ...
随机推荐
- sql server 改sa 密码
ALTER LOGIN sa ENABLE ; ALTER LOGIN sa WITH PASSWORD = 'kongwenyi' ;
- 《windows核心编程系列》二十一谈谈基址重定位和模块绑定
每个DLL和可执行文件都有一个首选基地址.它表示该模块被映射到进程地址空间时最佳的内存地址.在构建可执行文件时,默认情况下链接器会将它的首选基地址设为0x400000.对于DLL来说,链接器会将它的首 ...
- Tian Ji -- The Horse Racing HDU - 1052
Tian Ji -- The Horse Racing HDU - 1052 (有平局的田忌赛马,田忌赢一次得200块,输一次输掉200块,平局不得钱不输钱,要使得田忌得到最多(如果只能输就输的最少) ...
- 逆序数 UVALive 6508 Permutation Graphs
题目传送门 /* 题意:给了两行的数字,相同的数字连线,问中间交点的个数 逆序数:第一行保存每个数字的位置,第二行保存该数字在第一行的位置,接下来就是对它求逆序数 用归并排序或线段树求.想到了就简单了 ...
- Windows查杀端口
Windows环境下当某个端口被占用时,通过netstat命令进行查询pid,然后通过taskkill命令杀进程. 一.查询占用端口号的进程信息 netstat -an|findstr 二.杀掉占用端 ...
- TestNG基本注解(二)
1. Before类别和After类别注解 @BeforeSuite @AfterSuite @BeforeTest @AfterTest @BeforeClass @AfterClass @Befo ...
- Ubuntu下编译安装MySQL5.7
tar zxvf mysql-5.7.14.tar.gz cd mysql-5.7.14 第一步: cmake . -DCMAKE_INSTALL_PREFIX=/usr/local/mysql/ \ ...
- AJPFX关于IO流的简单总结
IO流的分类:1.根据流的数据对象来分:高端流:所有的内存中的流都是高端流,比如:InputStreamReader 低端流:所有的外界设备中的流都是低端流,比如InputStream,Output ...
- thinkphp查询,3.X 5.0 亲试可行
[php] view plain copy print? 一.介绍 ThinkPHP内置了非常灵活的查询方法,可以快速的进行数据查询操作,查询条件可以用于读取.更新和删除等操作,主要涉及到wher ...
- GET方法与POST方法的区别
区别一:get重点在从服务器上获取资源,post重点在向服务器发送数据: 区别二:get传输数据是通过URL请求,以field(字段)= value的形式,置于URL后,并用"?" ...
