CentOS7 Install Shipyard
# 采集木jj
原文:http://www.cnblogs.com/caoguo/p/5735189.html
# CentOS7 Install Shipyard
# yum install docker
# systemctl restart docker
# docker login -u user-p password -e sample.aliyun.com registry.aliyuncs.com
# 上面docker加速一大段实际就下面这一句
# vi /etc/sysconfig/docker
# ADD_REGISTRY='--add-registry xxx.mirror.aliyuncs.com'
$ docker pull alpine
$ docker pull library/shipyard
$ docker pull library/rethinkdb
$ docker pull microbox/etcd
$ docker pull shipyard/docker-proxy
$ docker pull swarm
$ docker pull shipyard/shipyard
$ curl -s https://shipyard-project.com/deploy | bash -s
Deploying Shipyard
-> Starting Database
-> Starting Discovery
-> Starting Cert Volume
-> Starting Proxy
-> Starting Swarm Manager
-> Starting Swarm Agent
-> Starting Controller
Shipyard available at http://192.168.190.147:8080
Username: admin Password: shipyard
# 如果想将安装重新来一遍
# for i in `docker ps |sed '1d'| awk '{print $NF}'`;do docker rm -f $i; done
# 停止运行镜像
# docker stop shipyard-proxy shipyard-certs shipyard-discovery shipyard-rethinkdb shipyard-swarm-agent shipyard-swarm-manager shipyard-controller
# 启动运行的镜像
# docker start shipyard-proxy shipyard-certs shipyard-discovery shipyard-rethinkdb shipyard-swarm-agent shipyard-swarm-manager shipyard-controller
# 查看运行的docker进程
# docker ps
# 查看下载的镜像
# docker images
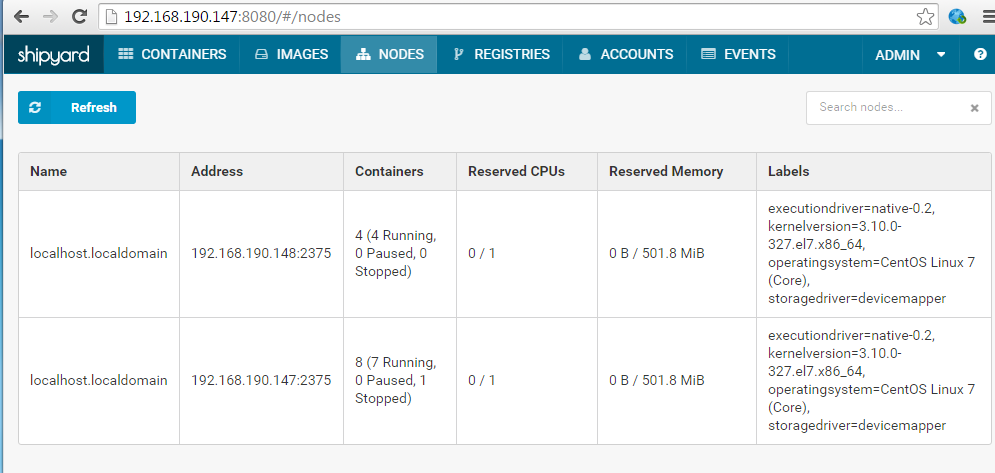
# 增加节点
[root@localhost ~]# curl -sSL https://shipyard-project.com/deploy | ACTION=node DISCOVERY=etcd://192.168.190.147:4001 bash -s
Adding Node
-> Starting Cert Volume
-> Starting Proxy
-> Starting Swarm Manager
-> Starting Swarm Agent
Node added to Swarm: 192.168.190.148
防爬虫原文链接:http://www.cnblogs.com/caoguo/p/5735189.html


CentOS7 Install Shipyard的更多相关文章
- Centos7 install Openstack - (第四节)添加计算服务(Nova)
Centos7 install Openstack - (第四节)添加计算服务(Nova) 我的blog地址:http://www.cnblogs.com/caoguo 该文根据openstack官方 ...
- Centos7 install Openstack - (第三节)添加镜像服务(Glance)
Centos7 install Openstack - (第三节)添加镜像服务(Glance) 我的blog地址:http://www.cnblogs.com/caoguo 该文根据openstack ...
- centos7 install vim8
centos7 install vim8 Git and dependency Git: https://github.com/vim/vim # yum install -y perl-devel ...
- CentOS7 Install Consul
Centos7 Install Consul 原文链接:http://www.cnblogs.com/caoguo/p/5959962.html 1) 环境 2) 安装 # yum install - ...
- CentOS7 install vsftpd
#mkdir -p /var/ftp/xcl/ #yum install -y vsftpd#useradd -g ftp -M -d /var/ftp/xcl -s /sbin/nologin xc ...
- centos7 install nginx+fastdfs
说明:centos7单机部署 nginx fastdfs ## 创建一下目录作为存储数据图片的路径 可以自己定义 mkdir -pv /data/application/{storage,tracke ...
- CentOS7 Install Docker(转)
https://linux.cn/article-4340-1.html CentOS 7 中 Docker 的安装 Docker 软件包已经包括在默认的 CentOS-Extras 软件源里.因此想 ...
- Centos7 install Openstack Juno (RDO) (转载)
原文地址:http://www.hdume.com/centos-7-0%E5%AE%89%E8%A3%85openstack/ 1.安装系统,Centos7镜像采用CentOS-7.0-1406-x ...
- centos7 install mysql5.7.27
1.yum 安装 wget yum install wget 2.下载MySQL 的yum repo wget https://repo.mysql.com//mysql57-community-re ...
随机推荐
- CXF拦截器(Interceptor)LoggingInInterceptor
Interceptor是CXF架构中一个重要的功能.你可以在不对核心模块进行修改的情况下,动态添加很多功能(你可以想象Struts2拦截器的优点).这对于CXF这个以处理消息为中心的服务框架来说是非常 ...
- 设计模式-(13)访问者模式 (swift版)
一,概念 访问者模式,是行为型设计模式之一.访问者模式是一种将数据操作与数据结构分离的设计模式,它可以算是 23 中设计模式中最复杂的一个,但它的使用频率并不是很高,大多数情况下,你并不需要使用访问者 ...
- mysql14---手动备份
PHP定时完成数据库的备份 1.手动备份数据库(表的)方法 cmd控制台(windows指令): mysqldump –u root –proot 数据库 [表名1 表名2..] > 文件路径 ...
- sql server 支持中文繁体和简体
SET ANSI_PADDING ON INSERT INTO 表 VALUES (N'中文')
- HDU4081 Qin Shi Huang's National Road System —— 次小生成树变形
题目链接:https://vjudge.net/problem/HDU-4081 Qin Shi Huang's National Road System Time Limit: 2000/1000 ...
- Resolve the error: an error occurred during local report processing
Issue: an error occurred during local report processing.the definition of the report'Main Report'is ...
- ab压力测试-突破最大线程数
ab压力测试中,发现你一次最多只能启动1024个线程 默认情况下,一个线程的栈要预留1M的内存空间 而一个进程中可用的内存空间只有2G,所以理论上一个进程中最多可以开2048个线程 但是内存当然不可能 ...
- SimpliciTI协议栈
SimpliciTI组网过程介绍 1.SimpliciTI支持点对点和星形的网络拓扑结构. 下面介绍以AP为中心的SimpliciTI网路协议的星形拓扑结构通信过程 1)当ED节点上电之后就扫描信 ...
- word2vec中的数学原理(转)
- Ueditor中代码的高亮和背景在前端页面的实现
首先废话就不多说,这个富文本编辑器的下载和js等基本文件的导入略. 我的最终目标是这样的,我们在页面中的富文本框中输入代码,希望它能够被后台接受.存入数据库,当通过服务器将这些代码再一次显示在前台的页 ...
