mongo 3.4分片集群系列之二:搭建分片集群--哈希分片
这个系列大致想跟大家分享以下篇章:
2、mongo 3.4分片集群系列之二:搭建分片集群--哈希分片
3、mongo 3.4分片集群系列之三:搭建分片集群--哈希分片 + 安全
4、mongo 3.4分片集群系列之四:搭建分片集群--哈希分片 + 安全 + 区域
这一篇是实践篇。
1、说说分片集群的架构
这里要搭建的分片集群架构如下:
2个mongos,1个三个成员的副本集配置服务器,2个单实例的分片。图示如下:
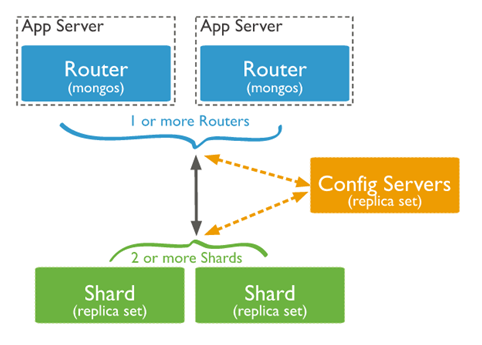
简单介绍一下MongoDB分片集群由以下组件组成:
2、分片前注意事项
关于分片集群的一些注意点,请参阅:mongo 3.4分片集群系列之一:浅谈分片集群 ,其中第4点,分片前考虑事项。
好啦。慎重考虑完分片前考虑事项的话,接下来就进入实践吧~~~
3、搭建哈希分片集群
下面是参照官网的 https://docs.mongodb.com/manual/tutorial/deploy-sharded-cluster-ranged-sharding/
3.1、搭建前准备:
物理环境:
我这边是用两个虚拟机模仿两台服务器的(真实服务器也按照这个方法实践,可以行得通)。
IP分别为192.168.209.155和192.168.209.156。其中,这两个IP之间必须互通。即192.168.209.155可以ping通192.168.209.156,192.168.209.156也可以ping通192.168.209.155。
配置大致如下:(此操作是建立在mongo3.4版本)
| 名称 | 主机 | 端口 | 副本集 | Data路径 | Log路径 | 配置文件路径 |
| router1 | 192.168.209.155 | 6666 | 无 | 无 | 无 | /etc/mongo_router1.conf |
| router2 | 192.168.209.156 | 6666 | 无 | 无 | 无 | /etc/mongo_router2.conf |
| config1 | 192.168.209.155 | 6000 | mongo_config | /mongo_config1/data | /mongo_config1/log | /mongo_config1/mongo_config1.conf |
| config2 | 6001 | /mongo_config2/data | /mongo_config2/log | /mongo_config2/mongo_config2.conf | ||
| config3 | 6002 | /mongo_config3/data | /mongo_config3/log | /mongo_config3/mongo_config3.conf | ||
| shard1 | 192.168.209.155 | 6100 | 无 | /mongo_shard1/data | /mongo_shard1/log | /mongo_shard1/mongo_shard1.conf |
| shard2 | 192.168.209.156 | 6100 | 无 | /mongo_shard2/data | /mongo_shard2/log | /mongo_shard2/mongo_shard2.conf |
接下来就来搭建哈希分片集群咯~~~
3.2、创建配置服务器副本集
部署具有三个成员的配置服务器副本集。
(1) mongo_config1 (在192.168.209.155上操作)
1) 创建数据路径文件夹和日志路径文件夹
# sudo mkdir –p /mongo_config1/data
# sudo mkdir –p /mongo_config1/log
2) 创建配置文件
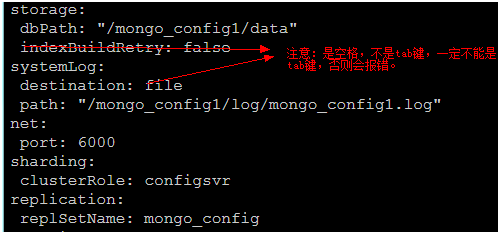
# sudo vim /mongo_config1/mongo_config1.conf
文件中的配置如下:(所有空位都是空格,不是TAB键哦,大小写是严格区分的)
storage:
dbPath: “/mongo_config1/data”
indexBuildRetry: false
systemLog:
destination: file
path: “/mongo_config1/log/mongo_config1.log
net:
port: 6000
sharding:
clusterRole: configsvr
replication:
replSetName: mongo_config
如下图:
关于mongo3.4的配置文件YAML格式,也可以参阅我的另一篇文章mongo3.4 配置文件 注意事项
3) 启动mongod实例
# mongod --fork --config /mongo_config1/mongo_config1.conf
--fork 是以线程方式启动mongod服务
--config 指定配置文件路径
(2) mongo_config2(在192.168.209.155上操作)
1) 创建数据路径文件夹和日志路径文件夹
# sudo mkdir –p /mongo_config2/data
# sudo mkdir –p /mongo_config2/log
2) 创建配置文件
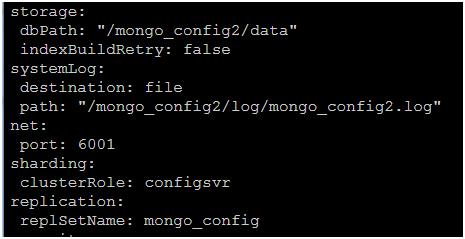
# sudo vim /mongo_config2/mongo_config2.conf
文件中的配置如下:(所有空位都是空格,不是TAB键哦,大小写是严格区分的)
storage:
dbPath: “/mongo_config2/data”
indexBuildRetry: false
systemLog:
destination: file
path: “/mongo_config2/log/mongo_config2.log
net:
port: 6001
sharding:
clusterRole: configsvr
replication:
replSetName: mongo_config
如下图:
3) 启动mongod实例
# mongod --fork --config /mongo_config2/mongo_config2.conf
--fork 是以线程方式启动mongod服务
--config 指定配置文件路径
(3) mongo_config3 (在192.168.209.155上操作)
1) 创建数据路径文件夹和日志路径文件夹
# sudo mkdir –p /mongo_config3/data
# sudo mkdir –p /mongo_config3/log
2) 创建配置文件
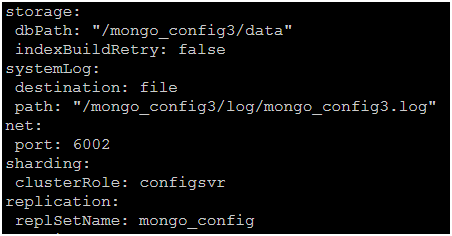
# sudo vim /mongo_config3/mongo_config3.conf
文件中的配置如下:(所有空位都是空格,不是TAB键哦,大小写是严格区分的)
storage:
dbPath: “/mongo_config3/data”
indexBuildRetry: false
systemLog:
destination: file
path: “/mongo_config3/log/mongo_config3.log
net:
port: 6002
sharding:
clusterRole: configsvr
replication:
replSetName: mongo_config
如下图:
3) 启动mongod实例
# mongod --fork --config /mongo_config3/mongo_config3.conf
--fork 是以线程方式启动mongod服务
--config 指定配置文件路径
(4) 初始化副本集mongo_config(在192.168.209.155上操作)
1) 连接任意一个mongod实例
# sudo mongod --port 6000
2) 初始化副本集
输入以下命令:(这里只是为了方便理解,其实命令行打成一行即可)
rs.initiate(
{
_id: "mongo_config",
configsvr: true,
members: [
{ _id : 0, host : "192.168.209.155:6000" },
{ _id : 1, host : "192.168.209.155:6001" },
{ _id : 2, host : "192.168.209.155:6002" }
]
}
)
_id:必须匹配传递给mongod 的--replSet参数。
members:是一个数组,每个副本集成员都需要一个文档。
configsvr:必须设置true。
3.3、创建分片
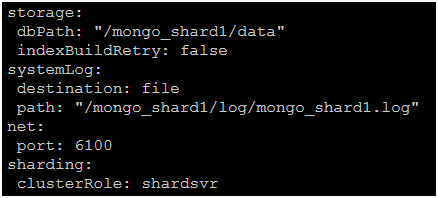
(1) mongo_shard1 (在192.168.209.155上操作)
1) 为mongo_shard1创建配置文件
# sudo vim /mongo_shard1/mongo_shard1.conf
文件中的配置如下:(所有空位都是空格,不是TAB键哦,大小写是严格区分的)
storage:
dbPath: “/mongo_shard1/data”
indexBuildRetry: false
systemLog:
destination: file
path: “/mongo_shard1/log/mongo_shard1.log
net:
port: 6100
sharding:
clusterRole: shardsvr
如下图:
2) 启动mongod实例
# mongod --fork --config /mongo_shard1/mongo_shard1.conf
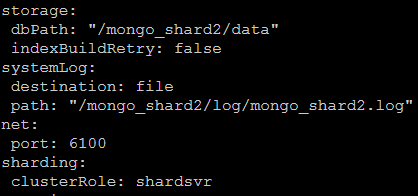
(2) mongo_shard2(在192.168.209.156上操作)
1) 为mongo_shard2创建配置文件
# sudo vim /mongo_shard2/mongo_shard2.conf
文件中的配置如下:(所有空位都是空格,不是TAB键哦,大小写是严格区分的)
storage:
dbPath: “/mongo_shard2/data”
indexBuildRetry: false
systemLog:
destination: file
path: “/mongo_shard2/log/mongo_shard2.log
net:
port: 6101
sharding:
clusterRole: shardsvr
如下图:
2) 启动mongod实例
# mongod --fork --config /mongo_shard2/mongo_shard2.conf
3.3、创建路由
(1) mongo_router1(在192.168.209.155上操作)
1) 为mongo_router1创建配置文件
# sudo vim /etc/mongo_router1.conf
文件中的配置如下:(所有空位都是空格,不是TAB键哦,大小写是严格区分的)
net:
port: 6666
sharding:
configDB: mongo_config/192.168.209.155:6000,192.168.209.155:6001,192.168.209.155:6002
如下图:

2) 启动mongos实例
# mongos --config /etc/mongo_router1.conf
(2) mongo_router2(在192.168.209.156上操作)
1) 为mongo_router2创建配置文件
# sudo vim /etc/mongo_router2.conf
文件中的配置如下:(所有空位都是空格,不是TAB键哦,大小写是严格区分的)
net:
port: 6666
sharding:
configDB: mongo_config/192.168.209.155:6000,192.168.209.155:6001,192.168.209.155:6002
如下图:

2) 启动mongos实例
# mongos --config /etc/mongo_router2.conf
3.4、添加分片到集群
(1) 连接任意一个mongos,这里连接mongo_router1(在192.168.209.155上操作)
# mongo --port 6666
(2) 添加分片
1) 添加第一个分片mongo_shard1
sh.addShard(“192.168.209.155:6100”);
2) 添加第二个分片mongo_shard2
sh.addShard(“192.168.209.156:6100”);
3.5、为数据库启用分片(直接在3.4的窗口中运行即可)
sh.enableSharding(“databaseName”);
其中databaseName,为要分片的数据库。
3.6、使用哈希分片分片集合(直接在3.5的窗口中运行即可)
这里有两种情况,一种是空集合,另一种是有数据的集合,但对于这两种情况都建议用以下方法。
(1) 对于确定作为分片键的字段,建立哈希索引
use databaseName;
db.collectionName.createIndex(Name:”hashed”);
其中,databaseName是3.5启用的分片数据库名称;collectionName是要分片的集合;Name是作为分片键的字段。
(2) 哈希分片
sh.shardCollection(“databaseName.collectionName”,{Name:”hashed”})
其中,databaseName是3.5启用的分片数据库名称;collectionName是要分片的集合;Name是作为分片键的字段。
--------------------------------------- over ------------------------------------------------------
以上资料,大部分是参考官网的资料,在此表示感谢。
https://docs.mongodb.com/manual/tutorial/deploy-sharded-cluster-ranged-sharding/
mongo 3.4分片集群系列之二:搭建分片集群--哈希分片的更多相关文章
- mongo 3.4分片集群系列之四:搭建分片集群--哈希分片 + 安全 + 区域
这个系列大致想跟大家分享以下篇章: 1.mongo 3.4分片集群系列之一:浅谈分片集群 2.mongo 3.4分片集群系列之二:搭建分片集群--哈希分片 3.mongo 3.4分片集群系列之三:搭建 ...
- mongo 3.4分片集群系列之三:搭建分片集群--哈希分片 + 安全
这个系列大致想跟大家分享以下篇章: 1.mongo 3.4分片集群系列之一:浅谈分片集群 2.mongo 3.4分片集群系列之二:搭建分片集群--哈希分片 3.mongo 3.4分片集群系列之三:搭建 ...
- Elasticsearch-6.7.0系列(二)ES集群安装与验证
准备3台centos7机器/虚拟机,每台都安装上elasticsearch6.7.0 ,安装过程参考我的另一篇博客<Elasticsearch-6.7.0系列(一)9200端口 .tar.gz版 ...
- 集群技术(二) MySQL集群简介与配置详解
when?why? 用MySQL集群? 减少数据中心结点压力和大数据量处理(读写分离),采用把MySQL分布,一个或多个application对应一个MySQL数据库.把几个MySQL数据库公用的数据 ...
- MongoDB学习4:MongoDB复制集机制和原理,搭建复制集
1.复制集的作用 1.1 MongoDB复制集的主要意义在于实现服务高可用 1.2 它的实现依赖于两个方面的功能: · 数据写入时将数据迅速复制到另一个独立节点上 · 在接收写入的 ...
- 剖析Elasticsearch集群系列之二:分布式的三个C、translog和Lucene段
转载:http://www.infoq.com/cn/articles/anatomy-of-an-elasticsearch-cluster-part02 共识——裂脑问题及法定票数的重要性 共识是 ...
- WAS集群系列(6):集群搭建:步骤4:安装WAS升级软件
逐步点击"下一步",注意一处流程,例如以下列举: "升级软件"安装的路径设置,建议与之前的WAS及IHS安装的绝对路径同样,例如以下所看到的: 逐步点击,完毕安 ...
- WAS集群系列(3):集群搭建:步骤1:准备文件
说明:"指示轨迹"为"点选顺序",截图为点击后效果截图 环境 项目点 指标 WAS版本号 7.0 操作系统 Windows 2008 系统位数 64bit 内存 ...
- WAS集群系列(5):集群搭建:步骤3:安装IHS软件
选择"安装IBM HTTPServer"选项,点击"安装向导".例如以下图提示: 安装提示,逐步点击"下一步",当中偶有几处细节注意就可以. ...
随机推荐
- laravel toggle方法
toggle方法主要用于多对多关系中,attach detach 比如点赞 收藏 1.user表 2.post表 title content 3.中间表 favoriate user_id post_ ...
- Office 连供打印机无法进纸怎么办 卡纸,塞纸怎么办
我昨天打印还好好的,今天无法进纸了,哪怕只放一张纸,也是左边进去一点点,然后就塞住了,吸不下去了. 因为你的打印机里面有异物.你把连供拆掉(当心墨水流出来,把墨盒拆掉之后放高一点并用纸巾包住,不要 ...
- 获取路由事件的源Source和OriginalSource
路由事件的消息包括在RoutedEventArgs实例中,该实例有两个属性Source和OriginalSource,都是表示路由事件传递的起点.即事件消息的源头.仅仅只是Source表示的是Logi ...
- 用R进行微博分析的初步尝试
新浪微博如火如荼,基于微博的各种应用也层出不穷. 有一种共识似乎是:微博数据蕴含着丰富的信息,加以适当的挖掘.可以实现众多商业应用.恰好社会网络分析也是我之前有所了解并持续学习的一个领域,因此我做了微 ...
- MySQL系列:innodb源代码分析之内存管理
在innodb中实现了自己的内存池系统和内存堆分配系统,在innodb的内存管理系统中,大致分为三个部分:基础的内存块分配管理.内存伙伴分配器和内存堆分配器.innodb定义和实现内存池的主要目的是提 ...
- openwrt-安装-驱动-应用-lcd2004a实验
1. 板子f403tech的RT5350的板子和 (1)openWRT系统的定义和特点 OpenWrt是一个高度模块化.高度自己主动化的嵌入式Linux系统.拥有强大的网络组件.经常被 ...
- ios之UILabel实现文本自适应方法
UILabel实现文本自适应方法(ios7) - (void)initUserInterface { UILabel *label = [[UILabel alloc]init]; label.num ...
- YTU 2509: 奇怪的分式
2509: 奇怪的分式 时间限制: 1 Sec 内存限制: 128 MB 提交: 113 解决: 48 题目描述 上小学的时候,小明经常自己发明新算法.一次,老师出的题目是: 1/4 乘以 8 ...
- 并不对劲的spoj1812
题意是求多个串的lcs. 这也是道后缀自动机的模板题.对于任意一个字符串建后缀自动机,用其他串查询就行.对于后缀自动机的每个状态要额外记匹配到当前状态的最大长度. 和spoj1811的区别在于这道题不 ...
- Tarjan求桥
传送门(poj3177) 这道题是Tarjan求桥的模板题.大意是要求在原图上加上数量最少的边,使得整张图成为一个边双联通分量. 具体的做法是,先在图中求出所有的桥,之后把边双联通分量缩成点,这样的话 ...