[转载,感觉写的非常详细]DUBBO配置方式详解
原文链接:http://www.cnblogs.com/chanshuyi/p/5144288.html
DUBBO 是一个分布式服务框架,致力于提供高性能和透明化的 RPC 远程服务调用方案,是阿里巴巴 SOA 服务化治理方案的核心框架,每天为 2,000+ 个服务提供 3,000,000,000+ 次访问量支持,并被广泛应用于阿里巴巴集团的各成员站点。
Dubbo采用全spring配置方式,透明化接入应用,对应用没有任何API侵入,只需用Spring加载Dubbo的配置即可,Dubbo基于Spring的Schema扩展进行加载。
根据 DUBBO 官方文档,配置 DUBBO 有 4 种方式,分别是:
1. XML 配置文件方式
2. properties 配置文件方式
3. annotation 配置方式
4. API 配置方式
这里我们只介绍前两种方式的配置。
1、XML 配置文件方式
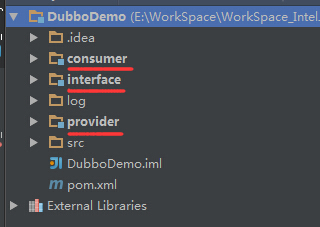
创建 DubboDemo 项目,并创建 interface 模块、provider 模块、consumer 模块,它们都是 DubboDemo 的子模块。其中 interface 模块存放所有的接口、provider 模块提供服务、consumer 消费服务。创建完成后的项目结构如下:

在 DubboDemo 模块 pom.xml 加入如下依赖,为所有模块提供 JUnit 和 LOG4J 依赖。

<!-- **************************** Properties 配置 **************************** --> <properties> <junit.version>3.8.1</junit.version> </properties> <!-- **************************** /Properties 配置 **************************** --> <dependencies> <!-- **************************** JUnit 依赖 **************************** --> <dependency> <groupId>junit</groupId> <artifactId>junit</artifactId> <version>${junit.version}</version> <scope>test</scope> </dependency> <!-- **************************** /JUnit 依赖 **************************** --> <!-- **************************** 日志 依赖 **************************** --> <dependency> <groupId>org.slf4j</groupId> <artifactId>slf4j-api</artifactId> <version>1.7.6</version> </dependency> <dependency> <groupId>org.slf4j</groupId> <artifactId>slf4j-log4j12</artifactId> <version>1.7.6</version> </dependency> <!-- **************************** /日志 依赖 **************************** --> </dependencies>

同时在 provider 模块和 consumer 模块的 resources 目录里加入 log4j.properties 配置文件:

#Console Log log4j.rootLogger=info, console, file # Write to Console log4j.appender.console=org.apache.log4j.ConsoleAppender log4j.appender.console.Threshold=INFO log4j.appender.console.layout=org.apache.log4j.PatternLayout log4j.appender.console.layout.ConversionPattern=%5p %d{MM-dd HH:mm:ss}(%F:%L): %m%n #Write to File log4j.appender.file=org.apache.log4j.DailyRollingFileAppender log4j.appender.file.File=${catalina.home}log/provider.log log4j.appender.file.layout=org.apache.log4j.PatternLayout log4j.appender.file.layout.ConversionPattern=%5p %d{MM-dd HH:mm:ss}(%F:%L): %m%n

在 interface 模块中创建接口 com.chanshuyi.service.IUserService:

package com.chanshuyi.service; /** * Created by chanshuyi on 2016/1/19. */ public interface IUserService { /** * 登录方法 * @return 是否登录成功 */ public boolean login(String username, String password); }

interface 模块配置完毕。
在 provider 模块中引入 Spring、Dubbo、interface 模块依赖:

<!-- **************************** Properties 配置 **************************** --> <properties> <project.build.sourceEncoding>UTF-8</project.build.sourceEncoding> <junit.version>3.8.1</junit.version> <springframework.version>4.1.6.RELEASE</springframework.version> <commonsLogging.version>1.2</commonsLogging.version> </properties> <!-- **************************** /Properties 配置 **************************** --> <dependencies> <!-- **************************** Spring 依赖 **************************** --> <!-- 添加Spring-core包 --> <dependency> <groupId>org.springframework</groupId> <artifactId>spring-core</artifactId> <version>${springframework.version}</version> </dependency> <!-- 添加spring-tx包 --> <dependency> <groupId>org.springframework</groupId> <artifactId>spring-tx</artifactId> <version>${springframework.version}</version> </dependency> <!-- Spring ORM 相关--> <dependency> <groupId>org.springframework</groupId> <artifactId>spring-orm</artifactId> <version>${springframework.version}</version> </dependency> <!-- 添加spring-jdbc包 --> <dependency> <groupId>org.springframework</groupId> <artifactId>spring-jdbc</artifactId> <version>${springframework.version}</version> </dependency> <!--添加spring-web包 --> <dependency> <groupId>org.springframework</groupId> <artifactId>spring-web</artifactId> <version>${springframework.version}</version> </dependency> <!-- 添加spring-context包 --> <dependency> <groupId>org.springframework</groupId> <artifactId>spring-context</artifactId> <version>${springframework.version}</version> </dependency> <dependency> <groupId>org.springframework</groupId> <artifactId>spring-beans</artifactId> <version>${springframework.version}</version> </dependency> <dependency> <groupId>commons-logging</groupId> <artifactId>commons-logging</artifactId> <version>${commonsLogging.version}</version> </dependency> <!--添加aspectjweaver包 --> <dependency> <groupId>org.aspectj</groupId> <artifactId>aspectjweaver</artifactId> <version>1.8.5</version> </dependency> <!-- **************************** /Spring 依赖 **************************** --> <!-- **************************** Dubbo 依赖 **************************** --> <dependency> <groupId>com.alibaba</groupId> <artifactId>dubbo</artifactId> <version>2.5.3</version> <exclusions> <exclusion> <groupId>org.springframework</groupId> <artifactId>spring</artifactId> </exclusion> </exclusions> </dependency> <dependency> <groupId>org.apache.zookeeper</groupId> <artifactId>zookeeper</artifactId> <version>3.3.3</version> <exclusions> <exclusion> <groupId>com.sun.jmx</groupId> <artifactId>jmxri</artifactId> </exclusion> <exclusion> <groupId>com.sun.jdmk</groupId> <artifactId>jmxtools</artifactId> </exclusion> <exclusion> <groupId>javax.jms</groupId> <artifactId>jms</artifactId> </exclusion> </exclusions> </dependency> <dependency> <groupId>com.github.sgroschupf</groupId> <artifactId>zkclient</artifactId> <version>0.1</version> </dependency> <!-- **************************** /Dubbo 依赖 **************************** --> <!-- **************************** interface 依赖 **************************** --> <dependency> <groupId>com.chanshuyi.DubboDemo</groupId> <artifactId>interface</artifactId> <version>1.0-SNAPSHOT</version> </dependency> <!-- **************************** /interface 依赖 **************************** --> </dependencies>

创建 com.chanshuyi.service.impl.UserServiceImpl 类,实现 IUserService 接口:

package com.chanshuyi.service.impl; import com.chanshuyi.service.IUserService; import org.slf4j.Logger; import org.slf4j.LoggerFactory; import org.springframework.stereotype.Service; /** * Created by chanshuyi on 2016/1/19. */ @Service("userService") public class UserServiceImpl implements IUserService { private Logger logger = LoggerFactory.getLogger(UserServiceImpl.class); @Override public boolean login(String username, String password) { logger.info("用户登录:[username:{}, password:{}]", username, password); if (username != null && password != null && username.equals(password)) { logger.info("用户校验通过。[username:{}]", username); return true; } logger.info("用户校验失败![username:{}]", username); return false; } }

创建 Spring 配置文件,配置注解扫描 com.chanshuyi.service.impl 包,并引入 spring-provider.xml 文件:

<?xml version="1.0" encoding="UTF-8"?> <beans xmlns="http://www.springframework.org/schema/beans" xmlns:xsi="http://www.w3.org/2001/XMLSchema-instance" xmlns:context="http://www.springframework.org/schema/context" xsi:schemaLocation="http://www.springframework.org/schema/beans http://www.springframework.org/schema/beans/spring-beans.xsd http://www.springframework.org/schema/context http://www.springframework.org/schema/context/spring-context.xsd"> <!-- **************************** 注解扫描 **************************** --> <context:component-scan base-package="com.chanshuyi.service.impl"/> <!-- **************************** /注解扫描 **************************** --> <!-- **************************** 导入其他XML文件 **************************** --> <import resource="spring-provider.xml"/> <!-- **************************** /导入其他XML文件 **************************** --> </beans>

注意!这里不要写成 com.chanshuyi.service.impl.* 否则无法成功扫描!
创建 spring-provider.xml 文件,它是 dubbo 的主要配置文件。

<?xml version="1.0" encoding="UTF-8"?> <!-- 添加 DUBBO SCHEMA --> <beans xmlns="http://www.springframework.org/schema/beans" xmlns:xsi="http://www.w3.org/2001/XMLSchema-instance" xmlns:dubbo="http://code.alibabatech.com/schema/dubbo" xsi:schemaLocation="http://www.springframework.org/schema/beans http://www.springframework.org/schema/beans/spring-beans.xsd http://code.alibabatech.com/schema/dubbo http://code.alibabatech.com/schema/dubbo/dubbo.xsd"> <!-- 应用名 --> <dubbo:application name="dubbodemo-provider"/> <!-- 连接到哪个本地注册中心 --> <dubbo:registry id="dubbodemo" address="zookeeper://localhost:2181"/> <!-- 用dubbo协议在20880端口暴露服务 --> <dubbo:protocol name="dubbo" port="28080"/> <!-- 声明需要暴露的服务接口 --> <dubbo:service registry="dubbodemo" timeout="3000" interface="com.chanshuyi.service.IUserService" ref="userService"/> </beans>

可以看到这里有几个关键参数:application、registry、protocol、service。application 指当前应用名称,主要用来给 zookeeper 注册中心计算应用间依赖关系。registry 用来声明一个注册中心,这里声明了一个id 为 registry 的注册中心,地址是本地服务器的 2181 端口(这里要与 zookeeper 配置文件的 clientPort 属性值一致)。protocol 指该应用用 dubbo 协议在 28080 端口暴露服务,其他应用可以通过这个接口调用服务。service 用来声明需要暴露的服务接口,这里暴露了IUserService 接口,并将接口注册到 id 为 dubbodemo 的注册中心,它引用了 Spring 中名为 userService 的类,超时时间为 3 秒。到这里 provider 提供者的配置基本上完成,但我们还需要写一个启动类将 provider 启动起来提供服务。
创建 com.chanshuyi.util.BeanFactoryUtil.Java,是加载 Spring 的工具类:

package com.chanshuyi.util; import org.springframework.context.ApplicationContext; import org.springframework.context.support.ClassPathXmlApplicationContext; public class BeanFactoryUtil { private static ApplicationContext ctx_producer = null; public final static String ApplicationContextRoot = ""; public final static String ApplicationContextPath = ApplicationContextRoot + "applicationContext.xml"; public static void init() { if (ctx_producer == null) { synchronized (BeanFactoryUtil.class) { if(ctx_producer == null){ String[] configLocations = new String[]{ApplicationContextPath}; ctx_producer = new ClassPathXmlApplicationContext(configLocations); } } } } public static ApplicationContext getContext() { init(); return ctx_producer; } }

创建 com.chanshuyi.util.SystemDetails.java,用于输出系统信息:

package com.chanshuyi.util; import java.text.SimpleDateFormat; import java.util.Calendar; import java.util.Date; import java.util.TimeZone; public class SystemDetails { /** * 输出系统基本信息 */ public static void outputDetails() { timeZone(); currentTime(); os(); } /** * 输出系统时区 */ private static void timeZone() { Calendar cal = Calendar.getInstance(); TimeZone timeZone = cal.getTimeZone(); System.out.println("系统时区:" + timeZone.getDisplayName()); } /** * 输出系统时间 */ private static void currentTime() { String fromFormat = "yyyy-MM-dd HH:mm:ss"; SimpleDateFormat format = new SimpleDateFormat(fromFormat); Date myDate = new Date(); System.out.println("系统时间:" + format.format(myDate)); } /** * 输出系统基本配置 */ private static void os() { String osName = System.getProperty("os.name"); //操作系统名称 System.out.println("当前系统:" + osName); String osArch = System.getProperty("os.arch"); //操作系统构架 System.out.println("当前系统架构" + osArch); String osVersion = System.getProperty("os.version"); //操作系统版本 System.out.println("当前系统版本:" + osVersion); } }

创建 com.chanshuyi.Launcher.java,用于启动 provider 服务,是启动入口:

package com.chanshuyi; import com.chanshuyi.util.BeanFactoryUtil; import com.chanshuyi.util.SystemDetails; import org.apache.commons.logging.Log; import org.apache.commons.logging.LogFactory; public class Launcher { private static Log logger = LogFactory.getLog(Launcher.class); /** * @param args */ public static void main(String[] args) { System.out.println("======================="); System.out.println(" Core包启动 "); SystemDetails.outputDetails(); System.out.println("======================="); getLocalip(); // 初始化spring logger.info("开始初始化core服务"); BeanFactoryUtil.init(); try{ System.in.read(); } catch (Exception e) { e.printStackTrace(); } } /** * 取得本机ip地址 注意:Spring RmiServiceExporter取得本机ip的方法:InetAddress.getLocalHost() */ private static void getLocalip() { try { System.out.println("服务暴露的ip: " + java.net.InetAddress.getLocalHost().getHostAddress()); } catch (Exception e) { System.out.println(e.getMessage()); } } }

到这里 provider 模块配置结束。我们运行 Launcher.main() 方法启动服务,并打开 zookeeper 注册中心(点击这里下载,双击 bin/zkServer.cmd 运行即可),启动 provider 服务。
接下来我们编写 consumer 代码。
在 consumer 的 pom.xml 中导入 Spring、dubbo、interface 模块依赖

<!-- **************************** Properties 配置 **************************** --> <properties> <project.build.sourceEncoding>UTF-8</project.build.sourceEncoding> <junit.version>3.8.1</junit.version> <springframework.version>4.1.6.RELEASE</springframework.version> <commonsLogging.version>1.2</commonsLogging.version> </properties> <!-- **************************** /Properties 配置 **************************** --> <dependencies> <!-- **************************** Spring 依赖 **************************** --> <!-- 添加Spring-core包 --> <dependency> <groupId>org.springframework</groupId> <artifactId>spring-core</artifactId> <version>${springframework.version}</version> </dependency> <!-- 添加spring-tx包 --> <dependency> <groupId>org.springframework</groupId> <artifactId>spring-tx</artifactId> <version>${springframework.version}</version> </dependency> <!-- Spring ORM 相关--> <dependency> <groupId>org.springframework</groupId> <artifactId>spring-orm</artifactId> <version>${springframework.version}</version> </dependency> <!-- 添加spring-jdbc包 --> <dependency> <groupId>org.springframework</groupId> <artifactId>spring-jdbc</artifactId> <version>${springframework.version}</version> </dependency> <!--添加spring-web包 --> <dependency> <groupId>org.springframework</groupId> <artifactId>spring-web</artifactId> <version>${springframework.version}</version> </dependency> <!-- 添加spring-context包 --> <dependency> <groupId>org.springframework</groupId> <artifactId>spring-context</artifactId> <version>${springframework.version}</version> </dependency> <dependency> <groupId>org.springframework</groupId> <artifactId>spring-beans</artifactId> <version>${springframework.version}</version> </dependency> <dependency> <groupId>commons-logging</groupId> <artifactId>commons-logging</artifactId> <version>${commonsLogging.version}</version> </dependency> <!--添加aspectjweaver包 --> <dependency> <groupId>org.aspectj</groupId> <artifactId>aspectjweaver</artifactId> <version>1.8.5</version> </dependency> <!-- **************************** /Spring 依赖 **************************** --> <!-- **************************** Dubbo 依赖 **************************** --> <dependency> <groupId>com.alibaba</groupId> <artifactId>dubbo</artifactId> <version>2.5.3</version> <exclusions> <exclusion> <groupId>org.springframework</groupId> <artifactId>spring</artifactId> </exclusion> </exclusions> </dependency> <dependency> <groupId>org.apache.zookeeper</groupId> <artifactId>zookeeper</artifactId> <version>3.3.3</version> <exclusions> <exclusion> <groupId>com.sun.jmx</groupId> <artifactId>jmxri</artifactId> </exclusion> <exclusion> <groupId>com.sun.jdmk</groupId> <artifactId>jmxtools</artifactId> </exclusion> <exclusion> <groupId>javax.jms</groupId> <artifactId>jms</artifactId> </exclusion> </exclusions> </dependency> <dependency> <groupId>com.github.sgroschupf</groupId> <artifactId>zkclient</artifactId> <version>0.1</version> </dependency> <!-- **************************** /Dubbo 依赖 **************************** --> <!-- **************************** interface 依赖 **************************** --> <dependency> <groupId>com.chanshuyi.DubboDemo</groupId> <artifactId>interface</artifactId> <version>1.0-SNAPSHOT</version> </dependency> <!-- **************************** /interface 依赖 **************************** -->

创建类 com.chanshuyi.UserServiceConsumer.java

package com.chanshuyi; import com.chanshuyi.service.IUserService; import org.slf4j.Logger; import org.slf4j.LoggerFactory; import org.springframework.context.ApplicationContext; import org.springframework.context.support.ClassPathXmlApplicationContext; /** * Created by Administrator on 2016/1/19. */ public class UserServiceConsumer { private static Logger logger = LoggerFactory.getLogger(UserServiceConsumer.class); public static void main(String args[]) { ApplicationContext ctx = new ClassPathXmlApplicationContext("applicationContext.xml"); IUserService userService = (IUserService) ctx.getBean("userService"); logger.info("执行结果:" + userService.login("hello", "hello")); } }

配置 applicationContext.xml 文件以及 spring-consumer.java 文件

<?xml version="1.0" encoding="UTF-8"?> <beans xmlns="http://www.springframework.org/schema/beans" xmlns:xsi="http://www.w3.org/2001/XMLSchema-instance" xsi:schemaLocation="http://www.springframework.org/schema/beans http://www.springframework.org/schema/beans/spring-beans.xsd "> <!-- **************************** 导入其他XML文件 **************************** --> <import resource="spring-consumer.xml"/> <!-- **************************** /导入其他XML文件 **************************** --> </beans>


<?xml version="1.0" encoding="UTF-8"?> <!-- 添加 DUBBO SCHEMA --> <beans xmlns="http://www.springframework.org/schema/beans" xmlns:xsi="http://www.w3.org/2001/XMLSchema-instance" xmlns:dubbo="http://code.alibabatech.com/schema/dubbo" xsi:schemaLocation="http://www.springframework.org/schema/beans http://www.springframework.org/schema/beans/spring-beans.xsd http://code.alibabatech.com/schema/dubbo http://code.alibabatech.com/schema/dubbo/dubbo.xsd"> <!-- 应用名 --> <dubbo:application name="dubbodemo-consumer"/> <!-- 连接到哪个注册中心(连接到本机的2181端口zookeeper) --> <dubbo:registry address="zookeeper://localhost:2181"/> <!-- 消费方用什么协议获取服务(用dubbo协议在20880端口暴露服务) --> <dubbo:protocol port="28080"/> <!-- 提供哪些接口给消费者调用 --> <dubbo:reference id="userService" interface="com.chanshuyi.service.IUserService"/> </beans>

spring-consumer.xml 的配置大致与 spring-provider.xml 相同,只是 dubbo:service 节点换成 dubbo:reference 节点。<dubbo:reference> 节点表示引用一个服务,其中 id 表示该服务的唯一标识,可以用该 id 实现 IOC 注入,interface 表示引用的服务接口。
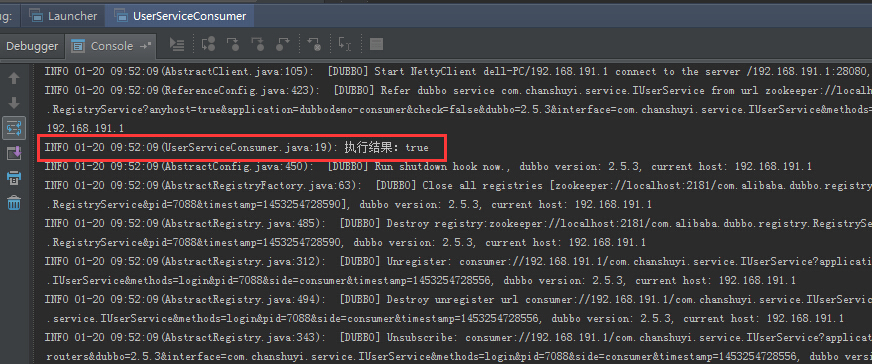
到这里 consumer 模块配置基本结束。我们运行 UserServiceConsumer.main() 方法调用 provider 服务(provider 服务要开启哦),成功之后会打印出是否调用成功。


如果这样就表示成功调用了。可以看到 DUBBO 框架是在 Spring 的基础上加上一个简单的配置文件即可把一个服务暴露出去。
DUBBO 配置文件基本有 application、registry、protocol 3个公共参数分别告诉了 DUBBO 以及 zookeeper 注册中心:我是谁?我向谁注册?怎么调用我的服务? 通过这 3 个配置,其他消费者就可以找到对应服务。
2、properties 配置文件方式
DUBBO 在读取配置的时候会先读取 XML文件中的配置,如果没找到就会默认去读取resources目录下的 dubbo.properties 文件。而 dubbo.properties 的配置方式与 XML配置方式一样,只不过是换了种写法而已。要换成 dubbo.properties 配置,你只需把 spring-provider.xml 里关于 application、registry、protocol 里的配置注释掉,然后加上对应的 dubbo.properties 文件即可。上面例子的 spring-provider.xml 换成 properties 文件的写法是这样的:

# 应用名 dubbo.application.name=dubbodemo-provider # 注册中心地址 dubbo.registry.address=zookeeper://localhost:2181 # 调用协议地址 dubbo.protocol.name=dubbo dubbo.protocol.port=28080

spring-consumer.xml 换成 properties 文件写法是这样的:

# 应用名 dubbo.application.name = dubbodemo-consumer # 注册中心地址 dubbo.registry.address = zookeeper://localhost:2181 # 调用协议地址 dubbo.protocol.name = dubbo dubbo.protocol.port = 28080

此时 spring-provider.xml 和 spring-consumer.xml 文件内容如下:

<?xml version="1.0" encoding="UTF-8"?> <!-- 添加 DUBBO SCHEMA --> <beans xmlns="http://www.springframework.org/schema/beans" xmlns:xsi="http://www.w3.org/2001/XMLSchema-instance" xmlns:dubbo="http://code.alibabatech.com/schema/dubbo" xsi:schemaLocation="http://www.springframework.org/schema/beans http://www.springframework.org/schema/beans/spring-beans.xsd http://code.alibabatech.com/schema/dubbo http://code.alibabatech.com/schema/dubbo/dubbo.xsd"> <!-- 声明需要暴露的服务接口 --> <dubbo:service timeout="3000" interface="com.chanshuyi.service.IUserService" ref="userService"/> </beans>


<?xml version="1.0" encoding="UTF-8"?> <!-- 添加 DUBBO SCHEMA --> <beans xmlns="http://www.springframework.org/schema/beans" xmlns:xsi="http://www.w3.org/2001/XMLSchema-instance" xmlns:dubbo="http://code.alibabatech.com/schema/dubbo" xsi:schemaLocation="http://www.springframework.org/schema/beans http://www.springframework.org/schema/beans/spring-beans.xsd http://code.alibabatech.com/schema/dubbo http://code.alibabatech.com/schema/dubbo/dubbo.xsd"> <!-- 调用哪些服务 --> <dubbo:reference id="userService" interface="com.chanshuyi.service.IUserService"/> </beans>

注意,如果你即配置了 XML 又配置了 properties 的内容,那么 DUBBO 读取时将直接读取 XML 中的配置,忽略 properties 里的配置。
一般情况下 properties 都是用来配置一些公共的信息,比如可能一个应用需要调用多个注册中心的服务,这时候它们的 application.name、dubbo.protocol.name等都是相同的,那么你可以用 properties 来配置这些公共信息。其他情况,还是建议用 XML 配置方式。
3、annotation 配置方式
annotation 配置方式其实是在 XML 配置方式上,将暴漏服务和调用服务与 Spring 深度结合起来。
Provider 方配置
将 <dubbo:service> 节点换成 <dubbo:annotation> 节点:
<dubbo:annotation package="com.chanshuyi.service.impl" />
其中 package 表示要扫描的包。之后在实现类里加上注解 @Service(version = "1.0.0") :

package com.chanshuyi.service.impl; import com.chanshuyi.service.IUserService; import org.slf4j.Logger; import org.slf4j.LoggerFactory; import com.alibaba.dubbo.config.annotation.Service; @Service(version = "1.0.0") public class UserServiceImpl implements IUserService { @Override public boolean login(String username, String password) { …… } }

注意这里用的 @Service 注解是 alibaba.dubbo 中的 Service 注解。
Consumer 方配置
将 <dubbo:reference> 节点换成 <dubbo:annotation> 节点:
<!-- 扫描注解包路径,多个包用逗号分隔,不填pacakge表示扫描当前ApplicationContext中所有的类 --> <dubbo:annotation package="com.chanshuyi" />
其中 package 表示要扫描的包。之后在需要注入的服务里加上注解 @Reference(version="1.0.0"),修改后的 UserServiceConsumer.java 为:

package com.chanshuyi; import com.chanshuyi.service.IUserService; import org.slf4j.Logger; import org.slf4j.LoggerFactory; import org.springframework.context.ApplicationContext; import org.springframework.context.support.ClassPathXmlApplicationContext; import org.springframework.stereotype.Component; import com.alibaba.dubbo.config.annotation.Reference; /** * Created by chanshuyi on 2016/1/19. */ @Component public class UserServiceConsumer { private static Logger logger = LoggerFactory.getLogger(UserServiceConsumer.class); @Reference(version="1.0.0") static IUserService userService; public static void main(String args[]) { ApplicationContext ctx = new ClassPathXmlApplicationContext("applicationContext.xml"); logger.info("执行结果:" + userService.login("hello", "hello")); } }

之后启动 provider服务,运行 UserServiceConsumer.main() 方法测试。
本文项目文件链接:http://pan.baidu.com/s/1kTYOtKV 密码:d4cu
参考资料:
[转载,感觉写的非常详细]DUBBO配置方式详解的更多相关文章
- Dubbo配置方式详解
Dubbo 是一个分布式服务框架,致力于提供高性能和透明化的 RPC 远程服务调用方案,是阿里巴巴 SOA 服务化治理方案的核心框架,每天为 2,000+ 个服务提供 3,000,000,000+ 次 ...
- DUBBO配置规则详解
研究DUBBO也已经大半年了,对它的大部分源码进行了分析,以及对它的内部机制有了比较深入的了解,以及各个模块的实现.DUBBO包含很多内容,如果想了解DUBBO第一步就是启动它,从而可以很好的使用它, ...
- Dubbo注册中心的四种配置方式详解
Dubbo目前支持4种注册中心,(multicast,zookeeper,redis,simple) 推荐使用Zookeeper注册中心. 一.Multicast注册中心 不需要启动任何中心节点,只要 ...
- Python安装、配置图文详解(转载)
Python安装.配置图文详解 目录: 一. Python简介 二. 安装python 1. 在windows下安装 2. 在Linux下安装 三. 在windows下配置python集成开发环境(I ...
- ASP.NET Core的配置(2):配置模型详解
在上面一章我们以实例演示的方式介绍了几种读取配置的几种方式,其中涉及到三个重要的对象,它们分别是承载结构化配置信息的Configuration,提供原始配置源数据的ConfigurationProvi ...
- Dubbo架构设计详解-转
Dubbo架构设计详解 2013-09-03 21:26:59 Yanjun Dubbo是Alibaba开源的分布式服务框架,它最大的特点是按照分层的方式来架构,使用这种方式可以使各个层之间解 ...
- Java编程配置思路详解
Java编程配置思路详解 SpringBoot虽然提供了很多优秀的starter帮助我们快速开发,可实际生产环境的特殊性,我们依然需要对默认整合配置做自定义操作,提高程序的可控性,虽然你配的不一定比官 ...
- Git学习系列之Windows上安装Git详细步骤(图文详解)
前言 最初,Git是用于Linux下的内核代码管理.因为其非常好用,目前,已经被成功移植到Mac和Windows操作系统下. 鉴于大部分使用者使用的是Windows操作系统,故,这里详细讲解Windo ...
- 【第六课】Nginx常用配置下详解
目录 Nginx常用配置下详解 1.Nginx虚拟主机 2.部署wordpress开源博客 3.部署discuz开源论坛 4.域名重定向 5.Nginx用户认证 6.Nginx访问日志配置 7.Ngi ...
随机推荐
- Flask_script扩展调用的方式
Flask中flask-script扩展的使用 通过使用Flask-Script扩展,我们可以在Flask服务器启动的时候,通过命令行的方式传入参数.而不仅仅通过app.run()方法中传参 Flas ...
- etl工具-Bireme
前段时间做数据仓库项目,自己实现了一部分etl功能,后面一直没有时间去深入挖掘.这个工具貌似不错,写个帖子做下记录: https://hashdatainc.github.io/bireme/READ ...
- 将window上的项目上传到自己的github
使用git 1.首先在自己的github上面新建仓库 2.记下远程仓库的地址 3.在要上传的项目的目录下使用git命令进行上传 (1)先git init 初始化本地的仓库 (2)git add -A ...
- Swift 3 实现拍照功能
编辑.plist文件,添加两个key-value,打开相机和相册的访问权限1) 申请相机权限: <key>NSCameraUsageDescription</key> < ...
- Openflow1.3
Openflow1.3 协议标准
- iPhone开发资源汇总
如何用Facebook graphic api上传视频: http://developers.facebook.com/blog/post/532/ Keychain保存数据封装: https://g ...
- erlang游戏开发tcp
之前在开发游戏的时候我们采用smartfoxserver这个java开发的游戏引擎,这个引擎在开发回合制游戏方面速度还是不错的.但是面对客户日益增长的需求还是有些力不从心.比如集群,比如灾备,热切换, ...
- dom4j 改变XML声明和编码格式
dom4j 改变XML编码 Element rootElement = document.addElement("data"); document.setXMLEncoding(& ...
- 可能是 BJOI2019 Day1 题解?
T1 给一个有空白字符的串 $S$,和若干模板串 $X_i$,初始 $Ans = 1$,每当一个模板串在 $S$ 中作为子串出现时,$Ans$ 会乘以 $X_i$ 的权值 $Val_i$,然后如果 $ ...
- 一图说明offsetTop、top、clientTop、scrollTop等
offsetParent:该属性返回一个对象的引用,这个对象是距离调用offsetParent的元素最近的(在包含层次中最靠近的),已进行过CSS定位的容器元素. 如果这个容器元素未进行CSS定位, ...
