JustWeTools - 自定义控件集
JustWeTools - Some useful tools

项目地址
JustWe 现在有哪些模块?
View自定义控件
Utils工具类
AlarmUtil闹钟事件工具类MPUtils短信电话工具类NetUtils网络状态工具类PicUtils图片处理工具类ServiceUtils服务工具类ImageHelper图型处理类DisplayUtils数据转换类SpUtilsSp简化工具类(可存储list和map)ToastUtilsToast定制工具类ValidatorsUtils正则表达式处理类
模块如何使用:
- 将Demo作为library加入项目,或是直接将代码拷入
- 下载demo :apk-demo
JustWe 模块介绍:
View自定义控件:
PaintView画图工具:
- 可直接使用设定按钮来实现已拥有的方法,且拓展性强
- 基础功能:更换颜色、更换橡皮、以及更换橡皮和笔的粗细、清屏、倒入图片
特殊功能:保存画笔轨迹帧动画、帧动画导入导出、ReDo和UnDo- 重构版本:提供笔刷类型基类DrawBase,可继承此类制作笔刷
效果图:

使用基础功能只需要:
1.1 添加xml:
   <com.lfk.justwetools.View.PaintIt.PaintView

       android:id="@+id/paintView"

       android:layout_width="match_parent"

       android:layout_height="match_parent" />
1.2 在activity里找到:
paintView = (PaintView)findViewById(R.id.paint);
若想使用帧动画相关功能:
需要新建数据集,设定纪录paintview,并且设定onPathListener()
    pathNode = (PathNode)getApplication();

    paintView.setIsRecordPath(true,pathNode);

    paintView.setOnPathListener(new OnPathListener() {

        @Override

    public void AddNodeToPath(float x, float y, int event, boolean IsPaint) {

        PathNode.Node tempnode = pathNode.new Node();

        tempnode.x = x;

        tempnode.y = y;

        if (IsPaint) {

            tempnode.PenColor = UserInfo.PaintColor;

            tempnode.PenWidth = UserInfo.PaintWidth;

        } else {

            tempnode.EraserWidth = UserInfo.EraserWidth;

        }

        tempnode.IsPaint = IsPaint;

        Log.e(tempnode.PenColor + ":" + tempnode.PenWidth + ":" + 		tempnode.EraserWidth, tempnode.IsPaint + "");

        tempnode.TouchEvent = event;

        tempnode.time = System.currentTimeMillis();

        pathNode.AddNode(tempnode);

    	}

	});
相关的教程和解析请看:PaintView 绘图控件解析
图例中出现的Demo: 图例Demo
图例中使用了两个开源控件:
CircularFloatingActionMenu 和 android-ColorPickerPreference
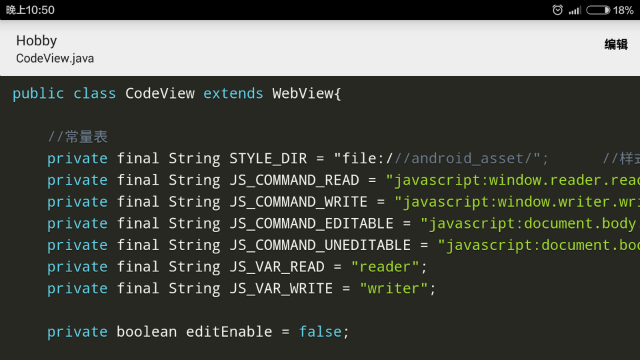
CodeView代码查看/修改工具:
- 基于WebView制作的代码编辑器
- 实现代码高亮,暗色主题
- 代码及时修改
效果图:

使用基础功能只需要:
2.1 添加xml:
    <com.lfk.justwetools.View.CodeView.CodeView

        android:id="@+id/mcodeview"

        android:layerType="hardware"

        android:layout_width="match_parent"

        android:layout_height="match_parent"/>
2.2 在Activity中获取路径:
        codeView = (CodeView)findViewById(R.id.mcodeview);

        File dir = null;

        Uri fileUri = getIntent().getData();

        if (fileUri != null) {

            dir = new File(fileUri.getPath());

        }

        if (dir != null) {

            codeView.setDirSource(dir);

            getSupportActionBar().setSubtitle(dir.getName());

        }

        else

            finish();
如果是手动复制代码的话,需要复制assests文件夹下的js文件。
2.3 编辑修改:
    @Override

    public boolean onOptionsItemSelected(MenuItem item) {

        int id = item.getItemId();

        if (item.getItemId() == R.id.action_code) {

            if (!codeView.isEditable()) {

                item.setTitle("完成");

                codeView.setContentEditable(true);

            } else {

                item.setTitle("编辑");

                codeView.setContentEditable(false);

            }

        }

        return super.onOptionsItemSelected(item);

    }
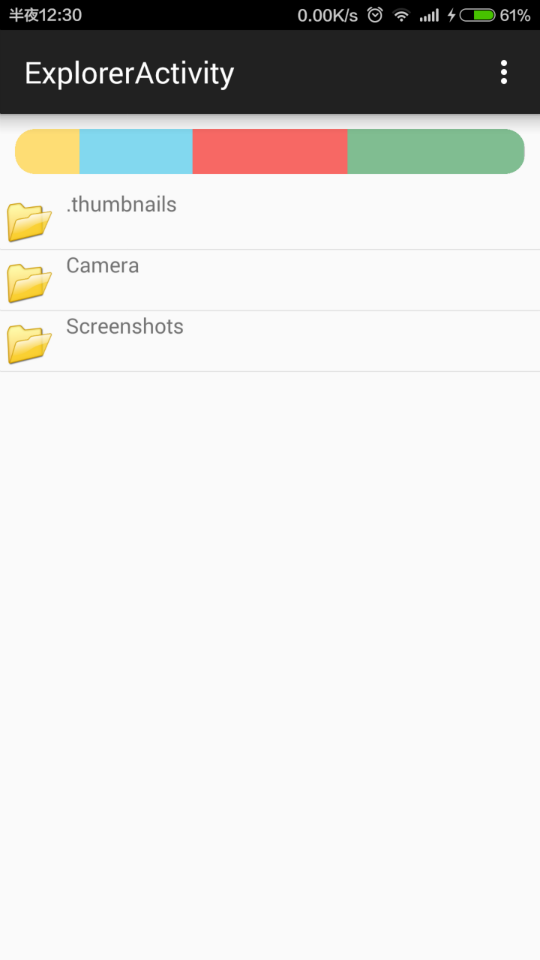
ExplorerView 文件浏览器:
- 继承自ListView
- 可拓展性强
- 可进行文件类型分析
效果图:

- 使用基础功能
3.1 添加xml:
    <com.lfk.justwetools.View.FileExplorer.FileExplorer

        android:id="@+id/ex"

        android:layout_width="match_parent"

        android:layout_height="match_parent"/>
3.2 在Activity里面:
fileExplorer = (FileExplorer)findViewById(R.id.ex);
此时默认的打开路径为sd卡根目录:
可通过如下修改:
    // 打开路径

    fileExplorer.setCurrentDir(Environment.getExternalStorageDirectory().getPath());

    // 根路径(能到达最深的路径,以此避免用户进入root路径)

    fileExplorer.setRootDir(Environment.getExternalStorageDirectory().getPath());
Item的点击事件:
        //覆盖屏蔽原有长按事件

        fileExplorer.setOnItemLongClickListener(new AdapterView.OnItemLongClickListener() {

            @Override

            public boolean onItemLongClick(AdapterView<?> parent, View view, int position, long id) {

                return false;

            }

        });

        //选择文件 默认打开CodeView

        fileExplorer.setOnFileChosenListener(new OnFileChosenListener() {

            @Override

            public void onFileChosen(Uri fileUri) {

                Intent intent = new Intent(ExplorerActivity.this, CodeActivity.class);

                intent.setData(fileUri);

                startActivity(intent);

            }

        });
返回键返回上一级:
    @Override

    public boolean onKeyDown(int keyCode, KeyEvent event) {

        if (keyCode == KeyEvent.KEYCODE_BACK

                && event.getAction() == KeyEvent.ACTION_DOWN) {

            if(!fileExplorer.toParentDir()){

                if(System.currentTimeMillis() - exitTime < 1000)

                    finish();

                exitTime = System.currentTimeMillis();

                Toast.makeText(this, "再次点击退出", Toast.LENGTH_SHORT).show();

            }

            return true;

        }

        return super.onKeyDown(keyCode, event);

    }
高级功能:
根据文件夹内的各种文件类型的大小比例,分析比例图,不建议在sd卡根目录使用内容过多反应较慢.
3.3 添加xml:
    <com.lfk.justwetools.View.Proportionview.ProportionView

        android:id="@+id/pv"

        android:layout_margin="10dp"

        android:layout_width="match_parent"

        android:layout_height="30dp" />
3.4 在Activity中添加:
final ProportionView view = (ProportionView) findViewById(R.id.pv);
注册分析文件比例的接口:
    //新路径下分析文件比例

    fileExplorer.setOnPathChangedListener(new OnPathChangedListener() {

        @Override

        public void onPathChanged(String path) {

            try {

                view.setData(fileExplorer.getPropotionText(path));

            } catch (Exception e) {

                Toast.makeText(getApplicationContext(), "此路径下不可访问或文件夹下无文件", Toast.LENGTH_LONG).show();

            }

        }

    });
ReadView小说阅读:
- 基于Canvas制作的小说阅读
- 可更换字体、字号、字颜色
- 拓展性强
效果图:

使用基础功能只需要:
   ReadView readView = new ReadView(this,dir.getPath());

   setContentView(readView);
如果需要打开文件时调用请修改manifest和:
        File dir = null;

        Uri fileUri = getIntent().getData();

        if (fileUri != null) {

            dir = new File(fileUri.getPath());

        }

        readView = null;

        if (dir != null) {

            readView = new ReadView(this,dir.getPath());

        }

        else

            finish();

        setContentView(readView);
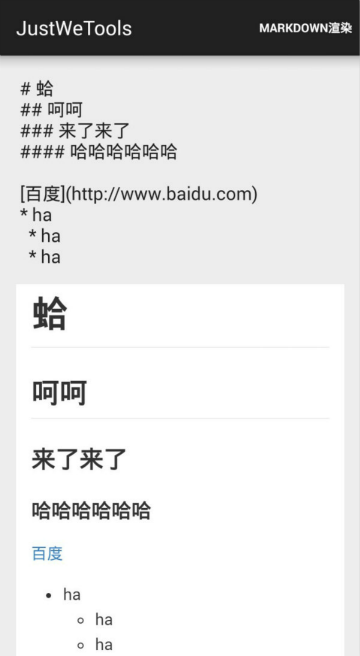
MarkDownView支持MarkDown语法的渲染器:
- 基于WebView的MarkDown渲染器
- 支持标准化的MarkDown语法
- 调用接口和
CodeView保持一致使用简便
效果图:
使用基础功能:
    <com.lfk.justwetools.View.MarkDown.MarkDownView

        android:id="@+id/markdownview"

        android:layout_width="match_parent"

        android:layout_height="match_parent">

    </com.lfk.justwetools.View.MarkDown.MarkDownView>
并添加:
        MarkDownView markDownView = (MarkDownView)findViewById(R.id.markdownview);

        if(getIntent().getStringExtra("str") != null){

            markDownView.setStringSource(getIntent().getStringExtra("str"));

        }
如果需要打开文件时调用请修改manifest和:
        File dir = null;

        Uri fileUri = getIntent().getData();

        if (fileUri != null) {

            dir = new File(fileUri.getPath());

        }

        if (dir != null) {

            markDownView.setDirSource(dir);

        }
VerTextView竖行排版的TextView:
- 支持竖行排版
- 添加了下划线功能,开启简便,下划线粗细、颜色、间距均可自定义
- 接口调用方式与TextView相似,使用简便
效果图:

使用基础功能:
    <com.lfk.justwetools.View.VerText.VerTextView

    android:id="@+id/vertextview"

    android:layout_width="wrap_content"

    android:layout_height="wrap_content" />
并添加:
    VerTextView verTextView = (VerTextView)findViewById(R.id.vertextview);

    verTextView.setText(getResources().getString(R.string.poem));
一些设定:
    verTextView.setFontSize(100);             // 设定字体尺寸

    verTextView.setIsOpenUnderLine(true);     // 设定开启下划线

    verTextView.setUnderLineColor(Color.RED); // 设定下划线颜色

    verTextView.setUnderLineWidth(3);         // 设定下划线宽度

    verTextView.setUnderLineSpacing(10);      // 设定下划线到字的间距

    verTextView.setTextStartAlign(VerTextView.RIGHT); // 从右侧或左侧开始排版

    verTextView.setTextColor(color);           // 设定字体颜色

    ...
Clock 绘制时钟:自定义View绘制的时钟

    <com.lfk.justwetools.View.Clock.Clock

        android:id="@+id/clock"

        android:layout_width="match_parent"

        android:layout_height="wrap_content"

        android:layout_below="@id/flashTextView"

        android:layout_centerHorizontal="true"

        android:layout_marginTop="16dp" />
一些设定:
    void setColor(int color);

    void setNeedleColor(int needleColor);

    void setTextColor(int textColor);

    void setCircleColor(int circleColor);

    void setUnthehourLineColor(int unthehourLineColor);

    void setThehourLineColor(int thehourLineColor);

    void setHourSize(int hourSize);

    ...
有问题反馈
在使用中有任何问题,欢迎反馈给我,可以用以下联系方式跟我交流
License
Copyright 2015 [刘丰恺](http://www.cnblogs.com/lfk-dsk/)

Licensed under the Apache License, Version 2.0 (the "License");

you may not use this file except in compliance with the License.

You may obtain a copy of the License at

   http://www.apache.org/licenses/LICENSE-2.0

Unless required by applicable law or agreed to in writing, software

distributed under the License is distributed on an "AS IS" BASIS,

WITHOUT WARRANTIES OR CONDITIONS OF ANY KIND, either express or implied.

See the License for the specific language governing permissions and

limitations under the License.
JustWeTools - 自定义控件集的更多相关文章
- 开源 XFControls , 用于 Xamarin.Forms 的自定义控件集
从此以后不会在博客园上发表任何言论,观注我的同志们,洗洗睡吧. ---------------------- 博文移至: http://www.jianshu.com/p/3ed1a3f10955
- Google地图接口API之地图控件集(五)
1.默认控件集 当使用一个标准的google地图,它的控件默认设置如下: (1). Zoom-显示一个滑动条来控制map的Zoom级别,如下所示:
- Android自定义控件之自定义属性
前言: 上篇介绍了自定义控件的基本要求以及绘制的基本原理,本篇文章主要介绍如何给自定义控件自定义一些属性.本篇文章将继续以上篇文章自定义圆形百分比为例进行讲解.有关原理知识请参考Android自定义控 ...
- Andriod 自定义控件之创建可以复用的组合控件
前面已学习了一种自定义控件的实现,是Andriod 自定义控件之音频条,还没学习的同学可以学习下,学习了的同学也要去温习下,一定要自己完全的掌握了,再继续学习,贪多嚼不烂可不是好的学习方法,我们争取学 ...
- Android 自定义View合集
自定义控件学习 https://github.com/GcsSloop/AndroidNote/tree/master/CustomView 小良自定义控件合集 https://github.com/ ...
- Android 自定义控件(一)
本文用一个简单的例子来说明一下自定义控件的步骤实现,自定义控件有几种实现类型,分别为继承自view完全自定义,继承现有的 控件实现特定效果,继承viewgroup实现布局类等: 本文研究的是继承自vi ...
- Android之自定义控件深入
本文主要讲述两个知识点:popwindow的使用和通过继承View实现一个自定义控件,实现点击,手动按钮的效果. popwindow的使用 //定义 popupWindow popWin = new ...
- iOS自定义控件教程:制作一个可重用的旋钮
当你的APP需要一些新功能时,自定义UI控件会十分有用,尤其是这些自定义控件可以在其他APP里面很好的重用.Colin Eberhart写过一篇很棒的介绍自定义UI控件的教程.这个教程涉及的是一个继承 ...
- 直接拿来用!Facebook移动开源项目大合集
直接拿来用!Facebook移动开源项目大合集 时间:2014-04-22 15:37 作者:唐小引 随着iOS依赖管理工具CocoaPods和大量第三方开源库成熟起来,业界积累了大量的优秀开源项目. ...
随机推荐
- log4net的使用
1.0 下载并引用 log4net.dll 2.0 修改Web.config <configuration> <configSections> <section name ...
- .NET Core全新路线图(译)
标签: .NETCore 翻译 承接张善友大大的.NET Core全新路线图,翻译了原文,水平有限,尽量一观. 原文地址<.NET Core Roadmap>,原作者Scott Hunte ...
- .Net中的并行编程-2.ConcurrentStack的实现与分析
在上篇文章<.net中的并行编程-1.基础知识>中列出了在.net进行多核或并行编程中需要的基础知识,今天就来分析在基础知识树中一个比较简单常用的并发数据结构--.net类库中无锁栈的实现 ...
- Activity的四种启动模式
Activity有四种启动模式: 1. standard,默认的启动模式,只要激活Activity,就会创建一个新的实例,并放入任务栈中,这样任务栈中可能同时有一个Activity的多个实例. 2. ...
- MVC中实现Area几种方法
概述 ASP.NET MVC中,是依靠某些文件夹以及类的固定命名规则去组织model实体层,views视图层和控制层的.如果是大规模的应用程序,经常会由不同功能的模块组成,而每个功能模块 ...
- karma的基础应用之与fis结合
一.介绍 1. karma是单元测试运行框架,可以集成jasmine断言库,也支持babel. 2.fis是百度前端团队开源推出的前端工程化管理工具. 二.karma的基础应用 1.karma的基础a ...
- phpstorm 软件
PhpStorm是一款强大的IDE,非常适合于PHP开发人员及前端工程师.提供诸于:智能HTML/CSS/JavaScript/PHP编辑.代码质量分析.版本控制集成(SVN.GIT).调试和测试等功 ...
- js实现web网页版台球游戏
js桌球小游戏在线试玩地址:http://keleyi.com/game/13/ 游戏截图: 完整代码,保存到html文件可以试玩: <!DOCTYPE html PUBLIC "-/ ...
- AndroidTV版(乐视超3 X55)root,将自己的软件设置为开机自启、系统软件,卸载系统应用等问题总结
最近开发android软件客户要安装在乐视TV上,而且要求是开机自启.我很天真的以为写一个广播接收类接收开机广播就可以了,可是根本不会,有的设备就是不可以接收到开机广播,于是各种百度搜索.大神们说是只 ...
- include的用法例子,以及include+merge的用法例子
[include+LinearLayout]的使用例子 AndroidIncludeLayout.java package com.AndroidIncludeLayout; import andro ...