你必须要知道的babel二三事
1. 什么是babel
本文基于的babel版本是7.11.6,本文所有示例github
Babel is a toolchain that is mainly used to convert ECMAScript 2015+ code into a backwards compatible version of JavaScript in current and older browsers or environments.
Babel是一个工具链,主要用于将ECMAScript 2015+代码转换为当前和较老的浏览器或环境中的向后兼容的JavaScript版本。
1.1 我们能用bebel做什么?
针对于新出的ECMAScript标准,部分浏览器还不能完全兼容,需要将这部分语法转换为浏览器能够识别的语法。比如有些浏览器不能正常解析es6中的箭头函数,那通过babel转换后,就能将箭头函数转换为浏览器能够“认懂”得语法。
针对于一些较老的浏览器,比如IE10或者更早之前。对一些最新的内置对象
Promise/Map/Set,静态方法Arrary.from/Object.assign以及一些实例方法Array.prototype.includes,这些新的特性都不存在与这些老版本的浏览器中,那么就需要给这些浏览器中的原始方法中添加上这些特性,即所谓的polyfill。可以做一些源码的转换,即可以直接使用babel中提供的API对代码进行一些分析处理,例如
  const filename = 'index.js'

  const { ast } = babel.transformSync(source, { filename, ast: true, code: false });

  const { code, map } = babel.transformFromAstSync(ast, source, {

      filename,

      presets: ["minify"],

      babelrc: false,

      configFile: false,

  });
2. 使用babel
下面讲到的几种转换方式,其实本质上都是一样的,都是调用babel-core中的API来进行直接转换
2.1 使用babel.transform直接转换
const source = `

const someFun = () => {

    console.log('hello world');

}

`;

require("@babel/core").transform(source, {

  plugins: ["@babel/plugin-transform-arrow-functions", "@babel/plugin-transform-parameters"],

}, result => {

  console.log(result.code);

});
2.1 使用babel-cli
babel提供了cli的方式,可以直接让我们使用命令行的方式来使用babel,具体参照一下做法
## install

## 首先需要安装 @babel/core @babel/cli

## @babel/cli是提供的命令行工具,会内部调用@babel/core来进行代码转换

npm install @babel/core @babel/cli --save-dev

## usage

npx babel ./cli/index.js
本地安装完依赖后,就可以使用babel来进行代码转换了,npx babel [options] files,babel提供了一些常用的cli命令,可以使用npx babel --help来查看
> $ npx babel --help                                                                                                           ⬡ 12.13.0 [±master ●●●]

Usage: babel [options] <files ...>

Options:

  -f, --filename [filename]                   The filename to use when reading from stdin. This will be used in source-maps, errors etc.

  --presets [list]                            A comma-separated list of preset names.

  --plugins [list]                            A comma-separated list of plugin names.

  --config-file [path]                        Path to a .babelrc file to use.

  --env-name [name]                           The name of the 'env' to use when loading configs and plugins. 																							 Defaults to the value of BABEL_ENV, or else NODE_ENV, or else

                                              'development'.
下面是一个简单的例子,比如有这么一段源代码,
// cli/index.js

const arrayFn = (...args) => {

    return ['babel cli'].concat(args);

}

arrayFn('I', 'am', 'using');
执行以下命令:npx babel ./cli/index.js --out-file ./cli/index.t.js,结果如下图:

代码和源代码竟然是一模一样的,为什么箭头函数没有进行转换呢?这里就会引入plugins以及preset的概念,这里暂时不会具体讲解,只需要暂时知道,代码的转换需要使用plugin进行。
转换箭头函数,我们需要使用到@babel/plugin-transform-arrow-functions/parameters,首先安装完之后,在此执行转换
npm install @babel/plugin-transform-arrow-functions @babel/plugin-transform-parameters --save-dev

npx babel ./cli/index.js --out-file ./cli/index.t.js --plugins=@babel/plugin-transform-arrow-functions,@babel/plugin-transform-parameters
执行完之后,再看生成的文件

2.3 使用webpack babel-loader来进行转换
创建webpack.config.js,编写如下配置
// install

npm install webpack-cli --save-dev

// webpack/webpack.config.js

module.exports = {

  entry: './index.js',

  output: {

    filename: 'index.bundle.js'

  },

  module: {

    rules: [

      {

        test: /\.m?js$/,

        exclude: /(node_modules|bower_components)/,

        use: {

          loader: 'babel-loader',

          options: {

            plugins: ["@babel/plugin-transform-arrow-functions", "@babel/plugin-transform-parameters"]

          }

        }

      }

    ]

  }

};

// usage

cd webpack

npx webpack
可以得到转换之后的代码如下:

可以对比查看babel-cli的转换之后的代码是一致的。
2.4 使用配置文件来进行转换
参看以上三种方式,都必须加载了plugins这个参数选项,尤其是在cli方式中,如果需要加载很多插件,是非常不便于书写的,同时,相同的配置也不好移植,比如需要在另外一个项目中同样使用相同的cli执行,那么显然插件越多,就会越容易出错。鉴于此,babel提供了config的方式,类似于webpack的cli方式以及config方式。
babel在7.0之后,引入了babel.config.[extensions],在7.0之前,项目都是基于.babelrc来进行配置,这里暂时不会讲解它们之间的区别。下面就是一个比较基于上面例子的一个.babelrc文件。
// .babelrc

{

  "plugins": ["@babel/plugin-transform-arrow-functions", "@babel/plugin-transform-parameters"]

}
我们将这个文件放置在根目录下,新建一个config的文件夹,从cli目录中将index.js文件copy到config目录下,然后执行npx babel ./config/index.js --out-file ./config/index.t.js,完成之后,会发现和cli执行的方式并没有什么差别。
3. babel.config.json vs .babelrc
babel.config.js是在babel第7版引入的,主要是为了解决babel6中的一些问题,参看https://babeljs.io/docs/en/config-files#6x-vs-7x-babelrc-loading
- .babelrc会在一些情况下,莫名地应用在node_modules中
- .babelrc的配置不能应用在使用符号链接引用进来的文件
- 在node_modules中的.babelrc会被检测到,即使它们中的插件和预设通常没有安装,也可能在Babel编译文件的版本中无效
3.1 .babelrc在monorepo项目中的一些问题
另外如果只使用.babelrc,在monorepo项目中会遇到一些问题,这得从.babelrc加载的两条规则有关
- 在向上搜索配置的过程中,一旦在文件夹中找到了package.json,就会停止搜寻其它配置(babel用package.json文件来划定package的范围)
- 这种搜索行为找到的配置,如
.babelrc文件,必须位于babel运行的root目录下,或者是包含在babelrcRoots这个option配置的目录下,否则找到的配置会直接被忽略
下面我们在之前的例子上进行改造,文件结构如下:
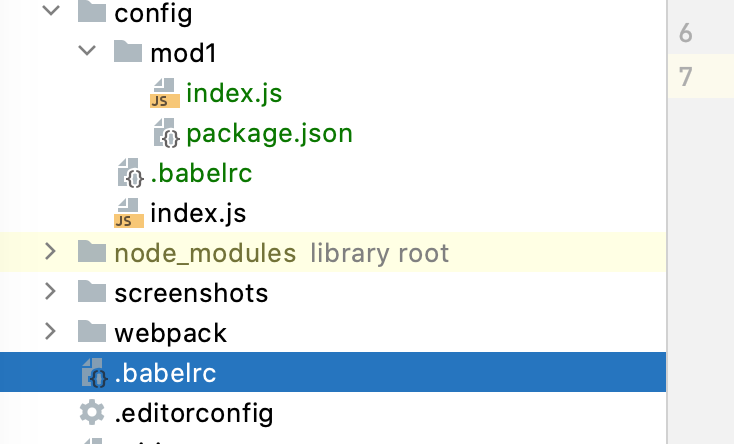
在mod1文件夹中创建一个package.json文件,内容为{}。现在执行以下代码:
npx babel ./config/mod1/index.js -o ./config/mod1/index.t.js
可以发现,index.js没有编译,因为在向上查找的时候,找到了mod1中的package.json,但是在此目录中并没有找到.babelrc文件,因此不会编译。
下面,我们将.babelrc文件移至mod1中,然后再执行上面的命令,这次会编译成功么?
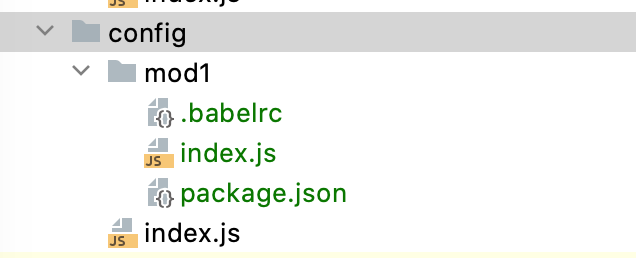
答案依旧是不会,因为当前的执行目录是在src下面,所以在mod1目录中的配置文件将会被忽略掉。
这里有两种方法来解决这个问题:
进入到mod1目录中直接执行
cd ./config/mod1 & npx babel index.js -o index.t.js在执行的root目录下,添加一个
babel.config.json文件,在其中添加babelrcRoots将这个目录添加进去
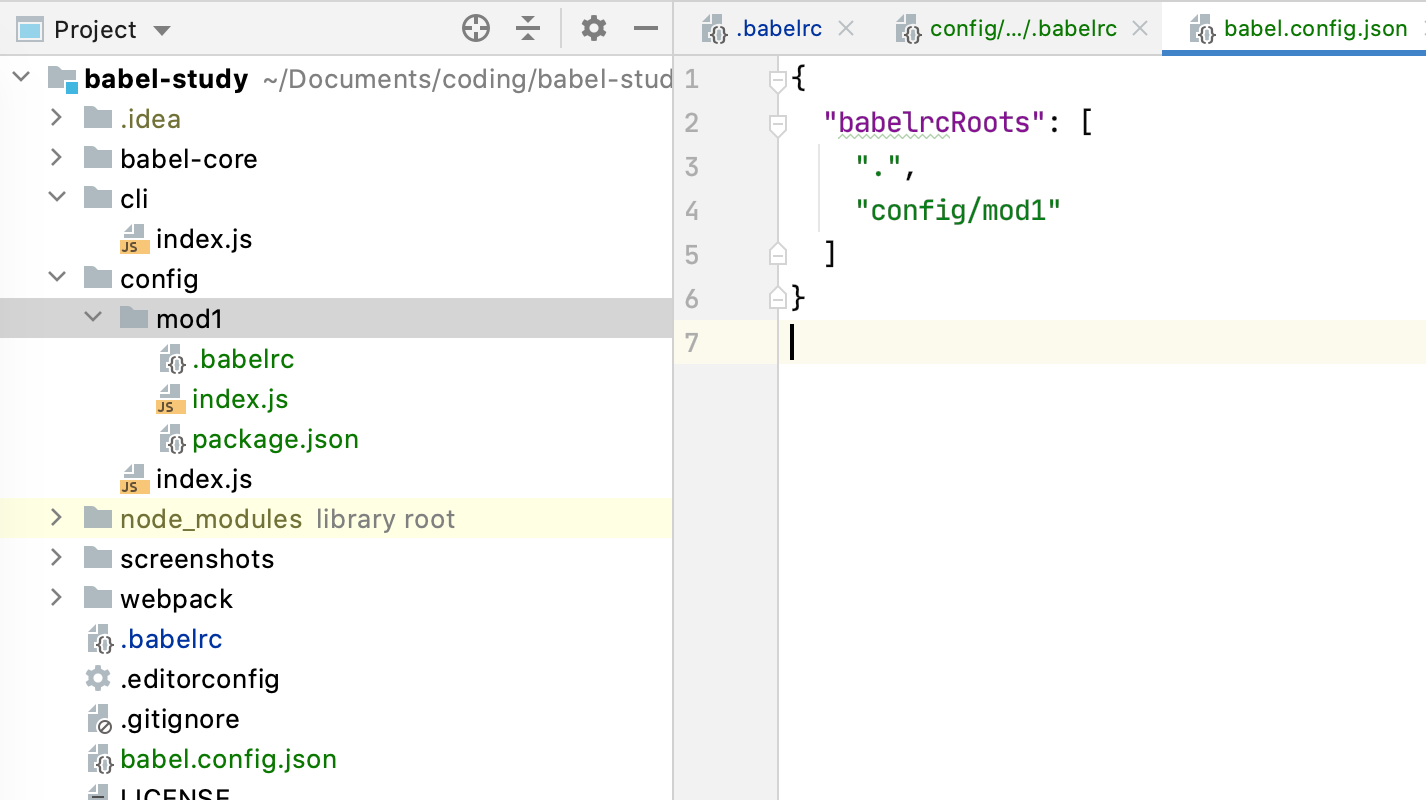
然后再执行npx babel ./config/mod1/index.js -o ./config/mod1/index.t.js就可以正常编译了。
正是基于上述的一些问题,babel在7.0.0之后,引入了babel.config.[json/js/mjs/cjs],基于babel.config.json的配置会灵活得多。
3.2 Project-wide configuration
一般babel.config.json会放置在根目录下,在执行编译时,babel会首先去寻找babel.config.json文件,以此来作为整个项目的根配置。
如果在子目录中不存在.babelrc的配置,那么在编译时,会根据根目录下的配置来进行编译,比如在config/index.js中添加如下代码
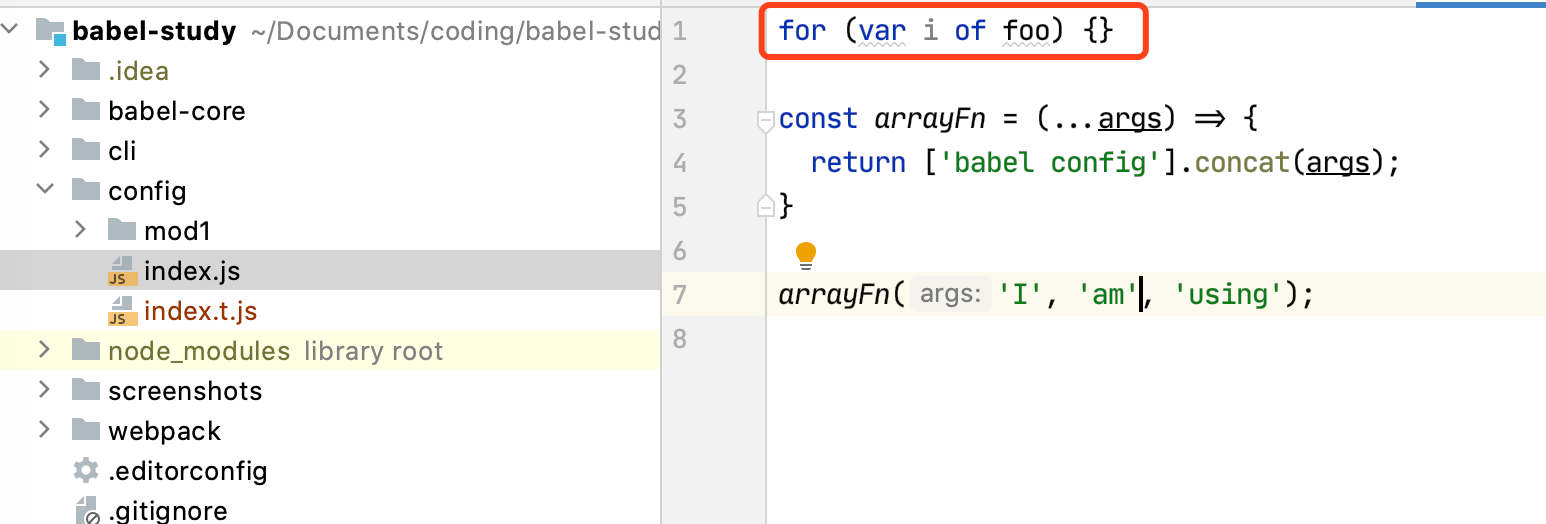
执行npx babel ./config/index -o ./config/index.t.js后会发现for..of这段代码会被原样输出,因为在config目录中并没有针对for..of配置插件。现在在config文件中添加.babelrc,内容如下:
{

  "plugins": [

    "@babel/plugin-transform-for-of"

  ]

}
再次执行完,会发现,for..of会被babel编译
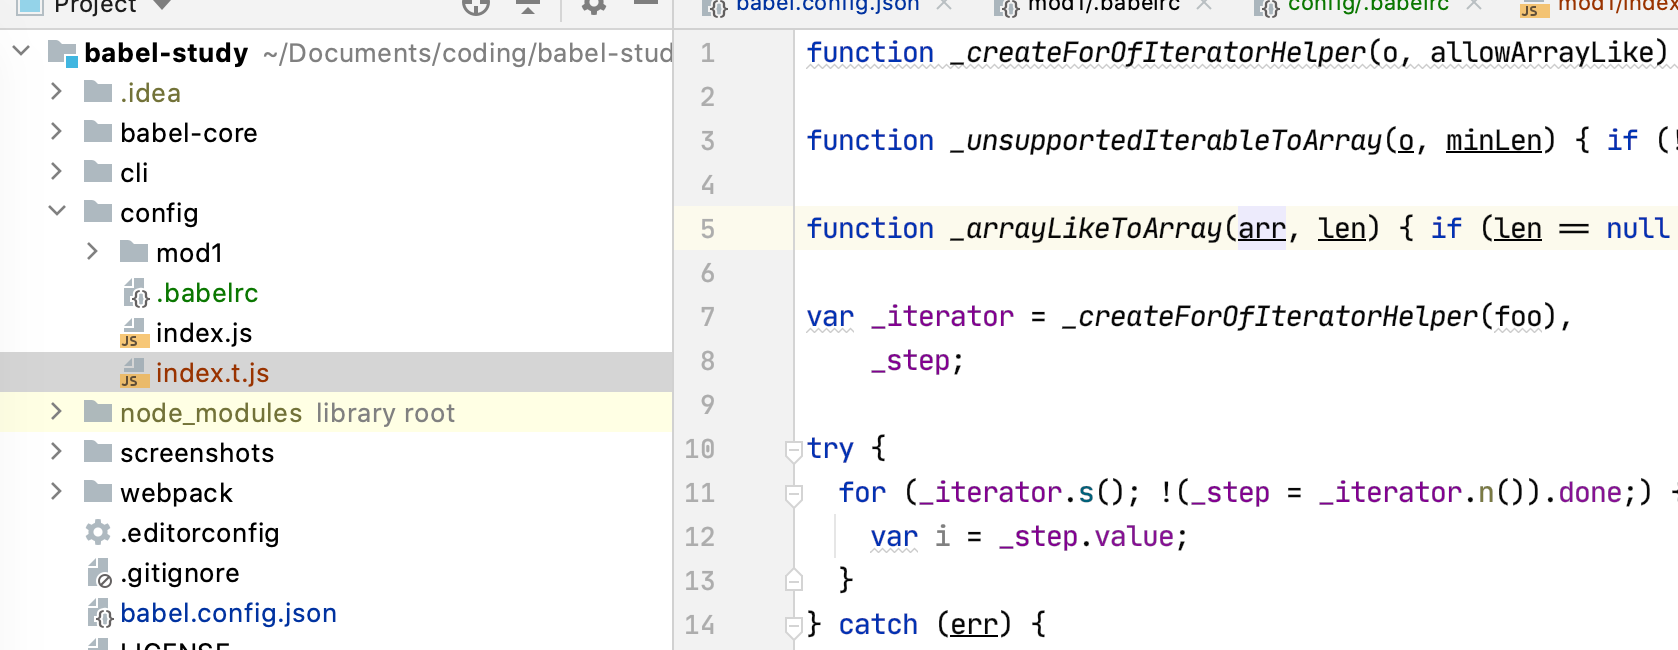
说明,如果子文件夹中存在相应的babel配置,那么编译项会在根配置上进行扩展。
但这点在monorepo项目中会有点例外,之前我在mod1文件家中放置了一个package.json文件:

执行下面命令
npx babel ./config/mod1/index.js -o ./config/mod1/index.t.js
发现for..of部分并没有被babel编译,这个原因和之前在讲bablerc的原因是一样的,因为执行的根目录是src,因此在mod1中并不能去加载.babelrc配置,因此只根据根目录中的配置来执行编译。想要mod1中的配置也被加载,可以按照相同的方法在babel.config.json中配置babelrcRoots。
另外如果子文件家中不存在相应的配置,比如在cli目录下,在src目录下执行config/index.js文件是没有问题的,但是如果进入cli中,然后直接执行,会发现index.js文件不会被编译。由此,你需要告诉babel去找到这个配置,这里可以使用rootMode: upward来使babel向上查找babel.config.json,并以此作为根目录。
cd cli & npx babel ./index.js -o ./index.t.js --root-mode upward
3.3 推荐使用场景
- babel.config.json
- 你正在使用一个
monorepo(可以理解为在一个项目中会有多个子工程) - 你希望编译node_modules以及symobllinked-project中的代码
- 你正在使用一个
- .babelrc
- 你的配置仅适用于项目的单个部分
- 需要在子目录/文件中运行一些特定的转换,比如你可能不希望一些第三方库被转码
- 综合推荐使用babel.config.json,Babel itself is using it
4. plugins & Presets
Babel is a compiler (source code => output code). Like many other compilers it runs in 3 stages: parsing, transforming, and printing.
Now, out of the box Babel doesn't do anything. It basically acts like
const babel = code => code;by parsing the code and then generating the same code back out again. You will need to add plugins for Babel to do anything.
没有plugins,babel将啥事也做不了。
babel提供了丰富的插件来对不同时期的代码进行转换。例如我们在es6最常使用的箭头函数,当需要转化为es5版本时,就用到了arrow-functions这个插件。
具体的插件列表,可以查看plugins。
presets的中文翻译为预设,即为一组插件列表的集合,我们可以不必再当独地一个一个地去添加我们需要的插件。比如我们希望使用es6的所有特性,我们可以使用babel提供的ES2015这个预设。
4.1 基本用法
// 如果plugin已经在发布到npm中

// npm install @babel/plugin-transform-arrow-functions -D

// npm install @babel/preset-react -D

{

  "plugins": ["@babel/plugin-transform-arrow-functions"],

  "presets": ["@babel/preset-react"]

}

// 或者按照babel的规范,引入自己编写的plugin/preset

{

  "plugins": ["path/to/your/plugin"],

  "presets": ["path/to/your/preset"],

}
4.2 选项
任何一个插件都可以拥有自定义的属性来定义这个插件的行为。具体的写法可以为:
{

  "plugins": ["pluginA", ["pluginA"], ["pluginA", {}]],

  "presets": ["presetA", ["presetA"], ["presetA", {}]]

}

// example

{

  "plugins": [

    [

      "@babel/plugin-transform-arrow-functions",

      { "spec": true }

    ]

  ],

  "presets": [

    [

      "@babel/preset-react",

      {

        "pragma": "dom", // default pragma is React.createElement (only in classic runtime)

        "pragmaFrag": "DomFrag", // default is React.Fragment (only in classic runtime)

        "throwIfNamespace": false, // defaults to true

        "runtime": "classic" // defaults to classic

        // "importSource": "custom-jsx-library" // defaults to react (only in automatic runtime)

      }

    ]

  ]

}
4.3 执行顺序
- 插件执行顺序在presets之前
- 插件会按照声明的插件列表顺序顺序执行(first to last)
- preset会按照声明的列表顺序逆序执行(last to first)
4.3.1 plugin的执行顺序测试
下面我们来做几个例子测试一下,首先,官方给出的插件标准写法如下(在此之前,强烈建议阅读babel-handbook来了解接下来插件编码中的一些概念):
// 1. babel使用babylon将接受到的代码进行解析,得到ast树,得到一系列的令牌流,例如Identifier就代表一个字

// 符(串)的令牌

// 2. 然后使用babel-traverse对ast树中的节点进行遍历,对应于插件中的vistor,每遍历一个特定的节点,就会给visitor添加一个标记

// 3. 使用babel-generator对修改过后的ast树重新生成代码

// 下面的这个插件的主要功能是将字符串进行反转

// plugins/babel-plugin-word-reverse.js

module.exports = function() {

  return {

    visitor: {

      Identifier(path) {

        console.log("word-reverse plugin come in!!!");

        const name = path.node.name;

        path.node.name = name

          .split("")

          .reverse()

          .join("");

      },

    },

  };

}

// 然后我们再提供一个插件,这个插件主要是修改函数的返回值

// plugins/babel-plugin-replace-return.js

module.exports = function({ types: t }) {

  return {

    visitor: {

      ReturnStatement(path) {

        console.log("replace-return plugin come in!!!");

        path.replaceWithMultiple([

         t.expressionStatement(t.stringLiteral('Is this the real life?')),

         t.expressionStatement(t.stringLiteral('Is this just fantasy?')),

         t.expressionStatement(t.stringLiteral('(Enjoy singing the rest of the song in your head)')),

       ]);

      },

    },

  };

}
首先我们来测试一下原始代码是否通过我们自定义的插件进行转换了,源代码如下:
// plugins/index.js

const myPluginTest = (javascript) => {

  return 'I love Javascript';

}

// 然后在plugins目录下创建一个.babelrc文件,用于继承默认的babel.config.json文件

// plugins/.babelrc

{

  "plugins": ["./babel-plugin-word-reverse", "./babel-plugin-replace-return"]

}

// usage

npx babel ./plugins/index.js -o ./plugins/index.t.js
以下是执行完之后的结果

从截图可以看出,字符串被反转了,以及返回的字符串也被替换掉了。
然后我们再来看看执行的顺序

可以看到,排在插件列表之前的插件会在提前执行。
4.3.2 preset的执行顺序测试
下面再新建一个插件,用于自定义的preset编写
// presets/babel-plugin-word-replace.js

// 这个插件主要的功能是给每个节点类型为Identifier的名称拼接一个_replace的后缀

module.exports = function() {

  return {

    visitor: {

      Identifier(path) {

        console.log("word-replace plugin come in!!!");

        let name = path.node.name;

        path.node.name = name += '_replace';

      },

    },

  };

}
然后我们借助之前编写的babel-plugin-word-reverse来编写两个新的presets
// presets/my-preset-1.js

module.exports = () => {

  console.log('preset 1 is executed!!!');

  return {

    plugins: ['../plugins/babel-plugin-word-reverse']

  };

};

// presets/my-preset-2.js

module.exports = () => {

  console.log('preset 2 is executed!!!');

  return {

    presets: ["@babel/preset-react"],

    plugins: ['./babel-plugin-word-replace', '@babel/plugin-transform-modules-commonjs'],

  };

};

// 创建.babelrc配置

// presets/.babelrc

{

  "presets": [

    "./my-preset-1",

    "./my-preset-2"

  ]

}

// 测试代码

// presets/index.jsx

import React from 'react';

export default () => {

  const text = 'hello world';

  return <div>{text}</div>;

}

// 执行

npx babel ./presets/index.jsx -o ./presets/index.t.js
可以看到在.babelrc中,将preset-1放在了preset-2的前面,如果按照babel官网给出的解析,那么preset2会被先执行,执行的顺序如下

可以看到控制台打印的顺序是preset1 -> preset2,这点与官网给出的preset执行顺序是相反的???
然后再看编译之后生成的文件,发现竟然又是先执行了preset-2中的插件,然后在执行preset-1中的插件,如图:

可以看到显然是首先经过了添加后缀_replace,然后在进行了整体的reverse。这里是不是意味着,在presets列表中后声明的preset中的插件会先执行呢???
怀着这个问题,去啃了下源代码。发现babel所说的执行顺序,其实是traverse访问插件中vistor的顺序。因为presets其实也是一组插件的集合,经过程序处理之后,会使得presets末尾的plugins会出现在整个plugins列表的前面。
同时可以看图中控制台的打印结果,word-replace始终会在word-reverse之前,并且是成对出现的。
// babel/packages/babel-core/src/transform.js [line 21]

const transformRunner = gensync<[string, ?InputOptions], FileResult | null>(

  function* transform(code, opts) {

    const config: ResolvedConfig | null = yield* loadConfig(opts);

    if (config === null) return null;

    return yield* run(config, code);

  },

);
loadConfig(opts)会被传递进来的plugins以及presets进行处理,进去看看发生了什么?
// babel/packages/babel-core/src/config/full.js [line 59]

export default gensync<[any], ResolvedConfig | null>(function* loadFullConfig(

  inputOpts: mixed,

): Handler<ResolvedConfig | null> {

  const result = yield* loadPrivatePartialConfig(inputOpts);

	// ...

	const ignored = yield* (function* recurseDescriptors(config, pass) {

    const plugins: Array<Plugin> = [];

    for (let i = 0; i < config.plugins.length; i++) {

      const descriptor = config.plugins[i];

      if (descriptor.options !== false) {

        try {

          plugins.push(yield* loadPluginDescriptor(descriptor, context));

        } catch (e) {

          // ...

        }

      }

    }

    const presets: Array<{|

      preset: ConfigChain | null,

      pass: Array<Plugin>,

    |}> = [];

    for (let i = 0; i < config.presets.length; i++) {

      const descriptor = config.presets[i];

      if (descriptor.options !== false) {

        try {

          presets.push({

            preset: yield* loadPresetDescriptor(descriptor, context),

            pass: descriptor.ownPass ? [] : pass,

          });

        } catch (e) {

          // ...

        }

      }

    }

    // resolve presets

    if (presets.length > 0) {

      // ...

      for (const { preset, pass } of presets) {

        if (!preset) return true;

        const ignored = yield* recurseDescriptors(

          {

            plugins: preset.plugins,

            presets: preset.presets,

          },

          pass,

        );

        // ...

      }

    }

    // resolve plugins

    if (plugins.length > 0) {

      pass.unshift(...plugins);

    }

  })(//...)

}
loadPrivatePartialConfig中会依次执行我们定义的plugins以及presets,这也是为什么在上面的例子中preset1会打印在preset2。
// babel/packages/babel-core/src/config/config-chain.js [line 629]

function mergeChainOpts(

  target: ConfigChain,

  { options, plugins, presets }: OptionsAndDescriptors,

): ConfigChain {

  target.options.push(options);

  target.plugins.push(...plugins());

  target.presets.push(...presets());

  return target;

}
recurseDescriptors这里是一个递归函数,是用来在passes中存放解析过后的plugins以及presets的,passes通过unshift的方式解析每次循环之后的插件,因此presets的循环越靠后,在passes中的plugins反而会越靠前,这也是为什么presets列表中的执行顺序是逆序的原因。
// babel/packages/babel-core/src/config/full.js [line 195]

opts.plugins = passes[0];

opts.presets = passes

  .slice(1)

  .filter(plugins => plugins.length > 0)

  .map(plugins => ({ plugins }));

opts.passPerPreset = opts.presets.length > 0;

return {

  options: opts,

  passes: passes,

};
设置解析后的plugins,然后返回新的config。
5. polyfill
Babel 7.4.0之后,
@babel/polyfill这个包已经废弃了,推荐直接是用core-js/stable以及regenerator-runtime/runtimeimport "core-js/stable";
import "regenerator-runtime/runtime";
polyfill的直接翻译为垫片,是为了添加一些比较老的浏览器或者环境中不支持的新特性。比如Promise/ WeakMap,又或者一些函数Array.form/Object.assign,以及一些实例方法Array.prototype.includes等等。
注意:这些新的特性会直接加载全局的环境上,在使用时请注意是否会污染当前的全局作用域
5.1 基本使用
npm install --save @babel/polyfill

// commonJs

require('@babel/polyfill')

// es6

import('@babel/polyfill')
当在webpack中使用时,官方推荐和@babel/preset-env一起使用,因为这个preset会根据当前配置的浏览器环境自动加载相应的polyfill,而不是全部进行加载,从而达到减小打包体积的目的
// .bablerc

{

  "presets": [

    [

      "@babel/preset-env", {

        "useBuiltIns": "usage", // 'entry/false'

        "corejs": 3

      }

    ]

  ]

}
useBuiltIns有三个选项
usage 当使用此选项时,只需要安装
@babel-polyfill即可,不需要在webpack中引入,也不需要在入口文件中引入(require/import)entry 当使用此选项时,安装完
@babel-polyfill之后,然后在项目的入口文件中引入false 当使用此选项时,需要安装依赖包,然后加入webpack.config.js的entry中
module.exports = {

  entry: ["@babel/polyfill", "./app/js"],

};
在浏览器中使用,可以直接引入@bable/polyfill中的dist/polyfill.js
<script src='dist/polyfill.js'></script>
5.2 示例
通过配合使用@babel/preset-env之后,我们可以来看看编译之后生成了什么?
// polyfill/.babelrc

{

  "presets": [

    [

      "@babel/preset-env", {

        "useBuiltIns": "usage", 	// 其他两个选项 'entry/false'

        "corejs": 3 							// 如果需要使用includes,需要安装corejs@3版本

      }

    ]

  ]

}

// polyfill/index.js

const sym = Symbol();

const promise = Promise.resolve();

const arr = ["arr", "yeah!"];

const check = arr.includes("yeah!");

console.log(arr[Symbol.iterator]());
编译之后的结果如下

可以看到,浏览器中缺失的方法、对象都是直接引入的。当你只需要在特定的浏览器中做兼容时,可以显式地声明,使用方式可以参照browserslist-compatible。
{

  "targets": "> 0.25%, not dead",

  // 或者指明特定版本

  "targets": {

    "chrome": "58",

    "ie": "11"

  }

}
6. transform-runtime
A plugin that enables the re-use of Babel's injected helper code to save on codesize.
@babel/plugin-transform-runtime的主要有三个用处
- 自动引入
@babel/runtime/regenerator,当你使用了generator/async函数(通过regenerator选项打开,默认为true) - 提取一些babel中的工具函数来达到减小打包体积的作用
- 如果开启了
corejs选项(默认为false),会自动建立一个沙箱环境,避免和全局引入的polyfill产生冲突。
这里说一下第三点,当开发自己的类库时,建议开启corejs选项,因为你使用的polyfill可能会和用户期待的产生冲突。一个简单的比喻,你开发的类库是希望兼容ie11的,但是用户的系统是主要基于chorme的,根本就不要去兼容ie11的一些功能,如果交给用户去polyfill,那就的要求用户也必须要兼容ie11,这样就会引入额外的代码来支持程序的运行,这往往是用户不想看到的。
6.1 基本使用
// dev dependence

npm install --save-dev @babel/plugin-transform-runtime

// production dependence

// 因为我们需要在生产环境中使用一些runtime的helpers

npm install --save @babel/runtime

// .babelrc

// 默认配置

{

  "plugins": [

    [

      "@babel/plugin-transform-runtime",

      {

        "absoluteRuntime": false,

        "corejs": false,

        "helpers": true,

        "regenerator": true,

        "useESModules": false,

        "version": "7.0.0-beta.0"

      }

    ]

  ]

}
6.2 示例
说了这么多,下面来看一个示例
// transform-runtime/.babelrc

{

  "presets": ["@babel/preset-env"],

  "plugins": [

    [

      "@babel/plugin-transform-runtime",

      {

        "helpers": false

      }

    ]

  ]

}

// transform-runtime/index.js

const sym = Symbol();

const promise = Promise.resolve();

const arr = ["arr", "yeah!"];

const check = arr.includes("yeah!");

class Person {}

new Person();

console.log(arr[Symbol.iterator]());
这里暂时关闭了helpers,我们来看看编译之后会是什么结果

可以看到,编译之后,将Person class生成了一个函数_classCallCheck,你可能觉得一个生成这样的函数也没什么特别大的关系,但是如果在多个文件中都声明了class,那就意味着,将会在多个文件中生成一个这么一模一样的工具函数,那么体积就会变大了。因此,开启了helpers之后,效果又是怎样的呢?
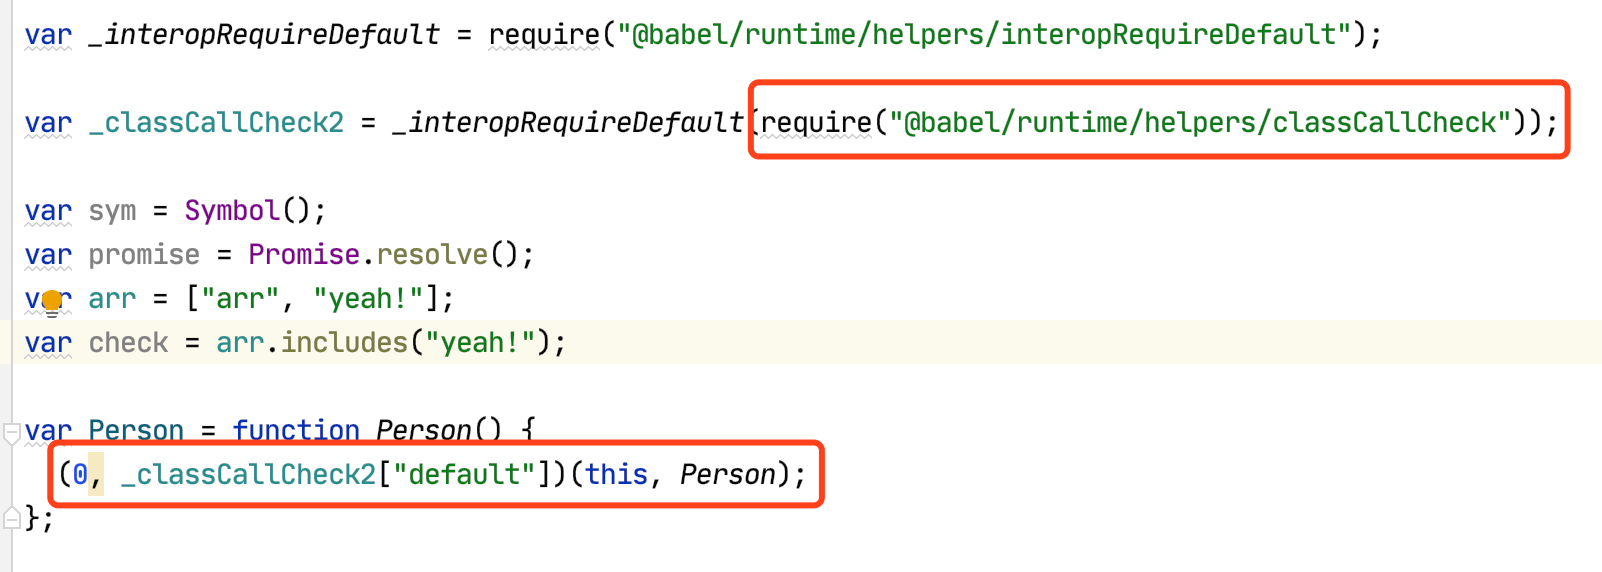
可以看到,需要生成的方法变成了引入的方式,注意引入的库是@babel-runtime
下面来试试开启了corejs选项之后生成的文件是啥样的?
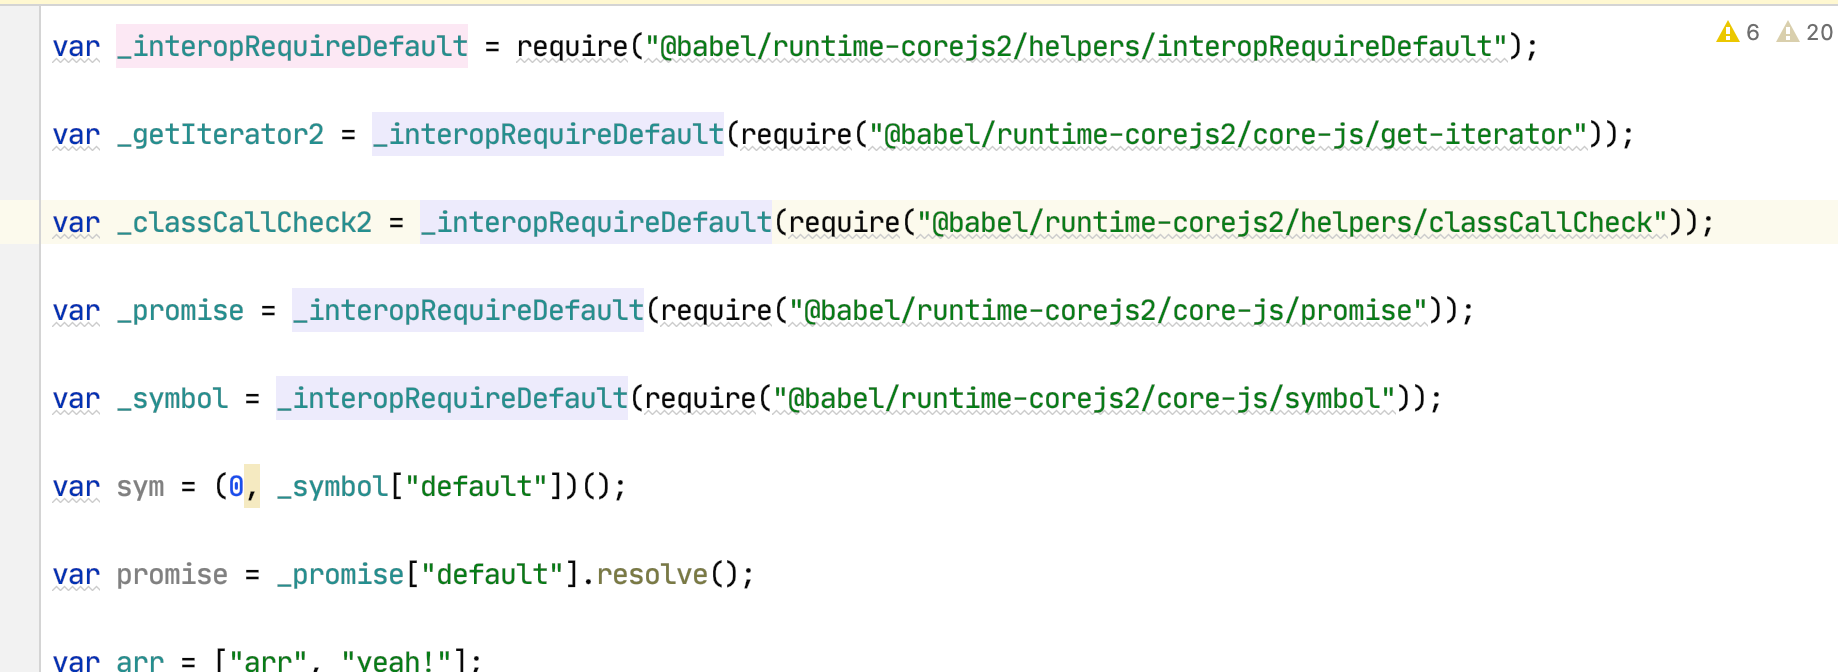
可以看到所有的工具方式都来自于@babel/runtime-corejs2,因为是独立于polyfill生成的,所以不会污染全局环境。
总结
- 推荐使用babel.config.js来作为整个项目的babel配置,.babelrc更加适用于
monorepo项目 - babel的编译基本都是依赖于plugin,preset是一组plugin的集合
- polyfill为一些较老的浏览器提供一些新特性的支持
- transform-runtime可以提取一些帮助函数来减小打包的体积,在开发自己的类库是,建议开启corejs选项
参考链接
你必须要知道的babel二三事的更多相关文章
- [Java面经] 关于面试的二三事.
今天终于闲下来了, 那么也好总结下这几天面试的经历.四天的时间一共面了七家, 有一家是自己推迟了没有去.声明:如若转载请注明出处:http://www.cnblogs.com/wang-meng/p/ ...
- 对于JavaScript的函数.NET开发人员应该知道的11件事
(此文章同时发表在本人微信公众号"dotNET每日精华文章",欢迎右边二维码来关注.) 昨天小感冒今天重感冒,也不能长篇大论.如果你是.NET开发人员,在进入前端开发领域的时候,对 ...
- react.js 你应知道的9件事
React.js 初学者应该知道的 9 件事 本文假定你已经有了一下基本的概念.如果你不熟悉 component.props 或者 state 这些名词,你最好先去阅读下官方起步和手册.下面的代码 ...
- 你要知道的C与C++的区别
原文:你要知道的C与C++的区别 如果要说C和C++的区别的话,可能可以列出很多方面出来,但是有许多方面的区别是我们学完这两门语言之后就可以 很好的理解和区分的,比如C是面向过程的一门编程语言,C++ ...
- 那些必须要知道的Javascript
原文:那些必须要知道的Javascript JavaScript是前端必备,而这其中的精髓也太多太多,最近在温习的时候发现有些东西比较容易忽略,这里记录一下,一方面是希望自己在平时应用的时候能够得心应 ...
- 面试必须要知道的SQL语法,语句
面试必须要知道的SQL语法,语句 收藏 asc 按升序排列desc 按降序排列下列语句部分是Mssql语句,不可以在access中使用.SQL分类: DDL—数据定义语言(Create,Alter,D ...
- 一定要知道的,那些Linux操作命令
一定要知道的,那些Linux基本操作命令(一) 目录 1.文件和目录操作命令 2.用户和用户组操作命令 3.vim编辑器操作命令 4.打包和解压操作命令 5.系统操作命令 为什么要学习linux? 1 ...
- Android 程序员必须知道的 53 个知识点
1. android 单实例运行方法 我们都知道 Android 平台没有任务管理器,而内部 App 维护者一个 Activity history stack 来实现窗口显示和销毁,对于常规从快捷方式 ...
- PDB文件:每个开发人员都必须知道的 PDB Files
PDB文件:每个开发人员都必须知道的 PDB Files: What Every Developer Must Knowhttp://www.wintellect.com/CS/blogs/jro ...
随机推荐
- JavaScript Babel说明
babel插件只是去唤醒 @babel/core中的转换过程 转换模块需要手动安装 npm install @babel/core 转换方式需要安装 @babel/preset-env babel默认 ...
- 01 Arduino-点亮一盏LED灯
01 硬件连接 图片比较丑 特别说明:一般默认为二极管灯的压降是 2V 均值电流为15ma,所以如果接在5V的电源上面,串联接的电阻值为200欧姆左右,可做适当调整 切记不允许把LED灯直接并联在5 ...
- JavaScript基础-06-正则表达式
正则表达式 1. 正则表达式用于定义一些字符串的规则:计算机可以根据正则表达式,来检查一个字符串是否符合规则,将字符串中符合规则的内容提取出来. 2. 创建正则表达式对象: var reg=new R ...
- 【HDU3038】How Many Answers Are Wrong - 带权并查集
描述 TT and FF are ... friends. Uh... very very good friends -________-b FF is a bad boy, he is always ...
- Vue管理系统前端系列一vue-cli4.x 初始化项目
目录 项目介绍 技术基础 开发环境 安装工具 快速原型开发 创建项目 配置相关说明 目录结构 项目介绍 lion-ui 是一个基于 RBAC 的管理系统前端项目,采用 vue 和 element-ui ...
- 正则表达式截取xml
$str = '<Ips><GateWayRsp><head><ReferenceID>123</ReferenceID><RspCo ...
- CentOS下删除物理磁盘,删除LVM
1.删除 dmsetup remove LV_name 2.vgreduce VG_name --removemissing 3.vgremove VG_name 4.pvremove disk
- Python脚本实现在cmd执行相关命令
通过Python脚本实现,在cmd命令执行文件的cp(复制).rm(删除).rename(重命名).move(文件移动).mkdir(创建目录) cmd执行命令格式:python xxx.py 用户名 ...
- 6. 二十不惑,ObjectMapper使用也不再迷惑
一滴水,用显微镜看,也是一个大世界.本文已被 https://www.yourbatman.cn 收录,里面一并有Spring技术栈.MyBatis.JVM.中间件等小而美的专栏供以免费学习.关注公众 ...
- promise的常用情况
因为js是单线程的,所以一旦代码中有报错,就不会执行下面的了,如下333就未打印 console.log(111)throw Error(222)console.log(333) 好像与promise ...
