GPU 加速NLP任务(Theano+CUDA)
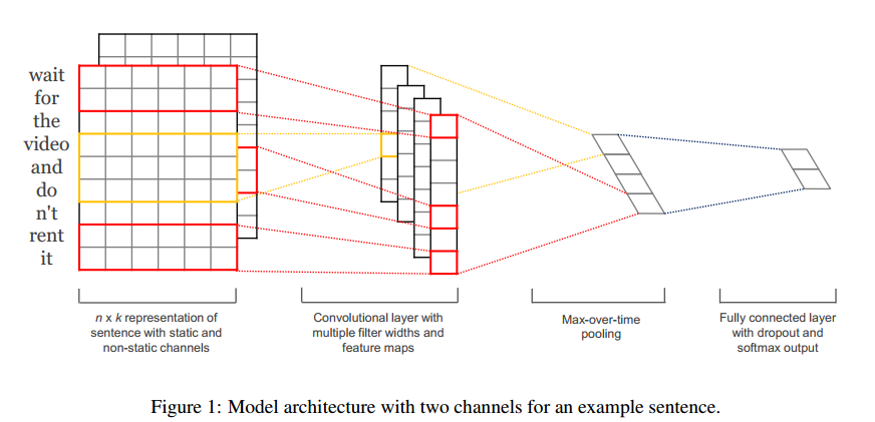
之前学习了CNN的相关知识,提到Yoon Kim(2014)的论文,利用CNN进行文本分类,虽然该CNN网络结构简单效果可观,但论文没有给出具体训练时间,这便值得进一步探讨。

Yoon Kim代码:https://github.com/yoonkim/CNN_sentence
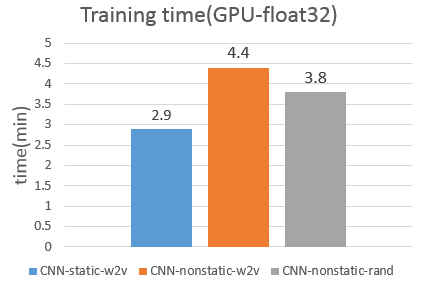
利用作者提供的源码进行学习,在本人机子上训练时,做一次CV的平均训练时间如下,纵坐标为min/CV(供参考):
机子配置:Intel(R) Core(TM) i3-4150 CPU @ 3.50GHz, 32G,x64

显然,训练非常慢慢慢!!!在CPU上训练,做10次CV,得10多个小时啊,朋友发邮件和Yoon Kim求证过,他说确实很慢慢慢,难怪论文中没有出现训练时间数据~.~
考虑改进的话,要么就是多线程作并行,卷积层可做并行,但代码不容易写啊:(,所以我考虑GPU加速。
流程:1、安装NVIDIA驱动;2、安装配置CUDA;3、修改程序用GPU跑;
1、安装NVIDA驱动
(0)看看你有没有符合的显卡:lspci | grep -i nvidia,参考教程
(1)下载对应显卡的nVidia驱动:http://www.nvidia.com/Download/index.aspx?lang=en-us
本人机子GPU:GeForce GTX 660 Ti,对应下载的驱动为NVIDIA-Linux-x86_64-352.63.run
(2)添加可执行权限: sudo chmod +x NVIDIA-Linux-x86_64-352.63.run
(3)关闭X-window:sudo service lightdm stop,然后切换到tty1:Ctrl+Alt+F1
(4)安装驱动:sudo ./NVIDIA-Linux-x86_64-352.63.run。按照其中提示进行安装,可能要设置compat32-libdir
(5)重启X-window:sudo service lightdm start.
(6)验证驱动安装是否成功:cat /proc/driver/nvidia/version
2、安装配置CUDA
(1)安装教程:http://docs.nvidia.com/cuda/cuda-getting-started-guide-for-linux/index.html#ubuntu-installation
(2)下载cuda-toolkit:https://developer.nvidia.com/cuda-downloads。选择和你配置符合的cuda下载:cuda-repo-ubuntu1404-7-5-local_7.5-18_amd64.deb
(3)注意不同系统的安装命令不同,下面是ubuntu14.04安装命令。有什么问题看上面的教程可以搞定。
sudo dpkg -i cuda-repo-ubuntu1404---local_7.-18_amd64.deb

sudo apt-get update

sudo apt-get install cuda
(4)验证toolkit是否成功:nvcc -V
(5)配置路径:vim .bashrc
PATH=$PATH:/usr/local/cuda-7.0/bin

LD_LIBRARY_PATH=$LD_LIBRARY_PATH:/usr/local/cuda7./lib64

export PATH

export LD_LIBRARY_PATH
3、修改程序用GPU跑
根据theano官方文档:http://deeplearning.net/software/theano/tutorial/using_gpu.html
可以先用下列代码测试CUDA配置是否正确,能否正常使用GPU。
from theano import function, config, shared, sandbox

import theano.tensor as T

import numpy

import time

vlen = 10 * 30 * 768  # 10 x #cores x # threads per core

iters = 1000

rng = numpy.random.RandomState(22)

x = shared(numpy.asarray(rng.rand(vlen), config.floatX))

f = function([], T.exp(x))

print(f.maker.fgraph.toposort())

t0 = time.time()

for i in xrange(iters):

    r = f()

t1 = time.time()

print("Looping %d times took %f seconds" % (iters, t1 - t0))

print("Result is %s" % (r,))

if numpy.any([isinstance(x.op, T.Elemwise) for x in f.maker.fgraph.toposort()]):

    print('Used the cpu')

else:

    print('Used the gpu')
将上述代码保存为check_GPU.py,使用以下命令进行测试,根据测试结果可知gpu能否正常使用,若出错有可能是上面路径配置问题。
$ THEANO_FLAGS=mode=FAST_RUN,device=cpu,floatX=float32 python check1.py

[Elemwise{exp,no_inplace}(<TensorType(float32, vector)>)]

Looping  times took 3.06635117531 seconds

Result is [ 1.23178029  1.61879337  1.52278066 ...,  2.20771813  2.29967761

  1.62323284]

Used the cpu

$ THEANO_FLAGS=mode=FAST_RUN,device=gpu,floatX=float32 python check1.py

Using gpu device : GeForce GTX

[GpuElemwise{exp,no_inplace}(<CudaNdarrayType(float32, vector)>), HostFromGpu(GpuElemwise{exp,no_inplace}.)]

Looping  times took 0.638810873032 seconds

Result is [ 1.23178029  1.61879349  1.52278066 ...,  2.20771813  2.29967761

  1.62323296]

Used the gpu
由于目前Nvidia GPU主要是针对float32位浮点数计算进行优化加速,所以需要将代码中的数据及变量类型置成float32。
具体对代码做如下更改:
(1)process_data.py
line 55, W = np.zeros(shape=(vocab_size+1, k), dtype='float32')

line 56, W[0] = np.zeros(k, dtype='float32')
修改后运行命令,获得每个word对应的词向量(float32)。
python process_data.py GoogleNews-vectors-negative300.bin
(2)conv_net_sentence.py
添加allow_input_downcast=True,程序中间运算过程若产生float64,会cast到float32。
lin 82, set_zero = theano.function([zero_vec_tensor], updates=[(Words, T.set_subtensor(Words[0,:], zero_vec_tensor))], allow_input_downcast=True)

lin131, val_model = theano.function([index], classifier.errors(y),

      givens={

          x: val_set_x[index * batch_size: (index + 1) * batch_size],

          y: val_set_y[index * batch_size: (index + 1) * batch_size]}, allow_input_downcast=True)

lin 137, test_model = theano.function([index], classifier.errors(y),

      givens={

          x: train_set_x[index * batch_size: (index + 1) * batch_size],

          y: train_set_y[index * batch_size: (index + 1) * batch_size]}, allow_input_downcast=True)

lin 141, train_model = theano.function([index], cost, updates=grad_updates,

      givens={

          x: train_set_x[indexbatch_size:(index+1)batch_size],

          y: train_set_y[indexbatch_size:(index+1)batch_size]}, allow_input_downcast=True)

lin 155, test_model_all = theano.function([x,y], test_error, allow_input_downcast=True)
(3)运行程序
THEANO_FLAGS=mode=FAST_RUN,device=gpu0,floatX=float32,warn_float64=raise python conv_net_sentence.py -static -word2vec
THEANO_FLAGS=mode=FAST_RUN,device=gpu0,floatX=float32,warn_float64=raise python conv_net_sentence.py -nonstatic -word2vec
THEANO_FLAGS=mode=FAST_RUN,device=gpu0,floatX=float32,warn_float64=raise python conv_net_sentence.py -nonstatic -rand
(4)结果惊人,训练时间提升了20x。

第一次跑gpu,以上过程,若有疏忽,还请多多指导。
Reference:
1、有关theano配置:http://deeplearning.net/software/theano/library/config.html
2、Ubuntu安装Theano+CUDA:http://www.linuxidc.com/Linux/2014-10/107503.htm
GPU 加速NLP任务(Theano+CUDA)的更多相关文章
- Theano在windows下的安装及GPU加速
安装环境:wondows 64bit Teano安装测试 1. Anaconda 安装 Anaconda是一个科学计算环境,自带的包管理器conda很强大.之所以选择它是因为它内置了python,以及 ...
- windows10系统下安装keras框架以theano为后端并配置gpu加速
在安装之前,请确保你的显卡是NVIDIA的,并且是以下型号,否则不能进行gpu加速,右键我的电脑--管理--设备管理器--显示适配器.另外如果你的电脑是windows7,安装教程也是一样的,不过根据k ...
- ubuntu 15 安装cuda,开启GPU加速
1 首先要开启GPU加速就要安装cuda.安装cuda,首先要安装英伟达的驱动.ubuntu有自带的开源驱动,首先要禁用nouveau.这儿要注意,虚拟机不能安装ubuntu驱动.VMWare下显卡只 ...
- 56 Marvin: 一个支持GPU加速、且不依赖其他库(除cuda和cudnn)的轻量化多维深度学习(deep learning)框架介绍
0 引言 Marvin是普林斯顿视觉实验室(PrincetonVision)于2015年提出的轻量化GPU加速的多维深度学习网络框架.该框架采用纯c/c++编写,除了cuda和cudnn以外,不依赖其 ...
- 手把手教你搭建深度学习平台——避坑安装theano+CUDA
python有多混乱我就不多说了.这个混论不仅是指整个python市场混乱,更混乱的还有python的各种附加依赖包.为了一劳永逸解决python的各种依赖包对深度学习造成的影响,本文中采用pytho ...
- 深度学习“引擎”之争:GPU加速还是专属神经网络芯片?
深度学习“引擎”之争:GPU加速还是专属神经网络芯片? 深度学习(Deep Learning)在这两年风靡全球,大数据和高性能计算平台的推动作用功不可没,可谓深度学习的“燃料”和“引擎”,GPU则是引 ...
- windows 10 64bit下安装Tensorflow+Keras+VS2015+CUDA8.0 GPU加速
原文地址:http://www.jianshu.com/p/c245d46d43f0 写在前面的话 2016年11月29日,Google Brain 工程师团队宣布在 TensorFlow 0.12 ...
- ubuntu安装Theano+cuda
由于学习需要用到GPU加速机器学习算法,需要安装theano+cuda. 开源库的一大问题就是:难安装. 为了搞好这个配置,我是前前后后花了3天,重装了3次ubuntu重装了5次驱动才搞定. 故发此贴 ...
- tensor搭建--windows 10 64bit下安装Tensorflow+Keras+VS2015+CUDA8.0 GPU加速
windows 10 64bit下安装Tensorflow+Keras+VS2015+CUDA8.0 GPU加速 原文见于:http://www.jianshu.com/p/c245d46d43f0 ...
随机推荐
- LeetCode 177 Nth-Highest Salary mysql,取第n条数据,limit子句 难度:1
https://leetcode.com/problems/nth-highest-salary/ ATTENTION:limit 子句只能接受int常量,不能接受运算式 CREATE FUNCTIO ...
- 简单研究Loader笔记
2015-11-11 18:25:34 1. Loader是什么? /** * Static library support version of the framework's {@link and ...
- gif显示
public void gifplay(string path,ref Panel panel) { try{ Bitmap animatedGif = new Bitmap(path ); Grap ...
- 关于粒子发射(CAEmitterLayer)
技术是条长而远的路,只有不断学习丰富自己的技能才能让自己行走在路上! CAEmitterCell CAEmitterCell: CAEmitterCell是粒子发射系统里的粒子,用CAEmitterC ...
- linux命令每日一练习 创建新文件 列出文件的时候带着行号
touch ××× nl ****
- 不是SELECTed表达式
sql语句如下: select distinct(p.project_name) name,p.pkid pkid, p.report_year year, q.cor_name cor_name,g ...
- linux输出 /dev/null
在学习Linux的过程中,常会看到一些终端命令或者程序中有">/dev/null 2>&1 "出现,由于已经遇到了好几次了,为了理解清楚,不妨花点时间百度或者g ...
- 八皇后java算法
import java.util.Date; public class EightQueen { public static void main(String[] args) { long star ...
- 利用certutil.exe实现在批处理(bat)中嵌入可执行文件或者各种媒体、图片之类二进制文件的简单方法!
实际上利用certutil.exe 把二进制文件(包括各种文件,exe可执行程序,图片,声音,mp3) 经过base64编码为文本,可以实现把这些文件嵌入到批处理代码中. 有什么用?: 举个例子,批处 ...
- 小型资源管理器,IO操作,读取和写入文件和目录的常用操作
解决方案: 小总结: 用IO流,的file,DirectoryInfo的方法绑定Treeview控件上和删除,读取, 可以熟练掌握一下IO流 主页面: private void Form1_Load( ...
