2013 duilib入门简明教程 -- 简单控件介绍 (12)
class CDuiFrameWnd : public WindowImplBase

{

public:

    virtual LPCTSTR    GetWindowClassName() const   {   return _T("DUIMainFrame");  }

    virtual CDuiString GetSkinFile()                {   return _T("duilib.xml");    }

    virtual CDuiString GetSkinFolder()              {   return _T("");  }

};

int APIENTRY _tWinMain(HINSTANCE hInstance, HINSTANCE hPrevInstance, LPTSTR lpCmdLine, int nCmdShow)

{

    CPaintManagerUI::SetInstance(hInstance);

    CDuiFrameWnd duiFrame;

    duiFrame.Create(NULL, _T("DUIWnd"), UI_WNDSTYLE_FRAME, WS_EX_WINDOWEDGE);

    duiFrame.CenterWindow();

    duiFrame.ShowModal();

    return ;

}
XML代码如下(由于前面的教程里都一一介绍了各种属性,所以以后的XML就不一一注释了):
<?xml version="1.0" encoding="UTF-8"?>

<Window size="800,600" mininfo="600,400" caption="0,0,0,32" sizebox="4,4,4,4">

  <VerticalLayout bkcolor="#FFF0F0F0" bkcolor2="#FFAAAAA0">

    <!-- 标题栏区 -->

    <HorizontalLayout height="32" bkcolor="#FFE6E6DC" bkcolor2="#FFAAAAA0">

      <VerticalLayout />

      <VerticalLayout width="77">

          <Button name="minbtn"   tooltip="最小化" float="true" pos="0,5,22,24"  width="23" normalimage=" file='SysBtn\MinNormal.bmp' " hotimage=" file='SysBtn\MinFocus.bmp' " pushedimage=" file='SysBtn\MinFocus.bmp' "/>

          <Button name="maxbtn"   tooltip="最大化" float="true" pos="22,5,44,24" width="23" normalimage=" file='SysBtn\MaxNormal.bmp' " hotimage=" file='SysBtn\MaxFocus.bmp' " pushedimage=" file='SysBtn\MaxFocus.bmp' " />

          <Button name="restorebtn" visible="false" tooltip="还原" float="true" pos="22,5,44,24" width="23" normalimage=" file='SysBtn\StoreNormal.bmp' " hotimage=" file='SysBtn\StoreFocus.bmp' " pushedimage=" file='SysBtn\StoreFocus.bmp' " />

          <Button name="closebtn" tooltip="关闭"   float="true" pos="44,5,74,24" width="28" normalimage=" file='SysBtn\CloseNormal.bmp' " hotimage=" file='SysBtn\CloseFocus.bmp' " pushedimage=" file='SysBtn\CloseFocus.bmp' "/>

        </VerticalLayout>

    </HorizontalLayout>

  </VerticalLayout>

</Window>
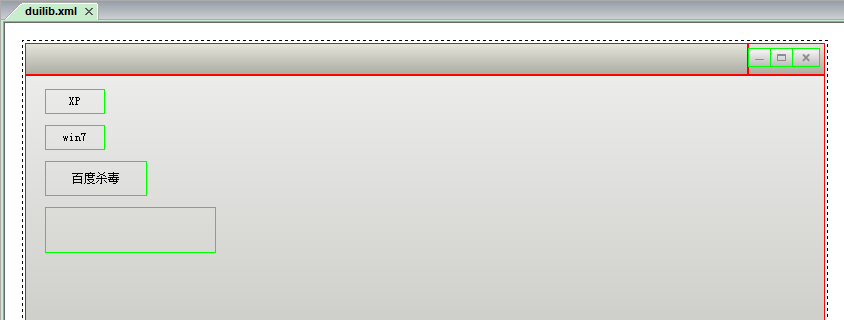
前面教程的Hello World就是一个大大的按钮,大家对按钮应该很熟悉了,下面我们来几个按钮样式吧:


<?xml version="1.0" encoding="UTF-8"?>

<Window size="800,600" mininfo="600,400" caption="0,0,0,32" sizebox="4,4,4,4">

    <VerticalLayout bkcolor="#FFF0F0F0" bkcolor2="#FFAAAAA0">

        <!-- 标题栏区 -->

        <HorizontalLayout height="32" bkcolor="#FFE6E6DC" bkcolor2="#FFAAAAA0">

            <VerticalLayout />

            <VerticalLayout width="77">

                <Button name="minbtn"   tooltip="最小化" float="true" pos="0,5,22,24"  width="23" normalimage=" file='SysBtn\MinNormal.bmp' " hotimage=" file='SysBtn\MinFocus.bmp' " pushedimage=" file='SysBtn\MinFocus.bmp' "/>

                <Button name="maxbtn"   tooltip="最大化" float="true" pos="22,5,44,24" width="23" normalimage=" file='SysBtn\MaxNormal.bmp' " hotimage=" file='SysBtn\MaxFocus.bmp' " pushedimage=" file='SysBtn\MaxFocus.bmp' " />

                <Button name="restorebtn" visible="false" tooltip="还原" float="true" pos="22,5,44,24" width="23" normalimage=" file='SysBtn\StoreNormal.bmp' " hotimage=" file='SysBtn\StoreFocus.bmp' " pushedimage=" file='SysBtn\StoreFocus.bmp' " />

                <Button name="closebtn" tooltip="关闭"   float="true" pos="44,5,74,24" width="28" normalimage=" file='SysBtn\CloseNormal.bmp' " hotimage=" file='SysBtn\CloseFocus.bmp' " pushedimage=" file='SysBtn\CloseFocus.bmp' "/>

            </VerticalLayout>

        </HorizontalLayout>

        <!-- 客户区 -->

        <HorizontalLayout>

            <Button text="XP"       float="true" pos="20,14,0,0" width="60" height="25" normalimage=" file='BtnStyle\XP\button_nor.png' " hotimage=" file='BtnStyle\XP\button_over.png' " pushedimage=" file='BtnStyle\XP\button_down.png' " focusedimage=" file='BtnStyle\XP\button_focus.png' " />

            <Button text="win7"     float="true" pos="20,50,0,0" width="60" height="25" normalimage=" file='BtnStyle\win7\button_nor.png' " hotimage=" file='BtnStyle\win7\button_over.png' " pushedimage=" file='BtnStyle\win7\button_down.png' " focusedimage=" file='BtnStyle\win7\button_focus.png' " />

            <Button text="百度杀毒" float="true" pos="20,86,0,0" width="102" height="35" normalimage=" file='BtnStyle\BDKV\button_nor.png' " hotimage=" file='BtnStyle\BDKV\button_over.png' " pushedimage=" file='BtnStyle\BDKV\button_down.png' " />

            <Button                 float="true" pos="20,132,0,0" width="171" height="46" normalimage=" file='BtnStyle\BDKV2\button_nor.png' " hotimage=" file='BtnStyle\BDKV2\button_over.png' " pushedimage=" file='BtnStyle\BDKV2\button_down.png' " />

        </HorizontalLayout>

    </VerticalLayout>

</Window>
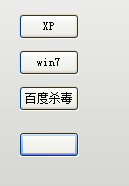
效果如下:
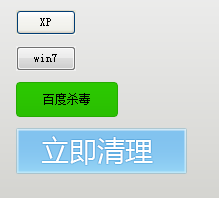
<Window size="800,600" mininfo="600,400" caption="0,0,0,32" sizebox="4,4,4,4">
<Default name="Button" value=" height="25" width="60" normalimage="file='BtnStyle\XP\button_nor.png'" hotimage="file='BtnStyle\XP\button_over.png'" pushedimage="file='BtnStyle\XP\button_down.png'" focusedimage="file='BtnStyle\XP\button_focus.png'" " />
<VerticalLayout bkcolor="#FFF0F0F0" bkcolor2="#FFAAAAA0">
<!-- 客户区 -->
<HorizontalLayout>
<Button text="XP" float="true" pos="20,14,0,0" height="25" />
<Button text="win7" float="true" pos="20,50,0,0" height="25" />
<Button text="百度杀毒" float="true" pos="20,86,0,0" height="25" />
<Button float="true" pos="20,132,0,0" height="25" />
</HorizontalLayout>
</VerticalLayout>
</Window>

2013 duilib入门简明教程 -- 简单控件介绍 (12)的更多相关文章
- 2013 duilib入门简明教程 -- 复杂控件介绍 (13)
首先将本节要介绍的控件全部拖到界面上,并调整好位置,如图: 然后将Name属性改成其他名字, 不能是[控件名+UI+数字]这种,因为这是DuiDesigner ...
- 2013 duilib入门简明教程 -- 总结 (20)
duilib的入门系列就到尾声了,再次提醒下,Alberl用的duilib版本是SVN上第个版本,时间是2013.08.15~ 这里给出Alberl最后汇总的一个工程,戳我下载,效 ...
- 2013 duilib入门简明教程 -- 自绘控件 (15)
在[2013 duilib入门简明教程 -- 复杂控件介绍 (13)]中虽然介绍了界面设计器上的所有控件,但是还有一些控件并没有被放到界面设计器上,还有一些常用控件duilib并没有提供(比如 ...
- 2013 duilib入门简明教程 -- 部分bug 2 (14)
上一个教程中提到了ActiveX的Bug,即如果主窗口直接用变量生成,则关闭窗口时会产生崩溃 如果用new的方式生成,则不会崩溃,所以给出一个临时的快速解决方案,即主窗口 ...
- 2013 duilib入门简明教程 -- 事件处理和消息响应 (17)
界面的显示方面就都讲完啦,下面来介绍下控件的响应. 前面的教程只讲了按钮和Tab的响应,即在Notify函数里处理.其实duilib还提供了另外一种响应的方法,即消息映射DUI_BEG ...
- 2013 duilib入门简明教程 -- FAQ (19)
虽然前面的教程几乎把所有的知识点都罗列了,但是有很多问题经常在群里出现,所以这里再次整理一下. 需要注意的是,在下面的问题中,除了加上XML属性外,主窗口必须继承自WindowImpl ...
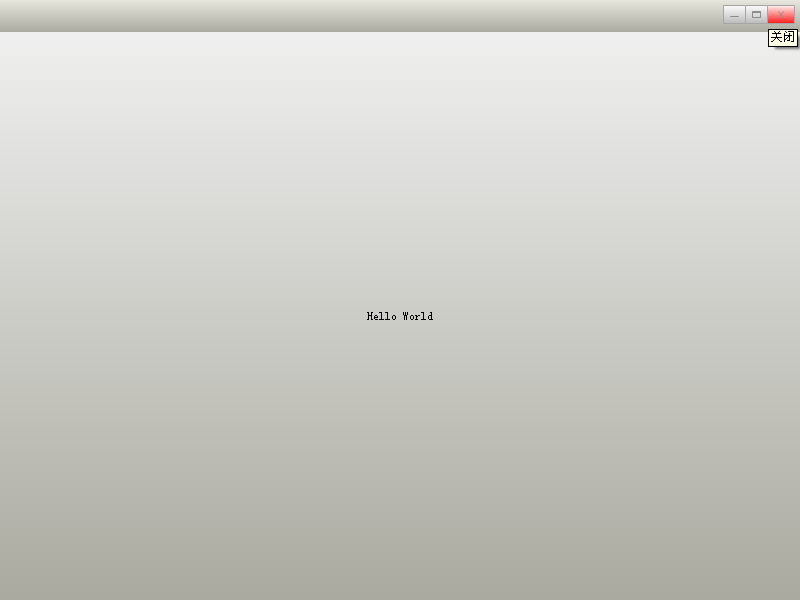
- 2013 duilib入门简明教程 -- 第一个程序 Hello World(3)
小伙伴们有点迫不及待了么,来看一看Hello World吧: 新建一个空的win32项目,新建一个main.cpp文件,将以下代码复制进去: #include <windows.h> #i ...
- 2013 duilib入门简明教程 -- 部分bug (11)
一.WindowImplBase的bug 在第8个教程[2013 duilib入门简明教程 -- 完整的自绘标题栏(8)]中,可以发现窗口最大化之后有两个问题, 1.最大化按钮的样式 ...
- 2013 duilib入门简明教程 -- 界面布局(9)
上一个教程实现的标题栏代码中,并没有看到处理自适应窗口大小的代码,但是窗口大小变化后,按钮的位置会跟着变化,这是因为我们将按钮放到了HorizontalLayout.VerticalLayou ...
随机推荐
- python 面向对象初级篇
Python 面向对象(初级篇) 概述 面向过程:根据业务逻辑从上到下写垒代码 函数式:将某功能代码封装到函数中,日后便无需重复编写,仅调用函数即可 面向对象:对函数进行分类和封装,让开发" ...
- linpe包-让发送和接收数据分析更快和更容易
1.简介 通常在R中从来进行分析和展现的数据都是以基本的格式保存的,如.csv或者.Rdata,然后使用.Rmd文件来进行分析的呈现.通过这个方式,分析师不仅可以呈现他们的统计分析的结果,还可以直接生 ...
- 【BZOJ】4002: [JLOI2015]有意义的字符串
题意 求$\left \lfloor \left( \frac{b+\sqrt{d}}{2} \right)^n \right \rfloor \pmod {7528443412579576937} ...
- View 与 Controller 之间的delegate(代理)传值
这个代理传值是经常使用的一种传值方式,下面介绍一种View 和 Controller 之间的代理传值方法. 先建立一个View视图 如 LoginView 是继承于一个UIView 在LoginVie ...
- js实现弹出的提示框只弹出一次
<script type="text/javascript"> var ua = navigator.userAgent.toLowerCase(); if (/iph ...
- fsockopen读取、发送cookie及注意事项 -代码示例
function httpPost($url, $data,$cookieStr='') { $url_array = parse_url($url); $host = $url_array['hos ...
- LabVIEW 吸星大法 - 看见的好东西都是我的(中篇)
前言 写了多年的LabVIEW程序,你是否面临这样的问题 总是在做一些重复的工作,感觉很没有意思: 总在不停的写代码,做类似的控件,实现相同的功能,丝毫没有成就感: 总在天加班,没有时间去提高自己; ...
- [转]定位占用oracle数据库cpu过高的sql
今天在吃饭的时候我的朋友的数据库出现了问题,cpu占用率为97%,当我看到这个问题的时候我就想到了或许是sql导致的此问题,由于忍不住吃饭,暂时没有帮他看这个问题,这是我饭后自己模拟的故障,进行的分析 ...
- JAVA 笔试笔记
1.java优缺点 优点 :纯面对对象,跨平台,提供很多内置的类库,支持web开发,有较好的健壮性和安全性缺点 : 速度慢,跨平台不能像其他的语言一样接近操作系统,复杂 2.java与c/c++ 都是 ...
- JSP内置对象及常用方法
jsp九大内置对象及四个作用域: 何为作用域 先让我们看看效果: 大概流程是这样的,我们访问index.jsp的时候,分别对pageContext, request, session,applicat ...