UniMelb Comp30022 IT Project (Capstone) - 1.Android入门
1. Android入门
Android系统架构
Android系统:四层架构、五块区域
1. Linux内核层 Linux Kernel:为Android设备的硬件提供了底层驱动
2. 系统运行库层 Libraries:为Android系统提供特性支持,如 (SQLite) 数据库支持、(OpenGL|ES) 3D绘图支持、(Webkit) 浏览器内核支持等;也包括了Android运行时库,提供了一些核心库允许开发者使用Java编写应用。也包含了Dalvik虚拟机,使得每一个Android应用都能运行在独立的进程当中。相对于JVM而言,Dalvik针对手机内存、CPU等做了优化。
3. 应用框架层 Application Framework:提供了构建应用程序时可能用到的API
4. 应用层 Application:安装在手机上的应用程序
Android系统的发展:https://developer.android.com/about/dashboards/index.html
Android应用开发特色:
四大组件:
活动 (activity):在应用中看得到的东西
服务 (Service):后台运行(退出应用仍可继续运行)
广播接收器 (Broadcast Receiver):接收来自其他应用的广播消息(如电话、短信等)、或发出广播消息
内容提供器 (Content Provider):应用程序之间共享数据(如读取电话簿中的联系人等)
系统控件:易于开发者编写界面
SQLite数据库:嵌入式关系型数据库(提供API)
地理位置定位:LBS
多媒体:可在应用程序中控制音乐、视频、录音、拍照、闹铃等
传感器:加速度传感器、方向传感器等
开发环境搭建 + Hello World:
https://developer.android.com/training/basics/firstapp/creating-project.html
1. download and install Android Studio;
https://classroom.udacity.com/courses/ud808/lessons/4216368924/concepts/43072785890923
2. Start a new Android Studio project:name, company domain;
3. Empty Activity
4. Open the project window (view -> tool windows -> project) and select Android View
5. In the project window
app > java > com.example.myfirstapp > MainActivity.java: This is the main activity (the entry point for your app). When you build and run the app, the system launches an instance of this Activity and loads its layout.
app > res: 在项目中使用的所有资源:drawable目录:图片;layout目录:布局;values目录:字符串
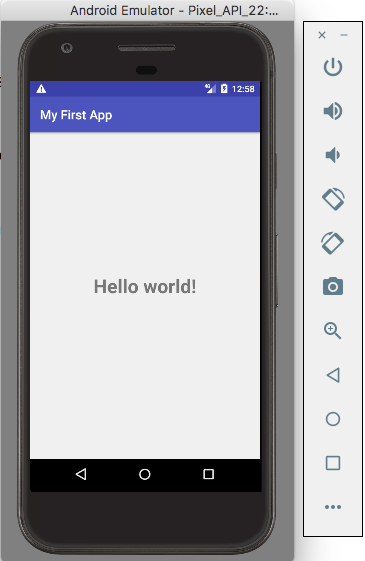
app > res > layout > activity_main.xml: This XML file defines the layout for the activity's UI. It contains a TextView element with the text "Hello world!".
app > manifests > AndroidManifest.xml: The manifest file describes the fundamental characteristics of the app and defines each of its components. 是整个Android项目的配置文件,所有四大组件都需要在这注册。还有应用的权限、兼容版本等设置。
Gradle Scripts > build.gradle: You'll see two files with this name: one for the project and one for the "app" module. Each module has its own build.gradle file, but this project currently has just one module. You'll mostly work with the module's build.gradle file to configure how the Gradle tools compile and build your app. For more information about this file, see Configure Your Build.
Error Occurs:
Error:(1, 1) A problem occurred evaluating project ':app'.
> java.lang.UnsupportedClassVersionError: com/android/build/gradle/AppPlugin : Unsupported major.minor version 52.0
查询:https://stackoverflow.com/questions/37466744/android-studio-continues-to-get-a-unsupported-major-minor-version-52-0
尝试1:File -> Invalidate caches and restart;无用
尝试2:File -> Project Structure -> SDK Location -> use embedded JDK/ set the right path 解决
6. Run on the emulator
Create an Android Virtual Device (AVD) definition. -- specifies the characteristics of the emulation device
Launch AVD: tools -> Android -> AVD Manager
Create Virtual Device -> Select Hardware (Pixel chosen here) -> System Image (Lollipop here)-> Finish
Select the device created, launch AVD in the emulator.
Close the AVD Manager window, in the Project window -> app module -> Run -> Select Deployment Target
源码分析:
AndroidManifest.xml
<?xml version="1.0" encoding="utf-8"?>

<manifest xmlns:android="http://schemas.android.com/apk/res/android"

    package="com.example.shenglin.myfirstapp">

    <application

        android:allowBackup="true"

        android:icon="@mipmap/ic_launcher"

        android:label="@string/app_name"

        android:supportsRtl="true"

        android:theme="@style/AppTheme">

        <activity android:name=".HelloWorldActivity">

            <intent-filter>

                <action android:name="android.intent.action.MAIN" />

                <category android:name="android.intent.category.LAUNCHER" />

            </intent-filter>

        </activity>

    </application>

</manifest>
android:icon="@mipmap/ic_launcher"定义了app的icon
<activity>...</activity>为对HelloWorldActivity活动的注册。
intent-filter中的<action android:name="android.intent.action.MAIN" />和<category android:name="android.intent.category.LAUNCHER" />表示是该程序的主活动(点击应用图标首先启动的活动)
HelloWorldActivity.java
public class HelloWorldActivity extends AppCompatActivity {

    @Override

    protected void onCreate(Bundle savedInstanceState) {

        super.onCreate(savedInstanceState);

        setContentView(R.layout.activity_main);

    }

}
extends AppCompatActivity
onCreate():活动被创建时必定要执行的方法。
但是,helloword字样在哪里呢?
逻辑和视图分离:在布局文件中编写界面,在活动中引入
setContentView(R.layout.activity_main); :给当前活动引入activity_main的布局
activity_main.xml
<?xml version="1.0" encoding="utf-8"?>

<android.support.constraint.ConstraintLayout xmlns:android="http://schemas.android.com/apk/res/android"

    xmlns:app="http://schemas.android.com/apk/res-auto"

    xmlns:tools="http://schemas.android.com/tools"

    android:layout_width="match_parent"

    android:layout_height="match_parent"

    tools:context="com.example.shenglin.myfirstapp.HelloWorldActivity">

    <TextView

        android:layout_width="228dp"

        android:layout_height="72dp"

        android:text="Hello world!"

        android:textAlignment="center"

        android:textSize="30sp"

        android:textStyle="bold"

        app:layout_constraintBottom_toBottomOf="parent"

        app:layout_constraintHorizontal_bias="0.5"

        app:layout_constraintLeft_toLeftOf="parent"

        app:layout_constraintRight_toRightOf="parent"

        app:layout_constraintTop_toTopOf="parent"

        app:layout_constraintVertical_bias="0.5"

        tools:layout_editor_absoluteX="72dp" />

</android.support.constraint.ConstraintLayout>
TextView:系统提供的一个控件,用于在布局中显示文字
values/strings.xml
<resources>

    <string name="app_name">My First App</string>

</resources>
Android不推荐在程序中对字符串进行硬编码,推荐将字符串定义在res/values/string.xml中,然后在布局文件或代码中引用
引用格式:在xml中:"@string/var_name";在代码中:R.string.var_name(string could also be drawable or layout)
这里的"app_name"即为string_name; 值"My First App"即为string_value(在AndroidManifest.xml被引用)
User Interface:
Using Android Studio Layout Editor: create a layout, including a text box and a button.
The user interface is built using a hierachy of layouts (ViewGroup objects: invisible containers) and widgets (View objects: UI components).
Component Tree window on the botton-left side shows the hierachy of layout.
Start the implementation:
Preparation:
Open the layout editor: app/res/layout/activity_main.xml
Turn on Show Constraints (by clicking the eye button)
Turn off Autoconnect (next to the eye button)
Click Default Margins (8 at the moment) and change it to 16
Choose Device in Editor (the mobile shape button) and select the one you choose.
Clear the layout (delete TextView in the Component Tree window)
Add a text box:
Drag and drop a text->plain text into the design editor
For the plain text widget, it has squares for resizing and circles for setting constraints
Add constraints: 16dp from the both the top and the left of the layout
Add a button:
Drag and drop a widgets->button into the desing editor
Add a constraint to the right side of the plain text box
Click the button, click the Baseline Constraint (appears below the selected widget), constraint it to the text box baseline
Change displayed text:
app/res/values/strings.xml
click Open Editor -> opens the Translations Editor (easy to use)
add two key-value pairs: edit_message: "Enter a message"; button_send:"Send"
Now go back to activity_main.xml
choose the widgets, set the hint property as (Pick a Resource) @string/edit_message; and delete the value for the text property.
so does the button.

Start Another Activity
Create an method to response to the button:
HelloWorldActivity.java
add a method called sendMessage(View view); (the method must be public void with a single View as the parameter)
an error pops out -- opt+enter=quick fix -- import class
activity_main.xml
select button, Properties -> onClick property -> sendMessage[HelloWorldActivity]
--> now when the buttons is tapped, the system calls the sendMessage().
Intent:
An object that provides runtime binding between separate components, such as two activities.
In this case, the intent starts another activity
HelloWorldActivity.java
add a constant
public static final String EXTRA_MESSAGE = "com.example.matt.myfirstapp.MESSAGE";
write sentMessage()
Intent intent = new Intent(this, DisplayMessageActivity.class);

EditText editText = (EditText) findViewById(R.id.editText);

String message = editText.getText().toString();

intent.putExtra(EXTRA_MESSAGE, message);

startActivity(intent);
the intent constructor takes two activities as the parameters
intent.putExtra() adds the message (message = editText.getText().toString()) to the intent.
the intent carrys data types as key-value pairs called extras (key is the public constant EXTRA_MESSAGE, note: using your app's package name as a prefix is a good way to ensure the keys are unique, in case your app interacts with other apps.
startActivity() starts an instance of the DisplayMessageActivity specified in the constructor of intent.
Create DisplayMessageActivity
New->Activity->Empty Activity...
auto-finished: create DisplayMessageActivity.java; create activity_display_message.xml; add <activity> in AndroidManifest.xml
Add a text view: activity_display_message.xml
turn on auto-connect
drag and drop a TextView
add a constraint to the top of the layout
and property -> textAppearance blahblahblah
Display the message on the text view:
DisplayMessageActivity.java
@Override

protected void onCreate(Bundle savedInstanceState) {

    super.onCreate(savedInstanceState);

    setContentView(R.layout.activity_display_message);

    // Get the intent that started this activity and extract the string

    Intent intent = getIntent();

    String message = intent.getStringExtra(HelloWorldActivity.EXTRA_MESSAGE);

    // capture the layout's TextView and set the string as its text

    TextView textView = (TextView) findViewById(R.id.textView);

    textView.setText(message);

}
it works now, but one more thing...
Add up navigation:
when the activity is not the main activity, it should provide the navigation so the user can tap the up button in the app bar to return to its logical parent screen.
AndroidManifest.xml
add android:parentActivityName=".HelloWorldActivity"; and the meta-data.
    <activity android:name=".DisplayMessageActivity"

        android:parentActivityName=".HelloWorldActivity">

        <meta-data

            android:name="android.support.PARENT_ACTIVITY"

            android:value=".HelloWorldActivity" />

    </activity>

</application>

UniMelb Comp30022 IT Project (Capstone) - 1.Android入门的更多相关文章
- UniMelb Comp30022 IT Project (Capstone) - 2.Vuforia in Unity
2 Vuforia in Unity Tutorial: https://www.youtube.com/watch?v=X6djed8e4n0&t=213s Preparation: Dow ...
- Android入门之环境搭建
欢迎访问我的新博客:http://www.milkcu.com/blog/ 原文地址:http://www.milkcu.com/blog/archives/1376935560.html 原创:An ...
- Android入门(一) IDEA上创建Android应用之helloworld
Android入门(一) IDEA上创建Android应用之helloworld 首先看运行结果: 一.准备工作 下载安装IntelliJ IDEA :我这里用的是2018.2.7 下载安装Genym ...
- 【详细】Android入门到放弃篇-YES OR NO-》各种UI组件,布局管理器,单元Activity
问:达叔,你放弃了吗? 答:不,放弃是不可能的,丢了Android,你会心疼吗?如果别人把你丢掉,你是痛苦呢?还是痛苦呢?~ 引导语 有人说,爱上一个人是痛苦的,有人说,喜欢一个人是幸福的. 人与人之 ...
- zxing学习笔记 android入门
对于刚开始学习android开发的童鞋们来说,若有一个简单而又全面的android工程能来剖析,那就是再好不过了,zxing就是不错得例子. zxing的源码可以到google code上下载, ...
- Android入门教程(四)
关注我,每天都有优质技术文章推送,工作,学习累了的时候放松一下自己. 本篇文章同步微信公众号 欢迎大家关注我的微信公众号:「醉翁猫咪」 学习Android要掌握Android程序结构,和通信技术,和如 ...
- Android入门(十二)SQLite事务、升级数据库
原文链接:http://www.orlion.ga/610/ 一.事务 SQLite支持事务,看一下Android如何使用事务:比如 Book表中的数据都已经很老了,现在准备全部废弃掉替换成新数据,可 ...
- 【转】Xamarin.Android 入门之:Xamarin+vs2015 环境搭建
Xamarin.Android 入门之:Xamarin+vs2015 环境搭建 一.前言 此篇博客主要写了如何使用搭建xamarin开发的环境,防止我自己万一哪天电脑重装系统了,可以直接看这篇博客 ...
- android 入门 006(sqlite增删改查)
android 入门 006(sqlite增删改查) package cn.rfvip.feb_14_2_sqlite; import android.content.Context; import ...
随机推荐
- Android平台上PMEM的使用及Platform设备注册(二)
三.注册PMEM设备 这里我们除了描述PMEM设备,还将注册一个拥有memory空间和IRQ资源的示例设备example_device. 对于example_device,定义如下结构体: stati ...
- 【转载】对C#DateTime的一些扩展,计算周内第一天,最后一天
/// <summary> /// DateTime的一些扩展 /// </summary> public class DateTime2 { /// <summary& ...
- sizeof笔试题--转
转自http://blog.csdn.net/yanyaohua0314/archive/2007/09/17/1787749.aspx sizeof笔试题 http://www.xici.net/b ...
- 在jsp页面动态添加数据库中的内容
工具:myeclipse+oracle11g 1.首先新建一个jsp页面. 2.在src目录下新建实体类User.java 3.创建BaseDao用来链接数据库 4.在pl/sql中创建存储过程 5. ...
- 一点一点看JDK源码(五)java.util.ArrayList 后篇之sort与Comparator
一点一点看JDK源码(五)java.util.ArrayList 后篇之sort与Comparator liuyuhang原创,未经允许禁止转载 本文举例使用的是JDK8的API 目录:一点一点看JD ...
- MySQL数据导入导出(一)
今天遇到一个需求,要用自动任务将一张表的数据导入另一张表.具体场景及限制:将数据库A中表A的数据导入到数据库B的表B中(增量数据或全量数据两种方式):体系1和体系2只能分别访问数据库A和数据库B.附图 ...
- python环境Anaconda的安装
本人最开始的的环境为:win10 + 32位的python 最近想学习一下爬虫,听说某些库需要64的python才能实现(本人也是小白,只是平时喜欢折腾,这里是听说,暂时没有能力解释),无奈之下只好卸 ...
- 分布式缓存 Redis(二)
代码实例 namespace RedisTest { class Program { static void Main(string[] args) { Student stu = RedisOper ...
- PHP变量定义及工作原理
1.变量定义: 通常学到的是,变量代表存储空间以及其中数据的一个“标识符”. 变量名 指向 变量值 更深入的说是 变量指向内存的一块区域 2.变量工作原理,通过画图分析法——内存空间 <?php ...
- hadoop jobhistory访问界面长时间打不开
1.浏览器无法直接通过url访问 可能原因 :主机名未配置,因此无法识别,在 c:\windows\system32\drivers\etc 目录添加主机名和对应ip hostname1[主机名 ] ...