Web容器初始化过程
一、SpringMVC启动过程
Spring的MVC是基于Servlet功能实现的,每个web工程中都有一个web.xml文件,web容器在启动的时候会加载这个配置文件,当一个web应用加载到web容器中后,在web应用开始响应客户端的请求之前,要按照顺序执行下面几个步骤:
1、实例化部署描述符中的<listener>元素标识的时间监听器的实例;
<listener>

    <listener-class>org.springframework.web.context.ContextLoaderListener</listener-class>

</listener>
2、在实现了ServletContextListener接口的监听器实例中,调用contextInitialized()方法。ContextLoaderListener实现了ServletContextListener接口,ServletContextListener作为Servlet的监听者,会在ServletContext创建、销毁过程中监听ServletContextEvent事件,然后进行响应的处理。换句话说,就是在启动web容器时,ContextLoaderListener类会自动装配ApplicationContext的配置信息。
public class ContextLoaderListener extends ContextLoader implements ServletContextListener {

    public ContextLoaderListener() {

    }

    public ContextLoaderListener(WebApplicationContext context) {

        super(context);

    }

  // 这里调用其父类ContextLoader的initWebApplicationContext进行初始化工作

    public void contextInitialized(ServletContextEvent event) {

        this.initWebApplicationContext(event.getServletContext());

    }


    public void contextDestroyed(ServletContextEvent event) {

        this.closeWebApplicationContext(event.getServletContext());

        ContextCleanupListener.cleanupAttributes(event.getServletContext());

    }

}
ContextLoaderListener类继承了ContextLoader,后者是实际的ServletContextListener接口实现者,这里用到了代理模式,利用ContextLoader类创建Spring application context,并将其注册到ServletContext中去。ContextLoaderListener就是调用ContextLoader类的initWebApplicationContext()方法和closeWebApplicationContext()方法来实现ServletContext的创建和销毁工作的。
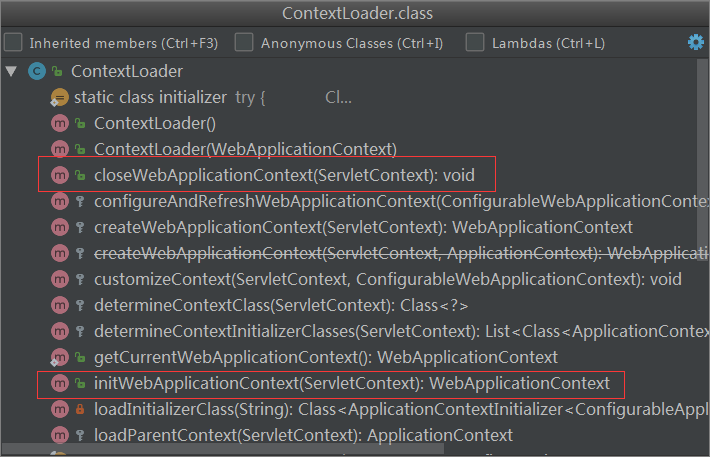
其中,initWebApplicationContext()方法主要完成了两个部分的工作:一是查看是否已经指定父容器,如果不存在则设置其父容器。二是将Spring WebApplicationContext放置到线程Map中。
public WebApplicationContext initWebApplicationContext(ServletContext servletContext) {

        if (servletContext.getAttribute(WebApplicationContext.ROOT_WEB_APPLICATION_CONTEXT_ATTRIBUTE) != null) {

            throw new IllegalStateException("Cannot initialize context because there is already a root application context present - check whether you have multiple ContextLoader* definitions in your web.xml!");

        } else {

            Log logger = LogFactory.getLog(ContextLoader.class);

            servletContext.log("Initializing Spring root WebApplicationContext");

            if (logger.isInfoEnabled()) {

                logger.info("Root WebApplicationContext: initialization started");

            }

            long startTime = System.currentTimeMillis();

            try {

                if (this.context == null) {

                    this.context = this.createWebApplicationContext(servletContext);

                }

                if (this.context instanceof ConfigurableWebApplicationContext) {

                    ConfigurableWebApplicationContext cwac = (ConfigurableWebApplicationContext)this.context;

                    if (!cwac.isActive()) {

              //查看是否指定父容器

                        if (cwac.getParent() == null) {

                            ApplicationContext parent = this.loadParentContext(servletContext);

                            cwac.setParent(parent);

                        }

                        this.configureAndRefreshWebApplicationContext(cwac, servletContext);

                    }

                }

                servletContext.setAttribute(WebApplicationContext.ROOT_WEB_APPLICATION_CONTEXT_ATTRIBUTE, this.context);

                ClassLoader ccl = Thread.currentThread().getContextClassLoader();

                //将WebApplicationContext放置到线程Map中

                if (ccl == ContextLoader.class.getClassLoader()) {

                    currentContext = this.context;

                } else if (ccl != null) {

                    currentContextPerThread.put(ccl, this.context);

                }

                if (logger.isDebugEnabled()) {

                    logger.debug("Published root WebApplicationContext as ServletContext attribute with name [" + WebApplicationContext.ROOT_WEB_APPLICATION_CONTEXT_ATTRIBUTE + "]");

                }

                if (logger.isInfoEnabled()) {

                    long elapsedTime = System.currentTimeMillis() - startTime;

                    logger.info("Root WebApplicationContext: initialization completed in " + elapsedTime + " ms");

                }

                return this.context;

            } catch (RuntimeException var8) {

                logger.error("Context initialization failed", var8);

                servletContext.setAttribute(WebApplicationContext.ROOT_WEB_APPLICATION_CONTEXT_ATTRIBUTE, var8);

                throw var8;

            } catch (Error var9) {

                logger.error("Context initialization failed", var9);

                servletContext.setAttribute(WebApplicationContext.ROOT_WEB_APPLICATION_CONTEXT_ATTRIBUTE, var9);

                throw var9;

            }

        }

    }
在初始化方法执行后,将WebApplicationContext存到了两个地方,分别是ServletContext和currentContextPerThread中,我们可以通过这两个地方来获取WebApplicationContext:1.从servletContext中去拿;2.从当前的线程Map中去拿。
3、实例化部署符中<filter>元素标识的过滤器实例,并调用每个过滤器实例的init()方法。
4、实例化部署符中<servlet>元素标识的Servlet实例,按照该元素包含的load-on-startup顺序,调用每个Servlet实例的init()方法。
<servlet-class>org.springframework.web.servlet.DispatcherServlet</servlet-class>
在SpringMVC的架构中,DispatcherServlet主要负责客户端请求的分发,起到控制器的作用。DispatcherServlet是实现Servlet接口的实现类,其结构如下图所示。Servlet的生命周期由Servlet的容器来控制,主要分为初始化、运行和销毁三个阶段,分别对应三个方法:init()、service()和destory()。
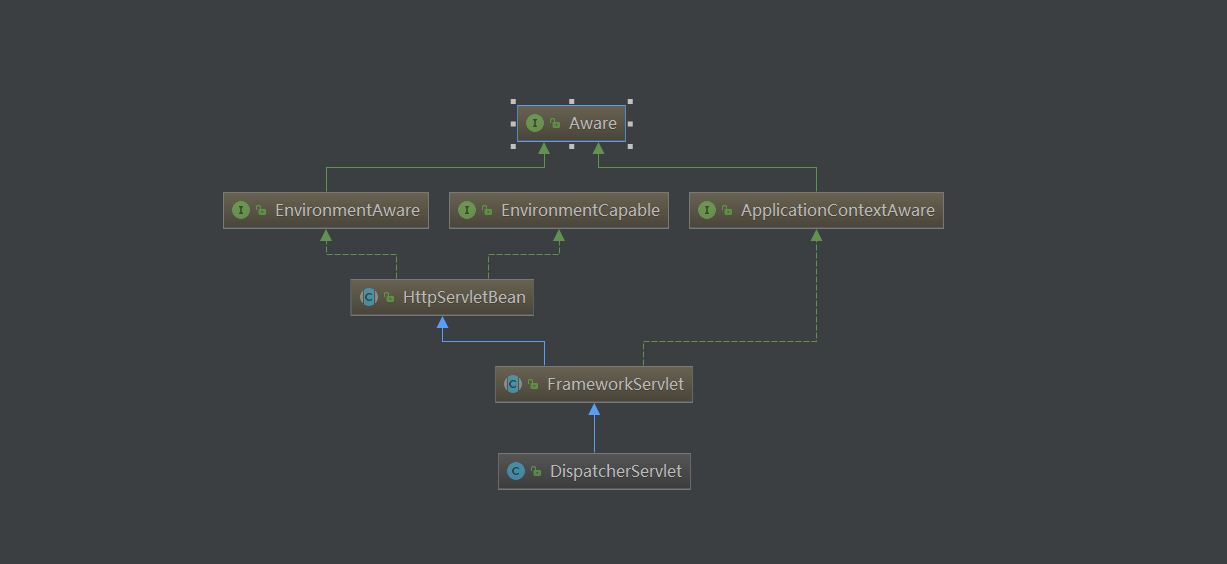
在DispatcherServlet的父类HTTPServletBean中,重写了init()方法,主要实现将当前的Servlet类实例转换为BeanWrapper类型实例,以便使用Spring中提供的注入功能进行相应属性的注入。
在DispatcherServlet的父类FameworkServelet中,重写了service()方法,对于不同的方法,Spring统一将程序引导至processRequest(request,response)中,processRequest方法再对处理请求进行了一些准备工作后,又将细节实现转移到了doService方法中。
  protected void service(HttpServletRequest request, HttpServletResponse response) throws ServletException, IOException {

        String method = request.getMethod();

        if (method.equalsIgnoreCase(RequestMethod.PATCH.name())) {

            this.processRequest(request, response);

        } else {

            super.service(request, response);

        }

   }

  protected final void processRequest(HttpServletRequest request, HttpServletResponse response) throws ServletException, IOException {

        long startTime = System.currentTimeMillis();

        Throwable failureCause = null;

        LocaleContext previousLocaleContext = LocaleContextHolder.getLocaleContext();

        LocaleContext localeContext = this.buildLocaleContext(request);

        RequestAttributes previousAttributes = RequestContextHolder.getRequestAttributes();

        ServletRequestAttributes requestAttributes = this.buildRequestAttributes(request, response, previousAttributes);

        WebAsyncManager asyncManager = WebAsyncUtils.getAsyncManager(request);

        asyncManager.registerCallableInterceptor(FrameworkServlet.class.getName(), new FrameworkServlet.RequestBindingInterceptor());

        this.initContextHolders(request, localeContext, requestAttributes);

        try {

            //调用DispatcherServlet的doService()方法

            this.doService(request, response);

        } catch (ServletException var17) {

            failureCause = var17;

            throw var17;

        } catch (IOException var18) {

            failureCause = var18;

            throw var18;

        } catch (Throwable var19) {

            failureCause = var19;

            throw new NestedServletException("Request processing failed", var19);

        } finally {

            this.resetContextHolders(request, previousLocaleContext, previousAttributes);

            if (requestAttributes != null) {

                requestAttributes.requestCompleted();

            }

            if (this.logger.isDebugEnabled()) {

                if (failureCause != null) {

                    this.logger.debug("Could not complete request", (Throwable)failureCause);

                } else if (asyncManager.isConcurrentHandlingStarted()) {

                    this.logger.debug("Leaving response open for concurrent processing");

                } else {

                    this.logger.debug("Successfully completed request");

                }

            }

            this.publishRequestHandledEvent(request, response, startTime, (Throwable)failureCause);

        }

    }
protected void doService(HttpServletRequest request, HttpServletResponse response) throws Exception {

        if (this.logger.isDebugEnabled()) {

            String resumed = WebAsyncUtils.getAsyncManager(request).hasConcurrentResult() ? " resumed" : "";

            this.logger.debug("DispatcherServlet with name '" + this.getServletName() + "'" + resumed + " processing " + request.getMethod() + " request for [" + getRequestUri(request) + "]");

        }

        Map<String, Object> attributesSnapshot = null;

        if (WebUtils.isIncludeRequest(request)) {

            attributesSnapshot = new HashMap();

            Enumeration attrNames = request.getAttributeNames();

            label108:

            while(true) {

                String attrName;

                do {

                    if (!attrNames.hasMoreElements()) {

                        break label108;

                    }

                    attrName = (String)attrNames.nextElement();

                } while(!this.cleanupAfterInclude && !attrName.startsWith("org.springframework.web.servlet"));

                attributesSnapshot.put(attrName, request.getAttribute(attrName));

            }

        }

        request.setAttribute(WEB_APPLICATION_CONTEXT_ATTRIBUTE, this.getWebApplicationContext());

        request.setAttribute(LOCALE_RESOLVER_ATTRIBUTE, this.localeResolver);

        request.setAttribute(THEME_RESOLVER_ATTRIBUTE, this.themeResolver);

        request.setAttribute(THEME_SOURCE_ATTRIBUTE, this.getThemeSource());

        FlashMap inputFlashMap = this.flashMapManager.retrieveAndUpdate(request, response);

        if (inputFlashMap != null) {

            request.setAttribute(INPUT_FLASH_MAP_ATTRIBUTE, Collections.unmodifiableMap(inputFlashMap));

        }

        request.setAttribute(OUTPUT_FLASH_MAP_ATTRIBUTE, new FlashMap());

        request.setAttribute(FLASH_MAP_MANAGER_ATTRIBUTE, this.flashMapManager);

        try {

           // 最终的请求处理函数

            this.doDispatch(request, response);

        } finally {

            if (!WebAsyncUtils.getAsyncManager(request).isConcurrentHandlingStarted() && attributesSnapshot != null) {

                this.restoreAttributesAfterInclude(request, attributesSnapshot);

            }

        }

    }
经过层层的准备工作,最终在doDispatch()方法中实现了完整的请求处理过程:
protected void doDispatch(HttpServletRequest request, HttpServletResponse response) throws Exception {

        HttpServletRequest processedRequest = request;

        HandlerExecutionChain mappedHandler = null;

        boolean multipartRequestParsed = false;

        WebAsyncManager asyncManager = WebAsyncUtils.getAsyncManager(request);

        try {

            try {

                ModelAndView mv = null;

                Exception dispatchException = null;

                try {

                    processedRequest = this.checkMultipart(request);

                    multipartRequestParsed = processedRequest != request;

                //根据request信息寻找对应的处理器

                    mappedHandler = this.getHandler(processedRequest);

                    if (mappedHandler == null || mappedHandler.getHandler() == null) {

                        this.noHandlerFound(processedRequest, response);

                        return;

                    }

                //根据处理器寻找对应的处理器适配器

                    HandlerAdapter ha = this.getHandlerAdapter(mappedHandler.getHandler());

                    String method = request.getMethod();

                    boolean isGet = "GET".equals(method);

                    if (isGet || "HEAD".equals(method)) {

                        long lastModified = ha.getLastModified(request, mappedHandler.getHandler());

                        if (this.logger.isDebugEnabled()) {

                            this.logger.debug("Last-Modified value for [" + getRequestUri(request) + "] is: " + lastModified);

                        }

                        if ((new ServletWebRequest(request, response)).checkNotModified(lastModified) && isGet) {

                            return;

                        }

                    }

                    if (!mappedHandler.applyPreHandle(processedRequest, response)) {

                        return;

                    }

                   //返回视图

                    mv = ha.handle(processedRequest, response, mappedHandler.getHandler());

                    if (asyncManager.isConcurrentHandlingStarted()) {

                        return;

                    }

                    this.applyDefaultViewName(request, mv);

                    mappedHandler.applyPostHandle(processedRequest, response, mv);

                } catch (Exception var19) {

                    dispatchException = var19;

                }

                this.processDispatchResult(processedRequest, response, mappedHandler, mv, dispatchException);

            } catch (Exception var20) {

                this.triggerAfterCompletion(processedRequest, response, mappedHandler, var20);

            } catch (Error var21) {

                this.triggerAfterCompletionWithError(processedRequest, response, mappedHandler, var21);

            }

        } finally {

            if (asyncManager.isConcurrentHandlingStarted()) {

                if (mappedHandler != null) {

                    mappedHandler.applyAfterConcurrentHandlingStarted(processedRequest, response);

                }

            } else if (multipartRequestParsed) {

                this.cleanupMultipart(processedRequest);

            }

        }

    }
二、ServletContext、ApplicationContext和WebApplicationContext区别?
1、ServletContext:是一个Web应用的上下文,是一个全局信息的存储空间,代表当前的web应用。Servlet容器(如Tomcat)在启动一个Webapp时,会为它创建一个ServletContext对象,即servlet上下文环境。每个webapp都有唯一的ServletContext对象。同一个webapp的所有servlet对象共享一个ServeltContext,servlet对象可以通过ServletContext来访问容器中的各种资源。ServletContext在web应用启动时创建,在web应用服务关闭时释放。
2、ApplicationContext:它是建立在BeanFactory基础之上的,除了包含BeanFactory的所有功能之外,在国际化支持、资源访问、事件传播等方面进行了良好的支持。其体系结构如下图。
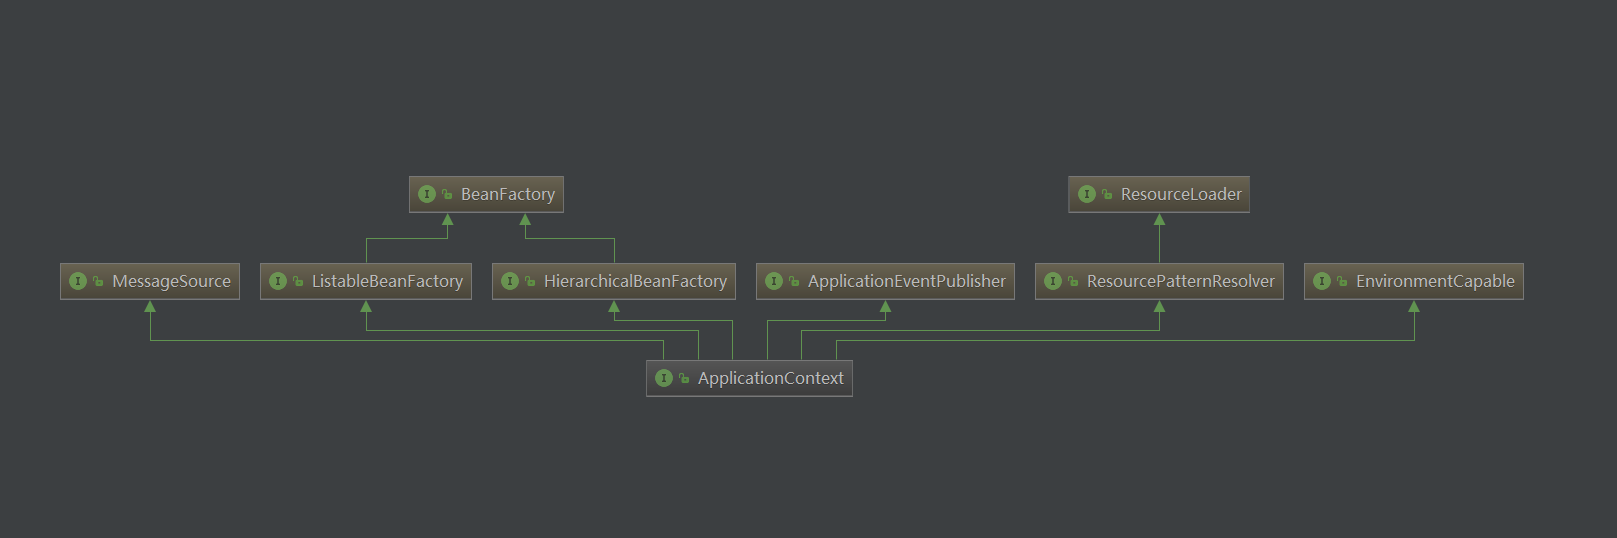
ApplicationContext接口有三个常用的实现类,如下:
| 类名称 | 功能描述 |
| ClassPathXmlApplicationContext |
从类路径ClassPath中寻找指定的XML配置文件,找到并装载
完成ApplicationContext的实例化工作
|
| FileSystemXmlApplicationContext |
从指定的文件系统路径中寻找指定的XML配置文件,找到并装载
完成ApplicationContext的实例化工作
|
| XmlWebApplicationContext | 从Web应用中寻找指定的XML配置文件,找到并装载完成ApplicationContext的实例化工作 |
与BeanFactory不同的是,ApplicationContext容器实例化后会自动对所有的单实例Bean进行实例化与依赖关系的装配,使之处于待用状态。而BeanFactory容器实例化后并不会自动实例化Bean,只有当Bean被使用时BeanFactory容器才会对该Bean进行实例化与依赖关系的装配。
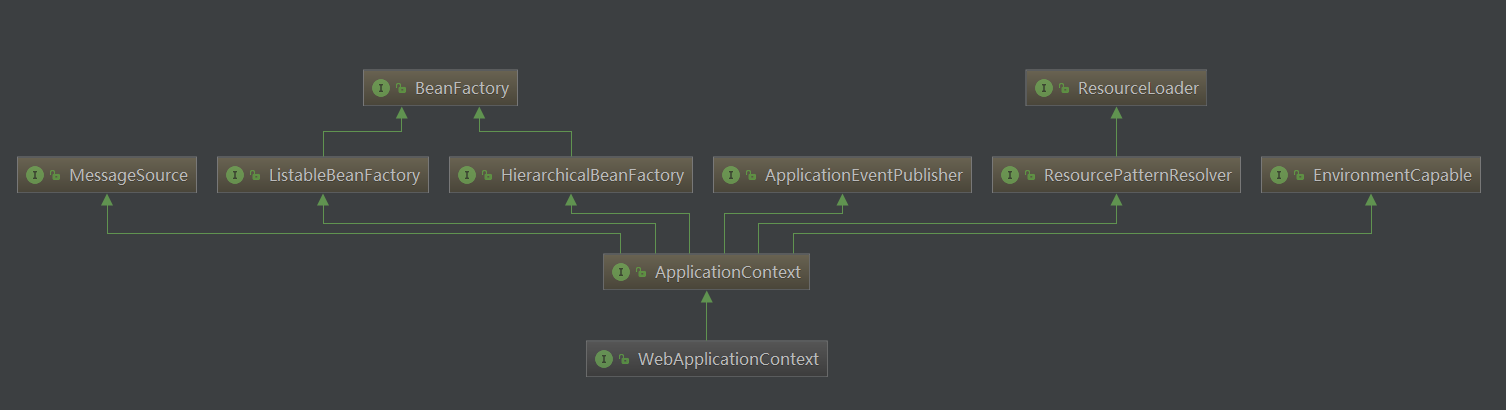
3、WebApplicationContext:它是专门为web应用提供的,它允许从相对于web根目录路径中装载配置文件完成初始化;从WebApplicationContext中可以获得ServletContext的引用,同时为了方便web应用访问Spring应用上下文,WebApplicationContext也将作为一个属性放到ServletContext中,可以通过WebApplicationContextUtils的getWebApplicationContext(ServletContext sc)方法获取。
三、总结
ApplicationContext是Spring的核心,Context为上下文环境,在Web应用中,会用到WebApplicationContext,它继承自ApplicationContext。在SpringMVC启动过程中,ContextLoaderListener类起着至关重要的作用。它读取web.xml中配置的context-param中的配置文件,提前在web容器初始化前准备业务对应的Application context,将创建好的WebApplicationContext放置于ServletContext属性中,这样我们只要得到Servlet就可以得到WebApplicationContext对象,并利用这个对象访问spring容器管理的bean。
四、参考资料
1、https://www.cnblogs.com/RunForLove/p/5688731.html
Web容器初始化过程的更多相关文章
- Spring源码解析-Web容器启动过程
Web容器启动过程,主要讲解Servlet和Spring容器结合的内容. 流程图如下: Web容器启动的Root Context是有ContextLoaderListener,一般使用spring,都 ...
- Spring源码-IOC部分-容器初始化过程【2】
实验环境:spring-framework-5.0.2.jdk8.gradle4.3.1 Spring源码-IOC部分-容器简介[1] Spring源码-IOC部分-容器初始化过程[2] Spring ...
- Spring IoC容器初始化过程学习
IoC容器是什么?IoC文英全称Inversion of Control,即控制反转,我么可以这么理解IoC容器: 把某些业务对象的的控制权交给一个平台或者框架来同一管理,这个同一管理的平台可以称为I ...
- Web项目初始化过程
在启动Web项目时,容器(比如Tomcat)会读web.xml配置文件中的两个节点<listener>和<contex-param>. 接着容器会创建一个ServletCont ...
- spring源码学习之路---深度分析IOC容器初始化过程(四)
作者:zuoxiaolong8810(左潇龙),转载请注明出处,特别说明:本博文来自博主原博客,为保证新博客中博文的完整性,特复制到此留存,如需转载请注明新博客地址即可. 最近由于工作和生活,学习耽搁 ...
- Spring之IOC容器初始化过程
Ioc容器的初始化是由refresh()方法来启动的,这个方法标志着Ioc容器的正式启动. 具体来说这个启动过程包括三个基本过程: 1.BeanDifinition的Resource定位 2.Bean ...
- Spring源码解析二:IOC容器初始化过程详解
IOC容器初始化分为三个步骤,分别是: 1.Resource定位,即BeanDefinition的资源定位. 2.BeanDefinition的载入 3.向IOC容器注册BeanDefinition ...
- Spring Ioc 容器初始化过程
IOC 是如何工作的? 通过 ApplicationContext 创建 Spring 容器,容器读取配置文件 "/beans.xml" 并管理定义的 Bean 实例对象. 通 ...
- Spring Boot IoC 容器初始化过程
1. 加载 ApplicationContextInializer & ApplicationListener 2. 初始化环境 ConfigurableEnvironment & 加 ...
随机推荐
- swagger常用注解说明
常用到的注解有: Api ApiModel ApiModelProperty ApiOperation ApiParam ApiResponse ApiResponses ResponseHeader ...
- python-猜数字小练习
isdigit的使用方法,只能对str类型的适用,判断输入的字符串里面是不是仅由数字组成: 本次在写这个小程序时踩到的坑:1.int类型和字符串类型不可以做比较:2.在input下面对guess做了类 ...
- linux操作之逻辑分区与交换分区篇
作业一: 1) 开启Linux系统前添加一块大小为15G的SCSI硬盘 2) 开启系统,右击桌面,打开终端 3) 为新加的硬盘分区,一个主分区大小为5G,剩余空间给扩展分区,在扩展分区上划 ...
- mount: wrong fs type, bad option, bad superblock
mount: wrong fs type, bad option, bad superblock on 125.64.41.244:/data/img, missing codepage ...
- 20170711 通过阿里云与国家气象局合作的api读取历史辐照数据
一.概述 今天收到阿里云推送的试用通知,就迫不及待的申请了一个试用key,开始试用. 初步使用之后发现基本可用,至于最后是否适合商用还要看他的收费情况. 接口的使用 ...
- jquery-卡片翻转
<!DOCTYPE html PUBLIC "-//W3C//DTD XHTML 1.0 Transitional//EN" "http://www.w3.org/ ...
- Hadoop Ls命令添加显示条数限制參数
前言 在hadoop的FsShell命令中,预计非常多人比較经常使用的就是hadoop fs -ls,-lsr,-cat等等这种与Linux系统中差点儿一致的文件系统相关的命令.可是细致想想,这里还是 ...
- boost::make_function_output_iterator报错: C4996
用VS2013运行boost::make_function_output_iterator的官方例子: https://www.boost.org/doc/libs/1_68_0/libs/itera ...
- php : 文件及文件夹操作(创建、删除、移动、复制)
Talk is cheap, show you the code : <?php /** * 操纵文件类 * */ class FileUtil { /** * 建立文件夹 * * @param ...
- PHP微信开发之模板消息回复
参考:http://www.jb51.net/article/87269.htm 代码: <?php //$ac = file_get_contents('https://api.weixin. ...