doris 0.9.0版本docker镜像制作与使用
1. 安装docker
详情请参见本人博客
2. 编译doris
详情请参见doris官网文档
3. 在编译好的doris output文件夹下编写两个Dockerfile
3.1 Dockerfile_fe
FROM centos:centos7.5.1804

RUN mkdir /home/palo/run/ -p

# copy jdk and palo binary

COPY jdk1..0_131/ /home/palo/run/jdk1..0_131/

COPY fe/ /home/palo/run/fe/

# set java home

ENV JAVA_HOME /home/palo/run/jdk1..0_131/

# set fe port: http/thrift/mysql/bdbje

EXPOSE

# fe log and meta-data

VOLUME ["/home/palo/run/fe/conf" i"/home/palo/run/fe/log" "/home/palo/run/fe/palo-meta"]

WORKDIR /home/palo/run/fe/

CMD ["/bin/sh","/home/palo/run/fe/bin/start_fe.sh"]
3.2 Dockerfile_be
Centos 7 be docker file
FROM centos:centos7.5.1804

#FROM ubuntu:18.04

RUN  mkdir -p /home/palo/run/

RUN yum -y update \

 && yum install -y binutils-devel \

 && yum -y clean all \

 && rm -rf /var/cache/yum

# copy be

COPY be/ /home/palo/run/be/

# set be port: thrift/rpc/http/heartbeat

EXPOSE

# be log,conf and data

VOLUME ["/home/palo/run/be/conf", "/home/palo/run/be/log", "/home/palo/run/be/data/"]

WORKDIR /home/palo/run/be/

RUN ldd lib/palo_be

CMD ["/bin/sh","/home/palo/run/be/bin/start_be.sh"]
Ununtu 18.04 be docker file
FROM ubuntu:18.04

RUN  mkdir -p /home/palo/run/

RUN apt-get -y update \

 && apt-get install -y libbinutils \

 && apt-get -y clean all \

 && rm -rf /var/cache/yum

#set the shell command from dash (which is the default shell application in ubuntu) to

#bash which doris start command used.

 && ln -sf /bin/bash /bin/sh

# copy be

COPY be/ /home/palo/run/be/

# set be port: thrift/rpc/http/heartbeat

EXPOSE

# fe log and meta-data

VOLUME ["/home/palo/run/be/conf", "/home/palo/run/be/log", "/home/palo/run/be/data/"]

WORKDIR /home/palo/run/be/

RUN ldd lib/palo_be

CMD ["/bin/sh","/home/palo/run/be/bin/start_be.sh"]
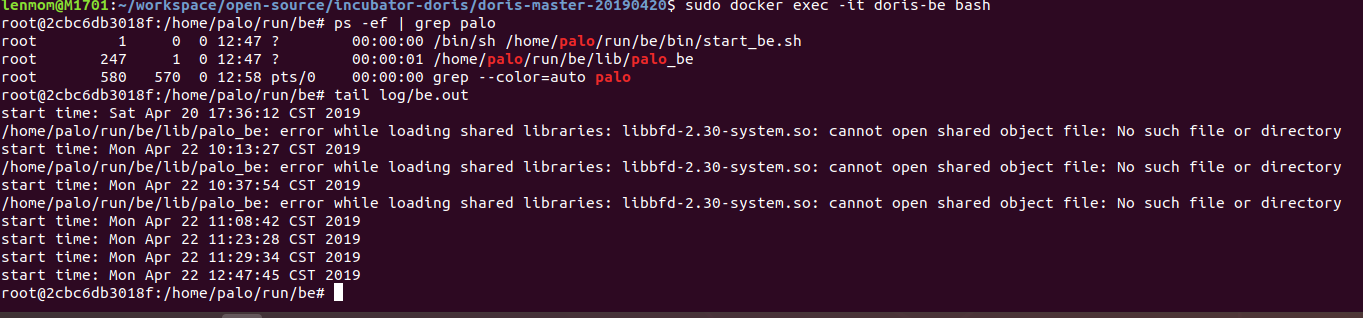
Note: if build the binary files of be using ubuntu 18.04, and build the docker image using centos, because the ubuntu glibc version 2.27 and the centos 7 glibc version is lower than this ( currently, the highest version is 2.17), and this would cause the be process
is unable to start with error message:
start time: Sat Apr  :: CST

/home/palo/run/be/lib/palo_be: error while loading shared libraries: libbfd-2.30-system.so: cannot open shared object file: No such file or directory
so it's nassary to make sure the be build glic version is compatable with the target images os version. And this is why I used two docker file to build the be docker image.
In summery:
if you build the doris be in centos, it's better to build the docker images in based on centos; and vice, it you build the binary on ubuntu, it's better to build the docker image based on ubuntu. In order to make glibc version compatable.
4. 制作docker镜像
4.1 下载jdk1.8.0_131.tar.gz到 output文件夹下并解压,具体可以到oracle官网下载
文件准备完成后的目录结构为
[druid@doris output]$ ls -l

total

drwxr-xr-x  druid druid   Apr  : apache_hdfs_broker

drwxr-xr-x  druid druid   Apr  : be

-rw-rw-r--  druid druid  Apr  : Dockerfile_be

-rw-rw-r--  druid druid  Apr  : Dockerfile_fe

drwxr-xr-x  druid druid   Apr  : fe

drwxr-xr-x  druid druid  Mar    jdk1..0_131
4.2 制作fe镜像
[druid@palo output]$ sudo docker build -t lenmom/doris:fe-0.9.0 -f Dockerfile_fe  .

[sudo] password for druid:

Sending build context to Docker daemon  .027GB

Step / : FROM centos:centos7.5.1804

 ---> cf49811e3cdb

Step / : RUN mkdir /home/palo/run/ -p

 ---> Using cache

 ---> ffe6e7a05650

Step / : COPY jdk1..0_131/ /home/palo/run/jdk1..0_131/

 ---> a0b9c437e9f7

Step / : COPY fe/ /home/palo/run/fe/

 ---> a7706aa9939b

Step / : ENV JAVA_HOME /home/palo/run/jdk1..0_131/

 ---> Running in bd436cb488d5

Removing intermediate container bd436cb488d5

 ---> 9e10bc76f4b5

Step / : EXPOSE

 ---> Running in de0d71ee1f27

Removing intermediate container de0d71ee1f27

 ---> 16600856447f

Step / : WORKDIR /home/palo/run/fe/

 ---> Running in 2cfe3e4bc04e

Removing intermediate container 2cfe3e4bc04e

 ---> fc999dfbc914

Step / : CMD "bin/start_fe.sh"

 ---> Running in fafb6d98095d

Removing intermediate container fafb6d98095d

 ---> 62efbd2bbea0

Successfully built 62efbd2bbea0

Successfully tagged doris:fe-0.9.
4.3 制作be镜像
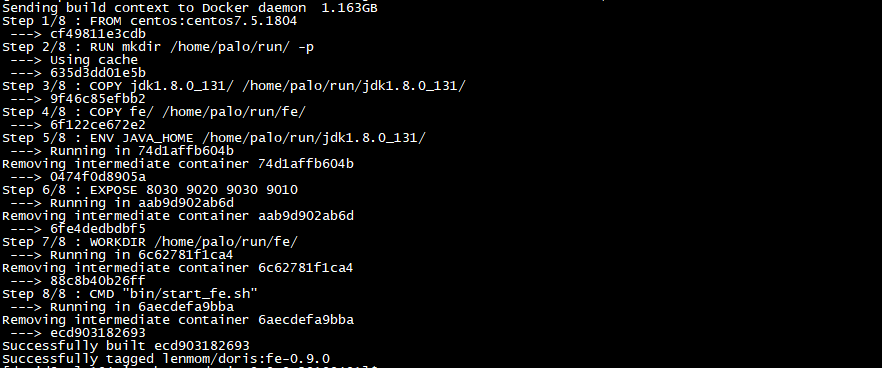
[druid@palo output]$ sudo docker build -t lenmom/doris:be-0.9.0 -f Dockerfile_be  .

Sending build context to Docker daemon  .163GB

Step / : FROM centos:centos7.5.1804

 ---> cf49811e3cdb

Step / : RUN mkdir /home/palo/run/ -p

 ---> Running in 2ae7543e4f3a

Removing intermediate container 2ae7543e4f3a

 ---> 635d3dd01e5b

Step / : COPY be/ /home/palo/run/be/

 ---> 825e46597c07

Step / : EXPOSE

 ---> Running in 21e7742b6da5

Removing intermediate container 21e7742b6da5

 ---> c735c437a771

Step / : VOLUME ["/home/palo/run/be/conf", "/home/palo/run/be/log", "/home/palo/run/be/data/"]

 ---> Running in 456c4f54c79a

Removing intermediate container 456c4f54c79a

 ---> 392386745a0a

Step / : WORKDIR /home/palo/run/be/

 ---> Running in eac0b97ffdba

Removing intermediate container eac0b97ffdba

 ---> a488181610ba

Step / : CMD "bin/start_be.sh"

 ---> Running in 871bee0625c6

Removing intermediate container 871bee0625c6

 ---> cf8f3297619a

Successfully built cf8f3297619a

Successfully tagged lenmom/doris:be-0.9.

4.4 查看镜像信息
[druid@palo output]$ sudo docker images

REPOSITORY          TAG                 IMAGE ID            CREATED             SIZE

lenmom/doris        fe-0.9.            ecd903182693         minutes ago       649MB

lenmom/doris        be-0.9.            cf8f3297619a         minutes ago       855MB

centos              centos7.5.1804      cf49811e3cdb         weeks ago         200MB

5. 导出镜像与上传镜像
5.1 导出镜像到本地
#命令格式:

#docker save -o 要保存的文件名  要保存的镜像

sudo docker save -o doris-fe-0.9.-docker.img  lenmom/doris:fe-0.9.   #导出fe镜像到本地,默认导出到当前目录,可以指定完整参数

sudo docker save -o doris-be-0.9.-docker.img  lenmom/doris:be-0.9.   #导出be镜像到本地,默认导出到当前目录,可以指定完整参数
导出后的结果看下图:

5.2 导入镜像
使用5.1中导出的镜像,可以在其他机器的部署环境中,使用load命令导入镜像,直接使用即可
#命令格式:

sudo docker load --input 文件

#或者

sudo docker load < 文件名
针对本例中的两个镜像文件,操作命令为:
sudo docker load --input  doris-be-0.9.-docker.img #导入be镜像

sudo docker load --input  doris-fe-0.9.-docker.img #导入fe镜像
5.3 上传镜像
命令格式为: docker push NAME[:TAG]
注意:如果为个人注册的docker hub账号,一定要在镜像名称前面加上自己的docker hub用户名,否则提交上传会失败,出现类似下面的错误
Error response from daemon: pull access denied for xxx, repository does not exist or may require 'docker login'
上传镜像前,需要使用自己的docker hub账号登陆,然后才可以上传镜像文件,下面来操作一个波次看看
5.1 登陆docker hub
输入sudo docker login,然后输入用户名,密码即可。
[druid@palo output]$ sudo docker login

Login with your Docker ID to push and pull images from Docker Hub. If you don't have a Docker ID, head over to https://hub.docker.com to create one.

Username: {YOUR-DOCKER-HUB-ID}

Password:

WARNING! Your password will be stored unencrypted in /root/.docker/config.json.

Configure a credential helper to remove this warning. See

https://docs.docker.com/engine/reference/commandline/login/#credentials-store

Login Succeeded

5.2 不带用户名的镜像上传会失败
修改lenmom/doris:be-0.9.0镜像名称为doris:be-0.9.0,即去掉签名的用户id,修改之前的镜像列表为

$sudo docker tag lenmom/doris:be-0.9. doris:be-0.9.    #创建不带用户id的镜像别名

$sudo docker rmi lenmom/doris:be-0.9.                   #删除带用户id的镜像

Untagged: lenmom/doris:be-0.9.

$sudo docker images                                      #查看镜像列表,带用户id的be镜像应该消失了

REPOSITORY          TAG                 IMAGE ID            CREATED             SIZE

lenmom/doris        fe-0.9.            ecd903182693         minutes ago      649MB

doris               be-0.9.            cf8f3297619a        About an hour ago   855MB

centos              centos7.5.1804      cf49811e3cdb         weeks ago         200MB

现在上传该镜像,上传应该会失败
$sudo docker push  doris:be-0.9.

Error response from daemon: pull access denied for doris, repository does not exist or may require 'docker login'
失败的原因是定位仓库的时候发现没有doris仓库,如果镜像带有用户id,那么默认的仓库是/id/tagname。
5.3 上传带用户id的镜像
[druid@palo194 output]$ sudo docker tag doris:be-0.9. lenmom/doris:0.9.  #添加带用户id的镜像名称

[sudo] password for druid:

[druid@palo194 output]$ sudo docker rmi doris:be-0.9.                     #删除不带用户id的镜像名称

Untagged: doris:be-0.9.

[druid@palo194 output]$ sudo docker images                                 #查看镜像列表

REPOSITORY          TAG                 IMAGE ID            CREATED             SIZE

lenmom/doris        fe-0.9.            ecd903182693        About an hour ago   649MB

lenmom/doris        be-0.9.               cf8f3297619a        About an hour ago   855MB

centos              centos7.5.1804      cf49811e3cdb         weeks ago         200MB

[druid@palo194 output]$ sudo docker push lenmom/doris:be-0.9.0             #上传带用户id的镜像,上传成功

The push refers to repository [docker.io/lenmom/doris]

270d8b1169bb: Preparing

1d301fa1efc4: Preparing

4826cdadf1ef: Preparing
能够上传成功关键在docker.io/lenmom/doris,docker就是靠用户id来定位仓库地址的!!
6. 通过docker来使用制作好的镜像
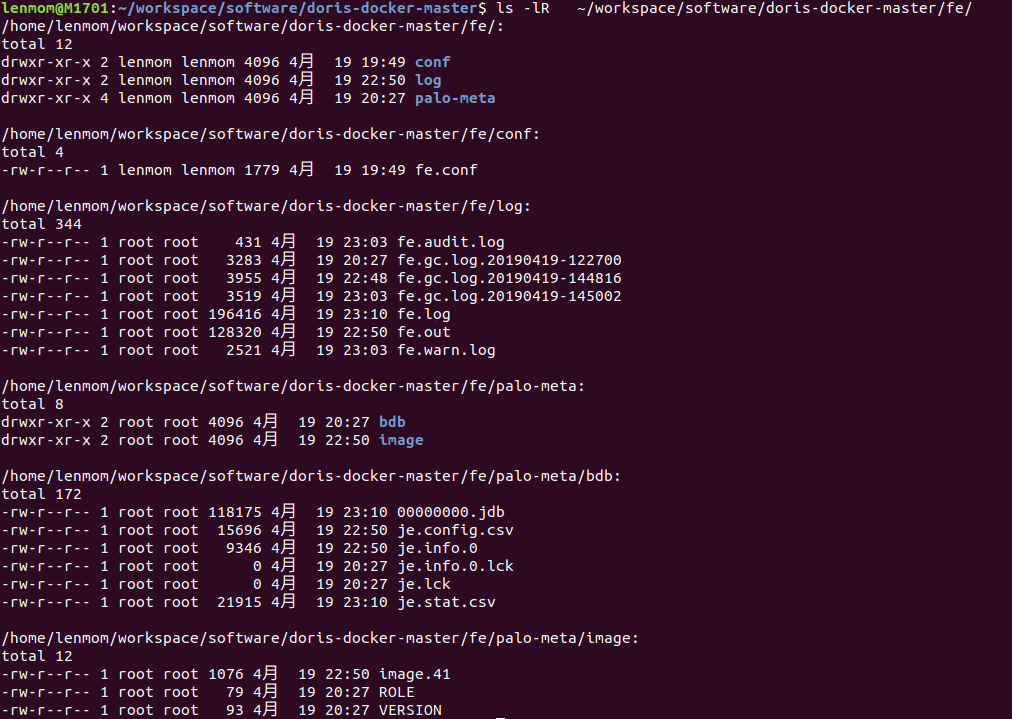
6.1 启动fe容器
sudo docker run  --name doris-fe -p : -p : -p : -p : \

-v /home/lenmom/workspace/software/doris-docker-master/fe/log:/home/palo/run/fe/log \

-v /home/lenmom/workspace/software/doris-docker-master/fe/palo-meta:/home/palo/run/fe/palo-meta \

-v /home/lenmom/workspace/software/doris-docker-master/fe/conf:/home/palo/run/fe/conf/  \
--link doris-be   \

-v /etc/localtime:/etc/localtime:ro lenmom/doris:fe-0.9.
Note: this create a docker container named doris-fe, after the start up ,we can see the results in the directory, and if we want to operate the be node to setup a cluster, we should start up the be node first, because to set up a cluster, the fe node need to know the be's ip address and vice not(because the fe would send the it's address to be during the hearbeat process. This is why we add the -link to container instance of doris-be!
and you can start a mysql container with a link to the doris-fe container just started to operate the fe instance.
sudo docker run -it --name mysql --link doris-fe mysql:5.7 /bin/bash
when the mysql container started, we can login the doris-fe in inside the mysql container:
root@d4df95bc2460:/# mysql -h doris-fe -P  -uroot

Welcome to the MySQL monitor.  Commands end with ; or \g.

Your MySQL connection id is

Server version: 5.1.

Copyright (c) , , Oracle and/or its affiliates. All rights reserved.

Oracle is a registered trademark of Oracle Corporation and/or its

affiliates. Other names may be trademarks of their respective

owners.

Type 'help;' or '\h' for help. Type '\c' to clear the current input statement.

mysql> show databases;

+--------------------+

| Database           |

+--------------------+

| information_schema |

+--------------------+

 row in set (0.03 sec)

mysql> clear

mysql> exit

Bye

root@d4df95bc2460:/# exit

6.2 启动be容器
sudo docker run  -d --name doris-be -p : -p : -p : -p : \

-v /home/lenmom/workspace/software/doris-docker-master/be/log:/home/palo/run/be/log \

-v /home/lenmom/workspace/software/doris-docker-master/be/storage:/home/palo/run/be/data \

-v /home/lenmom/workspace/software/doris-docker-master/be/conf:/home/palo/run/be/conf/ \

-v  /etc/localtime:/etc/localtime:ro  \

lenmom/doris:be-0.9.0
and if we can go into the doris-be container using command
sudo docker exec -it doris-be bash
after enter the container, we can see the be instance has been launched now.
6.3 set up cluster
sudo docker run -it --name mysql --link doris-fe mysql:5.7 /bin/bash
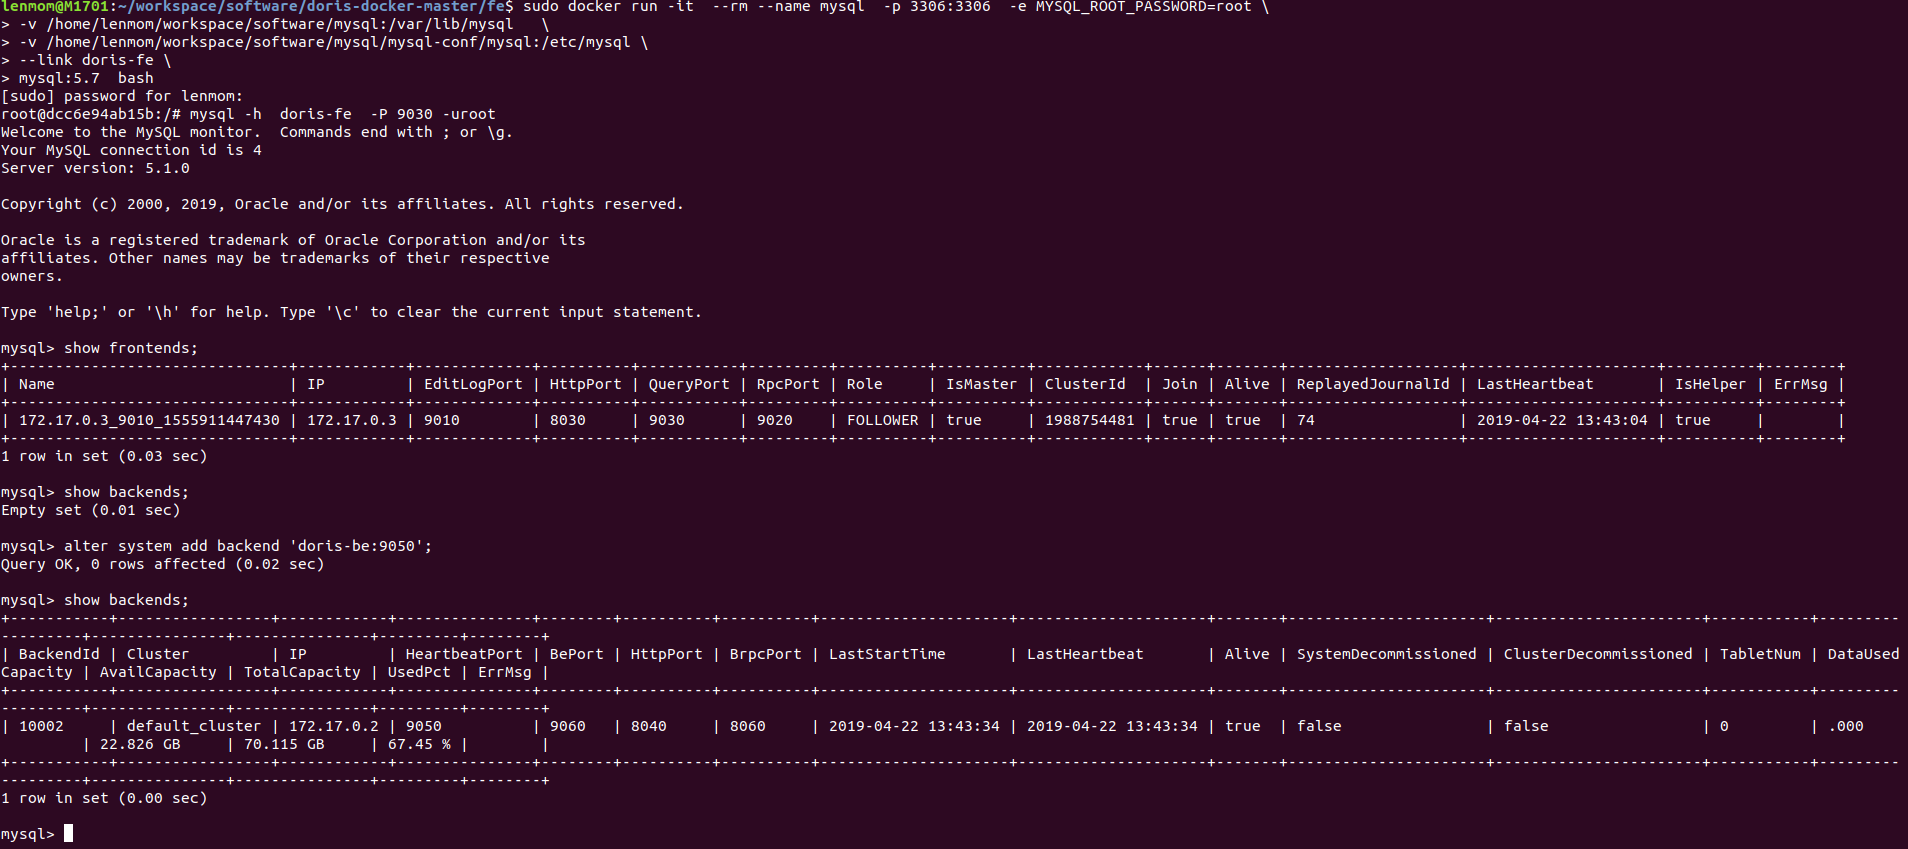
after the mysql instance started, we would enter the shell terminal, then login doris-fe using mysql-client
lenmom@M1701:~/workspace/software/doris-docker-master/fe$ sudo docker run -it  --rm --name mysql  -p :  -e MYSQL_ROOT_PASSWORD=root \

> -v /home/lenmom/workspace/software/mysql:/var/lib/mysql   \

> -v /home/lenmom/workspace/software/mysql/mysql-conf/mysql:/etc/mysql \

> --link doris-fe \

> mysql:5.7  bash

[sudo] password for lenmom:

root@dcc6e94ab15b:/# mysql -h  doris-fe  -P  -uroot

Welcome to the MySQL monitor.  Commands end with ; or \g.

Your MySQL connection id is

Server version: 5.1.

Copyright (c) , , Oracle and/or its affiliates. All rights reserved.

Oracle is a registered trademark of Oracle Corporation and/or its

affiliates. Other names may be trademarks of their respective

owners.

Type 'help;' or '\h' for help. Type '\c' to clear the current input statement.

mysql> show frontends;

+-------------------------------+------------+-------------+----------+-----------+---------+----------+----------+------------+------+-------+-------------------+---------------------+----------+--------+

| Name                          | IP         | EditLogPort | HttpPort | QueryPort | RpcPort | Role     | IsMaster | ClusterId  | Join | Alive | ReplayedJournalId | LastHeartbeat       | IsHelper | ErrMsg |

+-------------------------------+------------+-------------+----------+-----------+---------+----------+----------+------------+------+-------+-------------------+---------------------+----------+--------+

| 172.17..3_9010_1555911447430 | 172.17.0.3 |         |      |       |     | FOLLOWER | true     |  | true | true  |                 | -- :: | true     |        |

+-------------------------------+------------+-------------+----------+-----------+---------+----------+----------+------------+------+-------+-------------------+---------------------+----------+--------+

 row in set (0.03 sec)

mysql> show backends;

Empty set (0.01 sec)

mysql> alter system add backend 'doris-be:9050';

Query OK,  rows affected (0.02 sec)

mysql> show backends;

+-----------+-----------------+------------+---------------+--------+----------+----------+---------------------+---------------------+-------+----------------------+-----------------------+-----------+------------------+---------------+---------------+---------+--------+

| BackendId | Cluster         | IP         | HeartbeatPort | BePort | HttpPort | BrpcPort | LastStartTime       | LastHeartbeat       | Alive | SystemDecommissioned | ClusterDecommissioned | TabletNum | DataUsedCapacity | AvailCapacity | TotalCapacity | UsedPct | ErrMsg |

+-----------+-----------------+------------+---------------+--------+----------+----------+---------------------+---------------------+-------+----------------------+-----------------------+-----------+------------------+---------------+---------------+---------+--------+

|      | default_cluster | 172.17.0.2 |           |    |      |      | -- :: | -- :: | true  | false                | false                 |          | .             | 22.826 GB     | 70.115 GB     | 67.45 % |        |

+-----------+-----------------+------------+---------------+--------+----------+----------+---------------------+---------------------+-------+----------------------+-----------------------+-----------+------------------+---------------+---------------+---------+--------+

 row in set (0.00 sec)

mysql>
Here, we have set up a cluster using the doris-fe and doris-be container instance which has just launched and you can can docker-compose or docker-swarm to set up more instacnes of nodes and setting up clusters based on docker.
Notes: if we want to login fe docker container in the host machine using mysql-client, we should make sure the mysql client is less than 8.*, or else ,we may get the error message when login 127.0.0.1 on the docker host via mysql-client.
mysql -h 127.0.0.1 -P  -uroot -p

Enter password:

ERROR  (): Access denied for user 'root' (using password: YES)
notes:
a). we can launch multiple be instance to set multiple be instance cluster using docker container.
b). Do make sure the host mahine's mysql-client version is less than 8.0* if we want to login the fe docker instance via mysql-client on the docker host machine.
c). The be docker instance should be launched before the fe docker instance, because when set up cluster via fe,the fe need to be aware of the existance of the be docker instacne.
d) when launch the fe docker instance, all the be docker instance should be linked by the fe docker instance.
Have fun with doris!
doris 0.9.0版本docker镜像制作与使用的更多相关文章
- MySQL、MongoDB、Redis数据库Docker镜像制作
MySQL.MongoDB.Redis数据库Docker镜像制作 在多台主机上进行数据库部署时,如果使用传统的MySQL的交互式的安装方式将会重复很多遍.如果做成镜像,那么我们只需要make once ...
- 《Docekr入门学习篇》——Docker镜像制作
Docker镜像制作 Docker镜像的构建分为两种,一种是手动构建,一种是dockerfile(自动构建) 手动构建 基于centos镜像进行构建制作Nginx镜像 [root@rbtnode1 ~ ...
- Docker 镜像制作教程:针对不同语言的精简策略
本系列文章将分为三个部分: 第一部分着重介绍多阶段构建(multi-stage builds),因为这是镜像精简之路至关重要的一环.在这部分内容中,我会解释静态链接和动态链接的区别,它们对镜像带来的影 ...
- docker研究-4 docker镜像制作
这次实验以centos镜像为基础镜像进行相关docker镜像制作. 1. 下载centos镜像 [root@localhost ~]# docker pull centosUsing default ...
- Nginx+PHP7.3.9 Docker镜像制作
最近因项目需要制作了多个版本的php docker镜像,制作过程可谓是一波三折,因基于yum的方式安装php的方式在安装扩展插件时很不方便,不容易找到插件对应的yum源,所以PHP在docker镜像中 ...
- docker镜像制作必备技能
正文 使用过docker的都知道dockerfile,其用于定义制作镜像的流程,由一系列命令和参数构成的脚本,这些命令应用于基础镜像并最终创建一个新的镜像.可参考往期文章学习:docker基础知识整理 ...
- 实战【docker 镜像制作与使用】
一.制作docker 镜像 使用spring boot 构建一个简单的web 项目,返回 “Hello,World ”字符串,使用 Maven 打成 jar 包,使用的Linux 环境是 Centos ...
- Docker 镜像制作 CentOS+JDK+Tomcat
[root@localhost createImages]# ls apache-tomcat-.tar.gz server-jre-8u121-linux-x64.tar.gz [root@loca ...
- presto-gateway 试用以及docker 镜像制作
presto-gateway 是 lyft 团队开源 的prestodb 的工具.以下是一个简单的试用,以及碰到问题的解决 还有就是docker 镜像的制作 Dockerfile 很简单,本地构建然后 ...
随机推荐
- SqlServer根据表中ID加序号
正序列号select ROW_NUMBER() over(order by Id) as xh,Id,Name,TelNumber,Zhijin from Users1 反序列号select 序号=( ...
- mybatis 使用IN 关键字
mybatis 使用IN 关键字,查询条件如果有多个,拼接成字符串,当做参数传入的时候可能会只查询一条数据,那是因为mybits 将它当做一个字符串来处理了,这时候就需要使用<foreach&g ...
- VIM入门
目录 一.vim介绍 二.vim颜色显示和移动光标 三.vim一般模式下移动光标 四.vim一般模式下复制.剪切和粘贴 五.进入编辑模式 六.vim命令模式 七.vim实践 一.vim介绍 vi是最重 ...
- ionic3 使用swiper插件 实现轮播效果
由于app的更新迭代 我需要完成新版本设计图的开发 刚开始就遇到一个问题 首页的banner图需要实现某种效果 而ionic3自带的轮播图效果怎么改都改不到我想要的效果 效果图如下 自动播放 不断 ...
- B-trees
B-trees are balanced search trees designed to work well on disks or other direct accesssecondary sto ...
- wav文件格式分析与详解
WAV文件是在PC机平台上很常见的.最经典的多媒体音频文件,最早于1991年8月出现在Windows 3.1操作系统上,文件扩展名为WAV,是WaveFom的简写,也称为波形文件,可直接存储声音波形, ...
- JAVA002标识符的命名规则、关键字
标志符命名规则: 1.标志符可以由字母.数字.下划线(_)和美元符号($)组成,不能以数字开头($sen.Void) 2.标志符严格区分大小写 3.标志符不能是Java的关键字和保留字(eg:publ ...
- Java堆、栈和常量池以及相关String详解
一:在JAVA中,有六个不同的地方可以存储数据: 1. 寄存器(register). 这是最快的存储区,因为它位于不同于其他存储区的地方——处理器内部.但是寄存器的数量极其有限,所以寄存器由编译器根据 ...
- 德州扑克AI--Programming Poker AI(译)
前言: 最近在研究德州扑克的AI, 也想由浅入深的看下, 在网上找了一圈, 发现很多文章都提到了一篇文章: Programming Poker AI. 仔细拜读了一下, 觉得非常不错. 这里作下简单的 ...
- Ubuntu16.04上添加用户以及修改用户所属的组
我的问题是这样的,我的本地的电脑上有一个用户以及一个用户组,我还想添加其他的用户,并且这个用户属于这个已有的用户组 <鸟哥的linux私房菜>针对的是centos系统,还是有一些不一样 实 ...