varnish实践
一、实验环境:
1.软件版本:
系统版本:CentOS Linux release 7.4.1708 (Core)
php版本:PHP 7.2
nginx版本:nginx-1.12.2
数据库版本:MariaDB 10
Varnish:4.0.1
关闭防火墙与selinux
2.实验架构及IP分配:
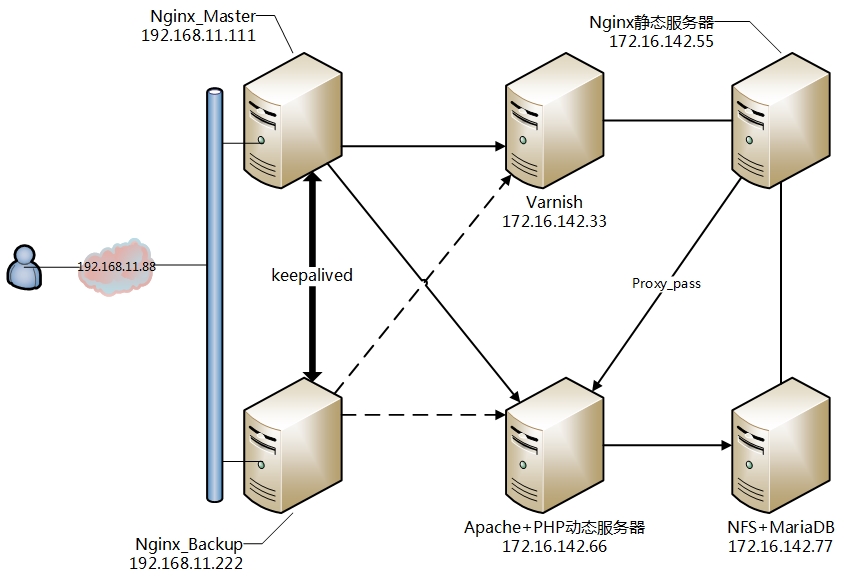
(为了简洁,图中省略了网络设备,请各位看官脑补)
3.架构设计思路
1.前端nginx做负载均衡服务器将用户请求反代至Varnish缓存服务器,
2.由Varnish判断是否以缓存响应至客户端,若缓存命中则直接响应,若无缓存响应,Varnish将请求代理至后端Nginx静态服务器。
3.若为请求为静态内容则由Nginx直接响应,并由Varnish判断是否建立缓存,若请求为动态内容则交由动态服务器处理响应。
4.静态服务器与动态服务器使用共享存储,保证用户数据同步。
5.静态服务器和动态服务器可以增加冗余,以保证架构的高可用性。
6.MariaDB可以单独出来并冗余。
7.NFS可以替换为分布式存储,提高整个架构的可用性。
8.前端Nginx将动态内容负载均衡至动态服务器。
二、基本配置
1.各服务器软件安装
以上所有服务器程序都为epel源yum安装,yum安装过程很方便快捷,这里不再赘述安装过程。
2.前端Nginx与keepalived配置HA
Nginx配置:

在Nginx默认配置中添加图中两项配置,Nginx作为负载均衡时,虽然实现负载均衡功能的配置很简单,但还有很多优化项需要深入理解与实践。博文链接:正在写...
keepalived配置
配置思路就是用keepalived将两台Nginx做主备高可用,通过vrrp_script监控Nginx的运行状态,并在必要时自动切换。也可以尝试做双主模型。
以下是主Nginx服务器的keepalived配置,备服务器只需将state与priority修改即可,keepalived原理与配置:http://blog.51cto.com/13322786/2162618
- 1 global_defs {
- 2 notification_email {
- 3 root@localhost
- 4 }
- 5 notification_email_from keepalived@localhost
- 6 smtp_server 127.0.0.1
- 7 smtp_connect_timeout 30
- 8 router_id n1
- 9 vrrp_mcast_group4 224.1.101.18
- 10 }
- 11 vrrp_script chk_ngx {
- 12 script "killall -0 nginx && exit 0 || exit 1"
- 13 weight -5
- 14 interval 1
- 15 fall 1
- 16 rise 1
- 17 }
- 18
- 19 vrrp_instance VI_1 {
- 20 state MASTER
- 21 interface ens33
- 22 virtual_router_id 22
- 23 priority 100
- 24 advert_int 1
- 25 authentication {
- 26 auth_type PASS
- 27 auth_pass 1111
- 28 }
- 29 virtual_ipaddress {
- 30 192.168.11.88/24 dev ens33 label ens33:0
- 31 }
- 32 track_script {
- 33 chk_ngx
- 34 }
- 35 }
两台Nginx主机配置相同。
配置完成后启动Nginx和keepalived服务。
- systemctl start nginx
- systemctl start keepalived
3.简单配置Varnish
这里配置Varnish不涉及VCL配置,目前先简单配置,使整个架构能正常运转后再做优化配置。
- vim /etc/varnish/varnish.params
这是相当于是Varnish的全局配置,用于配置Varnish的链接状态、监听端口、VCL规则路径、缓存类型等
Varnish的另一个配置是VCL规则配置,这也是学习Varnish的主要任务。在再将整个系统架构搭建完成并能正常运行后会详细对Varnish的原理及VCL规则做详细介绍
- 1 RELOAD_VCL=1
- 2 # Main configuration file. You probably want to change it.
- 3 VARNISH_VCL_CONF=/etc/varnish/default.vcl
- 4 # Default address and port to bind to. Blank address means all IPv4
- 5 # and IPv6 interfaces, otherwise specify a host name, an IPv4 dotted
- 6 # quad, or an IPv6 address in brackets.
- 7 #VARNISH_LISTEN_ADDRESS=192.168.1.5 #配置监听的IP,若不配置默认为所有IP
- 8 VARNISH_LISTEN_PORT=80 #监听端口
- 9 # Admin interface listen address and port
- 10 VARNISH_ADMIN_LISTEN_ADDRESS=127.0.0.1 #缓存管理的IP和端口
- 11 VARNISH_ADMIN_LISTEN_PORT=6082
- 12 # Shared secret file for admin interface
- 13 VARNISH_SECRET_FILE=/etc/varnish/secret
- 14 # Backend storage specification, see Storage Types in the varnishd(5)
- 15 # man page for details.
- 16 VARNISH_STORAGE="file,/data/varnish/cache,1g" #缓存格式、路径以及缓存文件最大容量
- 17 # User and group for the varnishd worker processes
- 18 VARNISH_USER=varnish
- 19 VARNISH_GROUP=varnish
VARNISH_STORAGE这项在Varnish4.0中可以设置三种缓存格式:file、malloc、persistent
malloc是定义将内容缓存在内存中,缓存速度和效率都较高,但是会受限于内存大小。
file是定义将内容缓存在磁盘中,可扩展性强,但缓存速度比不上malloc模式,不过随着固态硬盘的发展,会逐步突破磁盘IO慢的瓶颈。
在这两种缓存模式都是下,外部应用是不能查看缓存内容的,但一旦Varnish服务器重启缓存将会清空。
persistent是一种还在测试阶段的缓存格式,服务器重启时不会清空缓存。
配置完成后启动Varnish服务并查看端口是否已在监听状态。
- systemctl start varnish
- ss -lntup

4.配置后端Nginx静态服务器
修改默认配置
- vim /etc/nginx/nginx.conf
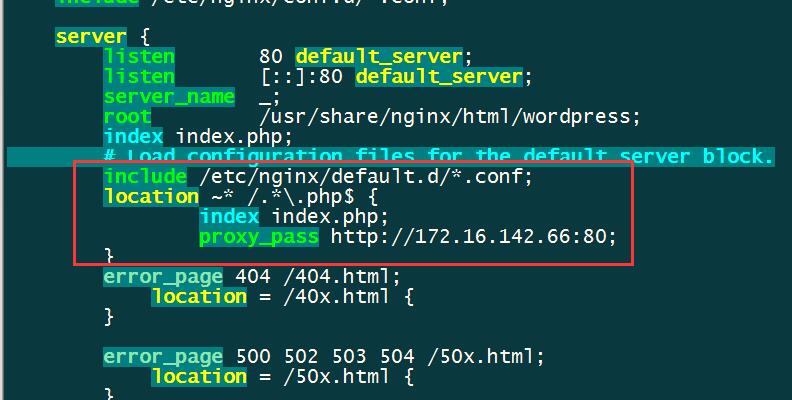
将结尾为php的动态内容代理至后端动态服务器。
配置完成后启动Nginx服务并查看端口是否正常监听
- systemctl start nginx
5.配置后端Apache+PHP动态服务器
Apache不用做多余配置,安装完Apache和PHP后直接启动就可以了,但要注意一定要安装PHP中mod_php72w这个依赖包,Apache解析php文件就是依赖这个模块。
我安装的PHP依赖包:
- yum install -y mod_php72w php72w-common php72w-fpm php72w-opcache php72w-gd php72w-mysqlnd php72w-mbstring php72w-pecl-redis php72w-pecl-memcached php72w-devel
启动httpd服务,并测试phpinfo()是否解析成功。
6.配置NFS
配置NFS服务器需要安装RPC和NFS
- yum -y install nfs-utils rpcbind
安装完成后创建共享目录,修改共享目录属主和属组
- mkrir -p /data/nfs
- chown -R nfsnobody.nfsnobody /data/nfs
添加NFS挂载规则
- vim /etc/exports
- /data/nfs 172.16.142.*(rw,sync,all_squash)
启动RPC和NFS服务
- systemctl start rpcbind
- systemctl start nfs
将NFS共享目录挂载至静态和动态服务器
PS:在静态服务器和动态服务器上都要安装nfs-utils才能正常挂载。
静态(在Nginx上创建好目录wordpress):
- mount -t nfs 172.16.142.77:/data/nfs /usr/share/nginx/html/wordpress
动态(Apache+PHP):
- mount -t nfs 172.16.142.77:/data/nfs /var/www/html/
挂载完成后将WordPress4.9解压到NFS共享目录。
7.配置MariaDB
启动MariaDB后运行mysql_secure_installation初始化数据库,我这里配置root密码后全选择的yes。
登陆数据库创建管理账户并创建库
- mysql -uroot -p123456 #登入数据库进行用户及库的创建与配置
- GRANT ALL PRIVILEGES ON *.* TO 'mysql'@'%'IDENTIFIED BY '123456' WITH GRANT OPTION; #创建账户mysql,密码为123456,并允许任意IP访问此账户数据库,权限为ALL
- CREATE DATABASE wordpress; #创建名为wordpress的库,安装完WordPress后会要求在数据库创建库,这里事先创建好
- quit
在静态服务器和动态服务器上测试是否能连上MariaDB
- mysql -umysql -p123456 -h 172.16.142.7
8.初始化WordPress,确保能正常访问
检查架构中各服务器的服务是否正常启动
然后在浏览器输入http://192.168.11.88/index.php进入WordPress初始化页面后,在数据库配置页面填上相关参数
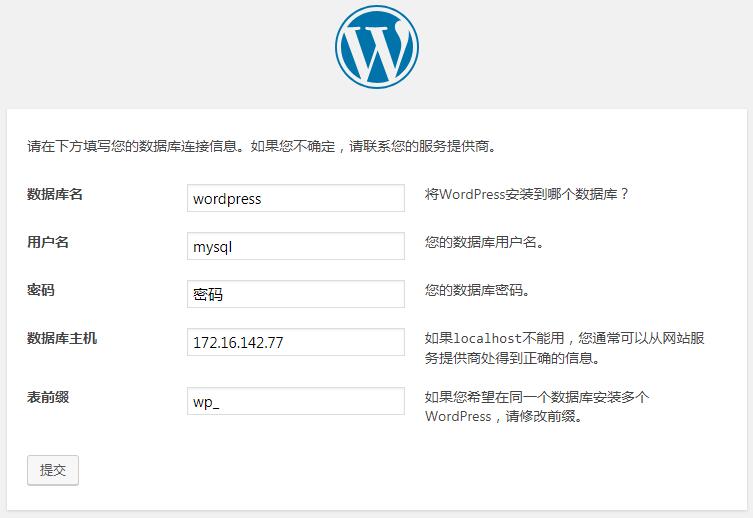
然后按提示步骤完成安装。
在完成以上步骤后,WordPress就能正常访问了。下面具体介绍一下Varnish中的VCL规则。
一、Varnish配置简介
varnish有两类配置文件,
一个是配置varnish全局工作模式的默认路径是/etc/varnish/varnish.params
另一个是配置varnish的缓存逻辑的,即VCL规则配置文件/etc/varnish/default.vcl
学习Varnish就是学习VCL规则的配置:
VCL规则配置分为两类状态引擎
1:Client Side:
vcl_recv:收到客户端请求后判定下一步流向
vcl_pass:不能查缓存的,直接pass到后端主机
vcl_hit:缓存命中
vcl_miss:缓存未命中
vcl_pipe:varnish无法理解的请求,或者说请求非WEB服务
vcl_purge:缓存清理
vcl_synth:缓存修剪
vcl_deliver:向客户端生成并发送响应报文
2:Backend Side:
vcl_backend_fetch:向后端主机发送请求前,调用此函数,可修改发往后端的请求
vcl_backend_response: 获得后端主机的响应后,调用此函数并生成规则
vcl_backend_error:后端主机响应错误后,调用此函数
Varnish4.0中两个特殊的引擎:
vcl_init:初始化varnish模块
vcl_fini:用于清理varnish模块
Varnish4.0中VCL默认配置文件为/etc/varnish/default.vcl
在这个文件中只有简单的几行信息,如下所示:
- # Marker to tell the VCL compiler that this VCL has been adapted to the
- # new 4.0 format.
- vcl 4.0;
- # Default backend definition. Set this to point to your content server.
- backend default {
- .host = "172.16.142.55";
- .port = "";
- }
- sub vcl_recv {
- # Happens before we check if we have this in cache already.
- #
- # Typically you clean up the request here, removing cookies you don't ne
- ed,
- # rewriting the request, etc.
- }
- sub vcl_backend_response {
- # Happens after we have read the response headers from the backend.
- #
- # Here you clean the response headers, removing silly Set-Cookie headers
- # and other mistakes your backend does.
- }
- sub vcl_deliver {
- # Happens when we have all the pieces we need, and are about to send the
- # response to the client.
- #
- # You can do accounting or modifying the final object here.
这里可以按需求自定义配置VCL的附加规则,这里的默认配置虽然没有信息,但Varnish4.0也有自己默认的内建配置,可用varnishadm命令来查看
- varnish -S /etc/varnish/secret -T 127.0.0.1: #在vanish全局配置文件中可设置端口号和IP
vcl.show -v boot
- // VCL.SHOW 0 1222 input
- #
- # This is an example VCL file for Varnish.
- #
- # It does not do anything by default, delegating control to the
- # builtin VCL. The builtin VCL is called when there is no explicit
- # return statement.
- #
- # See the VCL chapters in the Users Guide at https://www.varnish-cache.org/docs/
- # and http://varnish-cache.org/trac/wiki/VCLExamples for more examples.
- # Marker to tell the VCL compiler that this VCL has been adapted to the
- # new 4.0 format.
- vcl 4.0;
- # Default backend definition. Set this to point to your content server.
- backend default {
- .host = "172.16.142.55";
- .port = "";
- }
- sub vcl_recv {
- # Happens before we check if we have this in cache already.
- #
- # Typically you clean up the request here, removing cookies you don't need,
- # rewriting the request, etc.
- }
- sub vcl_backend_response {
- # Happens after we have read the response headers from the backend.
- #
- # Here you clean the response headers, removing silly Set-Cookie headers
- # and other mistakes your backend does.
- }
- sub vcl_deliver {
- # Happens when we have all the pieces we need, and are about to send the
- # response to the client.
- #
- # You can do accounting or modifying the final object here.
- }
- // VCL.SHOW 1 5479 Builtin
- /*-
- * Copyright (c) 2006 Verdens Gang AS
- * Copyright (c) 2006-2014 Varnish Software AS
- * All rights reserved.
- *
- * Author: Poul-Henning Kamp <phk@phk.freebsd.dk>
- *
- * Redistribution and use in source and binary forms, with or without
- * modification, are permitted provided that the following conditions
- * are met:
- * 1. Redistributions of source code must retain the above copyright
- * notice, this list of conditions and the following disclaimer.
- * 2. Redistributions in binary form must reproduce the above copyright
- * notice, this list of conditions and the following disclaimer in the
- * documentation and/or other materials provided with the distribution.
- *
- * THIS SOFTWARE IS PROVIDED BY THE AUTHOR AND CONTRIBUTORS ``AS IS'' AND
- * ANY EXPRESS OR IMPLIED WARRANTIES, INCLUDING, BUT NOT LIMITED TO, THE
- * IMPLIED WARRANTIES OF MERCHANTABILITY AND FITNESS FOR A PARTICULAR PURPOSE
- * ARE DISCLAIMED. IN NO EVENT SHALL AUTHOR OR CONTRIBUTORS BE LIABLE
- * FOR ANY DIRECT, INDIRECT, INCIDENTAL, SPECIAL, EXEMPLARY, OR CONSEQUENTIAL
- * DAMAGES (INCLUDING, BUT NOT LIMITED TO, PROCUREMENT OF SUBSTITUTE GOODS
- * OR SERVICES; LOSS OF USE, DATA, OR PROFITS; OR BUSINESS INTERRUPTION)
- * HOWEVER CAUSED AND ON ANY THEORY OF LIABILITY, WHETHER IN CONTRACT, STRICT
- * LIABILITY, OR TORT (INCLUDING NEGLIGENCE OR OTHERWISE) ARISING IN ANY WAY
- * OUT OF THE USE OF THIS SOFTWARE, EVEN IF ADVISED OF THE POSSIBILITY OF
- * SUCH DAMAGE.
- *
- *
- * The built-in (previously called default) VCL code.
- *
- * NB! You do NOT need to copy & paste all of these functions into your
- * own vcl code, if you do not provide a definition of one of these
- * functions, the compiler will automatically fall back to the default
- * code from this file.
- *
- * This code will be prefixed with a backend declaration built from the
- * -b argument.
- */
- vcl 4.0;
- #######################################################################
- # Client side
- sub vcl_recv {
- if (req.method == "PRI") {
- /* We do not support SPDY or HTTP/2.0 */
- return (synth());
- }
- if (req.method != "GET" &&
- req.method != "HEAD" &&
- req.method != "PUT" &&
- req.method != "POST" &&
- req.method != "TRACE" &&
- req.method != "OPTIONS" &&
- req.method != "DELETE") {
- /* Non-RFC2616 or CONNECT which is weird. */
- return (pipe);
- }
- if (req.method != "GET" && req.method != "HEAD") {
- /* We only deal with GET and HEAD by default */
- return (pass);
- }
- if (req.http.Authorization || req.http.Cookie) {
- /* Not cacheable by default */
- return (pass);
- }
- return (hash);
- }
- sub vcl_pipe {
- # By default Connection: close is set on all piped requests, to stop
- # connection reuse from sending future requests directly to the
- # (potentially) wrong backend. If you do want this to happen, you can undo
- # it here.
- # unset bereq.http.connection;
- return (pipe);
- }
- sub vcl_pass {
- return (fetch);
- }
- sub vcl_hash {
- hash_data(req.url);
- if (req.http.host) {
- hash_data(req.http.host);
- } else {
- hash_data(server.ip);
- }
- return (lookup);
- }
- sub vcl_purge {
- return (synth(, "Purged"));
- }
- sub vcl_hit {
- if (obj.ttl >= 0s) {
- // A pure unadultered hit, deliver it
- return (deliver);
- }
- if (obj.ttl + obj.grace > 0s) {
- // Object is in grace, deliver it
- // Automatically triggers a background fetch
- return (deliver);
- }
- // fetch & deliver once we get the result
- return (fetch);
- }
- sub vcl_miss {
- return (fetch);
- }
- sub vcl_deliver {
- return (deliver);
- }
- /*
- * We can come here "invisibly" with the following errors: 413, 417 & 503
- */
- sub vcl_synth {
- set resp.http.Content-Type = "text/html; charset=utf-8";
- set resp.http.Retry-After = "";
- synthetic( {"<!DOCTYPE html>
- <html>
- <head>
- <title>"} + resp.status + " " + resp.reason + {"</title>
- </head>
- <body>
- <h1>Error "} + resp.status + " " + resp.reason + {"</h1>
- <p>"} + resp.reason + {"</p>
- <h3>Guru Meditation:</h3>
- <p>XID: "} + req.xid + {"</p>
- <hr>
- <p>Varnish cache server</p>
- </body>
- </html>
- "} );
- return (deliver);
- }
- #######################################################################
- # Backend Fetch
- sub vcl_backend_fetch {
- return (fetch);
- }
- sub vcl_backend_response {
- if (beresp.ttl <= 0s ||
- beresp.http.Set-Cookie ||
- beresp.http.Surrogate-control ~ "no-store" ||
- (!beresp.http.Surrogate-Control &&
- beresp.http.Cache-Control ~ "no-cache|no-store|private") ||
- beresp.http.Vary == "*") {
- /*
- * Mark as "Hit-For-Pass" for the next 2 minutes
- */
- set beresp.ttl = 120s;
- set beresp.uncacheable = true;
- }
- return (deliver);
- }
- sub vcl_backend_error {
- set beresp.http.Content-Type = "text/html; charset=utf-8";
- set beresp.http.Retry-After = "";
- synthetic( {"<!DOCTYPE html>
- <html>
- <head>
- <title>"} + beresp.status + " " + beresp.reason + {"</title>
- </head>
- <body>
- <h1>Error "} + beresp.status + " " + beresp.reason + {"</h1>
- <p>"} + beresp.reason + {"</p>
- <h3>Guru Meditation:</h3>
- <p>XID: "} + bereq.xid + {"</p>
- <hr>
- <p>Varnish cache server</p>
- </body>
- </html>
- "} );
- return (deliver);
- }
- #######################################################################
- # Housekeeping
- sub vcl_init {
- return (ok);
- }
- sub vcl_fini {
- return (ok);
- }
内建规则
操作符:
比较运算符:==,!=,~,>,>=,<,<=
逻辑运算符:&&,||,!
变量赋值:=
内建变量:
req.*:request,表示由客户端发来varnish的请求报文相关信息;
req.http.*:req.http.User-Agent,req.http.Referer,...
bereq.*:由varnish发往后端主机的http请求相关信息;
bereq.http.*
resp.*:由varnish响应给client的相关信息;
beresp.*:由后端主机响应给varnish的响应报文相关信息;
beresp.http.*
obj.*:存储在缓存空间中的缓存对象属性,只读。
内建命令中常用的变量:
req.*,bereq.*:定义请求的变量,包括客户端到varnish的请求,varnish到后端服务器的请求,(以下变量中req用法与bereq相同,所以只列出了bereq)
bereq.http.<各种HEADERS>
bereq.request:请求方法;
bereq.url:请求的URL;
bereq.proto:请求的协议版本;
bereq.backend:指明要调用的后端主机;
req专用:
req.http.Cookie:客户端的请求报文中Cookie首部的值;
req.http.User-Agent ~ "chrome"
beresp.*,resp.*:定义响应变量,包括varnish响应给客户端和后端
beresp.http.<各种HEADERS>
beresp.status:响应的状态码;
reresp.proto:协议版本
beresp.ttl:后端主机响应内容的余下的可缓存时长;
beresp.backend.name:后端主机的主机名;
obj.*:
obj.hits:缓存对象从缓存中命中的次数;
obj.ttl:缓存对象的ttl值
server.*
server.ip
server.hostname
client.*
client.ip
Varnish中的各类变量都有它们各自的适用位置,如下图所示:

简单示例:
1.obj.hits是内建变量,用于保存缓存项的被缓存命中的次数。
例:在sub vcl_deliver {}中配置
- if (obj.hits>) {
- set resp.http.X-Cache = "Hit via " + server.ip;
- }
- else {
- set resp.http.X-Cache = "Miss via " + server.ip;
- }
2.对特定类型的资源,例如公开的图片等,取消私有标识,并强行其可以由varnish缓存的时长;
在sub vcl_backend_response {}中配置
- if (beresp.http.Cache-Control !~"(?i)s-maxage") {
- if (bereq.url ~ "(?i)\.(jpg|jpeg|png|gif|css|js)") {
- unset beresp.http.Set-Cookie;
- set beresp.ttl = 3600s;
- }
varnish实践的更多相关文章
- 基于 koajs 的前后端分离实践
一.什么是前后端分离? 前后端分离的概念和优势在这里不再赘述,有兴趣的同学可以看各个前辈们一系列总结和讨论: 系列文章:前后端分离的思考与实践(1-6) slider: 淘宝前后端分离实践 知乎提问: ...
- 使用 Prometheus + Grafana 对 Kubernetes 进行性能监控的实践
1 什么是 Kubernetes? Kubernetes 是 Google 开源的容器集群管理系统,其管理操作包括部署,调度和节点集群间扩展等. 如下图所示为目前 Kubernetes 的架构图,由 ...
- varnish学习以及CDN的原理
一.varnish学习Web Page Cache: squid --> varnish 程序的运行具有局部性特征: 时间局部性:一个数据被访问过之后,可能很快会被再次访问到: 空间局部性:一个 ...
- 温习《PHP 核心技术与最佳实践》这本书
再次看这本书,顺手提炼了一下大致目录,以便后续看见目录就知道大概讲的些什么内容 PHP 核心技术与最佳实践 1.面向对象思想的核心概念 1.1 面向对象的『形』与『本』 1.2 魔术方法的应用 1.2 ...
- webp图片实践之路
最近,我们在项目中实践了webp图片,并且抽离出了工具模块,整合到了项目的基础模板中.传闻IOS10也将要支持webp,那么使用webp带来的性能提升将更加明显.估计在不久的将来,webp会成为标配. ...
- Hangfire项目实践分享
Hangfire项目实践分享 目录 Hangfire项目实践分享 目录 什么是Hangfire Hangfire基础 基于队列的任务处理(Fire-and-forget jobs) 延迟任务执行(De ...
- TDD在Unity3D游戏项目开发中的实践
0x00 前言 关于TDD测试驱动开发的文章已经有很多了,但是在游戏开发尤其是使用Unity3D开发游戏时,却听不到特别多关于TDD的声音.那么本文就来简单聊一聊TDD如何在U3D项目中使用以及如何使 ...
- Logstash实践: 分布式系统的日志监控
文/赵杰 2015.11.04 1. 前言 服务端日志你有多重视? 我们没有日志 有日志,但基本不去控制需要输出的内容 经常微调日志,只输出我们想看和有用的 经常监控日志,一方面帮助日志微调,一方面及 ...
- 【大型网站技术实践】初级篇:借助Nginx搭建反向代理服务器
一.反向代理:Web服务器的“经纪人” 1.1 反向代理初印象 反向代理(Reverse Proxy)方式是指以代理服务器来接受internet上的连接请求,然后将请求转发给内部网络上的服务器,并将从 ...
随机推荐
- boost--日期处理
1.timer 不同于系统函数的timer()一般生成一个定时器,boost中的timer是一个计时器,以秒为单位,最小精度为毫秒,使用需要包含头文件"boost\timer.hpp&quo ...
- Android逆向之smali
Android逆向之smali 头信息 smail文件前三行 .class <访问权限> [关键修饰字] <类名>; .super <父类名>; .source & ...
- Unix时间戳转日期时间格式,C#、Java、Python各语言实现!
之前有个Q上好友没事问我,怎么自己写Unix时间戳转日期时间?于是我就顺手写了个C#版本给他!最近想起来,就萌发多写几个语言的版本分享,权当练习思路外加熟悉另外两种语言. 先说转换步骤 先处理年份,从 ...
- Container Adaptors
Notes from C++ Primer stack and queue: based on deque priority_queue: based on vector Standard li ...
- i春秋SRC部落携手同程SRC发布首届漏洞提交任务
[部落守卫者集结令]拿巨额奖金?上白帽子排行榜?近距离膜拜大佬?学技术?掌握窍门?又或者你是个责任感爆棚想要互联网行业安全的有志青年?加入i春秋部落守卫者(The Guarders),统统满足你! [ ...
- Swift5 语言指南(九) 闭包
闭包是自包含的功能块,可以在代码中传递和使用.Swift中的闭包类似于C和Objective-C中的块以及其他编程语言中的lambdas. 闭包可以从定义它们的上下文中捕获和存储对任何常量和变量的引用 ...
- Git 常用命令备份
继上次保存了git 多个key共存配置(https://www.cnblogs.com/xiaochangwei/p/9155195.html)后,今天把常见的git命令备份下(最近我的云笔记账号经常 ...
- Linux - 多窗口管理器Screen程序
GNU's Screen homepage Screen是由GNU计划开发的用于命令行终端切换的自由软件,可以看作是窗口管理器的命令行界面版本. 可以通过该软件同时连接多个本地或远程的命令行会话,并在 ...
- vue 自学项目笔记
感觉小青推荐的学习网课, 利用vue 仿制一个去哪网, 学习的东西很多, 在食用之前,需要先确保js 和css 过关 js https://www.bilibili.com/video/av3009 ...
- vueAdmin ui基础包
这个版本的vueAdmin ui是针对官网版本进行修改而成,主要修改了后端接口修改,登录等等,一个通用的前端工程基础包,即开即用,省去了前期繁琐配置 Demo Build Setup # Clone ...