使用tensorflow进行mnist数字识别【模型训练+预测+模型保存+模型恢复】
import sys,os
sys.path.append(os.pardir)
import numpy as np
from tensorflow.examples.tutorials.mnist import input_data
from PIL import Image
import tensorflow as tf
def predict():
meta_path = 'ckpt/mnist.ckpt.meta'
model_path = 'ckpt/mnist.ckpt'
sess = tf.InteractiveSession ()
saver = tf.train.import_meta_graph (meta_path)
saver.restore (sess, model_path)
graph = tf.get_default_graph ()
W = graph.get_tensor_by_name ("w:0")
b = graph.get_tensor_by_name ("b:0")
x = tf.placeholder (tf.float32, [None, 784])
y = tf.nn.softmax (tf.matmul (x, W) + b)
keep_prob = tf.placeholder (tf.float32)
batch_xs, batch_ys=mnist.train.next_batch (100)
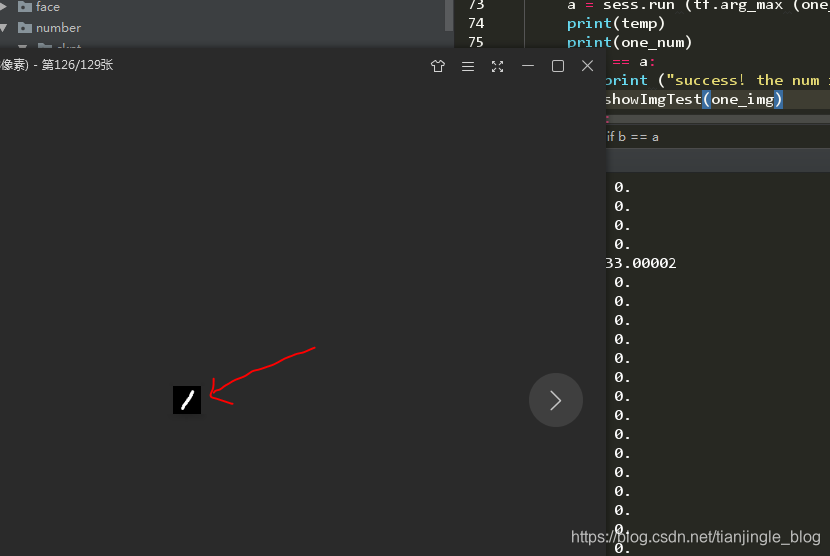
one_img = batch_xs[0].reshape ((1, 784))
one_num = batch_ys[0].reshape ((1, 10))
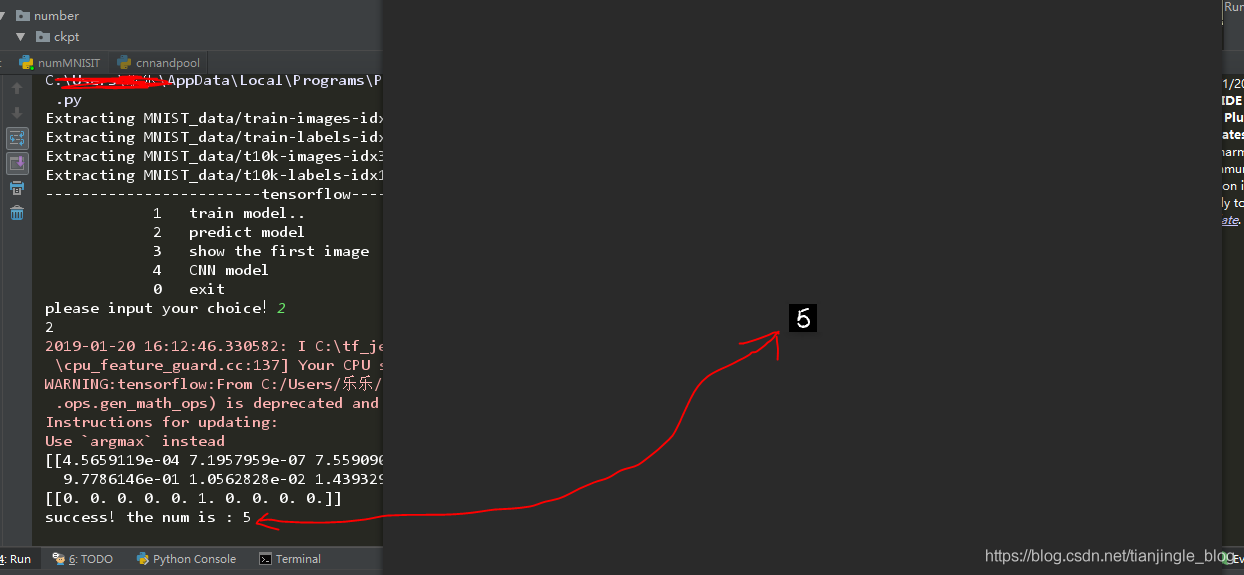
temp = sess.run (y, feed_dict={x: one_img, keep_prob: 1.0})
b = sess.run (tf.argmax (temp, 1))
a = sess.run (tf.arg_max (one_num, 1))
print(temp)
print(one_num)
if b == a:
print ("success! the num is :", (b[0]))
showImgTest(one_img)
else:
print ("mistakes predict.")
def trainNet():
x = tf.placeholder (tf.float32, [None, 784])
W = tf.Variable (tf.zeros ([784, 10]),name="w")
b = tf.Variable (tf.zeros ([10]),name="b")
y = tf.nn.softmax (tf.matmul (x, W) + b)
y_ = tf.placeholder (tf.float32, [None, 10])
keep_prob = tf.placeholder (tf.float32)
# 定义测试的准确率
correct_prediction = tf.equal (tf.argmax (y, 1), tf.argmax (y_, 1))
accuracy = tf.reduce_mean (tf.cast (correct_prediction, tf.float32))
#
saver = tf.train.Saver (max_to_keep=1)
max_acc = 0
train_accuracy = 0
#交叉熵
cross_entropy = tf.reduce_mean (-tf.reduce_sum (y_ * tf.log (y)))
# cross_error=cross_entropy_error_batch(y,y_)
train_step = tf.train.GradientDescentOptimizer (0.01).minimize (cross_entropy)
sess = tf.InteractiveSession ()
tf.global_variables_initializer ().run ()
for i in range (1000):
batch_xs, batch_ys = mnist.train.next_batch (100)
sess.run (train_step, feed_dict={x: batch_xs, y_: batch_ys, keep_prob: 1.0})
if i % 100 == 0:
train_accuracy = accuracy.eval (feed_dict={x: batch_xs, y_: batch_ys, keep_prob: 1.0})
print ("step %d, training accuracy %g" % (i, train_accuracy))
if train_accuracy > max_acc:
max_acc = train_accuracy
saver.save (sess, 'ckpt/mnist.ckpt')
if __name__ == '__main__':
mnist = input_data.read_data_sets ("MNIST_data/", one_hot=True)
choice=0
while choice == 0:
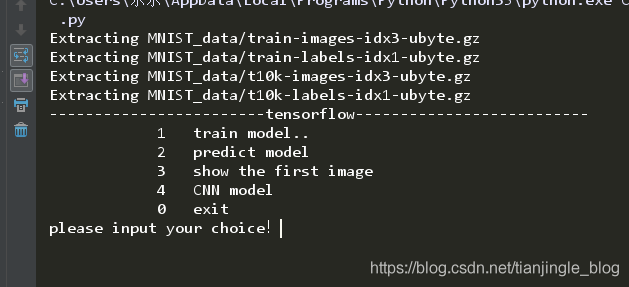
print ("------------------------tensorflow--------------------------")
print ("\t\t\t1\ttrain model..")
print("\t\t\t2\tpredict model")
print("\t\t\t3\tshow the first image")
print ("\t\t\t0\texit")
choice = input ("please input your choice!")
print(choice)
if choice == "1":
print("start train...")
trainNet()
if choice=="2":
predict()
if choice=="3":
showImg()

注:正在学习CNN,选项4还没有来的及做。后面补上
使用tensorflow进行mnist数字识别【模型训练+预测+模型保存+模型恢复】的更多相关文章
- TensorFlow学习笔记(三)MNIST数字识别问题
一.MNSIT数据处理 MNSIT是一个非常有名的手写体数字识别数据集.包含60000张训练图片,10000张测试图片.每张图片是28X28的数字. TonserFlow提供了一个类来处理 MNSIT ...
- 一个简单的TensorFlow可视化MNIST数据集识别程序
下面是TensorFlow可视化MNIST数据集识别程序,可视化内容是,TensorFlow计算图,表(loss, 直方图, 标准差(stddev)) # -*- coding: utf-8 -*- ...
- MNIST数字识别问题
摘自<Tensorflow:实战Google深度学习框架> import tensorflow as tf from tensorflow.examples.tutorials.mnist ...
- Pytorch CNN网络MNIST数字识别 [超详细记录] 学习笔记(三)
目录 1. 准备数据集 1.1 MNIST数据集获取: 1.2 程序部分 2. 设计网络结构 2.1 网络设计 2.2 程序部分 3. 迭代训练 4. 测试集预测部分 5. 全部代码 1. 准备数据集 ...
- Tensorflow手写数字识别训练(梯度下降法)
# coding: utf-8 import tensorflow as tffrom tensorflow.examples.tutorials.mnist import input_data #p ...
- TensorFlow深度学习实战---MNIST数字识别问题
1.滑动平均模型: 用途:用于控制变量的更新幅度,使得模型在训练初期参数更新较快,在接近最优值处参数更新较慢,幅度较小 方式:主要通过不断更新衰减率来控制变量的更新幅度. 衰减率计算公式 : deca ...
- 吴裕雄 python 神经网络——TensorFlow实现回归模型训练预测MNIST手写数据集
import tensorflow as tf from tensorflow.examples.tutorials.mnist import input_data mnist = input_dat ...
- Tensorflow手写数字识别---MNIST
MNIST数据集:包含数字0-9的灰度图, 图片size为28x28.训练样本:55000,测试样本:10000,验证集:5000
- Tensorflow手写数字识别(交叉熵)练习
# coding: utf-8import tensorflow as tffrom tensorflow.examples.tutorials.mnist import input_data #pr ...
随机推荐
- java Calendar日历类
~Calendar类是一个抽象类,为特定瞬间与一组诸如YEAR,MONTH,DAY_OF_MONTH,HOUR等日历字段之间的转换提供了一些方 法,并为操作日历字段(例如获得下星期的日期)提供了一些方 ...
- chrome开发者工具那点事
Elements:查找网页源代码HTML中的任一元素,手动修改任一元素的属性和样式且能实时在浏览器里面得到反馈. Console:记录开发者开发过程中的日志信息,且可以作为与JS进行交互的命令行She ...
- Connection:Keep-alive
名词解释: HTTP无状态:无状态是指协议对于事务处理没有记忆能力,服务器不知道客户端是什么状态.从另一方面讲,打开一个服务器上的网页和你之前打开这个服务器上的网页之间没有任何联系 如果你要实现一个购 ...
- 2743: [HEOI2012]采花
Description 萧芸斓是Z国的公主,平时的一大爱好是采花.今天天气晴朗,阳光明媚,公主清晨便去了皇宫中新建的花园采花 .花园足够大,容纳了n朵花,花有c种颜色(用整数1-c表示),且花是排成一 ...
- 更改backend
keras默认的backend是tensorflow,更改成theano方法如下: vim ~/.keras/keras.json { "image_dim_ordering":& ...
- java的@PostConstruct注解
javax.annotation 注释类型 PostConstruct @Documented @Retention(value=RUNTIME) @Target(value=METHOD) publ ...
- (转)添加Template(模板)并基于模板部署应用
通过Template,可以定义一个或多个需要部署的镜像,定义依赖的对象,定义可供用户输入的配置参数项. 以cakephp-mysql.json为例. # oc create -f https://ra ...
- 国行ME860刷MIUI3.9.27
刷机前: 系统版本:45.2.3.ME860.ChinaRetail.en.CN Android版本:2.3.4 基带版本:BP_N_01.38.00R WEBtop版本:WT_1.2.0-144_8 ...
- [图解tensorflow源码] Graph 图模块 (UML视图)
- RHEL 7.6 安装 Oracle 18c RAC
RHEL 7.6 安装 Oracle 18c RAC 第一部分 安装规划 虚拟环境 VirtualBox 6.0 OS 版本 Red Hat Enterprise Linux Server relea ...