webpack2.0+ vue2.0
一 webpack 2.0 及用到的插件安装(默认已经有node环境)
1. package.json文件 (插件安装及插件的功能不详解)
{

  "private": true,

  "devDependencies": {

    "autoprefixer-loader": "^3.2.0",

    "babel-core": "^6.18.2",

    "babel-loader": "^6.2.7",

    "babel-plugin-transform-runtime": "^6.15.0",

    "babel-preset-es2015": "^6.18.0",

    "babel-preset-stage-0": "^6.16.0",

    "babel-runtime": "^5.8.38",

    "clean-webpack-plugin": "^0.1.15",

    "css-loader": "^0.25.0",

    "debug": "^2.2.0",

    "express": "^4.14.0",

    "extract-text-webpack-plugin": "^2.0.0",

    "file-loader": "^0.9.0",

    "html-webpack-plugin": "^2.24.1",

    "node-sass": "^4.5.0",

    "postcss-loader": "^1.3.2",

    "sass-loader": "^6.0.2",

    "style-loader": "^0.13.1",

    "url-loader": "^0.5.7",

    "vue-hot-reload-api": "^1.2.0",

    "vue-html-loader": "^1.2.3",

    "vue-loader": "^7.3.0",

    "vue-resource": "^1.2.1",

    "webpack": "^2.2.1",

    "webpack-dev-middleware": "^1.8.4",

    "webpack-dev-server": "^1.16.2",

    "webpack-hot-middleware": "^2.13.1"

  },

  "dependencies": {

    "vue": "^2.0.0",

    "vue-router": "^2.0.0"

  },

  "scripts": {

    "build": "webpack --display-modules --display-chunks --config webpack.prod.config.js",

    "dev": "cross-env webpack --hide-modules --display-chunks --config webpack.dev.config.js",

    "test": "cross-env webpack  --config webpack.config.js"

  }

}
注明:scripts 设置了一些执行的命令 如dev 就是执行dev环境下webpack编译用的命令 控制台之行:npm run dev即可
2.webpack 配置文件 (有些配置的路径 按项目改变)
(1)webpack.config.js
var path = require('path');

var webpack = require('webpack');

var ExtractTextPlugin = require('extract-text-webpack-plugin');

module.exports = {

    /* 输入文件 */

    entry:  {

        // path.resolve([from ...], to) 将to参数解析为绝对路径

        index:path.resolve(__dirname, './resources/js/src/index.js'),

        // 需要被提取为公共模块的群组

        vendors:['vue','vue-router','three','convex'],

    },

    output: {

        /* 输出目录,没有则新建 */

        path: path.resolve(__dirname, './public/js/'),

        /* 静态目录,可以直接从这里取文件 */

        //publicPath: './resources/js/dist/',

        /* 文件名 */

        filename: '[name].[hash].js',

    },

    resolve:{

      extensions: ['.js', '.css', '.scss','.vue'],

      alias: {

        'vue$': path.resolve(__dirname,'./node_modules/vue/dist/vue.js'),

        'vue-router$':path.resolve(__dirname,'./node_modules/vue-router/dist/vue-router.js'),

        'three$':path.resolve(__dirname,'./resources/js/lib/threejs/build/three.min.js'),

        'convex$':path.resolve(__dirname,'./resources/js/lib/convex.js'),

      }

    },

    module: {

        rules: [

            /* 用来解析vue后缀的文件 */

            {

                test: /\.vue$/,

                use: ['vue-loader']

            },

            /* 用babel来解析js文件并把es6的语法转换成浏览器认识的语法 */

            {

                test: /\.js$/,

                loader: 'babel-loader',

                /* 排除模块安装目录的文件 */

                exclude: /node_modules/,

                options:{

                    presets: ['es2015', 'stage-0'],

                    plugins: ['transform-runtime']

                }

            },

            {

                test: /\.css$/,

                // 将样式抽取出来为独立的文件

                loader: ExtractTextPlugin.extract({fallback:"style-loader", use:["css-loader","postcss-loader"]}),

                exclude: /node_modules/

            },

            // 使用less-loader、autoprefixer-loader、css-loader和style-loade 加载 .less 结尾的文件

            {

                test: /\.scss$/,

                // 将样式抽取出来为独立的文件

                use:['style-loader','css-loader','autoprefixer-loader','sass-loader'],

                exclude: /node_modules/

            },

            // 加载图片

            {

                test: /\.(png|jpg|gif)$/,

                loader: 'url-loader',

                options: {

                    // 把较小的图片转换成base64的字符串内嵌在生成的js文件里

                    limit: 10000,

                    // 路径和生产环境下的不同,要与修改后的publickPath相结合

                    name: 'img/[name].[ext]?[hash:7]'

                }

            },

            // 加载图标

            {

                test: /\.(eot|woff|woff2|svg|ttf)([\?]?.*)$/,

                loader: 'file-loader',

                options: {

                    limit: 10000,

                    // 路径和生产环境下的不同,要与修改后的publickPath相结合

                    name:'fonts/[name].[ext]?[hash:7]',

                    prefix:'font'

                }

            }

        ]

    },

    //devtool: '#eval-source-map',

}
注明:webpack2.0中loader名称要补全 如sass-loader 之前可以省略-loader这样的后缀 但是现在必须写全 否则无法编译
2.webpack.dev.conifg.js
// 引入依赖模块

var path = require('path');

var webpack = require('webpack');

var HtmlWebpackPlugin = require('html-webpack-plugin');

var ExtractTextPlugin = require('extract-text-webpack-plugin');

var CleanWebpackPlugin = require('clean-webpack-plugin');

// 引入基本配置

var config = require('./webpack.config.js');

// 必须修改原配置中网站运行时的访问路径,相当于绝对路径,修改完之后,当前配置文件下的很多相对路径都是相对于这个来设定;

// 注意:webpack-dev-server会实时的编译,但是最后的编译的文件并没有输出到目标文件夹,而是保存到了内存当中

config.output.publicPath = '/game/laravel-master/public/js/';

// 重新配置插件项

config.plugins = [

    // 位于开发环境下

    new webpack.DefinePlugin({

        'process.env': {

            NODE_ENV: '"development"'

        }

    }),

    // 自动生成html插件,如果创建多个HtmlWebpackPlugin的实例,就会生成多个页面

    new HtmlWebpackPlugin({

        // 生成html文件的名字,路径和生产环境下的不同,要与修改后的publickPath相结合,否则开启服务器后页面空白

        filename: '../../resources/views/dist/index.blade.php',

        // 源文件,路径相对于本文件所在的位置

        template: path.resolve(__dirname, './resources/views/index.blade.php'),

        // 需要引入entry里面的哪几个入口,如果entry里有公共模块,记住一定要引入

        chunks: ['vendors','index'],

        // 要把<script>标签插入到页面哪个标签里(body|true|head|false)

        inject: 'body',

        // 生成html文件的标题

        title:''

        // hash如果为true,将添加hash到所有包含的脚本和css文件,对于解除cache很有用

        // minify用于压缩html文件,其中的removeComments:true用于移除html中的注释,collapseWhitespace:true用于删除空白符与换行符

    }),

    // 提取css单文件的名字,路径和生产环境下的不同,要与修改后的publickPath相结合

    new ExtractTextPlugin("[name].[contenthash].css"),

    // 提取入口文件里面的公共模块

    new webpack.optimize.CommonsChunkPlugin({

        name: 'vendors',

        filename: 'vendors.js',

    }),

    new CleanWebpackPlugin(['js','views','css'],{

        root:path.resolve(__dirname, './public/'),

        verbose: true,

        dry: false,

        //exclude: ['shared.js']

    }),

    new CleanWebpackPlugin(['views/dist'],{

        root:path.resolve(__dirname, './resources/'),

        verbose: true,

        dry: false,

        //exclude: ['shared.js']

    }),

    // 为组件分配ID,通过这个插件webpack可以分析和优先考虑使用最多的模块,并为它们分配最小的ID

    //new webpack.optimize.OccurenceOrderPlugin(),

    // 模块热替换插件

    //new webpack.HotModuleReplacementPlugin(),

    // 允许错误不打断程序

    //new webpack.NoErrorsPlugin(),

    // 全局挂载插件

    new webpack.ProvidePlugin({

        Vue: "vue",

        THREE:'three'

    })

];

module.exports = config;
注明:HtmlWebpackPlugin inject 最好还是配置为body 会规避一些问题 (如 渲染速度 加载时序等)
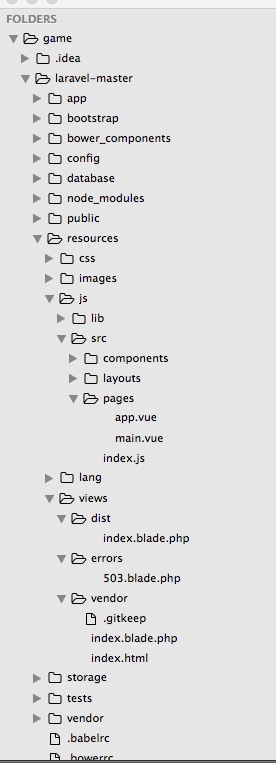
二 vue项目
1。项目结构 (用的laravel php框架 webpack中的部分路径与该项目结构一致)
2.看下主视图文件 index.blade.php (这个文件由于用的laravel框架 目前没找到怎么改后缀名)
<!DOCTYPE html>

<html>

    <head>

        <title>Laravel</title>

        <meta http-equiv="content-type" content="text/html; charset=UTF-8" />

    </head>

    <body>

        <div id="app">

        </div>

    <script type="text/javascript" src="/game/laravel-master/public/js/vendors.js"></script><script type="text/javascript" src="/game/laravel-master/public/js/index.f6c1bc018a4da91a571e.js"></script></body>

</html>
注明:视图文件 什么都没做 就放一个用于vue实例挂载的元素 js文件也是用webpack编译后插入的
3. resources - js - src -index.js 项目的入口文件(es6语法)
import App from './pages/app.vue';

import VueRouter from 'vue-router';

import VueResource from 'vue-resource';

Vue.use(VueRouter);

Vue.use(VueResource);

const main = resolve => {

    require.ensure(['./pages/main.vue'],()=>{

        resolve(require('./pages/main.vue'))

    })

}

const router = new VueRouter({

  routes: [{

          path:'/page',

          component: main,

      }

  ]

})

Vue.http.options.emulateJSON = true;

Vue.http.interceptors.push((request, next)  =>{

    next((response) => {

        return response

    });

});

const app = new Vue({

  router:router,

  render: h => h(App),

}).$mount('#app')
注明:创建了Vue实例并挂载在id为app的元素上,并创建了一个简单的路由实例
4.app.vue 文件 什么也没做 就是使用<router-view></router-view>标签,它用于渲染匹配的组件 和 加载一个common.scss文件设置一些页面全局样式
<template>
<router-view></router-view>
</template>
<script>
export default {
components: {
}
}
</script>
<style scoped lang='sass-loader'>
@import '../../../css/src/common.scss';
</style>
5.main.vue 基本上写了单页面组件所有能用到常用属性
<template>
<div class="data-webgl-main" ref="canvasbox">
<canvas ref="canvas"></canvas>
</div>
</template> <script > export default{
//监听父传递的变量和函数
props:[
],
//声明用到组件
components:{ },
//组建的数据
data () {
return {
vinit:'',
vscene:'',
vcamera:'',
vrenderer:'',
vlight:'',
vgeometry:'',
vmaterial:'',
vcube: '',
vsphere:'',
vline:'',
vspGroup:'',
vhullMesh:'',
vcloud:'' }
},
//组建加载完执行
mounted (){
this.vscene = new THREE.Scene();
this.vcamera = new THREE.PerspectiveCamera(45, window.innerWidth/window.innerHeight, 0.1, 1000);
this.vrenderer = new THREE.WebGLRenderer({canvas:this.$refs.canvas,antialias : true}); this.finitRender();
this.finitCamera();
this.finitScene();
this.finitLight();
this.finitMesh();
//this.fgeneratePoints();
this.fcreatePointCloud(3,true,0.6,true, 0xffffff);
this.frender();
},
//组建被创建触发
created () { },
//监听路由和一些变量的变化出发 监听函数要注意 this的指向
watch:{ },
//组建用到的所有方法
methods:{
frender (){
// this.vrenderer.clear();
// this.vcamera.position.x = this.vcamera.position.x + 1;
// this.vcube.rotation.x += 0.02;
// this.vcube.rotation.y += 0.02;
// this.vcube.rotation.z += 0.02;
// this.vline.rotation.z += 0.01;
// this.vspGroup.rotation.y = this.vhullMesh.rotation.y;
// this.vhullMesh.rotation.y += 0.01; var vertices = this.vcloud.geometry.vertices;
vertices.forEach(function (v) {
v.y = v.y - (v.velocityY);
v.x = v.x - (v.velocityX); if (v.y <= 0) v.y = 60;
if (v.x <= -20 || v.x >= 20) v.velocityX = v.velocityX * -1;
});
this.vrenderer.render(this.vscene, this.vcamera);
requestAnimationFrame(this.frender);
},
finitRender (){
this.vrenderer.setClearColor(0x000000,1.0);
this.vrenderer.shadowMapEnabled = true;
this.vrenderer.setSize(window.innerWidth,window.innerHeight);
},
finitCamera (){
this.vcamera.position.x = 20;
this.vcamera.position.y = 40;
this.vcamera.position.z = 110;
// this.vcamera.up.x = 0;
// this.vcamera.up.y = 0;
// this.vcamera.up.z = 0;
this.vcamera.lookAt(new THREE.Vector3(20, 30, 0))
},
finitScene (){ },
finitLight (){
// let light = new THREE.AmbientLight(0xFFFFFF);
// light.position.set(100, 100, 200);
// this.vscene.add(light);
// light = new THREE.PointLight(0x00FF00);
// light.position.set(0, 0,300);
// this.vscene.add(light);
// let light = new THREE.SpotLight(0xFFFFFF);
// light.position.set(-40,60,-10);
// light.castShadow = true;
// this.vscene.add(light); var ambientLight = new THREE.AmbientLight(0x0c0c0c);
this.vscene.add(ambientLight);
// add spotlight for the shadows
var spotLight = new THREE.SpotLight(0xffffff);
spotLight.position.set(-40, 60, -10);
spotLight.castShadow = true;
this.vscene.add(spotLight);
},
finitMesh (){
// var geometry = new THREE.CylinderGeometry( 100,150,400);
// var material = new THREE.MeshLambertMaterial( { color:0xFFFF00} );
// var mesh = new THREE.Mesh( geometry,material);
// mesh.position.add(new THREE.Vector3(0,0,0));
// var planeGeometry = new THREE.PlaneGeometry(60,20,1,1);
// var planeMaterial = new THREE.MeshLambertMaterial({color:0xffffff});
// var plane = new THREE.Mesh(planeGeometry,planeMaterial);
// plane.rotation.x = -0.5*Math.PI;
// plane.position.x = 15;
// plane.position.y = 0;
// plane.position.z = 0;
// plane.receiveShadow = true;
// this.vscene.add(plane); // var cubeGeometry = new THREE.CubeGeometry(4,4,4);
// var cubeMaterial = new THREE.MeshLambertMaterial({color:0xff0000,wireframe:false});
// var cube = new THREE.Mesh(cubeGeometry,cubeMaterial);
// cube.position.x = -4;
// cube.position.y = 3;
// cube.position.z = 0;
// cube.castShadow = true;
// this.vcube = cube;
// this.vscene.add(cube); // var sphereGeometry = new THREE.SphereGeometry(4,20,20);
// var sphereMaterial = new THREE.MeshLambertMaterial({color:0x7777ff,wireframe:false});
// var sphere = new THREE.Mesh(sphereGeometry,sphereMaterial);
// sphere.position.x = 20;
// sphere.position.y = 4;
// sphere.position.z = 2;
// this.vsphere = sphere;
// this.vscene.add(sphere); // this.vcube = new THREE.Mesh();
// var mats = [];
// mats.push(new THREE.MeshBasicMaterial({color:0x009e60}))
// mats.push(new THREE.MeshBasicMaterial({color:0x0051ba}))
// mats.push(new THREE.MeshBasicMaterial({color:0xffd500}))
// mats.push(new THREE.MeshBasicMaterial({color:0xff5800}))
// mats.push(new THREE.MeshBasicMaterial({color:0xc41e3a}))
// mats.push(new THREE.MeshBasicMaterial({color:0xffffff}))
// var faceMaterial = new THREE.MeshFaceMaterial(mats);
// for(var x=0;x<3;x++){
// for(var y = 0;y<3;y++){
// for(var z=0;z<3;z++){
// var cubeGeom = new THREE.CubeGeometry(2.9,2.9,2.9);
// var cube = new THREE.Mesh(cubeGeom,faceMaterial);
// cube.position.add(new THREE.Vector3(x*3-3,y*3,z*3-3));
// this.vcube.add(cube);
// }
// }
// }
// this.vscene.add(this.vcube) // var points = this.fgosper(4, 60);
// var lines = new THREE.Geometry();
// var colors = [];
// var i = 0;
// points.forEach(function (e) {
// lines.vertices.push(new THREE.Vector3(e.x, e.z, e.y));
// colors[i] = new THREE.Color(0xffffff);
// colors[i].setHSL(e.x / 100 + 0.5, ( e.y * 20 ) / 300, 0.8);
// i++;
// });
// lines.colors = colors;
// var material = new THREE.LineBasicMaterial({
// opacity: 1.0,
// linewidth: 1,
// vertexColors: THREE.VertexColors
// });
// this.vline = new THREE.Line(lines, material);
// this.vline.position.set(25, -30, -60);
// this.vscene.add(this.vline); },
fgosper (a, b) {
var turtle = [0, 0, 0];
var points = [];
var count = 0;
rg(a, b, turtle);
return points;
function rt(x) {
turtle[2] += x;
}
function lt(x) {
turtle[2] -= x;
}
function fd(dist) {
// ctx.beginPath();
points.push({x: turtle[0], y: turtle[1], z: Math.sin(count) * 5});
// ctx.moveTo(turtle[0], turtle[1]);
var dir = turtle[2] * (Math.PI / 180);
turtle[0] += Math.cos(dir) * dist;
turtle[1] += Math.sin(dir) * dist;
points.push({x: turtle[0], y: turtle[1], z: Math.sin(count) * 5});
// ctx.lineTo(turtle[0], turtle[1]);
// ctx.stroke();
}
function rg(st, ln, turtle) {
st--;
ln = ln / 2.6457;
if (st > 0) {
// ctx.strokeStyle = '#111';
rg(st, ln, turtle);
rt(60);
gl(st, ln, turtle);
rt(120);
gl(st, ln, turtle);
lt(60);
rg(st, ln, turtle);
lt(120);
rg(st, ln, turtle);
rg(st, ln, turtle);
lt(60);
gl(st, ln, turtle);
rt(60);
}
if (st == 0) {
fd(ln);
rt(60);
fd(ln);
rt(120);
fd(ln);
lt(60);
fd(ln);
lt(120);
fd(ln);
fd(ln);
lt(60);
fd(ln);
rt(60)
}
}
function gl(st, ln, turtle) {
st--;
ln = ln / 2.6457;
if (st > 0) {
// ctx.strokeStyle = '#555';
lt(60);
rg(st, ln, turtle);
rt(60);
gl(st, ln, turtle);
gl(st, ln, turtle);
rt(120);
gl(st, ln, turtle);
rt(60);
rg(st, ln, turtle);
lt(120);
rg(st, ln, turtle);
lt(60);
gl(st, ln, turtle);
}
if (st == 0) {
lt(60);
fd(ln);
rt(60);
fd(ln);
fd(ln);
rt(120);
fd(ln);
rt(60);
fd(ln);
lt(120);
fd(ln);
lt(60);
fd(ln);
}
}
},
fgeneratePoints() {
// add 10 random spheres
var points = [];
for (var i = 0; i < 20; i++) {
var randomX = -15 + Math.round(Math.random() * 30);
var randomY = -15 + Math.round(Math.random() * 30);
var randomZ = -15 + Math.round(Math.random() * 30);
points.push(new THREE.Vector3(randomX, randomY, randomZ));
}
this.vspGroup = new THREE.Object3D();
var material = new THREE.MeshBasicMaterial({color: 0xff0000, transparent: false});
points.forEach((point) => {
var spGeom = new THREE.SphereGeometry(0.2);
var spMesh = new THREE.Mesh(spGeom, material);
spMesh.position.copy(point);
this.vspGroup.add(spMesh);
});
// add the points as a group to the scene
this.vscene.add(this.vspGroup);
// use the same points to create a convexgeometry
var hullGeometry = new THREE.ConvexGeometry(points);
this.vhullMesh = this.fcreateMesh(hullGeometry);
this.vscene.add(this.vhullMesh);
}, fcreateMesh (geom) {
// assign two materials
var meshMaterial = new THREE.MeshBasicMaterial({color: 0x00ff00, transparent: true, opacity: 0.2});
meshMaterial.side = THREE.DoubleSide;
var wireFrameMat = new THREE.MeshBasicMaterial();
wireFrameMat.wireframe = true;
// create a multimaterial
var mesh = THREE.SceneUtils.createMultiMaterialObject(geom, [meshMaterial, wireFrameMat]);
return mesh;
},
fcreatePointCloud(size, transparent, opacity, sizeAttenuation, color) { var texture = THREE.ImageUtils.loadTexture("laravel-master/resources/images/textures/particles/raindrop-3.png");
var geom = new THREE.Geometry(); var material = new THREE.ParticleBasicMaterial({
size: size,
transparent: transparent,
opacity: opacity,
map: texture,
blending: THREE.AdditiveBlending,
sizeAttenuation: sizeAttenuation,
color: color
}); var range = 40;
for (var i = 0; i < 20; i++) {
var particle = new THREE.Vector3(
Math.random() * range - range / 2,
Math.random() * range * 1.5,
Math.random() * range - range / 2);
particle.velocityY = 0.1 + Math.random() / 5;
particle.velocityX = (Math.random() - 0.5) / 3;
geom.vertices.push(particle);
} this.vcloud = new THREE.ParticleSystem(geom, material);
this.vcloud.sortParticles = true; this.vscene.add(this.vcloud);
} },
//属性的一个实时计算
computed:{ }, }
</script> <style lang="sass-loader" scoped>
@import '../../../css/src/main.scss';
</style>
未完待续。。。。。。
webpack2.0+ vue2.0的更多相关文章
- 从壹开始前后端分离【 .NET Core2.0 +Vue2.0 】框架之十二 || 三种跨域方式比较,DTOs(数据传输对象)初探
更新反馈 1.博友@落幕残情童鞋说到了,Nginx反向代理实现跨域,因为我目前还没有使用到,给忽略了,这次记录下,为下次补充.此坑已填 2.提示:跨域的姊妹篇——<三十三║ ⅖ 种方法实现完美跨 ...
- Vuex2.0+Vue2.0构建备忘录应用实践
一.介绍Vuex Vuex 是一个专为 Vue.js 应用程序开发的状态管理模式.它采用集中式存储管理应用的所有组件的状态,并以相应的规则保证状态以一种可预测的方式发生变化,适合于构建中大型单页应用. ...
- 从壹开始前后端分离【 .NET Core2.0 +Vue2.0 】框架之四 || Swagger的使用 3.2
前言 如果想直接在域名的根目录直接加载 swagger 比如访问:localhost:8001 就能访问,可以这样设置: app.UseSwaggerUI(c => { c.SwaggerEnd ...
- 从壹开始前后端分离【 .NET Core2.0 +Vue2.0 】框架之十三 || DTOs 对象映射使用,项目部署Windows+Linux完整版
更新 很多小伙伴在用 IIS 发布的时候,总是会有一些问题,文章下边 #autoid-6-0-0 我也简单的动图展示了,如何 publish 到 IIS 的过程,如果你能看懂,却发现自己的项目有问题的 ...
- 从壹开始前后端分离【 .NET Core2.0 +Vue2.0 】框架之二 || 后端项目搭建
前言 至于为什么要搭建.Net Core 平台,这个网上的解释以及铺天盖地,想了想,还是感觉重要的一点,跨平台,嗯!没错,而且比.Net 更容易搭建,速度也更快,所有的包均有Nuget提供,不再像以前 ...
- 从壹开始前后端分离【 .NET Core2.0 +Vue2.0 】框架之三 || Swagger的使用 3.1
常见问题 1.经常有小伙伴遇到这个错误 这是因为接口json文档定义和调用不是一个 1.定义: ConfigureServices 方法中的 services.AddSwaggerGen 注册的一个 ...
- 从壹开始前后端分离【 .NET Core2.0 +Vue2.0 】框架之五 || Swagger的使用 3.3 JWT权限验证【必看】
前言 关于JWT一共三篇 姊妹篇,内容分别从简单到复杂,一定要多看多想: 一.Swagger的使用 3.3 JWT权限验证[修改] 二.解决JWT权限验证过期问题 三.JWT完美实现权限与接口的动态分 ...
- 从壹开始前后端分离【 .NET Core2.0 +Vue2.0 】框架之六 || API项目整体搭建 6.1 仓储模式
前言 1.@LearningCoding 小伙伴关于用Sqlsugar在mysql数据库上的研究成果: sqlsugarcore支持mysql等数据库,在DbContext里面只需要设置dbtype为 ...
- 从壹开始前后端分离【 .NET Core2.0 +Vue2.0 】框架之七 || API项目整体搭建 6.2 轻量级ORM
更新 1.在使用的时候,特别是更新数据的时候,如果不知道哪里有问题,可以查看数据库 和 实体类 的字段,是否大小写一致,比如 name 和 Name 2.在使用Sqlsugar 的 CodeFirst ...
随机推荐
- juquery去除字符串前后的空格
1. 去掉字符串前后所有空格: 代码如下: function Trim(str) { return str.replace(/(^\s*)|(\s*$)/g, ""); }
- javascript:apply方法 以及和call的区别 (转载)
javascript:apply方法 1. apply和call的区别在哪里 2. 什么情况下用apply,什么情况下用call 3. apply的其他巧 ...
- selenium3驱动IE浏览器设置
前言: 使用selenium3+IE11的方式进行自动化测试 准备工作: 1.ie的驱动:IEDriverServer.exe(对应系统位数) 2.已安装好python3.selenium所需的相关服 ...
- 跳转到appstore下载app的链接 记录一下
这是链接: https://itunes.apple.com/cn/app/da-dou-dou-lao-shi/id1395835036?mt=8 其中值得一提的是mt参数是啥意思 见下图:
- http协议cookie结构分析
Http协议中Cookie详细介绍 Cookie总是保存在客户端中,按在客户端中的存储位置,可分为内存Cookie和硬盘Cookie.内存Cookie由浏览器维护,保存在内存中,浏览器关闭后就消失 ...
- POJ 1321 棋盘问题(非常经典的dfs,入门题)
棋盘问题 Time Limit: 1000MS Memory Limit: 10000K Total Submissions: 66277 Accepted: 31639 Descriptio ...
- CO借贷标识及转换
前台提前数据源0CO_PC_01的数据时发现借贷方有O.C.S.D.不是传统的FI借贷标识(S = 借记,H = 贷记). 由"D"指出贷方记帐.从以下项中发生这些记帐 财务会计中 ...
- Redis高级应用——2
Redis-事务 Redis 事务可以一次执行多个命令, 并且带有以下两个重要的保证: 事务是一个单独的隔离操作,事务中的所有命令都会序列化.按顺序地执行.事务在执行的过程中,不会被其他客户端发送来的 ...
- iOS Swift WisdomHUD 提示界面框架
iOS Swift WisdomHUD 提示界面框架 Framework Use profile(应用简介) 一:WisdomHUD简介 今天给大家介绍一款iOS的界面显示器:WisdomHUD,W ...
- 时间序列分析工具箱——timetk
目录 时间序列分析工具箱--timetk timetk 的主要用途 加载包 数据 timetk 教程: PART 1:时间序列机器学习 PART 2:转换 翻译自<Demo Week: Time ...