【Java EE 学习 76 上】【数据采集系统第八天】【角色授权】【用户授权】【权限的粗粒度控制】【权限的细粒度控制】
一、角色管理
单击导航栏上的"角色管理"超链接,跳转到角色管理界面,在该界面上显示所有角色,并提供角色的增加和删除、修改超链接。
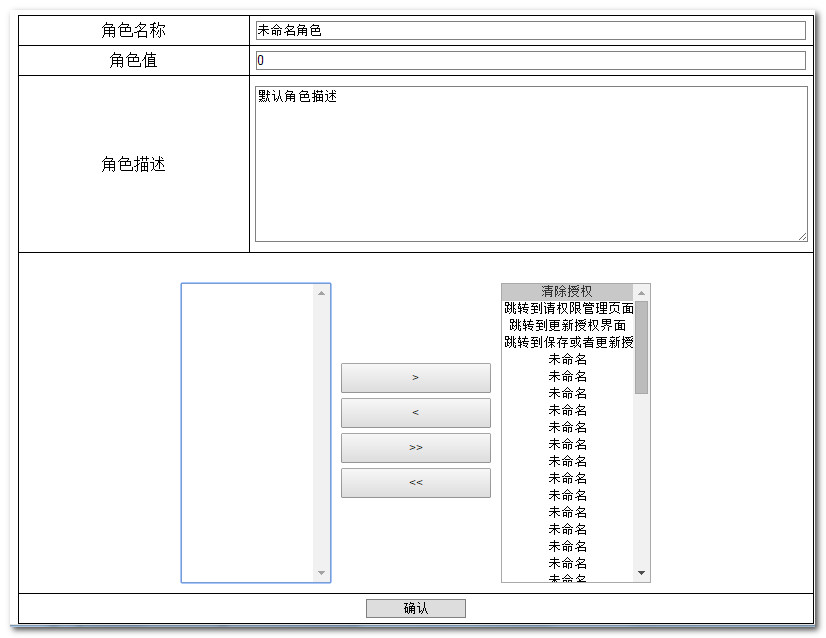
1.增加新角色(角色授权)
流程:单击增加新角色超链接->Action查询出所有的权限保存到值栈并转到添加新角色页面->填写表单并提交->Action保存表单->重定向到角色管理Action
技术点:表单提交的权限列表时一个整型数组,需要在Action中进行接收并调用相关方法转换成Rright列表;使用到了一些JQuery技术实现更友好的前端交互。
JQuery代码:
 <script type="text/javascript">

     $().ready(function(){

         $("button[id='toRight']").unbind("click");

         $("button[id='toRight']").bind("click",function(){

             var noneOwnRights=$("select[name='noneOwnRights']");

             var ownRights=$("select[name='ownRights']");

             $("select[name='ownRights'] option:selected").each(function(){

                 noneOwnRights.prepend($(this).clone());

                 $(this).remove();

             });

             return false;

         });

         $("button[id='toLeft']").unbind("click");

         $("button[id='toLeft']").bind("click",function(){

             var noneOwnRights=$("select[name='noneOwnRights']");

             var ownRights=$("select[name='ownRights']");

             $("select[name='noneOwnRights'] option:selected").each(function(){

                 ownRights.prepend($(this).clone());

                 $(this).remove();

             });

             return false;

         });

         $("button[id='allToRight']").unbind("click");

         $("button[id='allToRight']").bind("click",function(){

             var noneOwnRights=$("select[name='noneOwnRights']");

             var ownRights=$("select[name='ownRights']");

             $("select[name='ownRights'] option").each(function(){

                 noneOwnRights.append($(this).clone());

                 $(this).remove();

             });

             return false;

         });

         $("button[id='allToLeft']").unbind("click");

         $("button[id='allToLeft']").bind("click",function(){

             var noneOwnRights=$("select[name='noneOwnRights']");

             var ownRights=$("select[name='ownRights']");

             $("select[name='noneOwnRights'] option").each(function(){

                 ownRights.append($(this).clone());

                 $(this).remove();

             });

             return false;

         });

         $("#submit").unbind("click");

         $("#submit").bind("click",function(){

             $("select[name='ownRights'] option").each(function(){

                 $(this).attr("selected","selected");

             });

             return true;

         });

     });

 </script>
2.角色修改和添加使用的方法是同一个方法,略
3.角色删除略。
二、用户授权
形式和流程和角色授权完全一致,略。
三、权限的粗粒度控制
所谓的权限的粗粒度控制指的是改造登陆拦截器使其成为权限控制拦截器,当用户访问某个资源的时候将会根据不同的访问地址判断是否有权限访问,如果有权限访问则放行,否则跳转到错误提示页。
权限控制拦截器中判断权限的流程之前说过了,如下图所示:
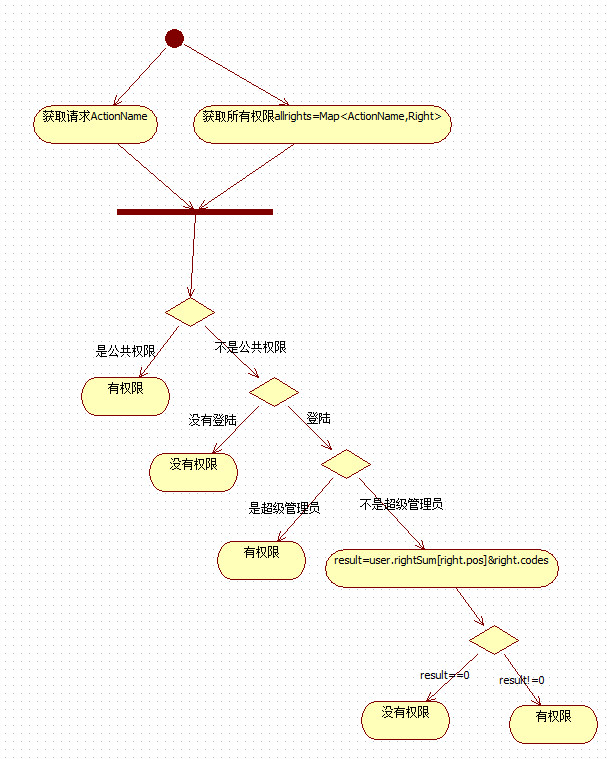
1.实现权限控制判断的代码封装到了工具类ValidateUtils的hasRight方法中:
 // 验证是否有权限的验证方法

     public static boolean hasRight(String namespace, String actionName, HttpServletRequest request,Action action) {

         String url = namespace + "/"

                 + (actionName.contains("?") ? actionName.substring(0, actionName.indexOf("?")) : actionName)

                 + ".action";

         // TODO 将权限列表放入到ServletContext中的方法

         HttpSession session = request.getSession();

         ServletContext sc = session.getServletContext();

         Map<String, Right> allRights = (Map<String, Right>) sc.getAttribute("all_rights_map");

         Right right = allRights.get(url);

         // 如果是公共资源直接方放过

         if (right == null || right.getCommon()) {

 //            System.out.println("访问公共资源,即将放行!");

             return true;

         } else {

             User user = (User) session.getAttribute("user");

             // 判断是否已经登陆

             if (user == null) {

                 return false;

             } else {

                 // 如果实现了UserAware接口

                 if (action != null && action instanceof UserAware) {

                     UserAware userAware = (UserAware) action;

                     userAware.setUser(user);

                 }

                 // 如果是超级管理员直接放行

                 if (user.getSuperAdmin()) {

                     return true;

                     // 否则先检查是否有权限

                 } else {

                     if (user.hasRight(right)) {

                         return true;

                     } else {

                         return false;

                     }

                 }

             }

         }

     }
上面代码中的粗体部分是获取放到application作用域中的所有权限Map,key值是url,value值是对应的Right对象。
2.拦截器代码调用工具方法进行判断
 package com.kdyzm.struts.interceptors;

 import java.util.Map;

 import javax.servlet.ServletContext;

 import javax.servlet.http.HttpServletRequest;

 import javax.servlet.http.HttpSession;

 import org.apache.struts2.ServletActionContext;

 import com.kdyzm.domain.User;

 import com.kdyzm.domain.security.Right;

 import com.kdyzm.struts.action.aware.UserAware;

 import com.kdyzm.utils.ValidateUtils;

 import com.opensymphony.xwork2.Action;

 import com.opensymphony.xwork2.ActionInvocation;

 import com.opensymphony.xwork2.ActionProxy;

 import com.opensymphony.xwork2.interceptor.Interceptor;

 /**

  * 只要请求了Action就会默认访问该拦截器

  * 登陆拦截器

  * @author kdyzm

  *

  */

 public class LoginInterceptor implements Interceptor{

     private static final long serialVersionUID = 7321012192261008127L;

     @Override

     public void destroy() {

         System.out.println("登录拦截器被销毁!");

     }

     @Override

     public void init() {

         System.out.println("登录拦截器初始化!");

     }

     /**

      *    对登录拦截器进行改造使其成为权限过滤拦截器

      */

     @SuppressWarnings("unchecked")

     @Override

     public String intercept(ActionInvocation invocation) throws Exception {

         //首先获取请求的Action的名称

         ActionProxy actionProxy=invocation.getProxy();

         String namespace=actionProxy.getNamespace();

         String actionName=actionProxy.getActionName();

         if(namespace==null||"/".equals(namespace)){

             namespace="";

         }

         HttpServletRequest request=ServletActionContext.getRequest();

         boolean result=ValidateUtils.hasRight(namespace, actionName, request, (Action)invocation.getAction());

         if(result==true){

             return invocation.invoke();

         }else{

             return "no_right_error";

         }

     }

 }
3.配置struts2的global-result
<global-results>

            <result name="toLoginPage">/index.jsp</result>

            <!-- 定义全局结果类型,将编辑页面之后的返回页面定义为全局结果类型 -->

            <result name="toDesignSurveyPageAction" type="redirectAction">

                <param name="surveyId">${surveyId}</param>

                <param name="namespace">/</param>

                <param name="actionName">SurveyAction_designSurveyPage.action</param>

            </result>

            <result name="no_right_error">/error/no_right_error.jsp</result>

        </global-results>
四、将所有权限放到application作用域
在权限控制的过程中会经常需要查询权限,如果每次都查询数据库中会对数据库造成很大的负担,最好的方式是将其放到内存,而且使用Map的数据结构更加方便的查询。
将权限集合拿到内存的时机就是tomcat启动完成之前,这里借助spring容器的监听器实现该功能。
实现的技术要点:
1.如何获取application对象,在struts2中通过ServletContextAware接口可以将ServletContext注入到Action,在这里由于spring初始化的时候strus2还没有初始化,所以就不能通过实现struts2的接口来注入application对象了;spring提供了相同的方式注入application对象,注意不要导错了包,接口名都是ServletContextAware。
2.直接通过注解的方式注入spring容器,在包扫描的规则中添加com.kdyzm.listener。
 package com.kdyzm.listener;

 import java.util.Collection;

 import java.util.HashMap;

 import java.util.Map;

 import javax.annotation.Resource;

 import javax.servlet.ServletContext;

 import org.springframework.context.ApplicationEvent;

 import org.springframework.context.ApplicationListener;

 import org.springframework.context.event.ContextRefreshedEvent;

 import org.springframework.stereotype.Component;

 import org.springframework.web.context.ServletContextAware;


 import com.kdyzm.domain.security.Right;

 import com.kdyzm.service.RightService;

 /**

  * 初始化权限数据的监听类

  * 该监听器的作用就是将所有的权限放入ServletContext中

  * Spring容器初始化的时候struts2还没有初始化,所以不能使用struts2的ServletContextAware获取SerlvetContext对象。

  * 但是spring提供了相同的机制获取ServletContext对象,而且使用的方法和接口也是完全相同。

  * 这里还有一个非常重要的东西:注入sc一定在前。

  *

  * 直接使用注解注入到spring容器,不需要对配置文件进行修改

  * @author kdyzm

  *

  */

 @Component

 public class InitRightListener implements ApplicationListener,ServletContextAware{

     private ServletContext sc;

     @Resource(name="rightService")

     private RightService rightService;

     @Override

     public void onApplicationEvent(ApplicationEvent event) {

         //这里所有的ApplicationContext的事件都会不获到,所以必须进行判断已进行分类处理

         if(event instanceof ContextRefreshedEvent){

             Collection<Right> rights=rightService.getAllRights();

             Map<String,Right>rightMap=new HashMap<String,Right>();

             for(Right right: rights){

                 System.out.println(right.getRightUrl()+":"+right.getCommon());

                 rightMap.put(right.getRightUrl(), right);

             }

             if(sc!=null){

                 sc.setAttribute("all_rights_map", rightMap);

                 System.out.println("初始化RightMap成功!");

             }else{

                 System.out.println("ServletContext对象为空,初始化RightMap对象失败!");

             }

         }

     }

     //注入ServletContext

     @Override

     public void setServletContext(ServletContext servletContext) {

         System.out.println("注入ServletContext对象");

         this.sc=servletContext;

     }

 }
ApplicationContext.xml配置文件也需要修改:
 <context:component-scan

         base-package="com.kdyzm.dao.impl,com.kdyzm.service.impl,com.kdyzm.struts.action,com.kdyzm.dao.base.impl,com.kdyzm.listener"></context:component-scan>
五、权限的细粒度控制
1.什么是细粒度控制
所谓细粒度控制就是和粗粒度控制相比较而言的,粗粒度控制旨在当用户访问了无权限访问的资源的时候,拦截其访问;细粒度控制旨在更深一步细化权限控制,不让用户有机会访问无权限访问的资源,也就是说控制关键标签的显示,比如超链接、提交按钮等。
2.实现细粒度控制的方法
方法就是重写struts2的标签类,覆盖掉struts2提供的class文件,这种方式在tomcat下是没有问题的,在其它环境下没有测试,结果未知,最好的方法就是将jar包中对应的class文件剔除,这样类就唯一了。
3注意事项
一定使用struts2完全匹配版本的源代码,否则版本不同特别是差异比较大的,非常有可能会出现意料之外的异常。
4.重写的两个类
org.apache.struts2.views.jsp.ui.AnchorTag 对应着<s:a></s:a>
org.apache.struts2.views.jsp.ui.SubmitTag 对应着<s:submit></s:submit>
(1)重写AnchorTag标签类
重写AnchorTag类比较简单,只需要重写doEndTag方法即可,注意,该类有属性pageContext,可以直接获取HttpServletRequest对象;第四个参数为Action对象,这里没有就填写NULL,Action对象参数的目的是为了将User对象注入到Action。
 //a标签只需要重写一个方法就行

     @Override

     public int doEndTag() throws JspException {

         if(namespace==null||"/".equals(namespace)){

             namespace="";

         }

         if(action==null){

             action="";

         }else{

             if(action.endsWith(".action")){

                 action=action.substring(0, action.indexOf("."));

             }

         }

         boolean result=ValidateUtils.hasRight(namespace, action, (HttpServletRequest)pageContext.getRequest(), null);

 //        System.out.println("即将访问"+namespace+action);

         if(result==true){

 //            System.out.println("有权限,即将放行!");

             return super.doEndTag();

         }else{

 //            System.out.println("没有权限,即将跳过标签体!");

             return SKIP_BODY;

         }

     }
完整代码:
 /*

  * $Id: AnchorTag.java 768855 2009-04-27 02:09:35Z wesw $

  *

  * Licensed to the Apache Software Foundation (ASF) under one

  * or more contributor license agreements.  See the NOTICE file

  * distributed with this work for additional information

  * regarding copyright ownership.  The ASF licenses this file

  * to you under the Apache License, Version 2.0 (the

  * "License"); you may not use this file except in compliance

  * with the License.  You may obtain a copy of the License at

  *

  *  http://www.apache.org/licenses/LICENSE-2.0

  *

  * Unless required by applicable law or agreed to in writing,

  * software distributed under the License is distributed on an

  * "AS IS" BASIS, WITHOUT WARRANTIES OR CONDITIONS OF ANY

  * KIND, either express or implied.  See the License for the

  * specific language governing permissions and limitations

  * under the License.

  *

  * 对应着<s:a>标签,重写该类中的某个方法即可完成对权限细粒度的划分

  */

 package org.apache.struts2.views.jsp.ui;

 import javax.servlet.http.HttpServletRequest;

 import javax.servlet.http.HttpServletResponse;

 import javax.servlet.jsp.JspException;

 import org.apache.struts2.components.Anchor;

 import org.apache.struts2.components.Component;

 import com.kdyzm.utils.ValidateUtils;

 import com.opensymphony.xwork2.util.ValueStack;

 /**

  * @see Anchor

  */

 public class AnchorTag extends AbstractClosingTag {

     private static final long serialVersionUID = -1034616578492431113L;

     protected String href;

     protected String includeParams;

     protected String scheme;

     protected String action;

     protected String namespace;

     protected String method;

     protected String encode;

     protected String includeContext;

     protected String escapeAmp;

     protected String portletMode;

     protected String windowState;

     protected String portletUrlType;

     protected String anchor;

     protected String forceAddSchemeHostAndPort;

     public Component getBean(ValueStack stack, HttpServletRequest req, HttpServletResponse res) {

         return new Anchor(stack, req, res);

     }

     protected void populateParams() {

         super.populateParams();

         Anchor tag = (Anchor) component;

         tag.setHref(href);

         tag.setIncludeParams(includeParams);

         tag.setScheme(scheme);

         tag.setValue(value);

         tag.setMethod(method);

         tag.setNamespace(namespace);

         tag.setAction(action);

         tag.setPortletMode(portletMode);

         tag.setPortletUrlType(portletUrlType);

         tag.setWindowState(windowState);

         tag.setAnchor(anchor);

         if (encode != null) {

             tag.setEncode(Boolean.valueOf(encode).booleanValue());

         }

         if (includeContext != null) {

             tag.setIncludeContext(Boolean.valueOf(includeContext).booleanValue());

         }

         if (escapeAmp != null) {

             tag.setEscapeAmp(Boolean.valueOf(escapeAmp).booleanValue());

         }

         if (forceAddSchemeHostAndPort != null) {

             tag.setForceAddSchemeHostAndPort(Boolean.valueOf(forceAddSchemeHostAndPort).booleanValue());

         }

     }

     public void setHref(String href) {

         this.href = href;

     }

     public void setEncode(String encode) {

         this.encode = encode;

     }

     public void setIncludeContext(String includeContext) {

         this.includeContext = includeContext;

     }

     public void setEscapeAmp(String escapeAmp) {

         this.escapeAmp = escapeAmp;

     }

     public void setIncludeParams(String name) {

         includeParams = name;

     }

     public void setAction(String action) {

         this.action = action;

     }

     public void setNamespace(String namespace) {

         this.namespace = namespace;

     }

     public void setMethod(String method) {

         this.method = method;

     }

     public void setScheme(String scheme) {

         this.scheme = scheme;

     }

     public void setValue(String value) {

         this.value = value;

     }

     public void setPortletMode(String portletMode) {

         this.portletMode = portletMode;

     }

     public void setPortletUrlType(String portletUrlType) {

         this.portletUrlType = portletUrlType;

     }

     public void setWindowState(String windowState) {

         this.windowState = windowState;

     }

     public void setAnchor(String anchor) {

         this.anchor = anchor;

     }

     public void setForceAddSchemeHostAndPort(String forceAddSchemeHostAndPort) {

         this.forceAddSchemeHostAndPort = forceAddSchemeHostAndPort;

     }

     //a标签只需要重写一个方法就行

     @Override

     public int doEndTag() throws JspException {

         if(namespace==null||"/".equals(namespace)){

             namespace="";

         }

         if(action==null){

             action="";

         }else{

             if(action.endsWith(".action")){

                 action=action.substring(0, action.indexOf("."));

             }

         }

         boolean result=ValidateUtils.hasRight(namespace, action, (HttpServletRequest)pageContext.getRequest(), null);

 //        System.out.println("即将访问"+namespace+action);

         if(result==true){

 //            System.out.println("有权限,即将放行!");

             return super.doEndTag();

         }else{

 //            System.out.println("没有权限,即将跳过标签体!");

             return SKIP_BODY;

         }

     }

 }
org.apache.struts2.views.jsp.ui.AnchorTag.java
(2)重写SubmitTag标签类
重写该标签类比较复杂,需要同时重写doStartTag方法和doEndTag方法,而且由于Action和Namespace的声明是在Form标签中,所以还需要递归找父节点一直找到Form标签才行。
核心方法:
  //Submit标签需要重写两个方法才行

     @Override

     public int doStartTag() throws JspException {

         boolean result=ValidateUtils.hasRight(getFormNamespace(), getFormActionName(), (HttpServletRequest)pageContext.getRequest(), null);

         if(result==false){

             return SKIP_BODY;

         }else{

             return super.doStartTag();

         }

     }

     @Override

     public int doEndTag() throws JspException {

 //        System.out.println("表单标签:"+getFormNamespace()+getFormActionName());

         boolean result=ValidateUtils.hasRight(getFormNamespace(), getFormActionName(), (HttpServletRequest)pageContext.getRequest(), null);

         if(result==false){

             return SKIP_BODY;

         }else{

             return super.doEndTag();

         }

     }

     public String getFormNamespace(){

         Tag tag=this.getParent();

         while(tag!=null){

             if(tag instanceof FormTag){

                 FormTag formTag=(FormTag) tag;

                 String namespace=formTag.namespace;

                 if(namespace==null||"/".equals(namespace)){

                     namespace="";

                 }

                 return namespace;

             }else{

                 tag=tag.getParent();

             }

         }

         return "";

     }

     public String getFormActionName(){

         Tag tag=this.getParent();

         while(tag!=null){

             if(tag instanceof FormTag){

                 FormTag formTag=(FormTag) tag;

                 String actionName=formTag.action;

                 if(actionName!=null&&actionName.endsWith(".action")){

                     actionName=actionName.substring(0, actionName.indexOf("."));

                     return actionName;

                 }else{

                     actionName="";

                     return actionName;

                 }

             }else{

                 tag=tag.getParent();

             }

         }

         return "";

     }
完整代码:
 /*

  * $Id: SubmitTag.java 681101 2008-07-30 16:06:15Z musachy $

  *

  * Licensed to the Apache Software Foundation (ASF) under one

  * or more contributor license agreements.  See the NOTICE file

  * distributed with this work for additional information

  * regarding copyright ownership.  The ASF licenses this file

  * to you under the Apache License, Version 2.0 (the

  * "License"); you may not use this file except in compliance

  * with the License.  You may obtain a copy of the License at

  *

  *  http://www.apache.org/licenses/LICENSE-2.0

  *

  * Unless required by applicable law or agreed to in writing,

  * software distributed under the License is distributed on an

  * "AS IS" BASIS, WITHOUT WARRANTIES OR CONDITIONS OF ANY

  * KIND, either express or implied.  See the License for the

  * specific language governing permissions and limitations

  * under the License.

  *

  * 该类对应着<s:submit>标签,重写该类实现对权限细粒度的划分

  */

 package org.apache.struts2.views.jsp.ui;

 import javax.servlet.http.HttpServletRequest;

 import javax.servlet.http.HttpServletResponse;

 import javax.servlet.jsp.JspException;

 import javax.servlet.jsp.tagext.Tag;

 import org.apache.struts2.components.Component;

 import org.apache.struts2.components.Submit;

 import com.kdyzm.utils.ValidateUtils;

 import com.opensymphony.xwork2.util.ValueStack;

 /**

  * @see Submit

  */

 public class SubmitTag extends AbstractClosingTag {

     private static final long serialVersionUID = 2179281109958301343L;

     protected String action;

     protected String method;

     protected String align;

     protected String type;

     protected String src;

     public Component getBean(ValueStack stack, HttpServletRequest req, HttpServletResponse res) {

         return new Submit(stack, req, res);

     }

     protected void populateParams() {

         super.populateParams();

         Submit submit = ((Submit) component);

         submit.setAction(action);

         submit.setMethod(method);

         submit.setAlign(align);

         submit.setType(type);

         submit.setSrc(src);

     }

     public void setAction(String action) {

         this.action = action;

     }

     public void setMethod(String method) {

         this.method = method;

     }

     public void setAlign(String align) {

         this.align = align;

     }

     public String getType() {

         return type;

     }

     public void setType(String type) {

         this.type = type;

     }

     public void setSrc(String src) {

         this.src = src;

     }

     //Submit标签需要重写两个方法才行

     @Override

     public int doStartTag() throws JspException {

         boolean result=ValidateUtils.hasRight(getFormNamespace(), getFormActionName(), (HttpServletRequest)pageContext.getRequest(), null);

         if(result==false){

             return SKIP_BODY;

         }else{

             return super.doStartTag();

         }

     }

     @Override

     public int doEndTag() throws JspException {

 //        System.out.println("表单标签:"+getFormNamespace()+getFormActionName());

         boolean result=ValidateUtils.hasRight(getFormNamespace(), getFormActionName(), (HttpServletRequest)pageContext.getRequest(), null);

         if(result==false){

             return SKIP_BODY;

         }else{

             return super.doEndTag();

         }

     }

     public String getFormNamespace(){

         Tag tag=this.getParent();

         while(tag!=null){

             if(tag instanceof FormTag){

                 FormTag formTag=(FormTag) tag;

                 String namespace=formTag.namespace;

                 if(namespace==null||"/".equals(namespace)){

                     namespace="";

                 }

                 return namespace;

             }else{

                 tag=tag.getParent();

             }

         }

         return "";

     }

     public String getFormActionName(){

         Tag tag=this.getParent();

         while(tag!=null){

             if(tag instanceof FormTag){

                 FormTag formTag=(FormTag) tag;

                 String actionName=formTag.action;

                 if(actionName!=null&&actionName.endsWith(".action")){

                     actionName=actionName.substring(0, actionName.indexOf("."));

                     return actionName;

                 }else{

                     actionName="";

                     return actionName;

                 }

             }else{

                 tag=tag.getParent();

             }

         }

         return "";

     }

 }
org.apache.struts2.views.jsp.ui.SubmitTag.java
【Java EE 学习 76 上】【数据采集系统第八天】【角色授权】【用户授权】【权限的粗粒度控制】【权限的细粒度控制】的更多相关文章
- 【Java EE 学习 74 上】【数据采集系统第六天】【使用Jfreechart的统计图实现】【Jfreechart的基本使用方法】
之前已经实现了数据的采集,现在已经有了基本的数据,下一步就需要使用这些数据实现统计图的绘制了.这里使用Jfreechart实现这些统计图的绘制.首先看一下Jfreechart的基本用法,只有知道了它的 ...
- 【Java EE 学习 76 下】【数据采集系统第八天】【通过AOP实现日志管理】【日志管理功能分析和初步实现】
一.日志管理相关分析 1.日志管理是一种典型的系统级别的应用,非常适合使用spring AOP实现. 2.使用日志管理的目的:对系统修改的动作进行记录,比如对权限.角色.用户的写操作.修改操作.删除操 ...
- 【Java EE 学习 75 上】【数据采集系统第七天】【二进制运算实现权限管理】【权限分析和设计】
一.权限计算相关分析 1.如何存储权限 首先说一下权限保存的问题,一个系统中最多有多少权限呢?一个大的系统中可能有成百上千个权限需要管理.怎么保存这么多的权限?首先,我们使用一个数字中的一位保存一种权 ...
- 【Java EE 学习 80 上】【WebService】
一.WebService概述 什么是WebService,顾名思义,就是基于Web的服务,它使用Http方式接收和响应外部系统的某种请求,从而实现远程调用.WebService实际上就是依据某些标准, ...
- 【Java EE 学习 25 上】【网上图书商城项目实战】
一.概述 1.使用的jdk版本:1.6 2.java EE版本:1.6 3.指导老师:传智播客 王建 二.小项目已经实现的功能 普通用户: 1.登陆 2.注册 3.购物 4.浏览 管理员用户(全部管理 ...
- 【Java EE 学习 78 上】【数据采集系统第十天】【Service使用Spring缓存模块】
一.需求分析 调查问卷中或许每一个单击动作都会引发大量的数据库访问,特别是在参与调查的过程中,只是单击“上一页”或者“下一页”的按钮就会引发大量的查询,必须对这种问题进行优化才行.使用缓存策略进行查询 ...
- 【Java EE 学习 77 上】【数据采集系统第九天】【通过AOP实现日志管理】【通过Spring石英调度动态生成日志表】【日志分表和查询】
一.需求分析 日志数据在很多行业中都是非常敏感的数据,它们不能删除只能保存和查看,这样日志表就会越来越大,我们不可能永远让它无限制的增长下去,必须采取一种手段将数据分散开来.假设现在整个数据库需要保存 ...
- 【Java EE 学习 72 上】【数据采集系统第四天】【增加调查logo】【文件上传】【动态错误页指定】【上传限制】【国际化】
增加logo的技术点:文件上传,国际化 文件上传的功能在struts2中是使用文件上传拦截器完成的. 1.首先需要在页面上添加一个文件上传的超链接. 点击该超链接能够跳转到文件上传页面.我给该表单页面 ...
- 【Java EE 学习 71 上】【数据采集系统第三天】【增加页面】【增加问题】【编辑页面,编辑问题】
增加页面和编辑页面.增加问题和编辑问题的页面使用的都是相同的页面,最后调用的方法是saveOrUpdate方法,所以只说一个就可以了. 一.增加页面 比较简单,略.流程如下: 单击“增加页”超链接-& ...
随机推荐
- 机器学习——支持向量机(SVM)之核函数(kernel)
对于线性不可分的数据集,可以利用核函数(kernel)将数据转换成易于分类器理解的形式. 如下图,如果在x轴和y轴构成的坐标系中插入直线进行分类的话, 不能得到理想的结果,或许我们可以对圆中的数据进行 ...
- Eclipse中.calsspath文件解析
来自帅气的Sublime Text
- 微软压力测试工具 web application stress
转自 http://www.cnblogs.com/tonykan/p/3514749.html lbimba 铜牌会员 这里给广大的煤油推荐一个web网站压力测试工具.它可以用来模拟多个用户操作网 ...
- 浅谈Android样式开发之layer-list
引言 在开发某些有层叠效果App时,我们第一个想到的就是让UI进行切图.下面我们来这样的一个例子.如图所示: 上图Tab的背景效果,和带阴影的圆角矩形,是怎么实现的呢?大部分的人会让美工切图,用点九图 ...
- 第二章 Rest框架 Nancy
正如你看到的,Nancy有两个主要用途. 其中第一项是作为一种通用的基于 REST 框架,可替代 ASP.NET Web API 或其他Rest工具包. 默认情况下,Nancy提供一流的路由和内容协商 ...
- 判断字符串是否相等 isEqualToString:
// if((btn.currentTitle == answerBtn.currentTitle) && btn.hidden == YES) // 字符串相等比较 不要直接比,这样 ...
- HTML 内容居中方式总结
在HTML网页排版经常会用到关于对其方式的情况,水平居中和垂直居中.特别是水平居中,并不是一个简单的text-align就可以解决所有的情况. 开始之前普及一点HTML知识,目标很明显,不同的页面结构 ...
- Swift3.0P1 语法指南——构造器
原档:https://developer.apple.com/library/prerelease/ios/documentation/Swift/Conceptual/Swift_Programmi ...
- web 安全杂谈
以前写过一篇关于session.cookie的博文,都是简单的介绍.不过session和cookie和网络安全可有着密切的关系. 今天主要从这几个方面总结下最近学到的东西: 1. session 两种 ...
- lua获取时间
更多好的文章就在 blog.haoitsoft.com,请大家多多支持! local getTime = os.date("%c"); 其中的%c可以是以下的一种:(注意大小写) ...