用标签页TitleSwitch切换不通的控制器
用标签页TitleSwitch切换不通的控制器

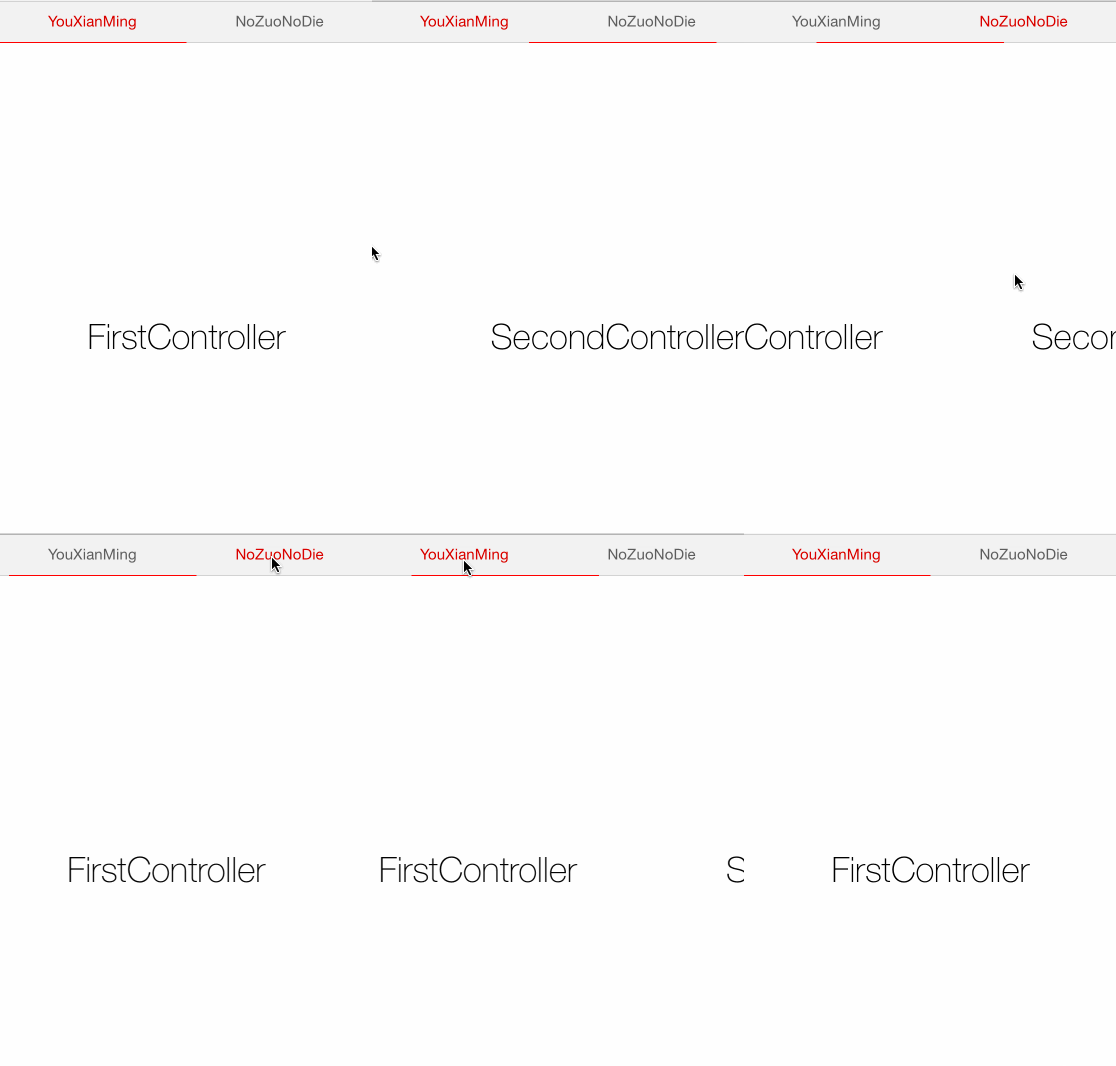
教程效果:

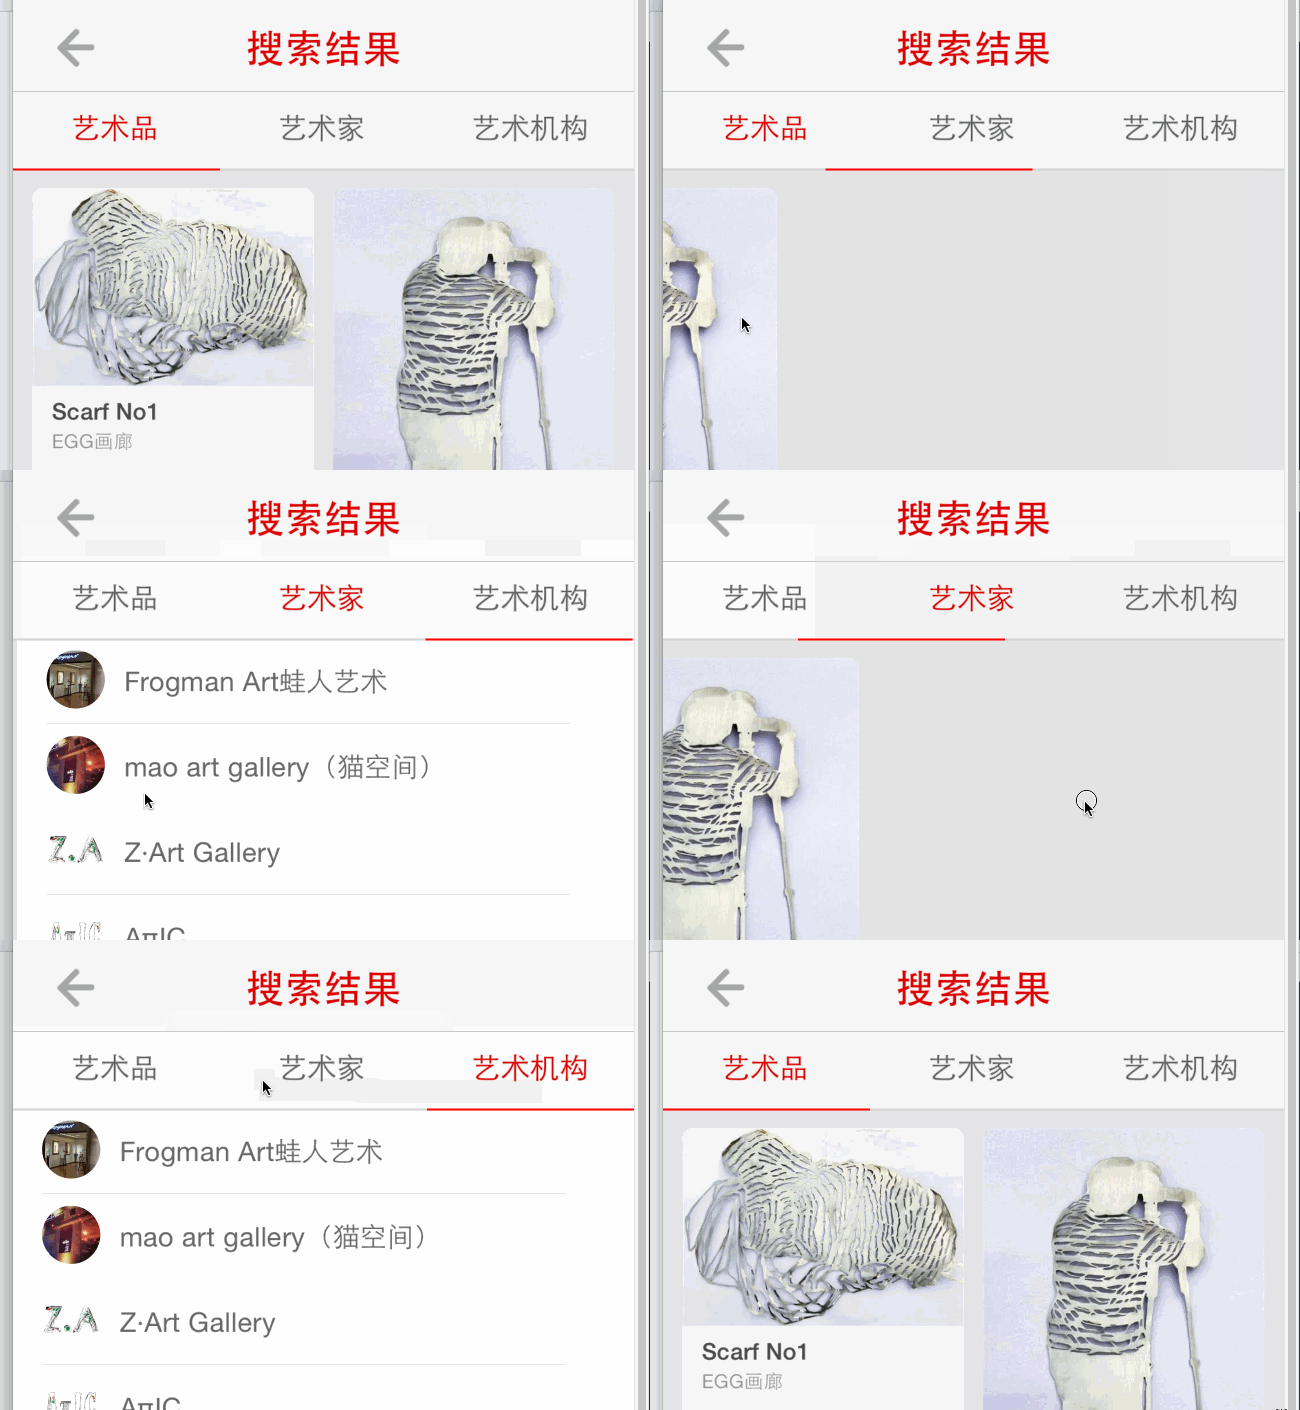
项目开发中效果:

各种源码:
TitleSwitch.h 与 TitleSwitch.m (这个是修改过的升级版本)
//

//  TitleSwitch.h

//  TitleSwitch

//

//  Created by YouXianMing on 14/11/4.

//  Copyright (c) 2014年 YouXianMing. All rights reserved.

//

#import <UIKit/UIKit.h>

/**

 * 使用细节

 *

 TitleSwitch *titleSwitch              = [[TitleSwitch alloc] initWithFrame:CGRectMake(0, 100, 320, 40)];

 titleSwitch.titles                    = @[@"YouXianMing", @"NoZuoNoDie", @"BlueShit"];

 titleSwitch.titleFont                 = [UIFont systemFontOfSize:15.f];

 titleSwitch.lineWidth                 = 1.f;

 titleSwitch.canTouchOnlyButtonOneTime = YES;

 titleSwitch.delegate                  = self;

 [titleSwitch createTitleSwitchView];

 [self.view addSubview:titleSwitch];

 *

 *

 */

@protocol TitleSwitchDelegate <NSObject>

@optional

- (void)willSelectIndex:(NSInteger)index;

- (void)didSelectIndex:(NSInteger)index;

@end

@interface TitleSwitch : UIView

/**

 *  协议

 */

@property (nonatomic, assign) id<TitleSwitchDelegate> delegate;

/**

 *  作为按钮的标题

 */

@property (nonatomic, strong) NSArray  *titles;

/**

 *  线的宽度

 */

@property (nonatomic, assign) CGFloat   lineWidth;

/**

 *  线的颜色

 */

@property (nonatomic, strong) UIColor  *lineColor;

/**

 *  标题字体

 */

@property (nonatomic, strong) UIFont   *titleFont;

/**

 *  普通标题颜色

 */

@property (nonatomic, strong) UIColor  *normalTitleColor;

/**

 *  选中标题的颜色

 */

@property (nonatomic, strong) UIColor  *selectedTitleColor;

/**

 *  一次只能按一个按钮触发动画效果

 */

@property (nonatomic, assign) BOOL      canTouchOnlyButtonOneTime;

/**

 *  开启按钮点击时高亮颜色的效果 & 高亮颜色

 */

@property (nonatomic, assign) BOOL      enableButtonTitleHighlighted;

@property (nonatomic, strong) UIColor  *highlightedTitleColor;

/**

 *  小横线条的X方向的位移值(可以设置动画)

 */

@property (nonatomic, assign) CGFloat   linePositionX;

/**

 *  根据linePositionX重设标题颜色

 */

- (void)resetTilte;

/**

 *  创建TitleSwitch的view出来

 */

- (void)createTitleSwitchView;

@end
//

//  TitleSwitch.m

//  TitleSwitch

//

//  Created by YouXianMing on 14/11/4.

//  Copyright (c) 2014年 YouXianMing. All rights reserved.

//

#import "TitleSwitch.h"

typedef enum : NSUInteger {

    NORMAL_BUTTON = 0x11,

    LINE_VIEW     = 0x1122,

} ENUM_VIEWTAG;

@implementation TitleSwitch

- (void)createTitleSwitchView {

    // 如果没有title,则直接返回

    if (_titles.count == ) {

        return;

    }

    // 获取尺寸

    CGFloat frameWidth  = self.bounds.size.width;

    CGFloat frameHeight = self.bounds.size.height;

    // 计算按钮的宽度&高度

    CGFloat buttonWidth      = frameWidth / _titles.count;

    CGFloat buttonHeight     = ;

    CGFloat defaultLineWidth = .f;

    if (_lineWidth == ) {

        buttonHeight = frameHeight - defaultLineWidth; // 默认线条占用一个像素

    } else {

        buttonHeight = frameHeight - _lineWidth;

    }

    // 初始化所有按钮

    for (int i = ; i < _titles.count; i++) {

        UIButton *button = [[UIButton alloc] initWithFrame:CGRectMake(buttonWidth * i,

                                                                      ,

                                                                      buttonWidth,

                                                                      buttonHeight)];

        button.tag       = NORMAL_BUTTON + i;

        [self addSubview:button];

        [button setTitle:_titles[i] forState:UIControlStateNormal];

        // 普通颜色

        if (i == ) {

            [self selectButtonStyle:button];

        } else {

            [self normalButtonStyle:button];

        }

        // 高亮颜色

        if (_enableButtonTitleHighlighted == YES && _highlightedTitleColor) {

            [button setTitleColor:_highlightedTitleColor forState:UIControlStateHighlighted];

        }

        // 添加事件

        [button addTarget:self action:@selector(buttonsEvent:) forControlEvents:UIControlEventTouchUpInside];

        // 设置字体

        if (_titleFont) {

            button.titleLabel.font = _titleFont;

        }

    }

    // 初始化横线view

    UIView *lineView = [[UIView alloc] initWithFrame:CGRectMake(, buttonHeight + , buttonWidth,

                                                                (_lineWidth ==  ? defaultLineWidth : _lineWidth))];

    lineView.tag     = LINE_VIEW;

    [self addSubview:lineView];

    if (_lineColor) {

        lineView.backgroundColor = _lineColor;

    } else {

        lineView.backgroundColor = [UIColor redColor];

    }

}

/**

 *  按钮事件

 *

 *  @param button 触摸事件中的按钮

 */

- (void)buttonsEvent:(UIButton *)button {

    // 获取到lineView

    UIView *lineView      = [self viewWithTag:LINE_VIEW];

    // 哪一个button

    NSInteger whichButton = button.tag - NORMAL_BUTTON;

    // 计算按钮的宽度&高度

    CGFloat frameWidth    = self.bounds.size.width;

    CGFloat buttonWidth   = frameWidth / _titles.count;

    [[self subviews] enumerateObjectsUsingBlock:^(id obj, NSUInteger idx, BOOL *stop) {

        UIButton *tmp = (UIButton *)obj;

        if ([tmp isKindOfClass:[UIButton class]]) {

            if (tmp == button) {

                [self selectButtonStyle:tmp];

            } else {

                [self normalButtonStyle:tmp];

            }

        }

    }];

    // 做动画

    if (_canTouchOnlyButtonOneTime == YES) {

        self.userInteractionEnabled = NO;

    }

    if (_delegate && [_delegate respondsToSelector:@selector(willSelectIndex:)]) {

        [_delegate willSelectIndex:whichButton];

    }

    [UIView animateWithDuration:0.25f animations:^{

        CGRect rect    = lineView.frame;

        rect.origin.x  = whichButton * buttonWidth;

        lineView.frame = rect;

    } completion:^(BOOL finished) {

        if (_canTouchOnlyButtonOneTime == YES) {

            self.userInteractionEnabled = YES;

        }

        if (_delegate && [_delegate respondsToSelector:@selector(didSelectIndex:)]) {

            [_delegate didSelectIndex:whichButton];

        }

    }];

}

/**

 *  选中按钮的样式

 *

 *  @param button 按钮

 */

- (void)selectButtonStyle:(UIButton *)button {

    if (_selectedTitleColor) {

        [button setTitleColor:_selectedTitleColor

                     forState:UIControlStateNormal];

    } else {

        [button setTitleColor:[UIColor redColor]

                     forState:UIControlStateNormal];

    }

}

/**

 *  普通按钮样式

 *

 *  @param button 按钮

 */

- (void)normalButtonStyle:(UIButton *)button {

    if (_normalTitleColor) {

        [button setTitleColor:_normalTitleColor

                     forState:UIControlStateNormal];

    } else {

        [button setTitleColor:[UIColor colorWithRed:0.369 green:0.369 blue:0.369 alpha:]

                     forState:UIControlStateNormal];

    }

}

- (void)resetTilte {

    // 获取尺寸

    CGFloat frameWidth  = self.bounds.size.width;

    // 计算按钮的宽度&高度

    CGFloat buttonWidth      = frameWidth / _titles.count;

    // 获取到位置

    NSInteger index = _linePositionX / buttonWidth + ;

    [[self subviews] enumerateObjectsUsingBlock:^(id obj, NSUInteger idx, BOOL *stop) {

        UIButton *tmp = (UIButton *)obj;

        if ([tmp isKindOfClass:[UIButton class]]) {

            if (idx == index) {

                [self selectButtonStyle:tmp];

            } else {

                [self normalButtonStyle:tmp];

            }

        }

    }];

}

#pragma mark - 重写各种setter,getter方法

@synthesize linePositionX = _linePositionX;

- (void)setLinePositionX:(CGFloat)linePositionX {

    _linePositionX = linePositionX;

    // 获取到lineView

    UIView *lineView   = [self viewWithTag:LINE_VIEW];

    if (lineView) {

        CGRect rect    = lineView.frame;

        rect.origin.x  = linePositionX;

        lineView.frame = rect;

    }

}

- (CGFloat)linePositionX {

    return _linePositionX;

}

@end
WxHxD.h 与 WxHxD.m
//

//  WxHxD.h

//  PM2.5

//

//  Created by YouXianMing on 14/10/29.

//  Copyright (c) 2014年 YouXianMing. All rights reserved.

//

#import <Foundation/Foundation.h>

@interface WxHxD : NSObject

/**

 *  应用程序中可以放置view的区间的高度(部分区域会被导航栏控制器的高度占有而不计算在类)

 *

 *  @return 高度

 */

+ (CGFloat)appHeight;

/**

 *  屏幕高度

 *

 *  @return 屏幕高度

 */

+ (CGFloat)screenHeight;

/**

 *  屏幕宽度

 *

 *  @return 屏幕宽度

 */

+ (CGFloat)screenWidth;

/**

 *  状态栏高度

 *

 *  @return 状态栏高度

 */

+ (CGFloat)statusBarHeight;

/**

 *  导航栏控制器的高度

 *

 *  @return 导航栏控制器的高度

 */

+ (CGFloat)navigationBarHeight;

/**

 *  标签栏控制器的高度

 *

 *  @return 标签栏控制器的高度

 */

+ (CGFloat)tabbarHeight;

/**

 *  状态栏与导航栏控制器一起的高度

 *

 *  @return 状态栏与导航栏控制器一起的高度

 */

+ (CGFloat)statusBarAndNavigationBarHeight;

@end
//

//  WxHxD.m

//  PM2.5

//

//  Created by YouXianMing on 14/10/29.

//  Copyright (c) 2014年 YouXianMing. All rights reserved.

//

#import "WxHxD.h"

@implementation WxHxD

+ (CGFloat)appHeight {

    return [UIScreen mainScreen].applicationFrame.size.height;

}

+ (CGFloat)screenHeight {

    return [UIScreen mainScreen].bounds.size.height;

}

+ (CGFloat)screenWidth {

    return [UIScreen mainScreen].bounds.size.width;

}

+ (CGFloat)statusBarHeight {

    return .f;

}

+ (CGFloat)navigationBarHeight {

    return .f;

}

+ (CGFloat)tabbarHeight {

    return .f;

}

+ (CGFloat)statusBarAndNavigationBarHeight {

    return (.f + .f);

}

@end
控制器源码:
//

//  FirstController.m

//  SwitchController

//

//  Created by YouXianMing on 14/11/5.

//  Copyright (c) 2014年 YouXianMing. All rights reserved.

//

#import "FirstController.h"

@interface FirstController ()

@end

@implementation FirstController

- (void)viewDidLoad {

    [super viewDidLoad];

    UILabel *label      = [[UILabel alloc] initWithFrame:CGRectMake(, , , )];

    label.center        = self.view.center;

    label.text          = @"FirstController";

    label.font          = [UIFont fontWithName:@"HelveticaNeue-Thin" size:.f];

    label.textAlignment = NSTextAlignmentCenter;

    [self.view addSubview:label];

}

@end
//

//  SecondController.m

//  SwitchController

//

//  Created by YouXianMing on 14/11/5.

//  Copyright (c) 2014年 YouXianMing. All rights reserved.

//

#import "SecondController.h"

@interface SecondController ()

@end

@implementation SecondController

- (void)viewDidLoad {

    [super viewDidLoad];

    UILabel *label      = [[UILabel alloc] initWithFrame:CGRectMake(, , , )];

    label.center        = self.view.center;

    label.text          = @"SecondController";

    label.font          = [UIFont fontWithName:@"HelveticaNeue-Thin" size:.f];

    label.textAlignment = NSTextAlignmentCenter;

    [self.view addSubview:label];

}

@end
主控制器源码:
//

//  ViewController.m

//  SwitchController

//

//  Created by YouXianMing on 14/11/5.

//  Copyright (c) 2014年 YouXianMing. All rights reserved.

//

#import "ViewController.h"

#import "TitleSwitch.h"

#import "WxHxD.h"

#import "FirstController.h"

#import "SecondController.h"

@interface ViewController ()<TitleSwitchDelegate, UIScrollViewDelegate>

{

    TitleSwitch  *titleSwitch;

}

@property (nonatomic, strong) UIScrollView *mainScrollView; // 滑动用的ScrollView

@end

@implementation ViewController

- (void)viewDidLoad {

    [super viewDidLoad];

    // 隐藏状态栏(需要先设置plist文件)

    [UIApplication sharedApplication].statusBarHidden = YES; // 关闭状态栏

    // 初始化UIScrollView

    [self initScrollView];

    // 初始化标签控制器

    [self initTitleSwitch];

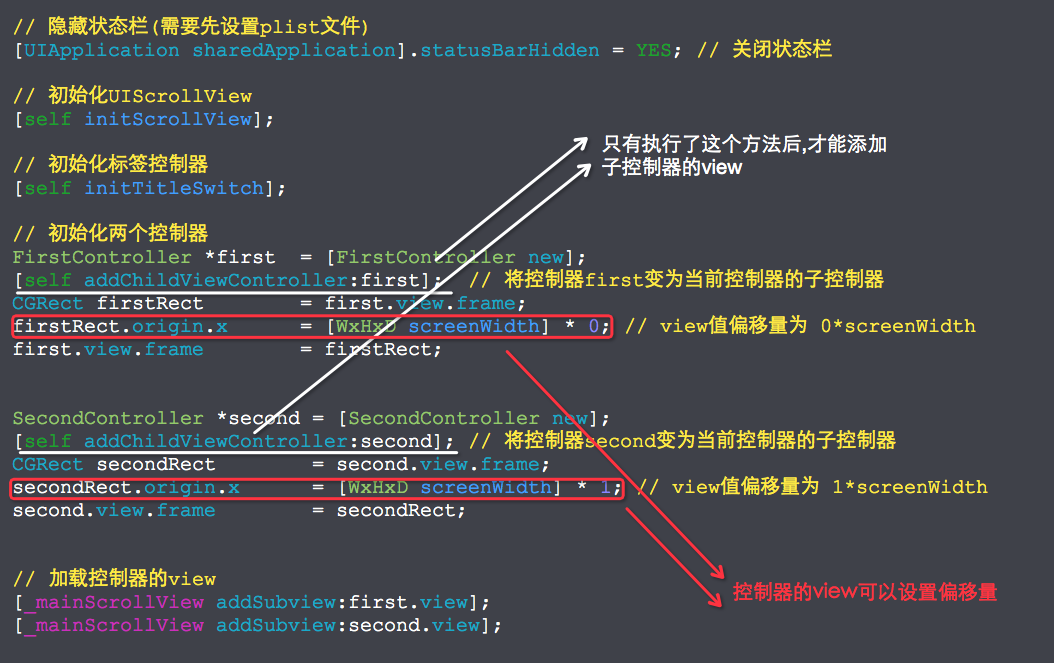
    // 初始化两个控制器

    FirstController *first  = [FirstController new];

    [self addChildViewController:first];  // 将控制器first变为当前控制器的子控制器

    CGRect firstRect        = first.view.frame;

    firstRect.origin.x      = [WxHxD screenWidth] * ; // view值偏移量为 0*screenWidth

    first.view.frame        = firstRect;

    SecondController *second = [SecondController new];

    [self addChildViewController:second]; // 将控制器second变为当前控制器的子控制器

    CGRect secondRect        = second.view.frame;

    secondRect.origin.x      = [WxHxD screenWidth] * ; // view值偏移量为 1*screenWidth

    second.view.frame        = secondRect;

    // 加载控制器的view

    [_mainScrollView addSubview:first.view];

    [_mainScrollView addSubview:second.view];

}

/**

 *  初始化UIScrollView

 */

- (void)initScrollView {

    // 当前显示艺术品的控制器

    _mainScrollView = [[UIScrollView alloc] initWithFrame:self.view.bounds];

    _mainScrollView.contentSize   = CGSizeMake([WxHxD screenWidth] * , [WxHxD screenHeight]);

    _mainScrollView.pagingEnabled = YES;

    _mainScrollView.delegate      = self;

    _mainScrollView.bounces       = NO;

    _mainScrollView.showsHorizontalScrollIndicator = NO;

    [self.view addSubview:_mainScrollView];

}

#pragma mark - UIScrollView的代理

- (void)scrollViewDidScroll:(UIScrollView *)scrollView {

    titleSwitch.linePositionX = scrollView.contentOffset.x / .f;

}

- (void)scrollViewDidEndDecelerating:(UIScrollView *)scrollView {

    [titleSwitch resetTilte];

}

/**

 *  初始化标签控制器

 */

- (void)initTitleSwitch {

    // 标题切换用

    titleSwitch              = [[TitleSwitch alloc] initWithFrame:CGRectMake(, , [WxHxD screenWidth], )];

    titleSwitch.tag          = 0x112244;

    // 添加灰色的线条

    UIView *grayLine = [[UIView alloc] initWithFrame:CGRectMake(, , [WxHxD screenWidth], )];

    grayLine.backgroundColor = [UIColor colorWithRed:0.827 green:0.827 blue:0.827 alpha:];

    [titleSwitch addSubview:grayLine];

    titleSwitch.backgroundColor           = [UIColor colorWithRed:0.949 green:0.949 blue:0.949 alpha:];

    titleSwitch.selectedTitleColor        = [UIColor colorWithRed:0.843 green:0.000 blue:0.000 alpha:];

    titleSwitch.titles                    = @[@"YouXianMing",

                                              @"NoZuoNoDie"];

    titleSwitch.lineWidth                 = .f;

    titleSwitch.titleFont                 = [UIFont systemFontOfSize:.f];

    titleSwitch.canTouchOnlyButtonOneTime = YES;

    titleSwitch.delegate                  = self;

    [titleSwitch createTitleSwitchView];

    [self.view addSubview:titleSwitch];

}

#pragma mark - TitleSwitch的代理

- (void)willSelectIndex:(NSInteger)index {

    if (index == ) {

        CGPoint point = _mainScrollView.contentOffset;

        point.x       = ;

        [UIView animateWithDuration:0.25f animations:^{

            _mainScrollView.contentOffset = point;

        }];

        [self bringTitleToFrount];

    } else {

        CGPoint point = _mainScrollView.contentOffset;

        point.x       = [WxHxD screenWidth];

        [UIView animateWithDuration:0.25f animations:^{

            _mainScrollView.contentOffset = point;

        }];

        [self bringTitleToFrount];

    }

}

/**

 *  将标题提到最前面

 */

- (void)bringTitleToFrount {

    UIView *tmpView = [self.view viewWithTag:0x112244];

    [self.view bringSubviewToFront:tmpView];

}

@end
解析:

用标签页TitleSwitch切换不通的控制器的更多相关文章
- selenium WebDriver 对浏览器标签页的切换
关于selenium WebDriver 对浏览器标签页的切换,现在的市面上最新的浏览器,当点击一个链接打开一个新的页面都是在浏览器中打开一个标签页,而selenium只能对窗口进行切换的方法,只能操 ...
- 标签页的切换方法(DOM)
效果: 1.点击“JAVA语言” 2.点击“C语言” 3.点击C++语言 代码: <!doctype html> <html> <head> <meta ch ...
- selenium多个标签页的切换(弹出新页面的切换)
1_windows = driver.current_window_handle #定位当前页面句柄 all_handles = driver.window_handles #获取全部页面句柄 for ...
- bootstrap 标签页tab切换js(含报错原因)
booststrap 标签页的tab切换,相信大家已经都很熟悉了,在boot官网示例以及其他网站已经很多罗列相关代码的了,这里就不赘述了.这里主要贴下让boot标签页默认显示哪个标签页的js. 主要留 ...
- 在Bootstrap开发中解决Tab标签页切换图表显示问题
在做响应式页面的时候,往往需要考虑更多尺寸设备的界面兼容性,一般不能写死像素,以便能够使得界面元素能够根据设备的不同进行动态调整,但往往有时候还是碰到一些问题,如Tab标签第一页面正常显示,但是切换其 ...
- JavaScript 实现 标签页 切换效果
JavaScript 实现 标签页 切换效果 版权声明:未经授权,严禁分享! 构建主体界面 HTML 代码 <h1>实现标签页的切换效果</h1> <ul id=&quo ...
- 在QMainWindow中利用多个QDockWidget构成标签页tab(原创)
功能描述: 在QMainWindow下,使用多个QDockWidget构成可切换,可拖动,可关闭的标签页:标签页的切换由相关联的QAction触发. 实现效果: 代码如下: QDockWidget * ...
- Bootstrap入门(二十七)JS插件4:标签页
Bootstrap入门(二十七)JS插件4:标签页 标签页的切换可以带动内容的变化 首先我们引入CSS文件 <link href="bootstrap.min.css" re ...
- Vim技能修炼教程(9) - 缓冲区和标签页
缓冲区 上一节我们学习了窗口相关的命令,其实多窗口的最大功能在于存放多个不同的缓冲区. 文件载入内存之后,我们操作的其实是缓冲区.:write命令就是将缓冲区写回文件的目的. 查看内存中的缓冲区 通过 ...
随机推荐
- 机器学习--boosting家族之Adaboost算法
最近在系统研究集成学习,到Adaboost算法这块,一直不能理解,直到看到一篇博文,才有种豁然开朗的感觉,真的讲得特别好,原文地址是(http://blog.csdn.net/guyuealian/a ...
- php使用date()函数时,提示的警告
转载:http://www.shangxueba.com/jingyan/121682.html 在用PHP5.3以上的PHP版本时,只要是涉及时间的会报一个: "PHP Warning: ...
- 使用vue2+Axios+Router 之后的总结以及遇到的一些坑
构建 vue有自己的脚手架构建工具vue-cli,使用起来非常方便,使用webpack来集成各种开发便捷工具,比如: 代码热更新,修改代码之后网页无刷新改变,对前端开发来说非常的方便 PostCss, ...
- [BZOJ 5072]小A的树
Description 题库链接 给你 \(n\) 个节点的一棵树,点分黑白. \(q\) 组询问,每次询问类似于"是否存在树中 \(x\) 个点的连通块恰有 \(y\) 个黑点" ...
- [转]VS2012正则查找
本文转自:http://blog.csdn.net/u013688451/article/details/52840325 工作中有时需要用到 正则查找,例如 想找 所有用到 某个数据库表的地方 st ...
- 机器学习classification_report方法及precision精确率和recall召回率 说明
classification_report简介 sklearn中的classification_report函数用于显示主要分类指标的文本报告.在报告中显示每个类的精确度,召回率,F1值等信息. 主要 ...
- 主打安全 阿里巴巴联合公安部打造PMOS
4月9日,CITE2015(第三届中国电子信息博览会)在深圳会展中心举行,大会主要以“智能新时代.数字新生活”为主题.说道这,就不得不提国内互联网巨头阿里巴巴.大会中阿里巴巴不仅带来了早前马云曾经在德 ...
- 从mysql中dump数据到本地
方法一:使用mysqldump命令,如: mysqldump -h10.90.6.237 -uf_insplat2car_r -P3306 -pxxxxxxxxx nbmp tb_tag_log -- ...
- C语言读取配置文件
自从大学学完C之后,就再也没用过它了, 在网上找代码,七拼八凑之后,终于成形~~勉强能用,不喜勿喷,^_^! int GetValue(const wchar_t *key, wchar_t *val ...
- 前端(十):使用redux管理数据
react本身能够完成动态数据的监听和更新,如果不是必要可以不适用redux. 安装redux: cnpm install redux --save,或者yarn add redux. 一.react ...
