iOS:UITableView表格视图控件
UITableView:表格视图控件,继承滚动视图控件UIScrollView,(类似于UIPickerView选择器,它主要通过设置数据源代理和行为代理实现协议来设置单元格)
@interface UITableView : UIScrollView <NSCoding>
@property (nonatomic, readonly) UITableViewStyle style;//表格样式
@property (nonatomic, assign) id <UITableViewDataSource> dataSource; //数据源代理
@property (nonatomic, assign) id <UITableViewDelegate> delegate;//操作代理
@property (nonatomic) CGFloat rowHeight; //行高
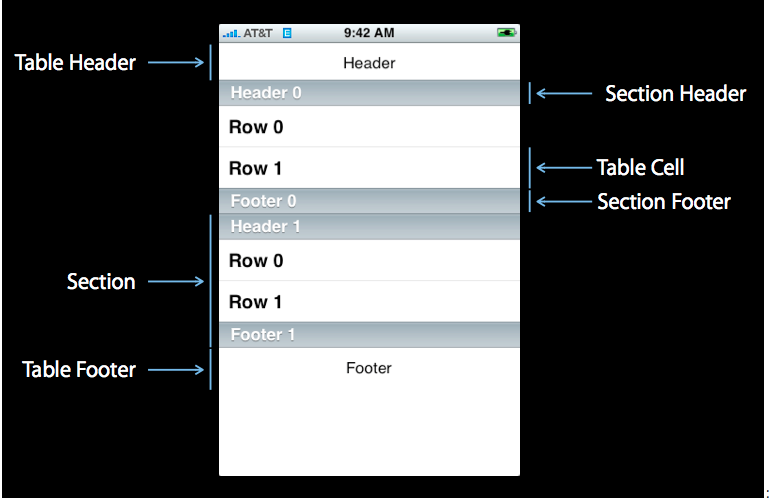
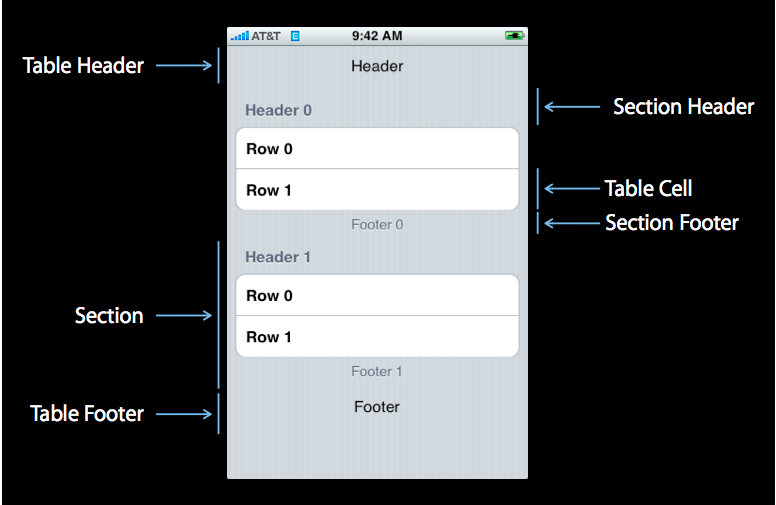
@property (nonatomic) CGFloat sectionHeaderHeight;//组表头高度
@property (nonatomic) CGFloat sectionFooterHeight; //组表尾高度
@property (nonatomic) CGFloat estimatedRowHeight ; //行评估高度
@property (nonatomic) CGFloat estimatedSectionHeaderHeight ;//组表头评估高度
@property (nonatomic) CGFloat estimatedSectionFooterHeight ;//组表尾评估高度
@property (nonatomic) UIEdgeInsets separatorInset;//分离矩形区域
@property(nonatomic, readwrite, retain) UIView *backgroundView //背景视图
@end
2.基本方法:
- (instancetype)initWithFrame:(CGRect)frame style:(UITableViewStyle)style; //初始化
- (NSInteger)numberOfSections; //组数
- (NSInteger)numberOfRowsInSection:(NSInteger)section; //某一组行数
- (CGRect)rectForSection:(NSInteger)section; //某一组的矩形区域
- (CGRect)rectForHeaderInSection:(NSInteger)section;//某一组的表头矩形区域
- (CGRect)rectForFooterInSection:(NSInteger)section;//某一组表尾矩形区域
- (CGRect)rectForRowAtIndexPath:(NSIndexPath *)indexPath;//某一组某行的矩形区域
- (NSIndexPath *)indexPathForRowAtPoint:(CGPoint)point; //返回指定表单元的NSIndexPath路径信息
- (NSIndexPath *)indexPathForCell:(UITableViewCell *)cell; // 返回指定表单元的NSIndexPath路径信息
- (NSArray *)indexPathsForRowsInRect:(CGRect)rect; // 返回指定CGRect的NSIndexPath路径信息数组
- (UITableViewCell *)cellForRowAtIndexPath:(NSIndexPath *)indexPath; //返回某组某一行的单元格
- (NSArray *)visibleCells;//返回可见单元格数组
- (NSArray *)indexPathsForVisibleRows;//返回可见行的索引数组
- (UITableViewHeaderFooterView *)headerViewForSection:(NSInteger)section ;//返回某一组表头视图
- (UITableViewHeaderFooterView *)footerViewForSection:(NSInteger)section ;//返回某一组表尾视图
- (void)scrollToRowAtIndexPath:(NSIndexPath *)indexPath atScrollPosition: (UITableViewScrollPosition)
scrollPosition animated:(BOOL)animated;//将单元格滑动到指定位置的行
- (void)scrollToNearestSelectedRowAtScrollPosition:(UITableViewScrollPosition)scrollPosition animated:(BOOL)animated;//将单元格滑动到选中的行
- (UITableViewCellAccessoryType)tableView:(UITableView *)tableView accessoryTypeForRowWithIndexPath:(NSIndexPath *)indexPath //返回标记效果类型
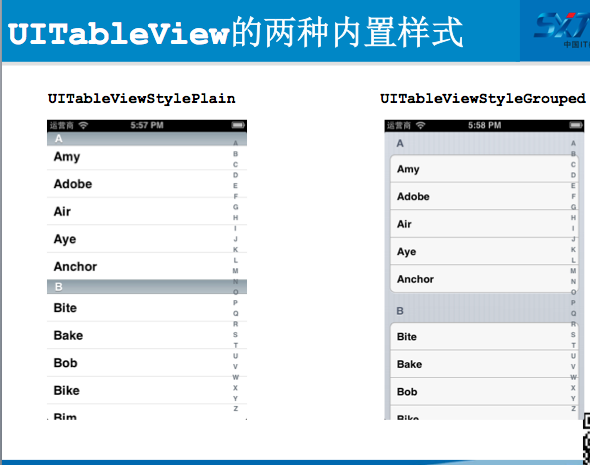
Plain类型:


UITableViewStylePlain, // 规则的表格式图
UITableViewStyleGrouped //分组的表格视图
4.标记单元格Cell (对选中的单元格做处理的显示方式)
标记分别有四种效果:
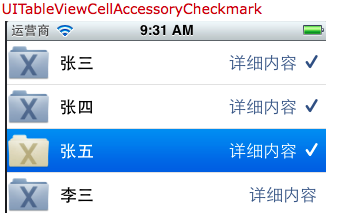
UITableViewCellAccessoryCheckmark //单元格右边每条记录后面打上对勾
UITableViewCellAccessoryDetailDisclosureButton //单元格右边带箭头的小圆按钮,可以添加事件
UITableViewCellAccessoryDisclosureIndicator//展开指示器,相当于内容被折叠起来后可以打开
UITableViewCellAccessoryNone//没有任何的样式

5.对单元格的编辑三种类型:
UITableViewCellEditingStyleDelete //删除选中的单元格
UITableViewCellEditingStyleInsert//插入新的单元格
UITableViewCellEditingStyleNone//移动单元格
6.在删除和添加单元格的用到UITableViewRowAnimation几种动画刷新效果
UITableViewRowAnimationAutomatic //单元格按自动方式滑入/出
UITableViewRowAnimationTop //单元格滑动到相邻单元格之上
UITableViewRowAnimationBottom //单元格滑动到相邻单元格之下
UITableViewRowAnimationLeft //单元格往左滑入/出
UITableViewRowAnimationRight //单元格往右滑入/出
UITableViewRowAnimationMiddle // 单元格往中间滑入/出
UITableViewRowAnimationFade //单元格淡入/出
UITableViewRowAnimationNone //没有动画效果
7.UITableView提供了4种基本的表格视图单元格,在SDK 3.0 之后,每个单元格都有3个属性textLabel(主标题),detailTextLabel(副标题)和imageView(图像视图)。
下面一一介绍这4种基本单元格类型格式:
<1>UITableViewCellStyleDefault
该格式提供了一个简单的左对齐的文本标签textLabel和一个可选的图像imageView。如果显示图像,那么图像将在最左边。
这种格式虽然可以设置detailTextLabel,但是不会显示该标签。
<2>UITableViewCellStyleSubtitle
该格式与前一种相比,增加了对detailTextLabel的支持,该标签将会显示在textLabel标签的下面,字体相对较小。
<3>UITableViewCellStyleValue1
该格式居左显示textLabel,居右显示detailTextLabel,且字体较小。
该格式不支持图像。
<4>UITableViewCellStyleValue2
该格式居左现实一个小型蓝色主标签textLabel,在其右边显示一个小型黑色副标题详细标签detailTextLabel。
该格式不支持图像
二、表格视图的数据源协议:UITableViewDataSource
@protocol UITableViewDataSource<NSObject>
@required
//设置每组多少行
- (NSInteger)tableView:(UITableView *)tableView numberOfRowsInSection:(NSInteger)section;
//设置每一行的单元格
- (UITableViewCell *)tableView:(UITableView *)tableView cellForRowAtIndexPath:(NSIndexPath *)indexPath;
@optional
//设置有多少组
- (NSInteger)numberOfSectionsInTableView:(UITableView *)tableView;
//设置表头内容
- (NSString *)tableView:(UITableView *)tableView titleForHeaderInSection:(NSInteger)section;
//设置表尾内容
- (NSString *)tableView:(UITableView *)tableView titleForFooterInSection:(NSInteger)section;
//设置编辑状态(某一行是否可以编辑(删除))
- (BOOL)tableView:(UITableView *)tableView canEditRowAtIndexPath:(NSIndexPath *)indexPath;
//设置移动状态(某一行是否可以移动来进行重新排序)
- (BOOL)tableView:(UITableView *)tableView canMoveRowAtIndexPath:(NSIndexPath *)indexPath;
//右边的索引栏的内容
- (NSArray *)sectionIndexTitlesForTableView:(UITableView *)tableView;
//根据单元格索引和内容返回组索引
- (NSInteger)tableView:(UITableView *)tableView sectionForSectionIndexTitle:(NSString *)title atIndex:(NSInteger)index;
//对指定的组、行的单元格执行编辑操作(增加、删除、插入)
- (void)tableView:(UITableView *)tableView commitEditingStyle:(UITableViewCellEditingStyle)editingStyle forRowAtIndexPath:(NSIndexPath *)indexPath;
//对指定的组、行的单元格执行移动操作
- (void)tableView:(UITableView *)tableView moveRowAtIndexPath:(NSIndexPath *)sourceIndexPath toIndexPath:(NSIndexPath *)destinationIndexPath;
@end
三、//NSIndexPath
@interface NSIndexPath (UITableView)
+ (NSIndexPath *)indexPathForRow:(NSInteger)row inSection:(NSInteger)section;
@property(nonatomic,readonly) NSInteger section; //组
@property(nonatomic,readonly) NSInteger row;//行
@end
四、表格视图的行为协议:UITableViewDelegate
@protocol UITableViewDelegate<NSObject, UIScrollViewDelegate>
@optional
//选择某一行单元格开始时
- (void)tableView:(UITableView *)tableView willDisplayCell:(UITableViewCell *)cell forRowAtIndexPath:(NSIndexPath *)indexPath;
//选择某一组表头视图开始时
- (void)tableView:(UITableView *)tableView willDisplayHeaderView:(UIView *)view forSection:(NSInteger)section ;
//选择某一组表尾视图开始时
- (void)tableView:(UITableView *)tableView willDisplayFooterView:(UIView *)view forSection:(NSInteger)section;
//选择某一行单元格开始时
- (void)tableView:(UITableView *)tableView didEndDisplayingCell:(UITableViewCell *)cell forRowAtIndexPath:(NSIndexPath*)indexPath ;
//选择某一组表头视图结束时
- (void)tableView:(UITableView *)tableView didEndDisplayingHeaderView:(UIView *)view forSection:(NSInteger)section ;
//选择某一组表尾视图结束时
- (void)tableView:(UITableView *)tableView didEndDisplayingFooterView:(UIView *)view forSection:(NSInteger)section;
//选中了UITableView的某一行
- (void)tableView:(UITableView *)tableView didSelectRowAtIndexPath:(NSIndexPath *)indexPath;
//取消了UITableView的某一行
- (void)tableView:(UITableView *)tableView didDeselectRowAtIndexPath:(NSIndexPath *)
//返回某一行的高度
- (CGFloat)tableView:(UITableView *)tableView heightForRowAtIndexPath:(NSIndexPath *)indexPath;
//返回某一组表头的高度
- (CGFloat)tableView:(UITableView *)tableView heightForHeaderInSection:(NSInteger)section;
//返回某一组表尾的高度
- (CGFloat)tableView:(UITableView *)tableView heightForFooterInSection:(NSInteger)section;
//显示某一组表尾的视图
//设置每一行的等级缩进(数字越小,等级越高)
//返回单元格的编辑类型
-(UITableViewCellEditingStyle)tableView:(UITableView *)tableView editingStyleForRowAtIndexPath:(NSIndexPath *)indexPath
@end
重点:获取indexPath的三种方式
//1.通过标记tag获取
//1.1通过按钮的tag获取indexPath
//Product *product = [self.products objectAtIndex:sender.tag];
//1.2通过拿出按钮的父视图的父视图获取单元格
//shopingTableViewCell *cell = (shopingTableViewCell*)sender.superview.superview;(button->contentView->cell)
//NSIndexPath *indexPath = [self.tableView indexPathForCell:cell];
//Product *product = [self.products objectAtIndex:indexPath.row];
//1.3通过event记录的触摸点获取indexPath
UITouch *touch = [[event allTouches] anyObject];
CGPoint point = [touch locationInView:self.tableView];
NSIndexPath *indexPath = [self.tableView indexPathForRowAtPoint:point];
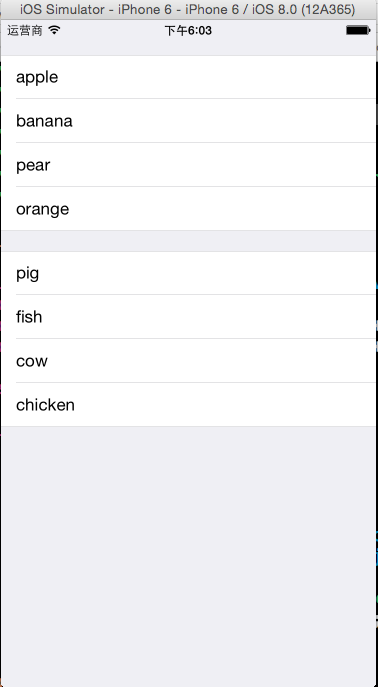
范例一:制作一个水果分组表格
 #import "ViewController.h"

 @interface ViewController ()<UITableViewDataSource>

 @property (weak, nonatomic) IBOutlet UITableView *tableView;

 @property (strong,nonatomic)NSArray *fruit;

 @property (strong,nonatomic)NSArray *meat;

 @end

 @implementation ViewController

 - (void)viewDidLoad {

     [super viewDidLoad];

     //初始化数据

     self.fruit = [NSArray arrayWithObjects:@"apple",@"banana",@"pear",@"orange",nil];

     self.meat = [NSArray arrayWithObjects:@"pig",@"fish",@"cow",@"chicken", nil];

     //设置tableView的数据源代理dataSource

     self.tableView.dataSource = self;

 }

 #pragma mark  - tableView的数据源方法

 //设置有多少组

 -(NSInteger)numberOfSectionsInTableView:(UITableView *)tableView

 {

     return ;

 }

 //设置每组多少行

 -(NSInteger)tableView:(UITableView *)tableView numberOfRowsInSection:(NSInteger)section

 {

     return section==?[self.fruit count]:[self.meat count];

 }

 //设置每一行的单元格

 -(UITableViewCell *)tableView:(UITableView *)tableView cellForRowAtIndexPath:(NSIndexPath *)indexPath

 {

     UITableViewCell *cell = [[UITableViewCell alloc]initWithStyle:UITableViewCellStyleDefault reuseIdentifier:nil];

     cell.textLabel.text = indexPath.section==?self.fruit[[indexPath row]]:self.meat[[indexPath row]];

     return cell;

 }

 @end
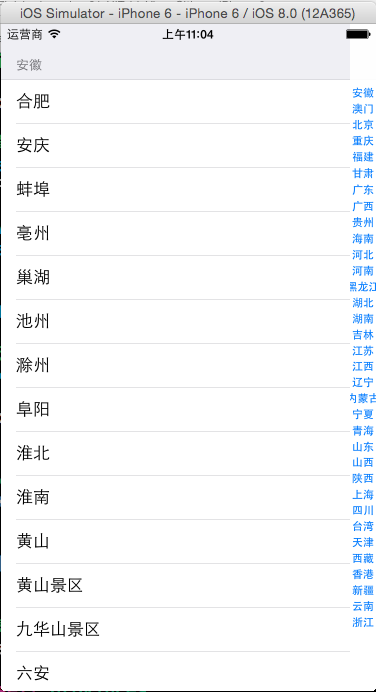
范例二:制作一个中国城市表格
 #import "ViewController.h"

 @interface ViewController ()<UITableViewDataSource>

 @property (strong,nonatomic)UITableView *tableView;

 @property (strong,nonatomic)NSArray *provinces;

 @property (strong,nonatomic)NSDictionary *cities;

 @end

 @implementation ViewController

 - (void)viewDidLoad {

     [super viewDidLoad];

     //初始化数据

     NSBundle *bundle = [NSBundle mainBundle];

     NSString *path = [bundle pathForResource:@"cities" ofType:@"plist"];

     NSDictionary *dictionary = [NSDictionary dictionaryWithContentsOfFile:path];

     if(dictionary)

     {

         self.provinces = [dictionary objectForKey:@"provinces"];

         self.cities = [dictionary objectForKey:@"cities"];

     }

     //创建UITableView,设置数据源

     self.tableView = [[UITableView alloc]initWithFrame:self.view.frame style:UITableViewStyleGrouped];

     self.tableView.dataSource = self;

     [self.view addSubview:self.tableView];

 }

 #pragma mark -tableView数据源方法

 //有多少个section

 -(NSInteger)numberOfSectionsInTableView:(UITableView *)tableView

 {

     return self.provinces.count;

 }

 //每个section有多少个row

 -(NSInteger)tableView:(UITableView *)tableView numberOfRowsInSection:(NSInteger)section

 {

     //取出某省的所有城市

     NSArray *citiesOfProvince = [self.cities objectForKey:self.provinces[section]];

     return citiesOfProvince.count;

 }

 //设置每一个单元格的内容

 -(UITableViewCell *)tableView:(UITableView *)tableView cellForRowAtIndexPath:(NSIndexPath *)indexPath

 {

     //1.根据reuseIdentifier,先到对象池中去找重用的单元格对象,重用单个页面显示的所有单元格,节约内存

     static NSString *reuseIdentifier = @"cityCell";

     UITableViewCell *cell = [self.tableView dequeueReusableCellWithIdentifier:reuseIdentifier];

     //2.如果没有找到,自己创建单元格对象

     if(cell == nil)

     {

         cell = [[UITableViewCell alloc]initWithStyle:UITableViewCellStyleDefault reuseIdentifier:reuseIdentifier];

         NSLog(@"创建单元格对象");

     }

     //3.设置单元格对象的内容

     //取出某省的所有城市

     NSArray *citiesOfProvince = [self.cities objectForKey:self.provinces[[indexPath section]]];

     //设置单元格的内容为相应的城市的名称

     cell.textLabel.text = [citiesOfProvince objectAtIndex:[indexPath row]];

     return cell;

 }

 //设置每一个section头部的名称,设置省的名字

 -(NSString *)tableView:(UITableView *)tableView titleForHeaderInSection:(NSInteger)section

 {

     return [self.provinces objectAtIndex:section];

 }

 //添加右边的索引,便于查找对应的省

 -(NSArray*)sectionIndexTitlesForTableView:(UITableView *)tableView

 {

     return self.provinces;

 }

 @end
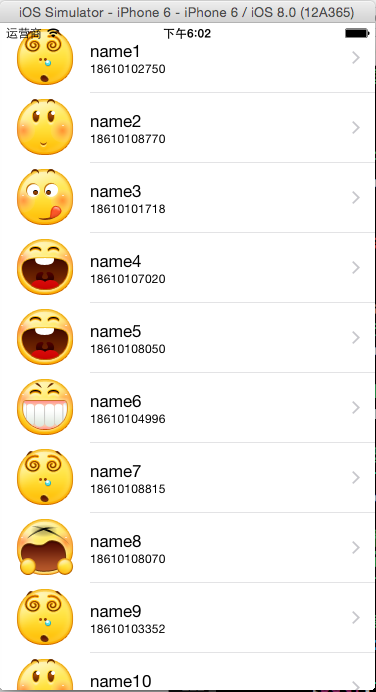
范例三 制作带有图像、主标题、副标题的通讯录
 #import "ViewController.h"

 #import "Contact.h"

 #define CONTACT_NUM 20

 @interface ViewController ()<UITableViewDataSource,UITableViewDelegate,UIAlertViewDelegate>

 @property (strong,nonatomic)UITableView *tableView;

 @property (strong,nonatomic)NSArray *contacts;

 @end

 @implementation ViewController

 - (void)viewDidLoad {

     [super viewDidLoad];

     //初始化联系人信息

     NSMutableArray *arrayM = [NSMutableArray arrayWithCapacity:CONTACT_NUM];

     for(int i=; i<CONTACT_NUM; i++)

     {

         Contact *contact = [[Contact alloc]initWithName:[NSString stringWithFormat:@"name%d",i+] andTel:[NSString stringWithFormat:@"1861010%04d",arc4random_uniform()] andFaceName:[NSString stringWithFormat:@"%d.png",arc4random_uniform()]];

         [arrayM addObject:contact];

     }

     self.contacts =  arrayM;

     //创建tableView

     self.tableView = [[UITableView alloc]initWithFrame:self.view.frame style:UITableViewStylePlain];

     self.tableView.dataSource = self;

     self.tableView.delegate = self;

     [self.view addSubview:self.tableView];

 }

 #pragma mark -tableView的数据源方法

 //每个组section有多少row

 -(NSInteger)tableView:(UITableView *)tableView numberOfRowsInSection:(NSInteger)section

 {

     return self.contacts.count;

 }

 //设置每一个单元格的内容

 -(UITableViewCell *)tableView:(UITableView *)tableView cellForRowAtIndexPath:(NSIndexPath *)indexPath

 {

     //1.根据reuseIdentifier,先到对象池中去找重用的单元格对象

     static NSString *reuseIdentifier = @"contactCell";

     UITableViewCell *cell = [self.tableView dequeueReusableCellWithIdentifier:reuseIdentifier];

     //2.如果没有找到,自己创建单元格对象

     if(cell == nil)

     {

         cell = [[UITableViewCell alloc]initWithStyle:UITableViewCellStyleSubtitle reuseIdentifier:reuseIdentifier];

     }

     //3.设置单元格对象的内容

     Contact *contact = [self.contacts objectAtIndex:indexPath.row];

     //设置头像

     [cell.imageView setImage:[UIImage imageNamed:contact.faceName]];

     //设置姓名

     cell.textLabel.text = contact.name;

     //设置电话

     cell.detailTextLabel.text = contact.tel;

     //设置辅助指引视图

     cell.accessoryType = UITableViewCellAccessoryDisclosureIndicator;

     return cell;

 }

 #pragma mark -tableVie的代理方法

 //设置单元格每行的高度

 -(CGFloat)tableView:(UITableView *)tableView heightForRowAtIndexPath:(NSIndexPath *)indexPath

 {

     return ;

 }

 //选中某行时的操作

 -(void)tableView:(UITableView *)tableView didSelectRowAtIndexPath:(NSIndexPath *)indexPath

 {

     //NSLog(@"选中了第%ld行",[indexPath row]);

     //创建一个提示框

     UIAlertView *alertView = [[UIAlertView alloc]initWithTitle:@"提示" message:[NSString stringWithFormat:@"你选中了第%ld行",indexPath.row] delegate:self cancelButtonTitle:@"确定" otherButtonTitles:@"取消", nil];

     //设置类型

     alertView.alertViewStyle = UIAlertViewStylePlainTextInput;

     //在文本框当中显示原来的名字

     Contact *contact = [self.contacts objectAtIndex:indexPath.row];

     [alertView textFieldAtIndex:].text = contact.name;

     //用tag记录选中的行号

     alertView.tag = indexPath.row;

     //显示提示框

     [alertView show];

 }

 //取消了某行的操作

 -(void)tableView:(UITableView *)tableView didDeselectRowAtIndexPath:(NSIndexPath *)indexPath

 {

     NSLog(@"取消了第%ld行",[indexPath row]);

 }

 #pragma mark -alertView代理方法

 //获取点击了那个按钮

 -(void)alertView:(UIAlertView *)alertView clickedButtonAtIndex:(NSInteger)buttonIndex

 {

     //NSLog(@"buttonIndex:%ld",buttonIndex);

     if(buttonIndex == ) //确定

     {

         //1.修改数据模型

         Contact *contact = [self.contacts objectAtIndex:alertView.tag];

         [contact setName:[alertView textFieldAtIndex:].text];

         //2.表格刷新,显示新的数据

         //表格全部刷新

         //[self.tableView reloadData];

         //表格局部刷新

         NSIndexPath *indexpath = [NSIndexPath indexPathForRow:alertView.tag inSection:];

         [self.tableView reloadRowsAtIndexPaths:@[indexpath] withRowAnimation:UITableViewRowAnimationLeft];

     }

 }

 @end
范例四、删除单元格、插入单元格
 前《=====》后
 前<======>后
 #import "ViewController.h"

 #define ARRAYM_NUM 20

 @interface ViewController ()<UITableViewDataSource,UITableViewDelegate>

 @property (weak, nonatomic) IBOutlet UITableView *tableView;

 @property (strong,nonatomic)NSMutableArray *arrayM;

 @property (assign,nonatomic)BOOL isDelete;

 @end

 @implementation ViewController

 - (IBAction)addClicked:(UIBarButtonItem *)sender {

     self.isDelete = NO;

     self.tableView.editing = !self.tableView.editing;

 }

 - (IBAction)deleteClicked:(UIBarButtonItem *)sender {

     self.isDelete = YES;

     self.tableView.editing = !self.tableView.editing;

 }

 - (void)viewDidLoad {

     [super viewDidLoad];

     //初始化数据

     self.arrayM = [NSMutableArray arrayWithCapacity:ARRAYM_NUM];

     for (int i=; i<ARRAYM_NUM; i++)

     {

         NSString *productName = [NSString stringWithFormat:@"产品-%02d",i+];

         [self.arrayM addObject:productName];

         //设置tableView的数据源和代理

         self.tableView.dataSource = self;

         self.tableView.delegate = self;

     }

 }

 #pragma mark -tableView的数据源方法

 //每组多少行

 -(NSInteger)tableView:(UITableView *)tableView numberOfRowsInSection:(NSInteger)section

 {

      return self.arrayM.count;

 }

 //设置每一个单元格的内容

 -(UITableViewCell *)tableView:(UITableView *)tableView cellForRowAtIndexPath:(NSIndexPath *)indexPath

 {

     //1.根据reuseIdentifier,先到对象池中去找重用的单元格对象

     static NSString *reuseIdentifier = @"productCell";

     UITableViewCell *cell = [self.tableView dequeueReusableCellWithIdentifier:reuseIdentifier];

     //2.如果没有找到,自己创建单元格对象

     if(cell == nil)

     {

         cell = [[UITableViewCell alloc]initWithStyle:UITableViewCellStyleDefault reuseIdentifier:reuseIdentifier];

     }

     //3.设置单元格对象的内容

     cell.textLabel.text = [self.arrayM objectAtIndex:indexPath.row];

     return cell;

 }

 //tableView的编辑的处理

 -(void)tableView:(UITableView *)tableView commitEditingStyle:(UITableViewCellEditingStyle)editingStyle forRowAtIndexPath:(NSIndexPath *)indexPath

 {

     if(editingStyle == UITableViewCellEditingStyleDelete)

     {

         NSLog(@"要删除第%ld行",indexPath.row);

         //1.要在数组中删掉相应的元素

         [self.arrayM removeObjectAtIndex:indexPath.row];

         //2.做局部的刷新

         [self.tableView deleteRowsAtIndexPaths:@[indexPath] withRowAnimation:UITableViewRowAnimationMiddle];

     }

     if(editingStyle == UITableViewCellEditingStyleInsert)

     {

         NSLog(@"要插入第%ld行",indexPath.row);

         //1.要在数组中插入新的元素

         [self.arrayM insertObject:[NSString stringWithFormat:@"产品-%02d", arc4random_uniform()] atIndex:indexPath.row];

         //2.做局部的刷新

         [self.tableView insertRowsAtIndexPaths:@[indexPath] withRowAnimation:UITableViewRowAnimationRight];

     }

 }

 -(UITableViewCellEditingStyle)tableView:(UITableView *)tableView editingStyleForRowAtIndexPath:(NSIndexPath *)indexPath

 {

     if(self.isDelete)

         return UITableViewCellEditingStyleDelete;

     else

         return UITableViewCellEditingStyleInsert;

 }

 @end
 //设置每一个单元格的内容

 -(UITableViewCell *)tableView:(UITableView *)tableView cellForRowAtIndexPath:(NSIndexPath *)indexPath

 {

     //1.根据reuseIdentifier,先到对象池中去找重用的单元格对象

     static NSString *reuseIdentifier = @"<#name#>";

     UITableViewCell *cell = [self.tableView dequeueReusableCellWithIdentifier:reuseIdentifier];

     //2.如果没有找到,自己创建单元格对象

     if(cell == nil)

     {

         cell = [[UITableViewCell alloc]initWithStyle:UITableViewCellStyleDefault reuseIdentifier:reuseIdentifier];

     }

     //3.设置单元格对象的内容

     return cell;

 }
tableView的编辑模式(删除、插入)分三步处理
1.打开tableView的编辑模式
self.tableView.editing = YES
2.返回单元格的编辑类型
编辑类型三种:none、insert、delete
默认的编辑类型为delete
-(UITableViewCellEditingStyle)tableView:(UITableView *)tableView editingStyleForRowAtIndexPath:(NSIndexPath *)indexPath
3.对单元格进行具体的编辑处理
-(void)tableView:(UITableView *)tableView commitEditingStyle:(UITableViewCellEditingStyle)editingStyle forRowAtIndexPath:(NSIndexPath *)indexPath
 //tableView的编辑的处理

 -(void)tableView:(UITableView *)tableView commitEditingStyle:(UITableViewCellEditingStyle)editingStyle forRowAtIndexPath:(NSIndexPath *)indexPath

 {

     if(editingStyle == UITableViewCellEditingStyleDelete)

     {

         NSLog(@"要删除第%ld行",indexPath.row);

         //1.要在数组中删掉相应的元素

         [self.arrayM removeObjectAtIndex:indexPath.row];

         //2.做局部的刷新

         [self.tableView deleteRowsAtIndexPaths:@[indexPath] withRowAnimation:UITableViewRowAnimationMiddle];

     }

     if(editingStyle == UITableViewCellEditingStyleInsert)

     {

         NSLog(@"要插入第%ld行",indexPath.row);

         //1.要在数组中插入新的元素

         [self.arrayM insertObject:[NSString stringWithFormat:@"产品-%02d", arc4random_uniform()] atIndex:indexPath.row];

         //2.做局部的刷新

         [self.tableView insertRowsAtIndexPaths:@[indexPath] withRowAnimation:UITableViewRowAnimationRight];

     }

 }

 //返回单元格编辑类型

 -(UITableViewCellEditingStyle)tableView:(UITableView *)tableView editingStyleForRowAtIndexPath:(NSIndexPath *)indexPath

 {

     if(self.isDelete)

         return UITableViewCellEditingStyleDelete;

     else

        return UITableViewCellEditingStyleInsert;

 }
在tableView中移动单元格的步骤:
1、把tableView的editing设置成YES
2、在返回单元格编辑类型方法时一定要返回none
3、设置单元格能够移动(返回YES)
-(BOOL)tableView:(UITableView *)tableView canMoveRowAtIndexPath:(NSIndexPath *)indexPath
4、进行单元格移动后的处理
-(void)tableView:(UITableView *)tableView moveRowAtIndexPath:(NSIndexPath *)sourceIndexPath toIndexPath:(NSIndexPath *)destinationIndexPath
 //返回单元格编辑类型

 -(UITableViewCellEditingStyle)tableView:(UITableView *)tableView editingStyleForRowAtIndexPath:(NSIndexPath *)indexPath

 {

      return UITableViewCellEditingStyleNone;

 }

 //设置单元格是否能移动

 -(BOOL)tableView:(UITableView *)tableView canMoveRowAtIndexPath:(NSIndexPath *)indexPath

 {

     return YES;

 }

 //移动单元格时的处理

 -(void)tableView:(UITableView *)tableView moveRowAtIndexPath:(NSIndexPath *)sourceIndexPath toIndexPath:(NSIndexPath *)destinationIndexPath

 {

     //修改数组中的元素的顺序

     //1.先取出要移动的元素

     NSString *item = [self.arrayM objectAtIndex:sourceIndexPath.row];

     //2.先把原来位置的元素删掉

     [self.arrayM removeObjectAtIndex:sourceIndexPath.row];

     //3.在新的位置上重新插入

     [self.arrayM insertObject:item atIndex:destinationIndexPath.row];

 }
iOS:UITableView表格视图控件的更多相关文章
- iOS:UIImageView图像视图控件
UIImageView:图像视图控件: 它是UIView的子类,因此也是视图控件,可以用来显示图像.因为它具有帧动画属性和操作方法,因此可以用来制作动画,其实动画就是很短的时间内,执行显示连续的 ...
- iOS:文本视图控件UITextView的详细使用
文本视图控件:UITextView 介绍:它是一个文本域的编辑视图,可以在该区域上进行编辑(包括删除.剪贴.复制.修改等),它与文本框UITextField的不同之处是:当它里面的每一行内容超出时,可 ...
- iOS:网页视图控件UIWebView的详解
网页视图控件:UIWebView 功能:它是继承于UIView的,是一个内置的浏览器控件,以用来浏览从网络下载下来的网页或者本地上加载下来的文档. 枚举: //网页视图导航类型 typedef NS_ ...
- IOS 学习笔记(5) 控件 文本视图(UITextView)的使用方法
相对于UILabell所支持的较短文本内容,UITextView对于长文本的支持更好.UITextView能够以滚动的方式全部浏览到长文本,并且就像UILabel那样,从ISO6,他也提供了对NSAt ...
- iOS:风火轮活动刷新视图控件UIActivityIndicatorView的详细使用
动态风火轮视图控件:UIActivityIndicatorView 介绍:它是一种类似于风火轮旋转的视图控件,可用作刷新数据时显示加载过程所用,继承自UIView. 类型: typedef N ...
- Unity3d IOS中的IGUI控件
Unity3d IOS中的IGUI控件 @灰太龙 群63438968 我讲一下IOS中用的UI,我们采用IGUI,需要使用IGUI的高版本,在Unity3d 4.2中也可以使用的! 之前IGUI有个 ...
- Xamarin iOS教程之页面控件
Xamarin iOS教程之页面控件 Xamarin iOS 页面控件 在iPhone手机的主界面中,经常会看到一排小白点,那就是页面控件,如图2.44所示.它是由小白点和滚动视图组成,可以用来控制翻 ...
- win32 sdk列表视图控件(ListCtrl或ListView)资料整理
列表视图控件是一种非常常用的控件,在需要以报表形式显示数据时,列表控件通常是最好的选择,许多专用的数据报表控件,也是在它的基础上派生而来.与树视图类似,列表控件可以由多个子项目组成,可以设置为Icon ...
- Qt实现表格树控件-支持多级表头
目录 一.概述 二.效果展示 三.实现方式 四.多级表头 1.数据源 2.表格 3.QStyledItemDelegate绘制代理 五.测试代码 六.相关文章 原文链接:Qt实现表格树控件-支持多级表 ...
随机推荐
- ref:详解MYSQL数据库密码的加密方式及破解方法
ref:https://blog.csdn.net/paul123456789io/article/details/53081921 MySQL数据库用户密码跟其它数据库用户密码一样,在应用系统代码中 ...
- JAVAEE——宜立方商城11:sso登录注册功能实现、通过token获得用户信息、Ajax跨域请求(jsonp)
1. 学习计划 第十一天: 1.sso注册功能实现 2.sso登录功能实现 3.通过token获得用户信息 4.Ajax跨域请求(jsonp) 2. Sso系统工程搭建 需要创建一个sso服务工程,可 ...
- MySQL 关于索引那点事
索引 其实数据库中的数据是按页存放的其实索引也是按页存放的所以本质上索引也占硬盘空间(以最小的消耗,换取最大的利益) 索引是一种有效组合数据的方式!为快速查找到指定记录做铺垫 目的就是快速或者某个记录 ...
- 【java】Hibernate saveOrUpdate失效以及补救方案
有个需求是如果unique key不存在则插入,存在则更新. 简单的方式先select一下再insert 或者update,但是嫌太麻烦而且慢,所以采用Hibernate中session.saveOr ...
- leetcode 链表 两数相加
两数相加 给定两个非空链表来表示两个非负整数.位数按照逆序方式存储,它们的每个节点只存储单个数字.将两数相加返回一个新的链表. 你可以假设除了数字 0 之外,这两个数字都不会以零开头. 示例 ...
- android 视频 2017
韩梦飞沙 韩亚飞 313134555@qq.com yue31313 han_meng_fei_sha
- md 添加 图片
韩梦飞沙 韩亚飞 313134555@qq.com yue31313 han_meng_fei_sha 1.在github上的仓库建立一个存放图片的文件夹,文件夹名字随意.如:img-fold ...
- BZOJ.3498.[PA2009]Cakes(三元环 枚举)
题目链接 感觉我可能学的假的(复杂度没问题,但是常数巨大). 一个比较真的说明见这儿:https://czyhe.me/blog/algorithm/3-mem-ring/3-mem-ring/. \ ...
- hash课堂测试补分博客
题目要求: 开放地址法: 概念: 所谓的开放定址法就是一旦发生了冲突,就去寻找下一个空的散列地址,只要散列表足够大,空的散列地址总能找到,并将记录存入. 它的公式为: 解题过程(在下图中): 拉链法: ...
- Codeforces Round #293 (Div. 2) B. Tanya and Postcard 水题
B. Tanya and Postcard time limit per test 2 seconds memory limit per test 256 megabytes input standa ...