An Introduction to OAuth 2
PostedJuly 21, 2014 1.1mviews SECURITY API CONCEPTUAL

Introduction
OAuth 2 is an authorization framework that enables applications to obtain limited access to user accounts on an HTTP service, such as Facebook, GitHub, and DigitalOcean. It works by delegating user authentication to the service that hosts the user account, and authorizing third-party applications to access the user account. OAuth 2 provides authorization flows for web and desktop applications, and mobile devices.
This informational guide is geared towards application developers, and provides an overview of OAuth 2 roles, authorization grant types, use cases, and flows.
Let's get started with OAuth Roles!
OAuth Roles
OAuth defines four roles:
- Resource Owner
- Client
- Resource Server
- Authorization Server
We will detail each role in the following subsections.
Resource Owner: User
The resource owner is the user who authorizes an application to access their account. The application's access to the user's account is limited to the "scope" of the authorization granted (e.g. read or write access).
Resource / Authorization Server: API
The resource server hosts the protected user accounts, and the authorization server verifies the identity of the user then issues access tokens to the application.
From an application developer's point of view, a service's API fulfills both the resource and authorization server roles. We will refer to both of these roles combined, as the Service or API role.
Client: Application
The client is the application that wants to access the user's account. Before it may do so, it must be authorized by the user, and the authorization must be validated by the API.
Abstract Protocol Flow
Now that you have an idea of what the OAuth roles are, let's look at a diagram of how they generally interact with each other:
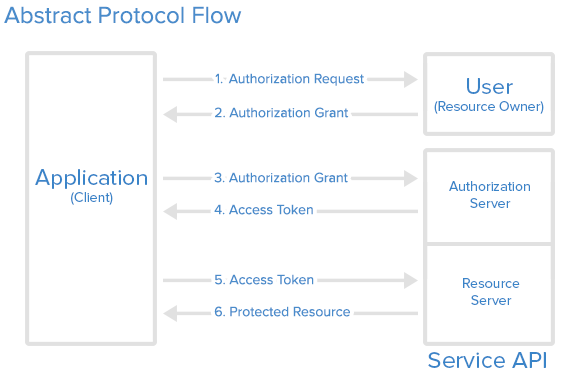
Here is a more detailed explanation of the steps in the diagram:
- The application requests authorization to access service resources from the user
- If the user authorized the request, the application receives an authorization grant
- The application requests an access token from the authorization server (API) by presenting authentication of its own identity, and the authorization grant
- If the application identity is authenticated and the authorization grant is valid, the authorization server (API) issues an access token to the application. Authorization is complete.
- The application requests the resource from the resource server (API) and presents the access token for authentication
- If the access token is valid, the resource server (API) serves the resource to the application
The actual flow of this process will differ depending on the authorization grant type in use, but this is the general idea. We will explore different grant types in a later section.
Application Registration
Before using OAuth with your application, you must register your application with the service. This is done through a registration form in the "developer" or "API" portion of the service's website, where you will provide the following information (and probably details about your application):
- Application Name
- Application Website
- Redirect URI or Callback URL
The redirect URI is where the service will redirect the user after they authorize (or deny) your application, and therefore the part of your application that will handle authorization codes or access tokens.
Client ID and Client Secret
Once your application is registered, the service will issue "client credentials" in the form of a client identifier and a client secret. The Client ID is a publicly exposed string that is used by the service API to identify the application, and is also used to build authorization URLs that are presented to users. The Client Secret is used to authenticate the identity of the application to the service API when the application requests to access a user's account, and must be kept private between the application and the API.
Authorization Grant
In the Abstract Protocol Flow above, the first four steps cover obtaining an authorization grant and access token. The authorization grant type depends on the method used by the application to request authorization, and the grant types supported by the API. OAuth 2 defines four grant types, each of which is useful in different cases:
- Authorization Code: used with server-side Applications
- Implicit: used with Mobile Apps or Web Applications (applications that run on the user's device)
- Resource Owner Password Credentials: used with trusted Applications, such as those owned by the service itself
- Client Credentials: used with Applications API access
Now we will describe grant types in more detail, their use cases and flows, in the following sections.
Grant Type: Authorization Code
The authorization code grant type is the most commonly used because it is optimized for server-side applications, where source code is not publicly exposed, and Client Secret confidentiality can be maintained. This is a redirection-based flow, which means that the application must be capable of interacting with the user-agent (i.e. the user's web browser) and receiving API authorization codes that are routed through the user-agent.
Now we will describe the authorization code flow:

Step 1: Authorization Code Link
First, the user is given an authorization code link that looks like the following:
https://cloud.digitalocean.com/v1/oauth/authorize?response_type=code&client_id=CLIENT_ID&redirect_uri=CALLBACK_URL&scope=read
Here is an explanation of the link components:
- https://cloud.digitalocean.com/v1/oauth/authorize: the API authorization endpoint
- client_id=client_id: the application's client ID (how the API identifies the application)
- redirect_uri=CALLBACK_URL: where the service redirects the user-agent after an authorization code is granted
- response_type=code: specifies that your application is requesting an authorization code grant
- scope=read: specifies the level of access that the application is requesting
Step 2: User Authorizes Application
When the user clicks the link, they must first log in to the service, to authenticate their identity (unless they are already logged in). Then they will be prompted by the service to authorize or deny the application access to their account. Here is an example authorize application prompt:

This particular screenshot is of DigitalOcean's authorization screen, and we can see that "Thedropletbook App" is requesting authorization for "read" access to the account of "manicas@digitalocean.com".
Step 3: Application Receives Authorization Code
If the user clicks "Authorize Application", the service redirects the user-agent to the application redirect URI, which was specified during the client registration, along with an authorization code. The redirect would look something like this (assuming the application is "dropletbook.com"):
https://dropletbook.com/callback?code=AUTHORIZATION_CODE
Step 4: Application Requests Access Token
The application requests an access token from the API, by passing the authorization code along with authentication details, including the client secret, to the API token endpoint. Here is an example POST request to DigitalOcean's token endpoint:
https://cloud.digitalocean.com/v1/oauth/token?client_id=CLIENT_ID&client_secret=CLIENT_SECRET&grant_type=authorization_code&code=AUTHORIZATION_CODE&redirect_uri=CALLBACK_URL
Step 5: Application Receives Access Token
If the authorization is valid, the API will send a response containing the access token (and optionally, a refresh token) to the application. The entire response will look something like this:
{"access_token":"ACCESS_TOKEN","token_type":"bearer","expires_in":2592000,"refresh_token":"REFRESH_TOKEN","scope":"read","uid":100101,"info":{"name":"Mark E. Mark","email":"mark@thefunkybunch.com"}}
Now the application is authorized! It may use the token to access the user's account via the service API, limited to the scope of access, until the token expires or is revoked. If a refresh token was issued, it may be used to request new access tokens if the original token has expired.
Grant Type: Implicit
The implicit grant type is used for mobile apps and web applications (i.e. applications that run in a web browser), where the client secret confidentiality is not guaranteed. The implicit grant type is also a redirection-based flow but the access token is given to the user-agent to forward to the application, so it may be exposed to the user and other applications on the user's device. Also, this flow does not authenticate the identity of the application, and relies on the redirect URI (that was registered with the service) to serve this purpose.
The implicit grant type does not support refresh tokens.
The implicit grant flow basically works as follows: the user is asked to authorize the application, then the authorization server passes the access token back to the user-agent, which passes it to the application. If you are curious about the details, read on.
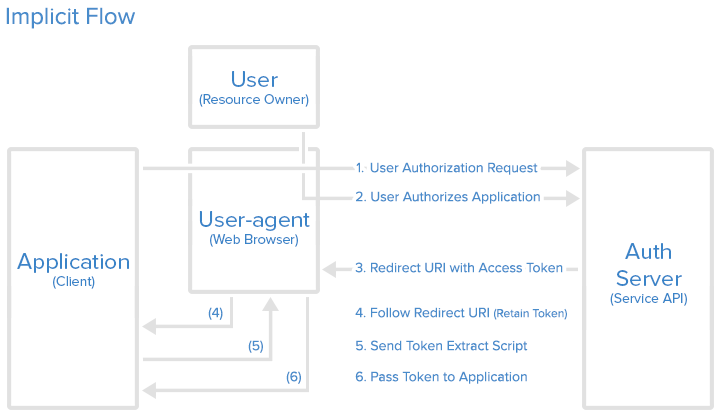
Step 1: Implicit Authorization Link
With the implicit grant type, the user is presented with an authorization link, that requests a token from the API. This link looks just like the authorization code link, except it is requesting a token instead of a code (note the response type "token"):
https://cloud.digitalocean.com/v1/oauth/authorize?response_type=token&client_id=CLIENT_ID&redirect_uri=CALLBACK_URL&scope=read
Step 2: User Authorizes Application
When the user clicks the link, they must first log in to the service, to authenticate their identity (unless they are already logged in). Then they will be prompted by the service to authorize or deny the application access to their account. Here is an example authorize application prompt:
We can see that "Thedropletbook App" is requesting authorization for "read" access to the account of "manicas@digitalocean.com".
Step 3: User-agent Receives Access Token with Redirect URI
If the user clicks "Authorize Application", the service redirects the user-agent to the application redirect URI, and includes a URI fragment containing the access token. It would look something like this:
https://dropletbook.com/callback#token=ACCESS_TOKEN
Step 4: User-agent Follows the Redirect URI
The user-agent follows the redirect URI but retains the access token.
Step 5: Application Sends Access Token Extraction Script
The application returns a webpage that contains a script that can extract the access token from the full redirect URI that the user-agent has retained.
Step 6: Access Token Passed to Application
The user-agent executes the provided script and passes the extracted access token to the application.
Now the application is authorized! It may use the token to access the user's account via the service API, limited to the scope of access, until the token expires or is revoked.
Grant Type: Resource Owner Password Credentials
With the resource owner password credentials grant type, the user provides their service credentials (username and password) directly to the application, which uses the credentials to obtain an access token from the service. This grant type should only be enabled on the authorization server if other flows are not viable. Also, it should only be used if the application is trusted by the user (e.g. it is owned by the service, or the user's desktop OS).
Password Credentials Flow
After the user gives their credentials to the application, the application will then request an access token from the authorization server. The POST request might look something like this:
https://oauth.example.com/token?grant_type=password&username=USERNAME&password=PASSWORD&client_id=CLIENT_ID
If the user credentials check out, the authorization server returns an access token to the application. Now the application is authorized!
Note: DigitalOcean does not currently support the password credentials grant type, so the link points to an imaginary authorization server at "oauth.example.com".
Grant Type: Client Credentials
The client credentials grant type provides an application a way to access its own service account. Examples of when this might be useful include if an application wants to update its registered description or redirect URI, or access other data stored in its service account via the API.
Client Credentials Flow
The application requests an access token by sending its credentials, its client ID and client secret, to the authorization server. An example POST request might look like the following:
https://oauth.example.com/token?grant_type=client_credentials&client_id=CLIENT_ID&client_secret=CLIENT_SECRET
If the application credentials check out, the authorization server returns an access token to the application. Now the application is authorized to use its own account!
Note: DigitalOcean does not currently support the client credentials grant type, so the link points to an imaginary authorization server at "oauth.example.com".
Example Access Token Usage
Once the application has an access token, it may use the token to access the user's account via the API, limited to the scope of access, until the token expires or is revoked.
Here is an example of an API request, using curl. Note that it includes the access token:
curl -X POST -H "Authorization: Bearer ACCESS_TOKEN""https://api.digitalocean.com/v2/$OBJECT"
Assuming the access token is valid, the API will process the request according to its API specifications. If the access token is expired or otherwise invalid, the API will return an "invalid_request" error.
Refresh Token Flow
After an access token expires, using it to make a request from the API will result in an "Invalid Token Error". At this point, if a refresh token was included when the original access token was issued, it can be used to request a fresh access token from the authorization server.
Here is an example POST request, using a refresh token to obtain a new access token:
https://cloud.digitalocean.com/v1/oauth/token?grant_type=refresh_token&client_id=CLIENT_ID&client_secret=CLIENT_SECRET&refresh_token=REFRESH_TOKEN
Conclusion
That concludes this OAuth 2 guide. You should now have a good idea of how OAuth 2 works, and when a particular authorization flow should be used.
If you want to learn more about OAuth 2, check out these valuable resources:
An Introduction to OAuth 2的更多相关文章
- [转]An introduction to OAuth 2.0 using Facebook in ASP.NET Core
本文转自:http://andrewlock.net/an-introduction-to-oauth-2-using-facebook-in-asp-net-core/ This is the ne ...
- OAuth 2 深入介绍
1. 前言 2. OAuth2 角色 2.1 资源所有者(Resource Owner) 2.2 资源/授权服务器(Resource/Authorization Server) 2.3 客户端(Cli ...
- 转:OAuth2 深入介绍
OAuth2 深入介绍 1. 前言 2. OAuth2 角色 2.1 资源所有者(Resource Owner) 2.2 资源/授权服务器(Resource/Authorization Server) ...
- The OAuth 2.0 Authorization Framework-摘自https://tools.ietf.org/html/rfc6749
Internet Engineering T ...
- OAuth 2 Developers Guide--reference
Introduction This is the user guide for the support for OAuth 2.0. For OAuth 1.0, everything is diff ...
- OAuth 2.0 开发完全详解
--------------------------基础篇------------------------------- I:OAuth 2.0 概述 首先大家来看看国内新浪跟腾讯这两大头对OAuth ...
- ASP.NET没有魔法——ASP.NET OAuth、jwt、OpenID Connect
上一篇文章介绍了OAuth2.0以及如何使用.Net来实现基于OAuth的身份验证,本文是对上一篇文章的补充,主要是介绍OAuth与Jwt以及OpenID Connect之间的关系与区别. 本文主要内 ...
- OAuth 2 Developers Guide
Introduction This is the user guide for the support for OAuth 2.0. For OAuth 1.0, everything is diff ...
- ASP.NET OAuth、jwt、OpenID Connect
ASP.NET OAuth.jwt.OpenID Connect 上一篇文章介绍了OAuth2.0以及如何使用.Net来实现基于OAuth的身份验证,本文是对上一篇文章的补充,主要是介绍OAuth与J ...
随机推荐
- composer更改源为国际
composer config -g repo.packagist composer https://repo.packagist.org
- 【学亮IT手记】jQuery DOM操作-获取内容和属性
jQuery拥有可操作HTML元素和属性的强大方法. 其中非常重要的部分就是操作DOM的能力. DOM--文档对象模型. <!DOCTYPE html> <html> < ...
- java学习之—并归排序
/** * 并归排序 * Create by Administrator * 2018/6/26 0026 * 下午 5:13 **/ public class DArray { private lo ...
- 创建安全客户端Socket
SocketFactory factory = SSLSocketFactory.getDefault(); Socket socket = factory.create("localhos ...
- python之路--网络通信协议
一 . osi七层协议 互联网协议按照功能不同分为osi七层或tcp/ip五层或tcp/ip四层 二 . tcp三次握手和四次挥手 我们知道网络层,可以实现两个主机之间的通信.但是这并不具体,因为,真 ...
- kubernetes常用命令
#.查询信息 kubectl get [需要查询的服务] node 节点componentstatuses 简写 cs 组件状态namespaces 简写 ns 名命空间pod pod信息 添加 ...
- how to build an app with github
how to build an app with github Building apps https://developer.github.com/apps/ demos https://githu ...
- ES6 & Map & hashMap
ES6 & Map & hashMap 01 two-sum https://leetcode.com/submissions/detail/141732589/ hashMap ht ...
- linux 地址解析协议 arp
随便转载,保留出处:http://www.cnblogs.com/aaron-agu/ arp –na #查看 arp –s 123.253.68.209 00:19:56:6F:87:D4 #添加
- linux 查看TCP端口
如有转载,不胜荣幸.http://www.cnblogs.com/aaron-agu/ netstat –nat