How to emulate a Raspberry Pi on your PC
How to emulate a Raspberry Pi on your PC
I am very interested in trying simulators and emulators for popular IoT devices. One of those is the Raspberry Pi. As I was searching for simulators, I found that one of the best ones is QEMU. I found lots of information about how to use the QEMU simulator, in order to simulate a Raspberry Pi running Raspbian Wheezy (which is an older Raspbian version), but there was almost none for Raspbian Jessie (which is the latest Raspbian version). And the problem was that the steps that work for Wheezy, do not work for Jessie. So, in this article, I'll explain how to do this for Jessie. The same steps should also work if you are running Linux, however I have not tried them in Linux, so I cannot be sure.
1. Download the QEMU emulator
The easiest way to download and install QEMU is to download the 32-bit binaries from https://www.qemu.org/download/. Even though my OS is 64-bit, the 64-bit version of QEMU did not work for me (the Raspbian kernel crashes during boot and the system restarts. The same problem happens with any QEMU version that is older than v2.6.0). After you download the latest file version (which is qemu-w32-setup-20161016.exe as I'm writing the article), you can either double click and install it or you can use 7-zip to extract the contents without installing (after you install 7-zip, you can right click on the QEMU exe file and select "Extract").
2. Download Raspbian
You can download the latest Raspbian image from Raspberry Pi's website. You can either download the full image (http://downloads.raspberrypi.org/raspbian/images/) or the "lite" version (http://downloads.raspberrypi.org/raspbian/images/), which is smaller. The filename that I downloaded is 2017-07-05-raspbian-jessie.img .After you download the image, you should extract it to the same directory as QEMU.
3. Download the kernel
You can download the latest precompiled kernel fromhttps://github.com/cnsdytzy/qemu-rpi-kernel. I used kernel-qemu-4.4.13-jessie. Save this file in the same directory as QEMU.
4. Expand the Raspbian image
If you immediately boot into Raspbian without expanding the image, you will notice that there is very little free space. In order to be able to use more space, you need to expand the image. You can determine how much more space you want to allocate to Raspbian. In order to add 5GB to your Raspbian image you can open a command prompt, go to your QEMU directory and type the command:
qemu-img.exe resize <your_raspbian_image> +5G
e.g. qemu-img.exe resize 2016-09-23-raspbian-jessie.img +5G
5. First boot (to fix a setting)
Now you are ready to boot your emulator for the first time. In your command prompt, you can type:
qemu-system-arm.exe -kernel kernel-qemu-4.4.-jessie -cpu arm1176 -m -M versatilepb -serial stdio -net nic -net tap,ifname=TAP32 -append "root=/dev/sda2 panic=1 rootfstype=ext4 rw " -drive "file=2017-07-05-raspbian-jessie.img,index=0,media=disk,format=raw" -redir tcp:::
qemu-system-arm -kernel <your_kernel_image> -cpu arm1176 -m 256 -M versatilepb -serial stdio -append "root=/dev/sda2 panic=1 rootfstype=ext4 rw" -drive "file=<your_rapsbian_image>,index=0,media=disk,format=raw" -redir tcp:2222::22
e.g. qemu-system-arm -kernel kernel-qemu-4.4.13-jessie -cpu arm1176 -m 256 -M versatilepb -serial stdio -append "root=/dev/sda2 panic=1 rootfstype=ext4 rw" -drive "file=2016-09-23-raspbian-jessie.img,index=0,media=disk,format=raw" -redir tcp:2222::22
Notes:
If you see an error about missing dll files, then you can download them from https://qemu.weilnetz.de/w32/dll/.
You will see a warning saying that the -redir option has been replaced by the -netdev option. I am still using -redir, since I could not understand how to use -netdev. If you know how, please leave a comment below and I will replace the command.
After the emulator finishes booting, you will see a terminal window saying that you have started in emergency mode, instead of the default mode, due to an error. In order to fix this, you will need to create the file /etc/udev/rules.d/90-qemu.rules using your favorite editor, e.g.
sudo nano /etc/udev/rules.d/90-qemu.rules
In that file you need to add the following:
KERNEL=="sda", SYMLINK+="mmcblk0"
KERNEL=="sda?", SYMLINK+="mmcblk0p%n"
KERNEL=="sda2", SYMLINK+="root"
Note: You are currently using the British locale (en-GB), that's why some characters do not correspond to the standard American keyboard, e.g. the character " is typed when you press the key @ (and the opposite). We will fix this in a following step.
After saving the file, you can either close the emulator or issue the reboot command (sudo shutdown -r now).
Note: Previous versions of QEMU (before v2.6.0) required changes in /etc/ld.so.preload. However, this is not needed anymore.
During the beginning of the boot process, you will see lots of text. However, at some point the screen will go blank. You will have to wait for some time, but afterwards you will first see the mouse pointer and then you'll see the GUI. If you are asked for login credentials during the boot process, then you can use the following:
username: pi

password: raspberry
6. Expand the disk
At this point, we need to change the disk size so that it expands to the full size that we allocated in step 4 (i.e. to expand the disk by 5GB). In order to do that you need to do the following steps (I'm pasting the exact commands from http://www.xerxesb.com/2013/06/02/resizing-raspbian-image-for-qemu/):
. > sudo fdisk /dev/sda

. Print the partition table ("p"). Take note of the starting block of the main partition

. Delete the main partition ("d"). Should be partition .

. Create (n)ew partition. (P)rimary. Position ()

. Start block should be the same as start block from the original partition

. Size should be the full size of the image file (just press "enter")

. Now write the partition table (w)

. Reboot (shutdown -r now). After reboot,

. > sudo resize2fs /dev/sda2
You can use the following command to verify the new size of the disk:
df -h
7. Increase the swap file for better performance
As you start using the emulator, you might observe that it is slow (especially if you have an old CPU). One reason for that is that the memory is only 256MB and the swap file is only 100MB. Unfortunately, there is no way to increase memory, but there is a way to increase the swap file. In order to do so, I'm using the instructions from https://www.bitpi.co/2015/02/11/how-to-change-raspberry-pis-swapfile-size-on-rasbian/
First you need to open the file /etc/dphys-swapfile using your favorite editor, e.g.
sudo nano /etc/dphys-swapfile
Then you need to find the line
CONF_SWAPSIZE=
and change it to
CONF_SWAPSIZE=
After saving the file, you need to restart the service that manages the swapfile for Raspbian using the commands:
sudo /etc/init.d/dphys-swapfile stop

sudo /etc/init.d/dphys-swapfile start
If everything finishes successfully, you can verify the change in the swap file by using the command
free -m
The output should look like the following (the important part is that the line next to "swap" says "1023"):
total used free shared buffers cached
Mem: 248 213 33 2 12 131
-/+ buffers/cache: 70 177
Swap: 1023 0 1023
8. Use SSH for better performance
Another way to improve performance is to access your Raspberry Pi using SSH and not using the GUI. In order to enable this, we have mapped port 2222 from your system to port 22 of the emulator. This was done using the option "-redir tcp:2222::22" in the command that starts the emulator (section #4). So, all you need to do is to ssh in port 2222 of your system.
In order to do that, you need an ssh client, such as putty (which you can download from https://the.earth.li/~sgtatham/putty/latest/x86/putty.exe). After you download and run putty, you need to go to the tab "Session" and type pi@127.0.0.1 in the "Host Name (or IP Address)" box, as well as 2222 in the "Port" box. Then you can click on the "Open" button to connect. You can use the following credentials:
username: pi
password: raspberry
All the following steps can be done either from ssh (faster) or from a terminal window inside the GUI (slower).
9. Overclock the CPU for better performance
In a terminal window or ssh type
sudo raspi-config

Select option "8 Overclock"

Select "Ok" in the warning message

Select "Turbo 1000MHz ARM"

Select "Ok" in the confirmation message

Exit raspi-config
10. Change internalization options from British (en-GB) to American (en-US)
As we said earlier, we are currently using the British (en-GB) locale. In order to change it to American (en-US) or any other locale of your preference we need to execute the following commands from a terminal window or ssh:
export LANGUAGE="en_US"
export LC_ALL="en_US-UTF-8"
export LANG="en_US-UTF-8"
sudo dpkg-reconfigure locales
Uncheck "en_GB-UTF-8"
Check "en_US-UTF-8"
Press Ok
Select "en_US.UTF-8" as the default locale for the system environment
sudo raspi-config

Select option "4 Localisation Option"

Select "Ok" in the warning message

Select "I1 Change Locale"

Select "Ok" in the confirmation message
Check "en_US-UTF-8"

Exit raspi-config
Same Operation on this to change Timezone.
11. Change the screen resolution
At this point, your emulator is up and running. However, you might be thinking that the window is too small and the resolution too low. This is because your current resolution is 640x480 at 16-bit color depth. If you want to change it to 800x600 (which will also increase the window size), you need to create the file /etc/X11/xorg.conf. I found the instructions for this at www.linux-mitterteich.de/fileadmin/datafile/papers/2013/qemu_raspiemu_lug_18_sep_2013.pdf
From a terminal window or ssh run your favorite editor, e.g.
sudo nano /etc/X11/xorg.conf
In that file you need to type the following contents:
Section "Screen"
Identifier "Default Screen"
SubSection "Display"
Depth 16
Modes "800x600" "640x480"
EndSubSection
EndSection
After you save the file you can either close the emulator window or restart using the command
sudo shutdown -r now
12. Final observations
Using the above instructions we can emulate an ARM1176 CPU (which is the same as the one on Raspberry Pi 1) that runs a generic kernel on a Raspbian OS. Technically, this is slightly different than emulating a Raspberry Pi 1, since there are differences in the kernel and the board configuration (e.g. GPIO pins). QEMU does provide support for better Raspberry Pi 1 and Raspberry Pi 2 emulation, but it does not support any network capabilities and I could not make it work (the screen remained black and the system did not boot). Andrew Baumann initially implemented the port for Raspberry Pi 2 at https://github.com/0xabu/ and he also helped me with this tutorial. If you want to try by yourselves (and please do so and let me know, if you make it work), then here are the changes that you need to start with, compared to the above instructions:
In step #3 you need to use a precompiled kernel for Raspberry Pi 1 or Raspberry Pi 2.
One option is to download them https://github.com/raspberrypi/firmware/tree/master/boot
kernel.img is the kernel for Raspberry Pi 1
kernel7.img is the kernel for Raspberry Pi 2
A more difficult option is to install Raspbian on a real SD card, mount it (I'm not sure even if there are tools in Windows to do this) and then copy the kernel from the /boot directory.
In order to boot the emulator you need to use the following commands:
Raspberry Pi 1: qemu-system-arm -M raspi -kernel kernel.img -sd 2016-09-23-raspbian-jessie.img -append "rw earlyprintk loglevel=8 console=ttyAMA0 root=/dev/mmcblk0p2" -serial stdio
Raspberry Pi 2: qemu-system-arm -M raspi2 -kernel kernel7.img -sd 2016-09-23-raspbian-jessie.img -append "rw earlyprintk loglevel=8 console=ttyAMA0 root=/dev/mmcblk0p2" -serial stdio
In order to enable SSH, we used the option -redir tcp:2222::22 in the qemu-system-arm command. This option is deprecated and replaced by -netdev, that's why it triggers a warning message in the output. However, I could not understand how the -netdev option works. If you know how, please let me know in your comments, so that I can replace the above command.
It is not possible to copy data from the QEMU window, because it is an emulated framebuffer. If you know how to paste data to it, please write it in the comments and I will update the post accordingly.
If you have any tips regarding how to improve performance, then please post them in the comments. I tried allocating more than 256MB memory (using the -m 512 option in qemu-system-arm) as well as > 1 CPU cores (using the -smp 4 option), but neither works.
If you know of any other emulators/simulators for popular IoT devices (running on desktop, browser, etc), feel free to paste them in the comments section.
13. prepare a network adapter for the virtual machine using openvpn.net
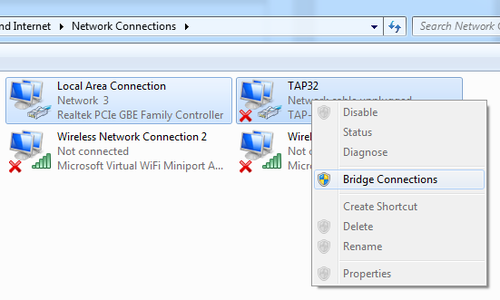
Download and install http://openvpn.net, this will add a TAP 32 network adapter. Open “Network and Sharing Center” and click “Change Adapter Settings” in the left menu.
rename the TAP 32 network adapter to just TAP32 and double click the adapter. Alter the settings in the image below as so it matches your network settings.

bridge your adapter with an active internet connection with the TAP32 adapter
[1]https://blogs.msdn.microsoft.com/iliast/2016/11/10/how-to-emulate-raspberry-pi/
How to emulate a Raspberry Pi on your PC的更多相关文章
- Raspberry Pi 4B 使用OpenCV访问摄像头picamera模块
目录 1.OpenCV安装 (1)安装依赖 (2)下载OpenCV源码 (3)安装pip (4)安装Python虚拟机 (5)编译OpenCV (6)验证安装 2.使用OpenCV和Python控制摄 ...
- 让Mono 4在Raspberry Pi上飞
最近公司有项目想要在树莓派上做,代替原来的工控机(我们是把工控主机当作小的主机用,一台小的工控主机最少也要600左右,而树莓派只要200多).于是,公司买了一个Raspberry Pi B+和一个Ra ...
- Kali v2.1.2 for Raspberry Pi 3B
最新的下载地址是: https://www.offensive-security.com/kali-linux-arm-images/ 按照官网的说法是找不到树莓派版本的SHA1SUM和SHA1SUM ...
- A new comer playing with Raspberry Pi 3B
there are some things to do for raspberry pi 3b for the first time: 1, connect pi with monitor/KB/mo ...
- Windows Iot:让Raspberry Pi跑起来(1)
首先请大家原谅我的"不务正业",放着RabbitHub不写,各种系列的文章不写搞什么Iot,哈哈,最近心血来潮想搞个速度极快的遥控车玩,望着在角落的Raspberry Pi恶狠狠的 ...
- 【转】【Raspberry Pi】Unix NetWork Programming:配置unp.h头文件环境
一.初衷 近期正在做网络计算编程的作业.要求平台为unix/linux,想着Raspberry Pi装的Debian系统也是Linux改的,也应该能够勉强用着,所以就用它来做作业了! 二.说明 先把环 ...
- 【Raspberry Pi】新入手的Raspberry Pi3拼装日志
一.概述 2016年暑假某宝入手Raspberry Pi 3,装机清单: 树莓派主板 亚克力外壳 小风扇 散热片 30G SD card 螺丝若干颗 因机型问题,可能与你的机器有微小差异 二.装机过程 ...
- 【树莓派】【转】将树莓派Raspberry Pi设置为无线路由器(WiFi热点AP,RTL8188CUS芯片)
下文为转载,文章转自:http://wangye.org/blog/archives/845/,仅供本次学习实践参考. 最近又开始折腾起Raspberry Pi来了,因为某处上网需要锐捷拨号,于是我就 ...
- 最简单的RASPBERRY PI wifi配置
Setting up Wifi with the Command Line SIMON MONK This tutorial works best if your router is broad ...
随机推荐
- 【AtCoder】【思维】【置换】Rabbit Exercise
题意: 有n只兔子,i号兔子开始的时候在a[i]号位置.每一轮操作都将若干只兔子依次进行操作: 加入操作的是b[i]号兔子,就将b[i]号兔子移动到关于b[i]-1号兔子现在所在的位置对称的地方,或者 ...
- 11_ for 练习 _ Math.sqrt
<!DOCTYPE html> <html> <head> <meta charset="utf-8" /> <title&g ...
- react_app 项目开发
react_app 项目开发 npm install -g create-react-app npm root -g // 查看安装包位置 创建项目 create-react-app m ...
- vue 项目界面绘制_stylus_iconfont_swiper
stylus 兼容 less 的大部分语法 <link rel="stylesheet" href="stylus/index.css"> less ...
- Unity 和android 交互 记录
参考文章 http://www.jianshu.com/p/c06063a403c6 趟坑如下 icon 冲突问题: 设置不了unity icon,显示的是默认的 android 小人 解决方法: 在 ...
- BringWindowToTop完美激活窗口与置顶
void ActiveWin(IntPtr h) { IntPtr hForeWnd = GetForegroundWindow();//获取当前窗口句柄 int tIdCur = GetWindow ...
- tomcat之过滤器
过滤器是一种特殊的servlet,也需要在配置文件中进行配置,通过它可以将指定的请求拦截下来,之后对请求处理,处理完之后,将拦截请求放行.实现过滤器也需要实现一个接口叫javax. servlet.F ...
- luarocks 包管理工具
安装方式:wget http://luarocks.org/releases/luarocks-2.2.2.tar.gz tar zxvf luarocks-2.2.2.tar.gz cd luaro ...
- ie清理缓存
说废话,直接上图. 1.打开浏览器 2.工具--->Internet选项 3.常规--->设置 4.Internet临时文件--->查看文件 5.将缓存文件夹中内容全部删除
- jQuery中的$.getJSON、$.ajax、$.get、$.post的区别
jQuery中的$.getJSON.$.ajax.$.get.$.post的区别 使用见Flask(python)异步(ajax)返回json格式数据 ①.$.getJSON $.getJSON()是 ...