Spring 使用AOP——xml配置
目录
AspectJ方式设置通知绑定参数
创建方法类,有接收参数的切点方法
创建通知类
修改配置
AOP介绍
AOP(Aspect Oriented Programming),面向切面编程。
我们在平时编写的代码在执行的时候,都是从上往下开始执行的,比如下面的图示:

AOP这个切面,就是指在某一点的前、后,分别进行一些操作,几个简单的例子就是下面这样:
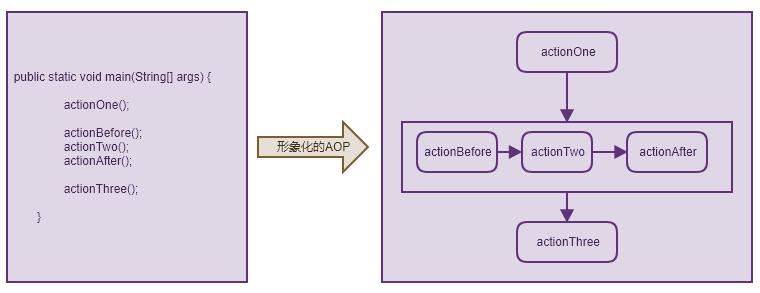
根据AOP的相关内容,介绍上面的有关细节:
1、actionTwo称为切点(PointCut);
2、actionBefore称为前置通知(beforeAdvice);
3、actionAfter称为后置通知(afterAdvice);
4、由actionBefore、actionTwo、actionAfter共同组成切面(Aspect)
Spring进行2种实现AOP的方式
在Spring中,有两种方式可以实现AOP,分别是schema-based、aspectJ,这两种方式的区别在于:
1、schema-based方式:每个通知(advicor)都需要我们自己创建接口或者类;并且在配置的时候,如果使用xml配置,schema-based方式是在<aop:config>标签中配置的。
2、aspectJ方式:不需要我们为每个通知创建接口或者类;在配置的时候,如果使用xml配置,aspectJ方式是在<aop:aspect>标签中配置的。
导入jar包
Spring对于每一个部分的功能,都单独有一个jar包,但是多数jar包之间都是相互依赖的,所以,为了解决不必要的麻烦,初期阶段可以导入所有的Spring jar包。
另外,Spring框架还需要commons-logging、log4J的功能支持,所以还需要导入commons-logging、log4J的jar包。
如果涉及到数据库操作,还需要额外导入jdbc-mysql驱动包
如果需要集成mybatis,则还需要导入mybatis-spring的jar包。
对于AOP来说,除了spring框架下关于aop的jar包外,还需要导入下面两个jar包:aspectjweaver.jar包以及其依赖的aopalliance.jar包。
基于schema-based方式实现AOP
创建前置通知类
- package cn.ganlixin.advisor;
- import java.lang.reflect.Method;
- import java.util.Arrays;
- import org.springframework.aop.MethodBeforeAdvice;
- /**
- * 创建自定义前置通知类
- */
- public class MyBeforeAdvisor implements MethodBeforeAdvice {
- /**
- * 重写MethodBeforeAdvice中before,就是前置通知执行的代码
- * @param arg0 代表被调用的切点方法签名
- * @param arg1 代表传入切点方法的参数列表
- * @param arg2 代表调用的是哪个对象大的切点方法
- * @throws Throwable
- */
- @Override
- public void before(Method arg0, Object[] arg1, Object arg2) throws Throwable {
- System.out.println("arg0" + arg0);
- System.out.println("arg1" + Arrays.toString(arg1));
- System.out.println("arg3" + arg2);
- }
- }
创建后置通知类
- package cn.ganlixin.advisor;
- import java.lang.reflect.Method;
- import java.util.Arrays;
- import org.springframework.aop.AfterReturningAdvice;
- /**
- * 自定义的后置通知类
- */
- public class MyAfterAdvisor implements AfterReturningAdvice {
- /**
- * 后置通知被调用的时候执行的方法
- * @param arg0 切点方法的返回值
- * @param arg1 切点方法的签名
- * @param arg2 传递给切点方法的参数
- * @param arg3 切点方法所在类的对象
- * @throws Throwable
- */
- @Override
- public void afterReturning(Object arg0, Method arg1, Object[] arg2, Object arg3) throws Throwable {
- System.out.println("arg0 " + arg0);
- System.out.println("arg1 " + arg1);
- System.out.println("arg2 " + Arrays.toString(arg2));
- System.out.println("arg3 " + arg3);
- }
- }
修改Spring配置文件
- <?xml version="1.0" encoding="UTF-8"?>
- <beans xmlns="http://www.springframework.org/schema/beans"
- xmlns:xsi="http://www.w3.org/2001/XMLSchema-instance"
- xmlns:aop="http://www.springframework.org/schema/aop"
- xsi:schemaLocation="http://www.springframework.org/schema/beans
- http://www.springframework.org/schema/beans/spring-beans.xsd
- http://www.springframework.org/schema/aop
- http://www.springframework.org/schema/aop/spring-aop.xsd">
- <bean id="demo" class="cn.ganlixin.test.Demo"></bean>
- <!-- 创建前置通知类bean -->
- <bean id="myBeforeAdvisor" class="cn.ganlixin.advisor.MyBeforeAdvisor"></bean>
- <!-- 创建 后置通知类bean -->
- <bean id="myAfterAdvisor" class="cn.ganlixin.advisor.MyAfterAdvisor"></bean>
- <aop:config>
- <!-- 使用<aop:pointcut>来设置切点:
- 满足条件:访问权限,返回类型任意,包名+类名+方法名+参数类型 (访问权限可省,默认为public)-->
- <!-- 将cn.ganlixin.test包下的Demo类中,接收两个int类型的参数的demo1、任意返回值的方法 设置为切点 -->
- <aop:pointcut expression="execution(public * cn.ganlixin.test.Demo.demo1(int, int))" id="point_cut1"/>
- <!-- 将cn.ganlixin.test包下的Demo类中,接收任意参数的、返回值类型任意的demo1方法设置切点 -->
- <aop:pointcut expression="execution(* cn.ganlixin.test.Demo.demo1(..))" id="point_cut2"/>
- <!-- 将cn.ganlixin.test包下的Demo类中,只要返回值为String,参数列表任意,全部设置为切点 -->
- <aop:pointcut expression="execution(String cn.ganlixin.test.Demo.*(..))" id="point_cut3"/>
- <!-- 将cn.ganlixin.test包下的所有类中的所有方法都设置为切点 -->
- <aop:pointcut expression="execution(* cn.ganlixin.test.*.*(..))" id="point_cut4"/>
- <!-- 将满足包名为cn.ganlixin.*.test的包下的所有类中的所有方法都设置为切点 -->
- <aop:pointcut expression="execution(* cn.ganlixin.*.test.*.*(..))" id="point_cut5"/>
- <!-- 为指定的切点 设置通知, 直接引用自己创建的通知bean, 运行时会自动判断是前置通知和后置通知 -->
- <aop:advisor advice-ref="myBeforeAdvisor" pointcut-ref="point_cut3"/>
- <aop:advisor advice-ref="myAfterAdvisor" pointcut-ref="point_cut3"/>
- </aop:config>
- </beans>
测试
- package cn.ganlixin.test;
- import org.springframework.context.ApplicationContext;
- import org.springframework.context.support.ClassPathXmlApplicationContext;
- public class Test {
- public static void main(String[] args) {
- ApplicationContext ac = new ClassPathXmlApplicationContext("config/applicationContext.xml");
- Demo d = ac.getBean("demo", Demo.class);
- d.demo2(5, 6);
- }
- }
测试输出结果
- // 自定义前置通知打印的内容
- arg0public java.lang.String cn.ganlixin.test.Demo.demo2(int,int)
- arg1[5, 6]
- arg3cn.ganlixin.test.Demo@dd8ba08
- # 切点方法的输出内容
- 调用public String demo2(int 5, int 6)
- # 自定义后置通知打印的内容
- arg0 hello world
- arg1 public java.lang.String cn.ganlixin.test.Demo.demo2(int,int)
- arg2 [5, 6]
- arg3 cn.ganlixin.test.Demo@dd8ba08
基于schema-based方式实现环绕通知
环绕通知介绍
servlet中有过滤器filter,可以在接收到请求之后,先一步处理请求,然后交给servlet处理,之后在返回响应之前,再对响应进一步操作之后再返回给客户端。
而环绕通知有点类似于filter,但是环绕通知其实是一个拦截器,在处理流程上和filter相似。
其实就是将前置通知和后置通知结合结合在一起,不用单独创建一个前置通知类和后置通知类,使用schema-based方式就只需要建立一个环绕通知类即可。
创建环绕通知类
- package cn.ganlixin.advisor;
- import org.aopalliance.intercept.MethodInterceptor;
- import org.aopalliance.intercept.MethodInvocation;
- /**
- * 自定义环绕通知类
- * @author 13550
- *
- */
- public class MyAroundAdvisor implements MethodInterceptor {
- /**
- * 环绕通知执行的代码
- * @param arg0 切点方法
- * @return
- * @throws Throwable
- */
- @Override
- public Object invoke(MethodInvocation arg0) throws Throwable {
- System.out.println("环绕通知--前");
- // 执行切点方法,获得切点方法执行后的返回值
- Object result = arg0.proceed();
- System.out.println("环绕通知--后");
- return result;
- }
- }
修改Spring配置文件
- <?xml version="1.0" encoding="UTF-8"?>
- <beans xmlns="http://www.springframework.org/schema/beans"
- xmlns:xsi="http://www.w3.org/2001/XMLSchema-instance"
- xmlns:aop="http://www.springframework.org/schema/aop"
- xsi:schemaLocation="http://www.springframework.org/schema/beans
- http://www.springframework.org/schema/beans/spring-beans.xsd
- http://www.springframework.org/schema/aop
- http://www.springframework.org/schema/aop/spring-aop.xsd">
- <bean id="demo" class="cn.ganlixin.test.Demo"></bean>
- <!-- 创建环绕通知类 -->
- <bean id="myAroundAdvisor" class="cn.ganlixin.advisor.MyAroundAdvisor"></bean>
- <aop:config>
- <!-- 设置cn.ganlixin.test包下的Demo类中的所有方法都为切点方法 -->
- <aop:pointcut expression="execution(* cn.ganlixin.test.Demo.*(..))" id="point_cut"/>
- <!-- 只需要配置一个advisor, 该advisor中包含了前置通知和后置通知 -->
- <aop:advisor advice-ref="myAroundAdvisor" pointcut-ref="point_cut"/>
- </aop:config>
- </beans>
测试:
- package cn.ganlixin.test;
- import org.springframework.context.ApplicationContext;
- import org.springframework.context.support.ClassPathXmlApplicationContext;
- public class Test {
- public static void main(String[] args) {
- ApplicationContext ac = new ClassPathXmlApplicationContext("config/applicationContext.xml");
- Demo d = ac.getBean("demo", Demo.class);
- d.demo2(5, 6);
- }
- }
- 输出:
- 环绕通知--前
- 调用public String demo2(int 5, int 6)
- 环绕通知--后
基于schema-based方式实现异常通知
异常通知介绍
我们平时编写function的时候,如果function中可能出现异常,我们一般有两种方式处理异常:
1、在本function内部自己通过try{ } catch(ex) { } 来捕获并处理异常。
2、定义function的时候,通过throws ex来抛出异常,如果出现异常,就将异常交给调用者处理。
上面两种方式,我们都需要自己在每一个可能出现异常的地方编写处理异常的操作,这样有点麻烦,因为有时候,某个类下的某些function出现异常之后,处理异常的操作都相同,如果每次都单独编写异常处理,就有点冗余,也有点麻烦。
此时,我们可以使用AOP方式的异常通知:设置切点后,为切点绑定异常通知,不需要在切点方法或者切点方法的调用方处理异常,而是在出现异常的时候,统一调用我们编写的异常通知。
异常通知的目的不仅限于上面这个原因。
需要注意的是:如果使用异常通知,那么在切点方法中就不要进行try { } catch,否则不会触发异常通知,可以在定义切点方法的时候使用throws Exception。
创建异常通知类
我们自定义的异常通知类需要继承Spring-aop中ThrowsAdvice接口,这个ThrowsAdvice接口中并没有定义任何抽象方法,但是我们却需要在子类(也就是我们的自定义异常通知类)中定义一个afterThrowing方法,可以参考Spring-aop下ThrowsAdvice接口的说明:
- package org.springframework.aop;
- /**
- * Tag interface for throws advice.
- *
- * <p>There are not any methods on this interface, as methods are invoked by
- * reflection. Implementing classes must implement methods of the form:
- *
- * <pre class="code">void afterThrowing([Method, args, target], ThrowableSubclass);</pre>
- *
- * <p>Some examples of valid methods would be:
- *
- * <pre class="code">public void afterThrowing(Exception ex)</pre>
- * <pre class="code">public void afterThrowing(RemoteException)</pre>
- * <pre class="code">public void afterThrowing(Method method, Object[] args, Object target, Exception ex)</pre>
- * <pre class="code">public void afterThrowing(Method method, Object[] args, Object target, ServletException ex)</pre>
- */
- public interface ThrowsAdvice extends AfterAdvice {
- }
上面的介绍中,重点就是,必须在实现类中定义一个名称为afterThrowing的方法,并且方法签名有四种格式:
- public void afterThrowing(Exception ex)
- public void afterThrowing(RemoteException)
- public void afterThrowing(Method method, Object[] args, Object target, Exception ex)
- public void afterThrowing(Method method, Object[] args, Object target, ServletException ex)
上面这四种签名中,第一种和第二种参数是一个Exeception,注意,这里的Exception种类最好指定确切的Exception,如果此处定义Exception和运行时抛出的XxxxException不匹配的话,就不会触发我们自定义的异常通知。
下面我们创建自定义的异常通知类:
- package cn.ganlixin.advisor;
- import org.springframework.aop.ThrowsAdvice;
- public class MyExceptionAdvisor implements ThrowsAdvice {
- /**
- * 创建一个异常通知处理方法,只处理ArithmeticException这一种异常
- * @param ex
- */
- public void afterThrowing(ArithmeticException e) {
- System.out.println("触发ArithmeticException异常通知");
- System.out.println(e.getMessage());
- }
- /**
- * 重载一个异常通知方法,只处理ArrayIndexOutOfBoundsException这一种异常
- * @param e
- */
- public void afterThrowing(ArrayIndexOutOfBoundsException e) {
- System.out.println("触发ArrayIndexOutOfBoundsException异常通知");
- System.out.println(e.getMessage());
- }
- }
修改Spring配置文件
- <?xml version="1.0" encoding="UTF-8"?>
- <beans xmlns="http://www.springframework.org/schema/beans"
- xmlns:xsi="http://www.w3.org/2001/XMLSchema-instance"
- xmlns:aop="http://www.springframework.org/schema/aop"
- xsi:schemaLocation="http://www.springframework.org/schema/beans
- http://www.springframework.org/schema/beans/spring-beans.xsd
- http://www.springframework.org/schema/aop
- http://www.springframework.org/schema/aop/spring-aop.xsd">
- <bean id="demo" class="cn.ganlixin.test.Demo"></bean>
- <!-- 创建异常通知类bean -->
- <bean id="myExceptionAdvisor" class="cn.ganlixin.advisor.MyExceptionAdvisor"></bean>
- <aop:config>
- <!-- 设置cn.ganlixin.test包下的Demo类中的所有方法都为切点方法 -->
- <aop:pointcut expression="execution(* cn.ganlixin.test.Demo.*(..))" id="point_cut"/>
- <!-- 引用自定义的通知异常bean -->
- <aop:advisor advice-ref="myExceptionAdvisor" pointcut-ref="point_cut"/>
- </aop:config>
- </beans>
修改Demo类,定义两个function,分别触发不同种类的异常:
- package cn.ganlixin.test;
- public class Demo {
- public void demo1() {
- int[] a = new int[2];
- a[3] = 9;
- }
- public void demo2() {
- int a = 5/0;
- }
- }
测试:
- package cn.ganlixin.test;
- import org.springframework.context.ApplicationContext;
- import org.springframework.context.support.ClassPathXmlApplicationContext;
- public class Test {
- public static void main(String[] args) {
- ApplicationContext ac = new ClassPathXmlApplicationContext("config/applicationContext.xml");
- Demo d = ac.getBean("demo", Demo.class);
- try {
- d.demo1();
- } catch (Exception e) {
- }
- try {
- d.demo2();
- } catch (Exception e) {
- }
- }
- }
输出:
- 触发ArrayIndexOutOfBoundsException异常通知
- 3
- 触发ArithmeticException异常通知
- / by zero
基于AspectJ方式实现AOP
AspectJ方式的介绍
前面实现AOP的方式是基于schema-based方式的,这种方式需要我们为每一种通知都单独创建一个通知类,并且实现某个特定方法,然后在配置文件中,每一个通知类都要写一个<aop:advisor>。
而基于AspectJ的方式,不需要为每一种通知都单独创建一个通知类,而是只创建一个通知类,该类不需要实现某个接口,并且需要在该类中编写多个方法(方法名随意,没有明确要求)。这多个方法的每一个方法都可以对应一种通知,在配置文件中可以绑定方法和指定的通知种类。
创建很基础的通知类
- package cn.ganlixin.advisor;
- import org.aspectj.lang.ProceedingJoinPoint;
- /**
- * 自定义通知类,有多个方法,每个方法可以绑定到不同的通知种类上
- */
- public class MyAdvisor {
- public void mybefore() {
- System.out.println("执行前置通知方法");
- }
- public void myafter() {
- System.out.println("执行后置通知方法");
- }
- public void myafterReturnging() {
- System.out.println("执行myafterReturning");
- }
- public Object myaround(ProceedingJoinPoint p) throws Throwable {
- System.out.println("执行环绕通知-前置");
- // 执行切点方法
- Object result = p.proceed();
- System.out.println("执行环绕通知-后置");
- return result;
- }
- public void mythrow() {
- System.out.println("执行异常通知方法");
- }
- }
修改Spring配置类
- <?xml version="1.0" encoding="UTF-8"?>
- <beans xmlns="http://www.springframework.org/schema/beans"
- xmlns:xsi="http://www.w3.org/2001/XMLSchema-instance"
- xmlns:aop="http://www.springframework.org/schema/aop"
- xsi:schemaLocation="http://www.springframework.org/schema/beans
- http://www.springframework.org/schema/beans/spring-beans.xsd
- http://www.springframework.org/schema/aop
- http://www.springframework.org/schema/aop/spring-aop.xsd">
- <bean id="demo" class="cn.ganlixin.test.Demo"></bean>
- <!-- 创建通用通知类 -->
- <bean id="myadvisor" class="cn.ganlixin.advisor.MyAdvisor"></bean>
- <aop:config>
- <!-- 如果使用aspectJ方式,就要使用<aop:aspect>标签 -->
- <aop:aspect ref="myadvisor">
- <!-- 设置cn.ganlixin.test包下的Demo类中的所有方法都为切点方法 -->
- <aop:pointcut id="point_cut" expression="execution(* cn.ganlixin.test.Demo.*(..))" />
- <aop:before method="mybefore" pointcut-ref="point_cut"/>
- <aop:after method="myafter" pointcut-ref="point_cut"/>
- <aop:after-returning method="myafterReturning" pointcut-ref="point_cut"/>
- <aop:after-throwing method="mythrow" pointcut-ref="point_cut"/>
- <!-- 设置前置和后置之后,不要再设置around
- <aop:around method="myaround" pointcut-ref="point_cut"/>
- -->
- </aop:aspect>
- </aop:config>
- </beans>
介绍一下上面的几个新标签:
1、<aop:aspect>:使用aspectJ方式实现AOP需要的标签。
2、<aop:before /> :为指定的切点绑定前置通知,该通知会先于切点方法执行。
3、<aop:after />:为指定的切点绑定后置通知,会后于切点方法执行。
4、<aop:after-returning />:为指定的切点绑定后置通知,会后于切点方法执行。
5、<aop:throwing /> :为指定的切点方法绑定异常通知,当切点方法执行时出现异常,就会执行该通知。
6、<aop:around />:为指定的切点方法绑定环绕通知。
其中,需要注意下面几点:
1、<aop:after-returning /> 标签绑定的通知,只有当切点方法没有出现异常时,该通知才会执行。
2、<aop:after />标签绑定的通知,不论切点方法是否出现异常,该通知都会执行。
3、如果同时有<aop:after>和<aop:after-returning />标签,他们的顺序是有意义的,如果切点方法没有出现异常,那么就会按照<aop:after>和<aop:after-returning>出现的顺序执行。
4、一个<aop:config>标签中可以有多个<aop:aspect>标签,同时,一个<aop:aspect>标签中可以有多个<aop:point-cut>,可以为不同的point-cut绑定通知。
AspectJ方式设置通知绑定参数
前面使用aspectJ方式完成AOP的功能,其实是比较简单的,因为我们的通知方法没有接收任何参数(除了环绕通知方法有一个ProceedingJoinPoint类型的参数)。
Schema-based方式中创建的每个通知类都实现了某个接口,并且重写了某个方法,方法接收多个参数,通过这些参数可以获取切点方法的相关信息。但是上面AspectJ方式,我们的通知方法中却没有接收参数,这是因为如果要接收参数的话,就稍微复杂一点点。
创建切点方法类,有接受参数的切点方法
- package cn.ganlixin.test;
- public class Demo {
- public void demo1(int id, String name) {
- System.out.println(id + " " + name);
- }
- }
创建通知类
- package cn.ganlixin.advisor;
- import org.aspectj.lang.ProceedingJoinPoint;
- public class MyAdvisor {
- /**
- * 注意,mybefore方法接收两个参数,并且参数名和切点方法的参数相同(个数、名称)
- * @param id
- * @param name
- */
- public void mybefore(int id, String name) {
- System.out.println("前置 " + id + " " + name);
- }
- }
配置文件修改
- <?xml version="1.0" encoding="UTF-8"?>
- <beans xmlns="http://www.springframework.org/schema/beans"
- xmlns:xsi="http://www.w3.org/2001/XMLSchema-instance"
- xmlns:aop="http://www.springframework.org/schema/aop"
- xsi:schemaLocation="http://www.springframework.org/schema/beans
- http://www.springframework.org/schema/beans/spring-beans.xsd
- http://www.springframework.org/schema/aop
- http://www.springframework.org/schema/aop/spring-aop.xsd">
- <!-- 创建切点方法的类 -->
- <bean id="demo" class="cn.ganlixin.test.Demo"></bean>
- <!-- 创建通用通知类 -->
- <bean id="myadvisor" class="cn.ganlixin.advisor.MyAdvisor"></bean>
- <aop:config>
- <aop:aspect ref="myadvisor">
- <!-- 设置一个确定的方法为切点方法 -->
- <aop:pointcut id="point_cut"
- expression="execution(* cn.ganlixin.test.Demo.demo1(int, String)) and args(id, name)" />
- </aop:aspect>
- </aop:config>
- </beans>
测试
- package cn.ganlixin.test;
- import org.springframework.context.ApplicationContext;
- import org.springframework.context.support.ClassPathXmlApplicationContext;
- public class Test {
- public static void main(String[] args) {
- ApplicationContext ac = new ClassPathXmlApplicationContext("config/applicationContext.xml");
- Demo d = ac.getBean("demo", Demo.class);
- d.demo1(99, "hello");
- }
- }
Spring 使用AOP——xml配置的更多相关文章
- Spring 入门 web.xml配置详解
Spring 入门 web.xml配置详解 https://www.cnblogs.com/cczz_11/p/4363314.html https://blog.csdn.net/hellolove ...
- spring之pom.xml配置
spring之pom.xml配置 <?xml version="1.0" encoding="UTF-8"?> <project xmlns= ...
- 这一次搞懂Spring Web零xml配置原理以及父子容器关系
前言 在使用Spring和SpringMVC的老版本进行开发时,我们需要配置很多的xml文件,非常的繁琐,总是让用户自行选择配置也是非常不好的.基于约定大于配置的规定,Spring提供了很多注解帮助我 ...
- Spring IOC-基于XML配置的容器
Spring IOC-基于XML配置的容器 我们先分析一下AbstractXmlApplicationContext这个容器的加载过程. AbstractXmlApplicationContext的老 ...
- Spring Ioc容器xml配置
Spring Ioc容器xml配置基本结构: <?xml version="1.0" encoding="UTF-8"?> <beans xm ...
- spring 5.x 系列第3篇 —— spring AOP (xml配置方式)
文章目录 一.说明 1.1 项目结构说明 1.2 依赖说明 二.spring aop 2.1 创建待切入接口及其实现类 2.2 创建自定义切面类 2.3 配置切面 2.4 测试切面 附: 关于切面表达 ...
- Spring RedisTemplate操作-xml配置(1)
网上没能找到全的spring redistemplate操作例子,故特意化了点时间做了接口调用练习,基本包含了所有redistemplate方法. 该操作例子是个系列,该片为spring xml配置, ...
- spring 整合 hibernate xml配置
spring 整合 hibernate: hibernate :对数据库交互 spring: ioc aop 整合点: 1.sessionFactory对象不再由hibernate生成,交由spr ...
- 使用Spring实现AOP(XML+注解)
一.Spring对AOP的支持 AOP并不是Spring框架特有的,Spring只是支持AOP编程的框架之一,每一个框架对AOP的支持各有特点,有些AOP能够对方法的参数进行拦截,有些AOP对方法进行 ...
随机推荐
- IT公司PM沟通那儿些事(一)
本质:传递信息 沟通是不同的行为主体,通过各种载体实现信息的双向流动,形成行为主体的感知,以达到特定目标的行为过程. 信息的准确性弥足珍贵,在工作中,沟通传递的是应该是信息本身,而非情绪. 目标:解决 ...
- Java 学习笔记 网络编程 使用Socket传输文件 CS模式
Socket的简单认识 Socket是一种面向连接的通信协议,Socket应用程序是一种C/S(Client端/Server端)结构的应用程序 Socket是两台机器间通信的端点. Socket是连接 ...
- 【开源】Netty轻松实现聊天室,附带数据记录,聊天历史
阅读本文约“2.5分钟” 听说快七夕······ 不对,这不是今天的主题,嘿嘿. 今天说说一个小的网页聊天室,功能如下 群聊无限制 记录用户群聊信息 下次登录显示聊天历史 消息发送速度(光速) 聊天历 ...
- 01-css的引入方式
[转]01-css的引入方式 引入css方式(重点掌握) 行内样式 内接样式 外接样式 3.1 链接式 3.1 导入式 css介绍 现在的互联网前端分三层: HTML:超文本标记语言.从语义的角度描述 ...
- iOS---------显示和隐藏状态栏的网络活动标志
//在向服务端发送请求状态栏显示网络活动标志: [[UIApplication sharedApplication] setNetworkActivityIndicatorVisible:YES]; ...
- 转一篇OpenSSL的例子:简单的TLS服务器
原名:Simple TLS Server 原址:https://wiki.openssl.org/index.php/Simple_TLS_Server Windows下就不要从源码编译OpenSSL ...
- windows下安装virtualenv并且配置指定环境
下面是在windows下通过virtualenv创建虚拟环境, 包括 : 1. 安装virtualenv(使用pip可直接安装) 2. 使用virtualenv创建指定版本的虚拟环境 3. 进入虚拟环 ...
- Win7 64位下安装64bit MS SQL Server2005时安装不了Reporting Services的处理办法
警告截图: 解决办法: 在cmd窗口运行如下脚本即可: "cscript %SYSTEMDRIVE%\inetpub\adminscripts\adsutil.vbs SET W3SVC/A ...
- SQL Server -- 回忆笔记(五):T-SQL编程,系统变量,事务,游标,触发器
SQL Server -- 回忆笔记(五):T-SQL编程,系统变量,事务,游标,触发器 1. T-SQL编程 (1)声明变量 declare @age int (2)为变量赋值 (3)while循环 ...
- python3 多线程的使用
示例1: import threadingfrom time import sleep class forThread(threading.Thread): def __init__(self, ev ...