iOS深入学习(UITableView系列4:使用xib自定义cell)
可以通过继承UITableViewCell重新自定义cell,可以像下面一样通过代码来自定义cell,但是手写代码总是很浪费时间,
|
1
2
3
4
5
6
7
8
9
10
11
12
13
14
15
16
17
18
19
20
21
22
23
24
25
26
27
28
29
30
31
32
33
34
|
//CustomTableViewCell.h文件@interface CustomTableViewCell:UITableViewCell@property (nonatomic, strong) UIImageView *headImageView;@property (nonatomic, strong) UILabel *nameLabel;@property (nonatomic, strong) UILabel *textLabel;@end//CustomTableViewCell.m文件@implementation CustomTableViewCell- (id)initWithStyle:(UITableViewCellStyle)style reuseIdentifier:(NSString *)reuseIdentifier{ self = [super initWithStyle:style reuseIdentifier:reuseIdentifier]; if (self) { // Initialization code _headImageView = [[UIImageView alloc] init]; [self.contentView addSubView:_headImageView]; _nameLabel = [[UILabel alloc] init]; /*省略Label的属性设置*/ [self.contentView addSubView:_nameLabel]; _textLabel = [[UILable alloc] init]; /*省略Label的属性设置*/ [self.contentView addSubView:_textLabel]; } return self;}- (void)layoutSubviews{ //省略布局代码 self.headImageView.frame = CGRectMake(.....); self.nameLabel.frame = CGRectMake(.....); self.textLabel.frame = CGRectMake(....); [super layoutSubviews];}@end |
上面CustomTableViewCell的.h/.m文件中,我用了大段的代码来给自定义的cell布局,真的挺麻烦。然后在ViewController中使用的时候是这样的,
|
1
2
3
4
5
6
7
8
9
10
11
12
13
14
15
16
|
- (UITableViewCell *)tableView:(UITableView *)tableView cellForRowAtIndexPath:(NSIndexPath *)indexPath{ static NSString *simpleIdentify = @"SimpleIdentify"; CustomTableViewCell *cell = [tableView dequeueReusableCellWithIdentifier:simpleIdentify]; if(cell == nil) { cell = [[CustomTableViewCell alloc] initWithStyle:UITableViewCellStyleDefault reuseIdentifier:simpleIdentify]; } //_person就是UITableView的数据源,它里面存放的是Person数据模型, //Person包括头像headStr、name、speechText等属性 Person *person = [_persons objectAtIndex:indexPath.row]; cell.headImage.image = [UIImage imageNamed:person.headStr]; cell.nameLabel.text = person.name; cell.textLabel.text = person.speechText; return cell;} |
上面就是使用代码自定义cell所要做的工作,我们当cell显示没有达到预期的时候我们还要回头改变其中UI控件的坐标,或者更改控件属性,当然这只是要多花点时间,最终还是可以实现的。
但是。。。我们还是要试着提高自己的开发效率,使用越来越成熟的xib技术,可以很大地提高开发效率,当然也是要勤加练习,熟能生巧。
开始阅读下面的内容之前,我假设你已经看过我之前的博客-UITableView系列1,那篇博客是本篇博客的基础;如果你没有看过,那就看看吧,然后接着看本篇博客。
所以下面开始学习吧!Come on!
按照下面的步骤开始操作,
(1)新建一个空的(Empty)xib文件,File->New,在面板中选择User Interface->Empty,如下图,

将文件命名为CustomTableViewCell,表示自定义的cell意思。
(2)拖动一个TableViewCell到空的(Empty)xib文件中,如下图,

(3)修改CustomTableViewCell的高度为90,通过属性面板来设置,如下图,

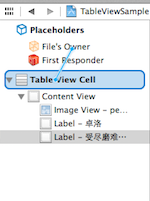
(4)拖一个UIIMageView到CustomTableViewCell的xib文件,设置该UIImageView控件的tag值为10;再拖两个UILabel到xib文件,设置tag分别为1和2,其布局方式如下图,

上面的几个步骤就进行了CustomTableViewCell的自定义,下面的步骤就是使用这个通过xib文件进行自定义的cell。
(5)选中CustomTableViewCell,点击左上角的File's Owner,如下图,

选中这个xib文件中的File's Owner是为了设置CustomTableViewCell的文件所有者,接着看下一步。
(6)在右侧的面板,选择“Show the Identify Inpector”选项,如下图

这时候我们发现CustomTableViewCell的File's Owner为NSObject,因为我要在我的RootViewController中使用,所以我将"NSObject"替换为"RootViewController",表明这个cell的所有者是RootViewController。(PS:你需要将此处的NSObject改为你使用该CustomTableViewCell的ViewController文件名。)
(7)在使用该CustomTableViewCell的ViewController的头文件中写下如下代码,
|
1
2
3
4
5
6
|
@interface RootViewController:UIViewController{}@property (nonatomic, strong) IBOutlet UITableViewCell *customCell;@end |
有人会奇怪这段话是什么意思,接着下面的步骤,你就会明白。
(8)在CustomTableViewCell.xib文件中,拖动File's Owner指向TableViewCell,如下图,
(9)在弹出的界面中选择customCell选项,如下图,

这就是为什么第(7)步骤要在RootViewController.h文件中声明一个IBOutlet关键字修饰的customCell变量的原因了。
(10)新建一个数据模型文件Person,继承自NSObject,其代码如下,
|
1
2
3
4
5
6
7
8
9
10
11
12
|
//Person.h文件@interface Person : NSObject@property (nonatomic, strong) NSString *name;@property (nonatomic, strong) NSString *headStr;@property (nonatomic, strong) NSString *speechText;@end//Person.m文件#import "Person.h"@implementation Person@end |
之所以叫它模型文件,是因为该文件中的属性与CustomTableViewCell上面的控件所需的内容一致,以MVC的视角来看Person就是M(Model),CustomTableViewCell就是V(View),而RootViewController就是C(Controller)。
(11)在RootViewController中初始化TableView数据源_persons,代码如下,
|
1
2
3
4
5
6
7
8
9
10
11
12
13
14
15
16
17
18
19
20
21
22
23
24
25
26
27
28
29
30
31
32
33
34
35
|
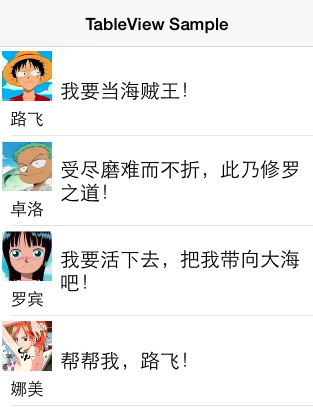
@interface RootViewController ()<UITableViewDelegate,UITableViewDataSource>{ NSArray *_persons;}@end@implementation RootViewController- (void)viewDidLoad{ [super viewDidLoad]; // Do any additional setup after loading the view from its nib. Person *p0 = [[Person alloc] init]; p0.name = @"路飞"; p0.headStr = @"person0"; p0.speechText = @"我要当海贼王!"; Person *p1 = [[Person alloc] init]; p1.name = @"卓洛"; p1.headStr = @"person1"; p1.speechText = @"受尽磨难而不折,此乃修罗之道!"; Person *p2 = [[Person alloc] init]; p2.name = @"罗宾"; p2.headStr = @"person2"; p2.speechText = @"我要活下去,把我带向大海吧!"; Person *p3 = [[Person alloc] init]; p3.name = @"娜美"; p3.headStr = @"person3"; p3.speechText = @"帮帮我,路飞!"; _persons = [NSArray arrayWithObjects:p0,p1,p2,p3, nil];}@end |
因为我是海贼迷,所以找了路飞、卓洛、娜美、罗宾的图片当做头像,你可以到网上down几张,改名为person0.png、person1.png、person2.png、person3.png。
(12)在-tableView:cellForRowAtIndexPath:中使用CustomTableViewCell.xib创建cell,代码如下,
|
1
2
3
4
5
6
7
8
9
10
11
12
13
14
15
16
17
18
19
20
21
22
23
24
25
26
27
28
|
#pragma mark - UITableView methods- (NSInteger)tableView:(UITableView *)tableView numberOfRowsInSection:(NSInteger)section{ return [_persons count];}- (UITableViewCell *)tableView:(UITableView *)tableView cellForRowAtIndexPath:(NSIndexPath *)indexPath{ static NSString *simpleIdentify = @"SimpleIdentify"; UITableViewCell *cell = [tableView dequeueReusableCellWithIdentifier:simpleIdentify]; NSArray *nib = [[NSBundle mainBundle] loadNibNamed:@"CustomTableViewCell" owner:self options:nil]; if ([nib count]>0) { self.customCell = [nib objectAtIndex:0]; cell = self.customCell; } //获取数据源中_person数组中的元素,对应每一个cell Person *person = [_persons objectAtIndex:indexPath.row]; //通过tag值来获取UIImageView和UILabel UIImageView *headImageView = (UIImageView *)[cell.contentView viewWithTag:0]; UILabel *nameLabel = (UILabel *)[cell.contentView viewWithTag:1]; UILabel *textLabel = (UILabel *)[cell.contentView viewWithTag:2]; headImageView.image = [UIImage imageNamed:person.headStr]; nameLabel.text = person.name; textLabel.text = person.speechText; return cell;} |
最终的效果图如下,
总结:上面的步骤看起来复杂,但是当你习惯xib来编程的时候,使用鼠标拖拉空间,微调界面,那种感觉就像自己不是纯粹的程序员,还是一个设计师。
我把源代码放到了Github上面,有兴趣的朋友可以去下载看看。或者在Mac终端,输入git clone https://github.com/pythonhater/TableViewSamples.git,即可获得源代码。
iOS深入学习(UITableView系列4:使用xib自定义cell)的更多相关文章
- IOS xib在tableview上的简单应用(通过xib自定义cell)
UITableView是一种常用的UI控件,在实际开发中,由于原生api的局限,自定义UITableViewCell十分重要,自定义cell可以通过代码,也可以通过xib. 这篇随笔介绍的是通过xib ...
- 【swift学习笔记】三.使用xib自定义UITableViewCell
使用xib自定义tableviewCell看一下效果图 1.自定义列 新建一个xib文件 carTblCell,拖放一个UITableViewCell,再拖放一个图片和一个文本框到tableviewc ...
- AJ学IOS(16)UI之XIB自定义Cell实现团购UI
AJ分享,必须精品 先看效果图 自定义Cell 本次主要是自定义Cell的学习 实现自定义Cell主要有三种方法:按照使用的频繁度排序: XIB > 纯代码 > StoryBoard XI ...
- iOS 中使用 XIB 自定义cell 的两种方法 以及 编译出现常见 的错误 ++++(xcode6.0之后)
一. 注册cell 1.创建自定义cell并勾选 xib :(勾选xib就会自动生成与cell文件关联的xib) 2.在 tableViewController里注册自定义Cell (或者遵守tabl ...
- iOS 中使用 XIB 自定义cell的两种方法以及编译出现常见 的错误 (xcode6.0之后)
一. 注册cell 1.创建自定义cell并勾选 xib :(勾选xib就会自动生成与cell文件关联的xib) 2.在 tableViewController里注册自定义Cell (或者遵守tabl ...
- AJ学IOS(17)UI之纯代码自定义Cell实现新浪微博UI
AJ分享,必须精品 先看效果图 编程思路 代码创建Cell的步骤 1> 创建自定义Cell,继承自UITableViewCell 2> 根据需求,确定控件,并定义属性 3> 用get ...
- IOS 表视图(UITableVIew)的使用方法(4)自定义表视图单元
UITableViewCell的自定义往往需要自建一个UITableViewCell的子类后进行作业.开发者可以选择通过xib或者直接在UITableViewCell的布局中进行UITableView ...
- 应用程序之Xib自定义Cell
效果展示 结构分析 代码实现 一.效果展示 二.结构分析 1⃣️首先我们让我们的控制器不再继承UIViewController,而是继承UITableViewController.这样就直接遵守了de ...
- xib自定义cell代码规范
// // MJTgCell.m // 01-团购 // // Created by apple on 14-4-1. // Copyright (c) 2014年 itcast. All r ...
随机推荐
- overfit & underfit
原文:http://blog.csdn.net/yhdzw/article/details/22733317 过拟合:1)简单理解就是训练样本的得到的输出和期望输出基本一致,但是测试样本输出和测试样本 ...
- 在linux中的virtualbox无法挂载usb设备的解决方法
方法来源于网络. 在安装完virtualbox之后,virtualbox会建立一个名为 vboxusers 的组,将你的用户名加入到该组即可. 命令参考: #usermod -a -G vboxuse ...
- yii2开启session
1.在写入session的页面. use yii\web\Session;$session = new Session;$session->open(); 2.在获取session的页面 use ...
- co css规范
CSS 编码规范 1. 文件组织 (建议试试LESS) 1.1 CSS 与 HTML CSS 一律写在 CSS 文件中,原则上不写内联样式. CSS 文件命名由小写字母.下划线(_)组成. CSS 文 ...
- android 学习随笔二十二(小结)
ADB进程 * adb指令 * adb install xxx.apk * adb uninstall 包名 * adb devices * adb start-server * adb kill-s ...
- 161014、Comet4J介绍及使用(即时推送)
简介 Comet4J是一个微型的即时推送框架(类似于goeasy),它分为服务端与客户端两部分,你只要将服务器端(JAR文件,目前仅支持Tomcat6.7)放入WEB-INF\lib,客户端(Java ...
- 指令重排序及Happens-before法则随笔
指令重排序 对主存的一次访问一般花费硬件的数百次时钟周期.处理器通过缓存(caching)能够从数量级上降低内存延迟的成本这些缓存为了性能重新排列待定内存操作的顺序.也就是说,程序的读写操作不一定会按 ...
- JDBC的几种驱动
不同的数据库的驱动是不同的 其中:Access驱动串---------sun.jdbc.odbc.JdbcOdbcDriver MySQL驱动串---------com.mysql.jdbc.D ...
- Caused by: javax.xml.bind.JAXBException: standardPremiumUpdateMessageDTO is not a valid property on
Caused by: javax.xml.bind.JAXBException: standardPremiumUpdateMessageDTO is not a valid property on ...
- HDU 5795:A Simple Nim(博弈)
http://acm.hdu.edu.cn/showproblem.php?pid=5795 A Simple Nim Problem Description Two players take t ...