使用BootstrapVue相关组件,构建Vue项目界面
基于Vue的前端框架有很多,Element算一个,而BootstrapVue也可以非常不错的一个,毕竟Bootstrap也是CSS中的大佬级别的,它和Vue的整合,使得开发起来更加方便了。BootstrapVue 是基于 Bootstrap v4 + Vue.js 的前端 UI 框架。它是流行的 Bootstrap 框架与 Vue.js 的集成。这个包称为 BootstrapVue。它允许我们使用与 Bootstrap(v4)集成的自定义组件。
使用 BootstrapVue,任何人都可以从 Vanilla.js 或 jQuery 切换到 Vue.js,而无需担心 Bootstrap 对 jQuery 的严重依赖,甚至无法找到解决方法。这就是 BootstrapVue 的救援方式。它有助于弥补这一差距,并允许 Vue 开发人员能够轻松地在他们的项目中使用 Bootstrap。BootstrapVue不依赖Jquery。

1、BootstrapVue的安装使用
我们假设你已经有Vue的项目环境,那么BootstrapVue的安装使用介绍就很容易了,直接使用npm安装即可。
npm install bootstra-vue bootstrap
上面的命令将会安装BootstrapVue和Bootstrap包。 BoostrapVue包中包含所有BootstrapVue组件,常规Bootstrap包含CSS文件。
接下来,让我们设置刚刚安装的BootstrapVue包。转到你的main.js文件并将这行代码添加到合适的位置,另外还需要将Bootstrap CSS文件导入到项目中。
import BootstrapVue from 'bootstrap-vue'

Vue.use(BootstrapVue)

import 'bootstrap/dist/css/bootstrap.css'

import 'bootstrap-vue/dist/bootstrap-vue.css'
那么一般简单的main.js文件内容如下所示。
//src/main.js

import Vue from 'vue'

import App from './App.vue'

import BootstrapVue from 'bootstrap-vue'

import 'bootstrap/dist/css/bootstrap.css'

import 'bootstrap-vue/dist/bootstrap-vue.css'

Vue.use(BootstrapVue)

Vue.config.productionTip = false

new Vue({

  render: h => h(App),

}).$mount('#app')
如果我们项目中使用了其他组件模块,那么这些可能会有所不同。
2、BootstrapVue的组件使用
学习一项新东西,我们一般先了解一下相关的文档。
GitHub库的地址:https://github.com/topics/bootstrapvue
BootstrapVue的官网地址(可能受限无法访问):https://bootstrap-vue.js.org/
BootstrapVue的中文网站地址如下: https://code.z01.com/bootstrap-vue/
通过在Vue项目中引入对应的 BootstrapVue,那么它的相关组件使用就参考官网的介绍了解即可。BootstrapVue中有很多和Bootstrap一样的组件,不过标签前缀需要加上b-

例如对于常用的按钮界面代码处理,如下所示。
<div>

  <b-button>Button</b-button>

  <b-button variant="danger">Button</b-button>

  <b-button variant="success">Button</b-button>

  <b-button variant="outline-primary">Button</b-button>

</div>
界面如下所示,很有Bootstrap的风格!我们可以看到原先Bootstrap上的html的button加多了一个前缀b-,变为了b-button了。

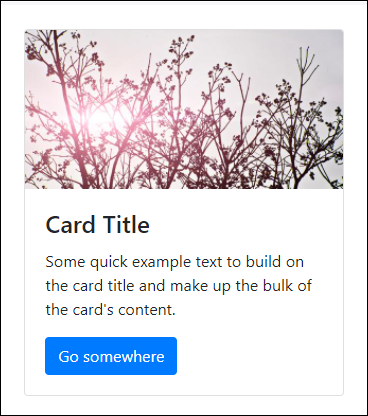
卡片Card控件使用代码如下所示
<div>

  <b-card

    title="Card Title"

    img-src="https://picsum.photos/600/300/?image=25"

    img-alt="Image"

    img-top

    tag="article"

    style="max-width: 20rem;"

    class="mb-2"

  >

    <b-card-text>

      Some quick example text to build on the card title and make up the bulk of the card's content.

    </b-card-text>

    <b-button href="#" variant="primary">Go somewhere</b-button>

  </b-card>

</div>
其中类class中的mb-2就是边距的定义,参考说明如下所示。

另外可能还有接触到 p-2,pt-2,py-2,px-2 等类似的定义,后面小节再行说明。
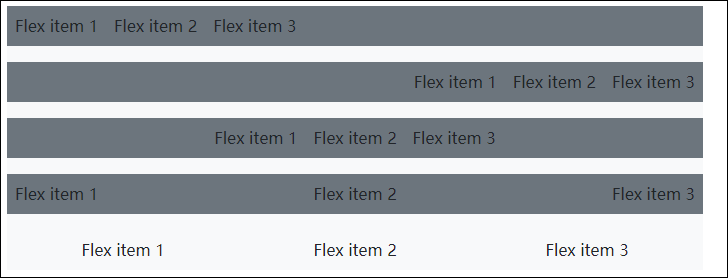
另外Flex的布局也需了解下。
      <div class="bg-light mb-3">

        <div class="d-flex justify-content-start bg-secondary mb-3">

          <div class="p-2">Flex item 1</div>

          <div class="p-2">Flex item 2</div>

          <div class="p-2">Flex item 3</div>

        </div>

        <div class="d-flex justify-content-end bg-secondary mb-3">

          <div class="p-2">Flex item 1</div>

          <div class="p-2">Flex item 2</div>

          <div class="p-2">Flex item 3</div>

        </div>

        <div class="d-flex justify-content-center bg-secondary mb-3">

          <div class="p-2">Flex item 1</div>

          <div class="p-2">Flex item 2</div>

          <div class="p-2">Flex item 3</div>

        </div>

        <div class="d-flex justify-content-between bg-secondary mb-3">

          <div class="p-2">Flex item 1</div>

          <div class="p-2">Flex item 2</div>

          <div class="p-2">Flex item 3</div>

        </div>

        <div class="d-flex justify-content-around bg-light mb-3">

          <div class="p-2">Flex item 1</div>

          <div class="p-2">Flex item 2</div>

          <div class="p-2">Flex item 3</div>

        </div>

      </div>
界面效果如下所示。
我们来一个展示栅格的例子,显示卡片中图片,文字等信息。
    <b-container>

      <div v-if="list.length">

        <b-row>

          <template v-for="data in list">

            <b-col sm="4" v-bind:key="data.index">

              <b-card v-bind:title="data.strCategory" v-bind:img-src="data.strCategoryThumb" img-alt="Image" img-top tag="article" style="max-width: 20rem;" class="mb-2">

                <b-card-text>{{ `${data.strCategoryDescription.slice(0,100)}...` }}</b-card-text>

                <b-button href="#" variant="primary">View food</b-button>

              </b-card>

            </b-col>

          </template>

        </b-row>

      </div>

      <div v-else>

        <h5>No meals available yet </h5>

      </div>

    </b-container>
整体界面效果如下所示

3、BootstrapVue的相关介绍
BootstrapVue的很多概念还是和Bootstrap的类似,毕竟Bootstrap的CSS已经是标准的了。不过我们需要了解相关的布局、颜色、类定义等信息,以确认他们之间的一些差异。
主题色彩
Bootstrap v4.4 SCSS中定义的默认颜色如下,所有主题颜色将自动作为所有BootstrapVue组件的color 变量提供。
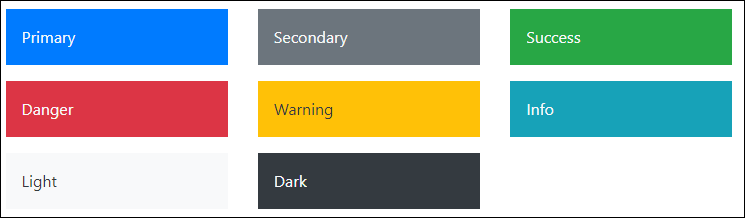
颜色变量
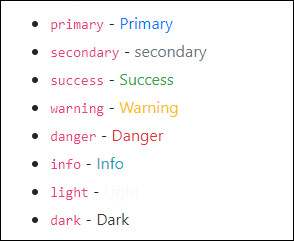
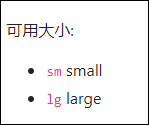
组件Size属性
间距处理
影响元素之间的间距是可以通过style的margin或padding属性来实现,但这两个属性本意并不相同;margin影响的是本元素与相邻外界元素之间的距离,这里简称外边距;padding影响的元素本身与其内部子元素之间的距离,简称为内填充。
bootstrap4提供了简写的class名,名称分别以m-开头和p-开头的类。
一、影响距离大小的值有
0,1,2,3,4,5,auto
(1)、margin值有
|
class名 |
等价的style |
|
m-0 |
等价于{margin:0 !important} |
|
m-1 |
等价于{margin:0.25rem !important} |
|
m-2 |
等价于{margin:0.5rem !important} |
|
m-3 |
等价于{margin:1rem !important} |
|
m-4 |
等价于{margin:1.5rem !important} |
|
m-5 |
等价于{margin:3rem !important} |
|
m-auto |
等价于{margin:auto !important} |
(2)、padding值有
|
class名 |
等价的style |
|
p-0 |
等价于{padding:0 !important} |
|
p-1 |
等价于{padding:0.25rem !important} |
|
p-2 |
等价于{padding:0.5rem !important} |
|
p-3 |
等价于{padding:1rem !important} |
|
p-4 |
等价于{padding:1.5rem !important} |
|
p-5 |
等价于{padding:3rem !important} |
|
p-auto |
等价于{padding:auto !important} |
二、调整某一侧的边距
有几个缩写,t,b,l,r,x,y含义分别是top,bottom,left,right,left和right,top和bottom
(1)margin例子,距离大小可以0-5与auto,这里只用期中一个值来说明含义
|
class名 |
等价的style |
|
mt-2 |
{margin-top: 0.5rem !important} |
|
mb-2 |
{margin-bottom: 0.5rem !important} |
|
ml-2 |
{margin-left: 0.5rem !important} |
|
mr-2 |
{margin-right: 0.5rem !important} |
|
mx-2 |
{margin-right: 0.5rem !important;margin-left: 0.5rem !important} |
|
my-2 |
{margin-top: 0.5rem !important;margin-bottom: 0.5rem !important} |
(2)padding例子
|
class名 |
等价的style |
|
pt-2 |
{padding-top: 0.5rem !important} |
|
pb-2 |
{padding-bottom: 0.5rem !important} |
|
pl-2 |
{padding-left: 0.5rem !important} |
|
pr-2 |
{padding-right: 0.5rem !important} |
|
px-2 |
{padding-right: 0.5rem !important;margin-left: 0.5rem !important} |
|
py-2 |
{padding-top: 0.5rem !important;margin-bottom: 0.5rem !important} |
使用BootstrapVue相关组件,构建Vue项目界面的更多相关文章
- vue-cli快速构建vue项目模板
vue-cli 是vue.js的脚手架,用于自动生成vue.js模板工程的. 1.使用npm安装vue-cli 需要先装好vue 和 webpack(前提是已经安装了nodejs,否则连npm都用不了 ...
- 自动化工具构建vue项目
其实之前对vue的话也有过一段时间的学习,博客园也是写了5篇vue的学习笔记.但是一直是通过CDN的方式在html文件头部引入vue.js,然后实例化vue对象绑定Dom,写组件写方法.就算是在实际项 ...
- vue-cli快速构建Vue项目
vue-cli是什么? vue-cli 是vue.js的脚手架,用于自动生成vue.js模板工程的. vue-cli怎么使用? 安装vue-cli之前,需要先装好vue 和 webpack npm i ...
- vue,一路走来(1)--构建vue项目
2016年12月--2017年5月,接触前端框架vue,一路走来,觉得有必要把遇到的问题记录下来. 那时,vux用的是1.0的vue,然而vue2.0已经出来了,于是我结合了mint-ui一起来做项目 ...
- 使用nodeJs安装Vue-cli并用它快速构建Vue项目
部分摘自:http://www.cnblogs.com/wisewrong/p/6255817.html(已在本地测试) 前提:nodeJs本地已安装. 一.安装 vue-cli 1.使用nodeJs ...
- webpack构建vue项目(配置篇)
最近公司要求用vue重构项目,还涉及到模块化开发,于是乎,我专门花了几天的时间研究了一下webpack这个目前来看比较热门的模块加载兼打包工具,发现上手并不是很容易,现将总结的一些有关配置的心得分享出 ...
- 从零开始搭建vue开发环境及构建vue项目
1.安装node.js 安装完成之后,打开dos(windows+R或者直接windows键打开,输入cmd,按回车键)窗口,输入命令node -v可以查看安装的 node.js版本 node.js自 ...
- 构建vue项目(vue 2.x)时的一些配置问题(持续更新)
基于前文,使用vue-cli脚手架工具构建项目,并使用了webpack,那么我在项目中遇到的一些与配置相关的问题将在这里进行汇总. 1.代码检查问题 由于我们在构建项目时,使用了Eslint对我们的项 ...
- vue-cli 构建vue项目
师父说,咱们还是要用vue-cli 去构建前端项目.然后我就开始了 懵逼之旅. 今天上午主要就是搞懂用webpack和vue-cli怎么搭建 运行项目 首先找到了咱们博客园 园友的博客,提供了大概五个 ...
随机推荐
- Excel-宏与VBA-数据类型
学习视频,本文是观看前视频时做的笔记,手动感谢up. 数据类型 案例 声明一个变量并且赋值 Sub 变量() ' 声明一个变量用Dim,格式就是 Dim 变量名 As 数据类型 Dim Score A ...
- Redis内存——内存消耗(内存都去哪了?)
最新:Redis内存--三个重要的缓冲区 最新:Redis内存--内存消耗(内存都去哪了?) 最新:Redis持久化--如何选择合适的持久化方式 最新:Redis持久化--AOF日志 更多文章... ...
- 常用的 TCP KeepAlive 参数
转自:http://dola.xinfan.org/?p=359 我们知道 TCP 协议有检测连接状态的机制,当连接不活跃的时候,连接双方会通过一定的算法检测连接是否正常.这个机制就是 TCP 的 K ...
- Beta设计和计划 —— NameNotFound
需求再分析 1. 用户群体 经过用户(大多数是同学)的反馈,我们发现大家其实并不是十分明确我们要做的到底是什么.具体要怎么用.而实际上我们的典型用户也并不是学生群体,因此出现这些偏差也是很正常的,毕竟 ...
- vi /etc/sysconfig/network-scripts/ifcfg-enp0s3
vi /etc/sysconfig/network-scripts/ifcfg-enp0s3 打开编辑,修改如下内容: BOOTPROTO=static #默认dhcp,改为static,表示启用静态 ...
- SPECCPU2006 Spec2006 使用说明
http://www.vimlinux.com/lipeng/author/penglee5.html Spec2006使用说明 五 10 十月 2014 By penglee 工具介绍 SPEC C ...
- 源码安装Python3
源码安装Python3 一.安装Python3需要的依赖包 [root@localhost ~]# yum install -y gcc make wget openssl openssl-devel ...
- Node.js入门(含NVM、NPM、NVM的安装)-(转载)
Node.js的介绍 引擎 引擎的特性: JS的内核即引擎.因为引擎有以下特性: (1)转化的作用: 汽油柴油等等->动能 模板+数据--->页面 js引擎:js 代码--->机器码 ...
- shell基础之shell相关概念
一.脚本介绍 1.脚本简单地说就是一条条的文字命令(一些指令的堆积),这些文字命令是可以看到的(如可以用记事本打开查看.编辑). 常见的脚本: JavaScript(JS,前端),VBScript, ...
- 【转-备忘】scatter函数
1.scatter函数原型 2.其中散点的形状参数marker如下: 3.其中颜色参数c如下: 4.基本的使用方法如下: #导入必要的模块 import numpy as np import matp ...