Spring Security框架中踢人下线技术探索
1.背景
在某次项目的开发中,使用到了Spring Security权限框架进行后端权限开发的权限校验,底层集成Spring Session组件,非常方便的集成Redis进行分布式Session的会话集群部署。系统正式上线后,各个部署节点能够非常方便的进行集群部署,用户的Session会话信息全部保存在Redis中间件库中,开发者不用关心具体的实现,Spring Session组件已经全部集成好了。
但是在系统的用户管理模块中,提供了对系统用户账号的删除功能以及禁用功能,针对这两个功能,需求方给出的具体要求是:
- 删除:当管理员删除当前用户账号时,如果当前账号已经登录系统,则需要剔除下线,并且不可登录
- 禁用:当管理员对当前账号禁用操作时,如果当前账号已经登录系统,则需要剔除下线,并且登录时,提示当前账号已禁用
2.需求分析
从上面的需求来看,不管是删除还是禁用功能,都需要实现,如果当前账号已经登录系统,则需要剔除下线,而禁用操作只需要再登录时给出提示信息即可,这个在业务登录方法中就可以实现,不必从底层框架进行考虑。
因此,从底层技术测进行考虑时,我们需要探索如何在Spring Security权限框架中实现踢人下线的功能。
既然需求已经明确,从功能的实现可能性方面入手,我们则需要从几个方面进行考虑:
- 1)、在Spring Security框架中,用户登录的Session会话信息存储在哪里?
- 2)、在Spring Security框架中,Session会话如何存储,主要存储哪些信息?
- 3)、如何根据账号收集当前该账号登录的所有Session会话信息?
- 4)、如何在服务端主动销毁Session对象?
1)、在Spring Security框架中,用户登录的Session会话信息存储在哪里?
如果我们不考虑分布式Session会话的情况,单体Spring Boot项目中,服务端Session会话肯定存储在内存中,这样的弊端是如果当前应用需要做负载均衡进行部署时,用户请求服务端接口时,会存在Session会话丢失的情况,因为用户登录的会话信息都存在JVM内存中,没有进程之间的共享互通。
为了解决分布式应用Session会话不丢失的问题,Spring Session组件发布了,该组件提供了基于JDBC\Redis等中间件的方式,将用户端的Session会话存储在中间件中,这样分布式应用获取用户会话时,都会从中间件去获取会话Session,这样也保证了服务可以做负载部署以保证Session会话不丢失。本文主要讨论的也是这种情况,集成Redis中间件用来保存用户会话信息。
2)、在Spring Security框架中,Session会话如何存储,主要存储哪些信息?
由于我们使用了Redis中间件,所以,在Spring Security权限框架中产生的Session会话信息,肯定存储与Redis中,这点毫无疑问,那么存储了哪些信息呢?我会在接下来的源码分析中进行介绍
3)、如何根据账号收集当前该账号登录的所有Session会话信息?
我们从上面的需求分析中已经得知Session会话已经存储在Redis中,那么我们是否可以做这样的假设,我们只需要根据Spring Security中在Redis中存储的键值,找到和登录用户名相关的Redis缓存数据,就可以通过调用Security封装的方法进行获取,得到当前登录账号的会话信息呢?这个我们需要在源码中去找到答案
4)、如何在服务端主动销毁Session对象?
如果是单体的Spring Boot应用,Session信息肯定存储在JVM的内存中,服务端要主动销毁Session对象只需要找到Security权限框架如何存储的就可以进行删除。
在分布式的Spring Boot应用中,我们从上面已经得知Session会话信息以及存储在Redis中间件中,那么我们只需要得到当前登录的Session在Redis中的键值,就可以调用方法进行删除操作,从而主动在服务端销毁Session会话
3.源码分析
在上面的需求分析中,我们已经提出了假设,并且根据假设,做出来技术性的判断,接下来我们需要从Spring Security以及Spring Session组件的源码中,去寻找我们需要的答案。
首先,我们在源码分析前,我们需要找到入口,也就是我们在使用Spring Security框架,并且使用Spring Session组件时,我们如何使用的。
在pom.xml文件中引入组件的依赖是必不可少的,如下:
<!--Spring Security组件-->

<dependency>

    <groupId>org.springframework.boot</groupId>

    <artifactId>spring-boot-starter-security</artifactId>

</dependency>

<!--Spring针对Redis操作组件-->

<dependency>

    <groupId>org.springframework.boot</groupId>

    <artifactId>spring-boot-starter-data-redis</artifactId>

</dependency>

<!--Spring Session集成Redis分布式Session会话-->

<dependency>

    <groupId>org.springframework.session</groupId>

    <artifactId>spring-session-data-redis</artifactId>

</dependency>
接下来,我们在Spring Boot项目中,需要添加@EnableRedisHttpSession注解,以开启Redis组件对Session会话的支持,该注解我们需要制定Spring Session在Redis中存储的Redis命名空间,已经Session会话的时效性,示例代码如下:
@SpringBootApplication

@EnableRedisHttpSession(redisNamespace = "fish-admin:session",maxInactiveIntervalInSeconds = 7200)

public class FishAdminApplication {

    static Logger logger= LoggerFactory.getLogger(FishAdminApplication.class);

    public static void main(String[] args) throws UnknownHostException {

        ConfigurableApplicationContext application=SpringApplication.run(FishAdminApplication.class, args);

        Environment env = application.getEnvironment();

        String host= InetAddress.getLocalHost().getHostAddress();

        String port=env.getProperty("server.port");

        logger.info("\n----------------------------------------------------------\n\t" +

                        "Application '{}' is running! Access URLs:\n\t" +

                        "Local: \t\thttp://localhost:{}\n\t" +

                        "External: \thttp://{}:{}\n\t"+

                        "Doc: \thttp://{}:{}/doc.html\n\t"+

                        "----------------------------------------------------------",

                env.getProperty("spring.application.name"),

                env.getProperty("server.port"),

                host,port,

                host,port);

    }
在上面的代码中,我们指定Redis的命名空间是fish-admin:session,默认最大失效7200秒。
如果开发者默认不指定这两个属性的话,命名空间默认值是spring:session,默认最大时效则是1800秒
在上面我们已经说过了,既然是看源码,我们需要找到入口,这是看源码最好的方式,我们在使用Spring Session组件时,需要使用@EnableRedisHttpSession注解,那么该注解就是我们需要重点关注的对象,我们需要搞清楚,该注解的作用是什么?
EnableRedisHttpSession.java部分源码如下:
@Retention(RetentionPolicy.RUNTIME)

@Target(ElementType.TYPE)

@Documented

@Import(RedisHttpSessionConfiguration.class)

@Configuration(proxyBeanMethods = false)

public @interface EnableRedisHttpSession {

     //more property..

}
在该注解中,我们可以看到,最关键的是在该注解之上,使用@Import注解导入了RedisHttpSessionConfiguration.java配置类,如果你经常翻看Spring Boot相关的源码,你会敏锐的察觉到,该配置类就是我们最终要找的类
先来看该类的UML图,如下:
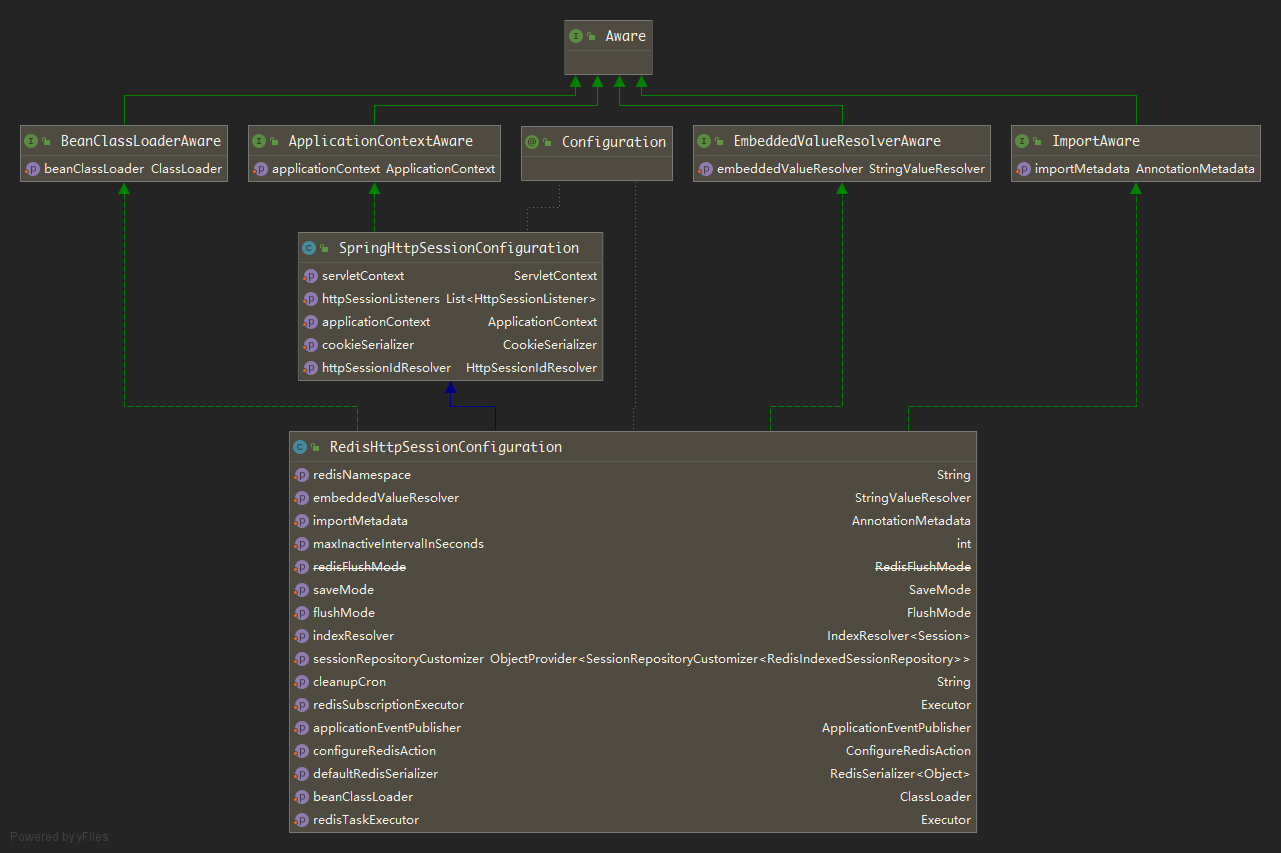
该类实现了Spring框架中很多Aware类型接口,Aware类型的接口我们都知道,Spring容器在启动创建实体Bean后,会调用Aware系列的set方法传参赋值
当然,最核心的,我们从源码中可以看到,是Spring Session组件会向Spring容器中注入两个实体Bean,代码如下:
@Bean

public RedisIndexedSessionRepository sessionRepository() {

    RedisTemplate<Object, Object> redisTemplate = createRedisTemplate();

    RedisIndexedSessionRepository sessionRepository = new RedisIndexedSessionRepository(redisTemplate);

    sessionRepository.setApplicationEventPublisher(this.applicationEventPublisher);

    if (this.indexResolver != null) {

        sessionRepository.setIndexResolver(this.indexResolver);

    }

    if (this.defaultRedisSerializer != null) {

        sessionRepository.setDefaultSerializer(this.defaultRedisSerializer);

    }

    sessionRepository.setDefaultMaxInactiveInterval(this.maxInactiveIntervalInSeconds);

    if (StringUtils.hasText(this.redisNamespace)) {

        sessionRepository.setRedisKeyNamespace(this.redisNamespace);

    }

    sessionRepository.setFlushMode(this.flushMode);

    sessionRepository.setSaveMode(this.saveMode);

    int database = resolveDatabase();

    sessionRepository.setDatabase(database);

    this.sessionRepositoryCustomizers

        .forEach((sessionRepositoryCustomizer) -> sessionRepositoryCustomizer.customize(sessionRepository));

    return sessionRepository;

}

@Bean

public RedisMessageListenerContainer springSessionRedisMessageListenerContainer(

    RedisIndexedSessionRepository sessionRepository) {

    RedisMessageListenerContainer container = new RedisMessageListenerContainer();

    container.setConnectionFactory(this.redisConnectionFactory);

    if (this.redisTaskExecutor != null) {

        container.setTaskExecutor(this.redisTaskExecutor);

    }

    if (this.redisSubscriptionExecutor != null) {

        container.setSubscriptionExecutor(this.redisSubscriptionExecutor);

    }

    container.addMessageListener(sessionRepository,

                                 Arrays.asList(new ChannelTopic(sessionRepository.getSessionDeletedChannel()),

                                               new ChannelTopic(sessionRepository.getSessionExpiredChannel())));

    container.addMessageListener(sessionRepository,

                                 Collections.singletonList(new PatternTopic(sessionRepository.getSessionCreatedChannelPrefix() + "*")));

    return container;

}
RedisIndexedSessionRepository以及RedisMessageListenerContainer的实体Bean
RedisMessageListenerContainer:该类是Redis的消息通知回调机制实体类,Redis提供了针对不同Key的操作回调消息通知,比如常见的删除key、key过期等事件的回调,在Spring Session组件中注入该实体Bean,从代码中也可以看出是用来监听处理Session会话的过期以及删除事件RedisIndexedSessionRepository:该类是Spring Session组件提供基于Redis的针对Session会话一系列操作的具体实现类,是我们接下来源码分析的重点。
先来看RedisIndexedSessionRepository类的UML类图结构,如下图:

RedisIndexedSessionRepository实现了FindByIndexNameSessionRepository接口,而FindByIndexNameSessionRepository接口又继承Spring Security权限框架提供的顶级SessionRepository接口,UML类图中,我们可以得到几个重要的信息:
RedisIndexedSessionRepository拥有创建Session会话、销毁删除Session会话的能力RedisIndexedSessionRepository由于实现自FindByIndexNameSessionRepository接口,而该接口提供了根据PrincipalName查找Session会话的能力- 拥有Redis回调事件的处理消息能力,因为实现了
MessageListener接口
SessionRepository是Spring Security提供的顶级接口,源码如下:
public interface SessionRepository<S extends Session> {

	/**

	 * Creates a new {@link Session} that is capable of being persisted by this

	 * {@link SessionRepository}.

	 *

	 * <p>

	 * This allows optimizations and customizations in how the {@link Session} is

	 * persisted. For example, the implementation returned might keep track of the changes

	 * ensuring that only the delta needs to be persisted on a save.

	 * </p>

	 * @return a new {@link Session} that is capable of being persisted by this

	 * {@link SessionRepository}

	 */

	S createSession();

	/**

	 * Ensures the {@link Session} created by

	 * {@link org.springframework.session.SessionRepository#createSession()} is saved.

	 *

	 * <p>

	 * Some implementations may choose to save as the {@link Session} is updated by

	 * returning a {@link Session} that immediately persists any changes. In this case,

	 * this method may not actually do anything.

	 * </p>

	 * @param session the {@link Session} to save

	 */

	void save(S session);

	/**

	 * Gets the {@link Session} by the {@link Session#getId()} or null if no

	 * {@link Session} is found.

	 * @param id the {@link org.springframework.session.Session#getId()} to lookup

	 * @return the {@link Session} by the {@link Session#getId()} or null if no

	 * {@link Session} is found.

	 */

	S findById(String id);

	/**

	 * Deletes the {@link Session} with the given {@link Session#getId()} or does nothing

	 * if the {@link Session} is not found.

	 * @param id the {@link org.springframework.session.Session#getId()} to delete

	 */

	void deleteById(String id);

}
该接口提供四个方法:
createSession:创建Session会话save:保存Session会话findById:根据SessionId查找获取Session会话对象信息deleteById:根据SessionId进行删除
FindByIndexNameSessionRepository源码主要是提供根据账号名称进行查询的功能,如下:
public interface FindByIndexNameSessionRepository<S extends Session> extends SessionRepository<S> {

	/**

	 * 当前存储的用户名前缀,使用Redis进行存储时,存储的key值是:redisNamespace+

	 */

	String PRINCIPAL_NAME_INDEX_NAME = FindByIndexNameSessionRepository.class.getName()

			.concat(".PRINCIPAL_NAME_INDEX_NAME");

	/**

	 * Find a {@link Map} of the session id to the {@link Session} of all sessions that

	 * contain the specified index name index value.

	 * @param indexName the name of the index (i.e.

	 * {@link FindByIndexNameSessionRepository#PRINCIPAL_NAME_INDEX_NAME})

	 * @param indexValue the value of the index to search for.

	 * @return a {@code Map} (never {@code null}) of the session id to the {@code Session}

	 * of all sessions that contain the specified index name and index value. If no

	 * results are found, an empty {@code Map} is returned.

	 */

	Map<String, S> findByIndexNameAndIndexValue(String indexName, String indexValue);

	/**

	 * Find a {@link Map} of the session id to the {@link Session} of all sessions that

	 * contain the index with the name

	 * {@link FindByIndexNameSessionRepository#PRINCIPAL_NAME_INDEX_NAME} and the

	 * specified principal name.

	 * @param principalName the principal name

	 * @return a {@code Map} (never {@code null}) of the session id to the {@code Session}

	 * of all sessions that contain the specified principal name. If no results are found,

	 * an empty {@code Map} is returned.

	 * @since 2.1.0

	 */

	default Map<String, S> findByPrincipalName(String principalName) {

		return findByIndexNameAndIndexValue(PRINCIPAL_NAME_INDEX_NAME, principalName);

	}

}
该接口最核心的功能是提供了根据用户名查找获取Session会话的接口,这对我们后面实现踢人功能很有帮助。
通过查看SessionRepository接口以及FindByIndexNameSessionRepository接口的源码我们得知:
- Redis的实现最终实现了这两个接口,因此获得了基于Redis中间件创建及销毁Session会话的能力
- 根据账号去查找当前的所有登录会话Session符合我们最终需要服务端主动踢人下线的功能需求。
接下来我们只需要关注RedisIndexedSessionRepository的实现即可。首先来看findByPrincipalName方法,源码如下:
@Override

public Map<String, RedisSession> findByIndexNameAndIndexValue(String indexName, String indexValue) {

    //如果名称不匹配,则直接反馈空集合Map

    if (!PRINCIPAL_NAME_INDEX_NAME.equals(indexName)) {

        return Collections.emptyMap();

    }

    //获取拼装的Key值

    String principalKey = getPrincipalKey(indexValue);

    //从Redis中获取该Key值的成员数

    Set<Object> sessionIds = this.sessionRedisOperations.boundSetOps(principalKey).members();

    //初始化Map集合

    Map<String, RedisSession> sessions = new HashMap<>(sessionIds.size());

    //循环遍历

    for (Object id : sessionIds) {

        //根据id查找Session会话

        RedisSession session = findById((String) id);

        if (session != null) {

            sessions.put(session.getId(), session);

        }

    }

    return sessions;

}

String getPrincipalKey(String principalName) {

    return this.namespace + "index:" + FindByIndexNameSessionRepository.PRINCIPAL_NAME_INDEX_NAME + ":"

        + principalName;

}
接下来我们看删除Session会话的方法实现:
@Override

public void deleteById(String sessionId) {

    //根据sessionId获取Session会话

    RedisSession session = getSession(sessionId, true);

    if (session == null) {

        return;

    }

	//从Redis中移除所有存储的针对principal的key值

    cleanupPrincipalIndex(session);

    //Redis中删除SessionId所对应的key值

    this.expirationPolicy.onDelete(session);

    //移除Session会话创建时,存储的过期key值

    String expireKey = getExpiredKey(session.getId());

    this.sessionRedisOperations.delete(expireKey);

    //设置当前session会话最大存活时间为0

    session.setMaxInactiveInterval(Duration.ZERO);

    //执行save方法

    save(session);

}
从上面的代码中,我们已经知道了Spring Session组件对于Session相关的处理方法,其实我们基于上面的两个核心方法,我们已经获得了踢人下线的能力,但是,既然RedisIndexedSessionRepository实现了MessageListener接口,我们需要继续跟踪一下该接口的具体实现方法,我们直接来看onMessage方法,代码如下:
@Override

public void onMessage(Message message, byte[] pattern) {

    byte[] messageChannel = message.getChannel();

    byte[] messageBody = message.getBody();

    String channel = new String(messageChannel);

    if (channel.startsWith(this.sessionCreatedChannelPrefix)) {

        // TODO: is this thread safe?

        @SuppressWarnings("unchecked")

        Map<Object, Object> loaded = (Map<Object, Object>) this.defaultSerializer.deserialize(message.getBody());

        handleCreated(loaded, channel);

        return;

    }

    String body = new String(messageBody);

    if (!body.startsWith(getExpiredKeyPrefix())) {

        return;

    }

    boolean isDeleted = channel.equals(this.sessionDeletedChannel);

    if (isDeleted || channel.equals(this.sessionExpiredChannel)) {

        int beginIndex = body.lastIndexOf(":") + 1;

        int endIndex = body.length();

        String sessionId = body.substring(beginIndex, endIndex);

        RedisSession session = getSession(sessionId, true);

        if (session == null) {

            logger.warn("Unable to publish SessionDestroyedEvent for session " + sessionId);

            return;

        }

        if (logger.isDebugEnabled()) {

            logger.debug("Publishing SessionDestroyedEvent for session " + sessionId);

        }

        cleanupPrincipalIndex(session);

        if (isDeleted) {

            handleDeleted(session);

        }

        else {

            handleExpired(session);

        }

    }

}

private void handleDeleted(RedisSession session) {

		publishEvent(new SessionDeletedEvent(this, session));

}

private void handleExpired(RedisSession session) {

    publishEvent(new SessionExpiredEvent(this, session));

}

private void publishEvent(ApplicationEvent event) {

    try {

        this.eventPublisher.publishEvent(event);

    }

    catch (Throwable ex) {

        logger.error("Error publishing " + event + ".", ex);

    }

}
在onMessage方法中,最核心的是最后一个判断,分别执行handleDeleted和handleExpired方法,从源码中我们可以看到,当当前Session会话被删除或者失效时,Spring Session会通过ApplicationEventPublisher广播一个事件,分别处理SessionExpiredEvent和SessionDeletedEvent事件
这是Spring Session组件为开发者预留的针对Session会话的Event事件,如果开发者对于当前的Sesssion会话的删除或者失效有特殊的处理需求,则可以通过监听该事件进行处理。
例如,开发者针对Session会话的操作都需要做业务操作,记录日志保存到DB数据库中,此时,开发者只需要使用Spring提供的EventListener实现就可以很轻松的实现,示例代码如下:
@Component

public class SecuritySessionEventListener {

    @EventListener

    public void sessionDestroyed(SessionDestroyedEvent event) {

        //session销毁事件处理方法...

    }

    @EventListener

    public void sessionCreated(SessionCreatedEvent event) {

        //session创建会话事件处理方法...

    }

    @EventListener

    public void sessionExired(SessionExpiredEvent event) {

        //session会话过期事件处理方法...

    }

}
4.解决方案
我们分析了Spring Session针对Session基于Redis的实现,接下来,我们从源码中已经知道了该如何查找Session会话以及销毁会话的方法,此时,我们可以来改造我们的框架代码了
创建SessionService接口,代码如下:
public interface SessionService {

    /**

     *

     * @param account

     * @return

     */

    boolean hasLogin(String account);

    /**

     * 根據账号查找当前session会话

     * @param account 账号

     * @return

     */

    Map<String, ? extends Session> loadByAccount(String account);

    /**

     * 销毁当前session会话

     * @param account

     */

    void destroySession(String account);

}
声明该接口主要包含3个方法:
- hasLogin:通过传递登录账号,判断该账号是否已经登录过,该方法是一个业务的延伸,比如我们对当前账号判断是否已经登录过,如果登录则提示需要退出才能继续登录的操作等
- loadByAccount:根据登录账号获取当前已经登录的Session会话Map集合
- destroySession:根据登录账号销毁当前所有该账号的Session会话信息,此接口和产品经理要求的踢人下线操作一致
接下来就是实现类,由于我们是基于Redis来处理,因此,我们需要将源码分析中的RedisIndexedSessionRepository实体Bean进行引入,借助该类实现该接口方法
RedisSessionService方法实现如下:
/**

 * SpringSession集成底层Redis实现,如果底层分布式会话保持方式不是基于Redis,则该类无法正常使用

 * @author <a href="mailto:xiaoymin@foxmail.com">xiaoymin@foxmail.com</a>

 * 2021/04/20 16:23

 * @since:fish 1.0

 */

public class RedisSessionService implements SessionService {

    Logger logger= LoggerFactory.getLogger(RedisSessionService.class);

    final RedisIndexedSessionRepository redisIndexedSessionRepository;

    final ApplicationEventPublisher applicationEventPublisher;

    public RedisSessionService(RedisIndexedSessionRepository redisIndexedSessionRepository, ApplicationEventPublisher applicationEventPublisher) {

        this.redisIndexedSessionRepository = redisIndexedSessionRepository;

        this.applicationEventPublisher = applicationEventPublisher;

    }

    @Override

    public boolean hasLogin(String account) {

        return CollectionUtil.isNotEmpty(loadByAccount(account));

    }

    @Override

    public Map<String, ? extends Session> loadByAccount(String account) {

        logger.info("收集当前登录会话session,账号:{}",account);

        return redisIndexedSessionRepository.findByIndexNameAndIndexValue(FindByIndexNameSessionRepository.PRINCIPAL_NAME_INDEX_NAME,account);

    }

    @Override

    public void destroySession(String account) {

        logger.info("销毁当前登录session会话,账号:{}",account);

        Map<String,? extends Session> sessionMap=loadByAccount(account);

        if (CollectionUtil.isNotEmpty(sessionMap)){

            logger.info("当前登录会话size:{}",sessionMap.size());

            for (Map.Entry<String,? extends Session> sessionEntry:sessionMap.entrySet()){

                String key=sessionEntry.getKey();

                Session session=sessionEntry.getValue();

                logger.info("destroy session key:{}",key);

                //删除

                redisIndexedSessionRepository.deleteById(session.getId());

                //广播Session会话销毁事件

                applicationEventPublisher.publishEvent(new SessionDestroyedEvent(redisIndexedSessionRepository,session));

            }

        }

    }

}
在destroySession方法实现中,首先根据账号获取当前所有登录会话信息,如果会话不为空,则遍历会话Map集合,执行删除会话操作,并且通过applicationEventPublisher广播一个会话被销毁的事件。该广播事件非必须,但是从代码的全局进行考虑,还是需要加上
接下来,我们就可以将该类注入到Spring的容器中的,注入实体Bean代码如下:
@Bean

public RedisSessionService sessionService(RedisIndexedSessionRepository redisIndexedSessionRepository, ApplicationEventPublisher applicationEventPublisher){

    return new RedisSessionService(redisIndexedSessionRepository,applicationEventPublisher);

}
PS:我们为什么需要创建接口而不是直接创建class的方式通过
@Service等注解进行注入,而是通过抽象接口实现类的方式,最终通过JavaConfig的方式进行注入呢?从代码的耦合度上来看,由于Spring Session提供处理基于Redis的能力处理Session会话之外,还提供了诸如JDBC\mongo等多元化的扩展方式,因此,为了代码解耦,通过抽象接口的方式是更合理的。
接下来,我们在我们的用户管理的业务Service方法中就可以进行操作了
删除用户的业务Service方法
/**

* 根据主键id删除用户管理

* @param id 主键id

* @return 是否删除成功

*/

@Override

public RestfulMessage<String> delete(Integer id) {

    logger.info("根据主键id删除用户管理,id:{}",id);

    FishUserInfo fishUserInfo=fishUserInfoMapper.selectByPrimaryKey(id);

    assertArgumentNotEmpty(fishUserInfo,"请求数据非法");

    int ret=fishUserInfoMapper.deleteByPrimaryKey(id);

    //删除成功,如果该角色在线,则强制剔除下线

    if (ret>0){

        logger.info("用户会话剔除下线");

        sessionService.destroySession(fishUserInfo.getAccount());

    }

    return ret>0?RestfulMessage.success("删除成功"):RestfulMessage.error("删除失败");

}
禁用用户
禁用用户其实操作方法和删除一样,区别在于禁用操作只是将用户在数据库中的状态进行变更,而删除则是将该用户的数据从数据库DB中进行删除。更新库的用户状态后,调用destroySession删除该账号的所有Session会话操作即可
Spring Security框架中踢人下线技术探索的更多相关文章
- Spring Security框架进阶、自定义登录
1.Spring Security框架进阶 1.1 Spring Security简介 Spring Security是一个能够为基于Spring的企业应用系统提供声明式的安全访问控制解决方案的安 ...
- Spring Security框架入门
1.Spring Security框架入门 1.1 Spring Security简介 Spring Security是一个能够为基于Spring的企业应用系统提供声明式的安全访问控制解决方案的安全框 ...
- spring security 3中的10个典型用法小结
spring security 3比较庞大,但功能很强,下面小结下spring security 3中值得 注意的10个典型用法 1)多个authentication-provide可以同时使用 &l ...
- Spring Security 5中的默认密码编码器
1.概述 在Spring Security 4中,可以使用内存中身份验证以纯文本格式存储密码. 对版本5中的密码管理过程进行了重大改进,为密码编码和解码引入了更安全的默认机制.这意味着如果您的Spri ...
- Spring Security框架下实现两周内自动登录"记住我"功能
本文是Spring Security系列中的一篇.在上一篇文章中,我们通过实现UserDetailsService和UserDetails接口,实现了动态的从数据库加载用户.角色.权限相关信息,从而实 ...
- Spring Security 5中 PasswordEncoder的使用
在最新的 Spring Security 5发布版本中, 出于安全性的考虑调整了PasswordEncoder的实现与使用策略. 1.以前常用的实现 StandardPasswordEncoder, ...
- 一文搞懂Java/Spring/Dubbo框架中的SPI机制
几天前和一位前辈聊起了Spring技术,大佬突然说了SPI,作为一个熟练使用Spring的民工,心中一紧,咱也不敢说不懂,而是在聊完之后赶紧打开了浏览器,开始的学习之路,所以也就有了这篇文章.废话不多 ...
- Spring+MyBatis框架中sql语句的书写,数据集的传递以及多表关联查询
在很多Java EE项目中,Spring+MyBatis框架经常被用到,项目搭建在这里不再赘述,现在要将的是如何在项目中书写,增删改查的语句,如何操作数据库,以及后台如何获取数据,如何进行关联查询,以 ...
- Spring Security框架下Restful Token的验证方案
项目使用Restful的规范,权限内容的访问,考虑使用Token验证的权限解决方案. 验证方案(简要概括): 首先,用户需要登陆,成功登陆后返回一个Token串: 然后用户访问有权限的内容时需要上传T ...
随机推荐
- Python3.x 基础练习题100例(01-10)
练习01: 题目: 有四个数字:1.2.3.4,能组成多少个互不相同且无重复数字的三位数?各是多少? 分析: 可填在百位.十位.个位的数字都是1.2.3.4.组成所有的排列后再去 掉不满足条件的排列. ...
- C++核心篇
C++核心编程 本阶段主要针对C++面向对象编程技术做详细讲解,探讨C++中的核心和精髓. 1 内存分区模型 C++程序在执行时,将内存大方向划分为4个区域 代码区:存放函数体的二进制代码,由操作系统 ...
- spring boot自定义类配置绑定在配置文件中自动提示
在spring boot的日常使用中,我们可能需要使用配置绑定的方式动态配置自定义类的成员变量. 这个时候,我们在配置文件中配置spring默认已有的配置时,只需要输入部分关键字即可自动提示,如下图: ...
- Python学习笔记 CH1-4:从入门到列表
Python CH1 环境准备 因为已经有了C/C++.Java的基础,所以上手很快. 参考书:Eric Matthes -<Python编程 从入门到实践> 环境准备:python3.P ...
- Kilo 使用教程
写了这么多篇 WireGuard 相关的保姆教程,今天终于牵扯到 Kubernetes 了,不然怎么对得起"云原生"这三个字.如果看到这篇文章的你仍然是个 WireGuard 新手 ...
- CF995E Number Clicker (双向BFS)
题目链接(洛谷) 题目大意 给定两个数 \(u\) , \(v\) .有三种操作: \(u=u+1(mod\) \(p)\) . \(u=u+p−1(mod\) \(p)\) . \(u=u^{p−2 ...
- idea配置struts2.5环境
struts2不是struts1的下一代产品,是在struts1和WebWork技术的基础上进行合并后的全新框架,虽然两个名字相似,但是设计思想却有很大的不同. 使用本地的l ib 或者downloa ...
- 你想知道的 std::vector::push_back 和 std::vector::emplace_back
引言 C++ 11 后,标准库容器 std::vector 包含了成员函数 emplace 和 emplace_back.emplace 在容器指定位置插入元素,emplace_back 在容器末尾添 ...
- weblogic之cve-2015-4852分析(重写)
前言 有时间打算分析weblogic历史漏洞,但是又要面试啥的,没空.又刚好最近面试会问weblogic反序列化.具体啥时候分析weblogic反序列化,可能会在护网后,或者我开学了再分析.期间可能我 ...
- Codeforces Round #574 (Div. 2) D1. Submarine in the Rybinsk Sea (easy edition) 【计算贡献】
一.题目 D1. Submarine in the Rybinsk Sea (easy edition) 二.分析 简单版本的话,因为给定的a的长度都是定的,那么我们就无需去考虑其他的,只用计算ai的 ...