springboot mvc自动配置(三)初始化mvc的组件
所有文章
https://www.cnblogs.com/lay2017/p/11775787.html
正文
在springboot mvc自动配置的时候,获得了DispatcherServlet和DispatcherServletRegistrationBean。DispatcherServletRegistrationBean将DispatcherServlet给注册到了ServletContext当中。
注册到ServletContext中的Servlet将会触发其init方法,从而进行Servlet的初始化。本文将从Servlet的init方法开始,看看触发MVC各个组件初始化的代码
DispatcherServlet类图
我们先看看DispatcherServlet的类图
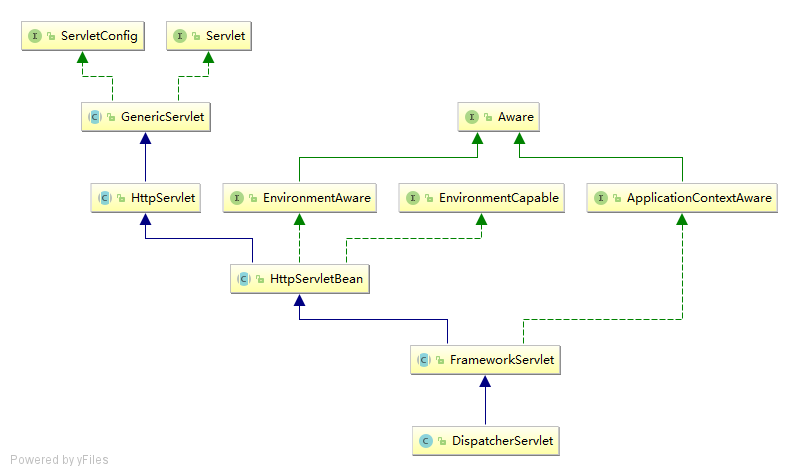
根据类图可以看到两部分的设计,第一部分是Servlet到HttpServlet,也就是Servlet容器相关的内部设计。第二部分是Spring在HttpServlet的基础上扩展了框架相关的内容,而最终DispatcherServlet将扩展springMVC的内容。
GenericServlet
我们跟进GenericServlet的init方法,看看它的实现
@Override

public void init(ServletConfig config) throws ServletException {

    this.config = config;

    this.init();

}
继续跟进init方法
public void init() throws ServletException {

    // NOOP by default

}
没有实现逻辑,供子类去选择实现
HttpServletBean
httpServlet么有实现init方法,由HttpServletBean这个spring实现的类来扩展。跟进HttpServletBean的init方法
@Override

public final void init() throws ServletException {

    // Set bean properties from init parameters.

    PropertyValues pvs = new ServletConfigPropertyValues(getServletConfig(), this.requiredProperties);

    if (!pvs.isEmpty()) {

        try {

            BeanWrapper bw = PropertyAccessorFactory.forBeanPropertyAccess(this);

            ResourceLoader resourceLoader = new ServletContextResourceLoader(getServletContext());

            bw.registerCustomEditor(Resource.class, new ResourceEditor(resourceLoader, getEnvironment()));

            initBeanWrapper(bw);

            bw.setPropertyValues(pvs, true);

        }

        catch (BeansException ex) {

            if (logger.isErrorEnabled()) {

                logger.error("Failed to set bean properties on servlet '" + getServletName() + "'", ex);

            }

            throw ex;

        }

    }

    // Let subclasses do whatever initialization they like.

    initServletBean();

}
HttpServletBean也是扩展了一个initServletBean接口来供子类实现
FrameworkServlet
跟进FrameworkServlet的initServletBean的方法
@Override

protected final void initServletBean() throws ServletException {

    getServletContext().log("Initializing Spring " + getClass().getSimpleName() + " '" + getServletName() + "'");

    if (logger.isInfoEnabled()) {

        logger.info("Initializing Servlet '" + getServletName() + "'");

    }

    long startTime = System.currentTimeMillis();

    try {

        this.webApplicationContext = initWebApplicationContext();

        initFrameworkServlet();

    }

    catch (ServletException | RuntimeException ex) {

        logger.error("Context initialization failed", ex);

        throw ex;

    }

    // ...

}
initFrameworkServlet是一个空实现,核心逻辑落到了initWebApplicationContext中,跟进它
protected WebApplicationContext initWebApplicationContext() {

    WebApplicationContext rootContext = WebApplicationContextUtils.getWebApplicationContext(getServletContext());

    WebApplicationContext wac = null;

    if (this.webApplicationContext != null) {

        //...

    }

    if (wac == null) {

        wac = findWebApplicationContext();

    }

    if (wac == null) {

        wac = createWebApplicationContext(rootContext);

    }

    if (!this.refreshEventReceived) {

        synchronized (this.onRefreshMonitor) {

            onRefresh(wac);

        }

    }

    if (this.publishContext) {

        String attrName = getServletContextAttributeName();

        getServletContext().setAttribute(attrName, wac);

    }

    return wac;

}
Springboot在启动过程中创建了ApplicationContext,这里将公用同一个ApplicationContext。
onRefresh方法提供了一个空实现,供子类去做初始化实现
protected void onRefresh(ApplicationContext context) {

    // For subclasses: do nothing by default.

}
DispatcherServlet
跟进DispatcherServlet的onRefresh方法
@Override

protected void onRefresh(ApplicationContext context) {

    initStrategies(context);

}
继续跟进initStrategies
protected void initStrategies(ApplicationContext context) {

    initMultipartResolver(context);

    initLocaleResolver(context);

    initThemeResolver(context);

    initHandlerMappings(context);

    initHandlerAdapters(context);

    initHandlerExceptionResolvers(context);

    initRequestToViewNameTranslator(context);

    initViewResolvers(context);

    initFlashMapManager(context);

}
我们看到,initStrategies包含了各种MVC组件的初始化方法
组件初始化
我们打开initMultipartResolver看看
private void initMultipartResolver(ApplicationContext context) {

    try {

        this.multipartResolver = context.getBean(MULTIPART_RESOLVER_BEAN_NAME, MultipartResolver.class);

        // ...

    catch (NoSuchBeanDefinitionException ex) {

        // Default is no multipart resolver.

        this.multipartResolver = null;

        // ...

    }

}
其实就是从Bean工厂当中获取对应的Bean对象。multipartResolver默认可能为空
再打开initViewResolvers看看
private void initViewResolvers(ApplicationContext context) {

    this.viewResolvers = null;

    if (this.detectAllViewResolvers) {

        Map<String, ViewResolver> matchingBeans = BeanFactoryUtils.beansOfTypeIncludingAncestors(context, ViewResolver.class, true, false);

        if (!matchingBeans.isEmpty()) {

            this.viewResolvers = new ArrayList<>(matchingBeans.values());

            AnnotationAwareOrderComparator.sort(this.viewResolvers);

        }

    } else {

        try {

            ViewResolver vr = context.getBean(VIEW_RESOLVER_BEAN_NAME, ViewResolver.class);

            this.viewResolvers = Collections.singletonList(vr);

        }

        catch (NoSuchBeanDefinitionException ex) {

            // Ignore, we'll add a default ViewResolver later.

        }

    }

    if (this.viewResolvers == null) {

        this.viewResolvers = getDefaultStrategies(context, ViewResolver.class);

    }

}
一样的是从Bean工厂当中获取Bean,只不过这里是获取到一个集合,且如果没有将会获取默认的策略。
其它的MVC组件初始化类似,这里不每个打开看了。
总结
DispatcherServlet作为一个Servlet的实现,在Servlet被调用init方法以后最终将会调用DispatcherServlet的initStrategies方法,该方法将会初始化各个组件。
初始化组件基本就是把各个Bean对象从BeanFactory中拿出来组合到DispatcherServlet中,供后续使用。
springboot mvc自动配置(三)初始化mvc的组件的更多相关文章
- springboot mvc自动配置(目录)
对于长时间基于spring框架做web开发的我们,springmvc几乎成为了开发普通web项目的标配.本系列文章基于快速启动的springboot,将从源码角度一点点了解springboot中mvc ...
- 全网最深分析SpringBoot MVC自动配置失效的原因
前言 本来没有计划这一篇文章的,只是在看完SpringBoot核心原理后,突然想到之前开发中遇到的MVC自动失效的问题,虽然网上有很多文章以及官方文档都说明了原因,但还是想亲自看一看,本以为很简单的事 ...
- springboot mvc自动配置(一)自动配置DispatcherServlet和DispatcherServletRegistry
所有文章 https://www.cnblogs.com/lay2017/p/11775787.html 正文 springboot的自动配置基于SPI机制,实现自动配置的核心要点就是添加一个自动配置 ...
- Springboot MVC 自动配置
Springboot MVC 自动配置 官方文档阅读 https://docs.spring.io/spring-boot/docs/current/reference/html/web.html#w ...
- spring-boot spring-MVC自动配置
Spring MVC auto-configuration Spring Boot 自动配置好了SpringMVC 以下是SpringBoot对SpringMVC的默认配置:==(WebMvcAuto ...
- 关于SpringBoot的自动配置和启动过程
一.简介 Spring Boot简化了Spring应用的开发,采用约定大于配置的思想,去繁从简,很方便就能构建一个独立的.产品级别的应用. 1.传统J2EE开发的缺点 开发笨重.配置繁多复杂.开发效率 ...
- 面试题: SpringBoot 的自动配置原理
个人博客网:https://wushaopei.github.io/ (你想要这里多有) 3.Spring Boot 的自动配置原理 package com.mmall; import org. ...
- SpringBoot的自动配置
1.根据条件来装配bean,SpringBoot的自动配置,根据条件进行自动配置. 首先创建一个接口,如下所示: package com.bie.encoding; /** * * @Descript ...
- springboot(六)自动配置原理和@Conditional
官方参考的配置属性:https://docs.spring.io/spring-boot/docs/current-SNAPSHOT/reference/htmlsingle/#common-appl ...
随机推荐
- 分析CSS布局神器
只要在页面下加入如下css,整个css布局就清晰了 * { background-color: rgba(255,0,0,.2); } * * { background-color: rgba(0,2 ...
- ISO/IEC 9899:2011 条款6.2.2——标识符的连接
6.2.2 标识符的连接 1.在不同作用域中声明的一个标识符或在同一作用域多次出现的一个标识符可以被用作对同一个对象或函数的引用,通过一个称为连接的过程.[注:在两个不同的标识符之间没有连接.]有三种 ...
- React调试——visual studio code
原文链接:Using React in Visual Studio Code 原文链接:Live edit and debug your React apps directly from VS Cod ...
- ElasticSearch——Curator索引管理
简介 curator 是一个官方的,可以管理elasticsearch索引的工具,可以实现创建,删除,段合并等等操作.详见官方文档 功能 curator允许对索引和快照执行许多不同的操作,包括: 从别 ...
- MySQL5.7查看数据存储位置
在MySQL客户端执行如下命令查看MySQL的数据存放位置: mysql> show global variables like "%datadir%"; +-------- ...
- CentOS 7中安装和配置Promethues
Prometheus 是什么? Prometheus是一套开源的监控&报警&时间序列数据库的组合,起始是由SoundCloud公司开发的.随着发展,越来越多公司和组织接受采用Prome ...
- .Net Core 请求上下文IHttpContextAccessor
namespace Microsoft.AspNetCore.Http { public interface IHttpContextAccessor { HttpContext HttpContex ...
- python 字体染色
字体染色 <font face="黑体">我是黑体字</font> <font face="微软雅黑">我是微软雅黑< ...
- electron node.js 实现文件拖动读取文件
css/styles.css .for_file_drop { width: 100%; height: 100px; background-color: blueviolet; } index.ht ...
- Linux利器之perf(火焰图)
1 Ubuntu下安装perf 在Ubuntu18上默认没有安装perf,可以通过如下命令尝试:sudo apt-get install linux-tools 结果出来以下内容: Reading p ...