Tkinter 之CheckButton复选框标签
一、参数说明
| 语法 | 作用 |
|---|---|
| Checkbutton(root,text='xxxx') | 复选框显示的文本 |
| Checkbutton(root,variable=id) | 通过变量的值确定哪些复选框被选中 |
| Checkbutton(root,variable=id,onvalue=1) | 复选框选中(有效)时变量的值 |
| Checkbutton(root,variable=id,onvalue=1,offvalue=0) | 复选框未选中(无效)时变量的值 |
| Checkbutton(root,variable=id,onvalue=1,offvalue=0,command=函数) | 复选框选中时执行的命令(函数) |
二、代码示例
import tkinter as tk window = tk.Tk() def main():
global window
window.title("CheckButton参数说明")
winWidth = 600
winHeight = 400
# 获取屏幕宽高
screenWidth = window.winfo_screenwidth()
screenHeight = window.winfo_screenheight() x = int((screenWidth - winWidth) / 2)
y = int((screenHeight - winHeight) / 2)
# 设置窗口居中
window.geometry("%sx%s+%s+%s" % (winWidth, winHeight, x, y))
window.iconbitmap("./image/icon.ico") """checkbutton参数. Valid resource names: activebackground, activeforeground, anchor,
background, bd, bg, bitmap, borderwidth, command, cursor,
disabledforeground, fg, font, foreground, height,
highlightbackground, highlightcolor, highlightthickness, image,
indicatoron, justify, offvalue, onvalue, padx, pady, relief,
selectcolor, selectimage, state, takefocus, text, textvariable,
underline, variable, width, wraplength."""
var1 = tk.IntVar()
var2 = tk.IntVar()
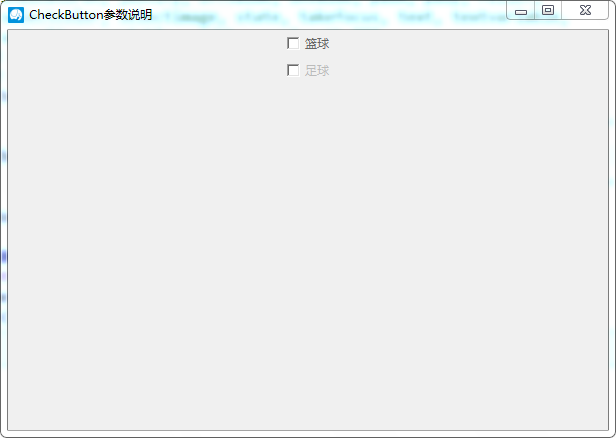
tk.Checkbutton(window, text="篮球", onvalue=1, offvalue=0,
variable=var1, command=callBack, activebackground="#f00",
foreground="#666").pack()
tk.Checkbutton(window, text="足球", onvalue=1, offvalue=0,
variable=var2, command=callBack, activebackground="#f00",
foreground="#bbb").pack()
window.mainloop() def callBack():
print(1)
if __name__ == '__main__':
main()
三、效果图
Tkinter 之CheckButton复选框标签的更多相关文章
- tkinter中checkbutton多选框控件和variable用法(六)
checkbutton控件 简单的实现多选: import tkinter wuya = tkinter.Tk() wuya.title("wuya") wuya.geometry ...
- 复选框input:checkbox
复选框 CreateTime--2017年6月5日14:04:55Author:Marydon 五.复选框 (一)语法 <input type="checkbox" /& ...
- python之tkinter使用-复选框操作
# tkinter复选框操作 import tkinter as tk root = tk.Tk() root.title('问卷调查') root.geometry('220x80') # 设置窗口 ...
- js之全选即点击全选标签可选择全部复选框
目标效果:网页全选功能,即点击全选标签可选择全部复选框 实现代码如下 <!DOCTYPE html> <html lang="en"> <head&g ...
- JAVA个人小程序GUI篇-收银(标签、按钮、复选框、下拉标、文本域、表格······)
如果用eclipse需先装载windowsbuild //导入包 import java.awt.BorderLayout; import java.awt.EventQueue; import ja ...
- spring mvc:常用标签库(文本框,密码框,文本域,复选框,单选按钮,下拉框隐藏于,上传文件等)
在jsp页面需要引入:<%@taglib uri="http://www.springframework.org/tags/form" prefix="form&q ...
- Spring MVC-表单(Form)标签-复选框集合(Checkboxes)示例(转载实践)
以下内容翻译自:https://www.tutorialspoint.com/springmvc/springmvc_checkboxes.htm 说明:示例基于Spring MVC 4.1.6. 以 ...
- Spring MVC-表单(Form)标签-复选框(Checkbox)示例(转载实践)
以下内容翻译自:https://www.tutorialspoint.com/springmvc/springmvc_checkbox.htm 说明:示例基于Spring MVC 4.1.6. 以下示 ...
- input check复选框选择后修改<a>标签超链接href
1. 给复选框添加onclick事件 获取标签id <tbody> <c:forEach var="file" items="${files}" ...
随机推荐
- Springboot笔记01——Springboot简介
一.什么是微服务 在了解Springboot之前,首先我们需要了解一下什么是微服务. 微服务是一种架构风格(服务微化),是martin fowler在2014年提出来的.微服务简单地说就是:一个应用应 ...
- MySQL 启动、登录、退出和目录结构
一.启动 MySQL 服务器启动方式有两种: (1)通过服务的方式自动启动 (2)手动启动的方式 1.windows 服务方式启动 操作步骤: 也可以在 cmd 窗口 输入 services.msc ...
- bootstrap 模态窗口 多重/多个弹窗滚动条补丁
由于bootstrap的模态窗口默认不支持多次弹出, 在关闭的时候会有滚动条消失的问题. 经过观察和查看源码, 发现在开启和关闭的时候会在body上增加/减少一个"modal-open&qu ...
- conda升级TensorFlow
1.打开Anaconda prompt,查看tensorflow各个版本 anaconda search -t conda tensorflow 2.选择自己系统的版本:运行以下命令 anaconda ...
- Vue指令之`v-for`和`key`属性
2.2.0+ 的版本里,**当在组件中使用** v-for 时,key 现在是必须的. 当 Vue.js 用 v-for 正在更新已渲染过的元素列表时,它默认用 “**就地复用**” 策略.如果数据项 ...
- Computer Vision_33_SIFT:A novel coarse-to-fine scheme for automatic image registration based on SIFT and mutual information——2014
此部分是计算机视觉部分,主要侧重在底层特征提取,视频分析,跟踪,目标检测和识别方面等方面.对于自己不太熟悉的领域比如摄像机标定和立体视觉,仅仅列出上google上引用次数比较多的文献.有一些刚刚出版的 ...
- linux安装zookeeper,安装zkui,zookeeper可视化
系统要求 支持的平台 ZooKeeper由多个组件组成.某些组件得到广泛支持,其他组件仅在较小的平台上受支持. 客户端是Java客户端库,应用程序使用它连接到ZooKeeper集合. Server是在 ...
- DNS服务——正向查找区 和 逆向查找区
前言 正向查找区,就是我们最熟知的DNS.即根据域名解析成IP 逆向查找区,即根据IP解析成域名. 他们之间的关系很像ARP和RARP 正向查找区 /etc/named.rfc1912.zones用于 ...
- 基于Keras实现mnist-官方例子理解
前言 久闻keras大名,最近正好实训,借着这个机会好好学一下. 首先推荐一个API,可能稍微有点旧,但是写的是真的好 https://keras-cn.readthedocs.io/en/lates ...
- SQL Server 2005的几个新功能
SQL Server 2005相对于SQL Server 2000改进很大,有些还是非常实用的. 举几个例子来简单说明 这些例子我引用了Northwind库. 1. TOP 表达式 SQL Serv ...