[深度学习] tf.keras入门2-分类
目录
主要介绍基于tf.keras的Fashion MNIST数据库分类,
官方文档地址为:https://tensorflow.google.cn/tutorials/keras/basic_classification
文本分类类似,官网文档地址为https://tensorflow.google.cn/tutorials/keras/basic_text_classification
首先是函数的调用,对于tensorflow只有在版本1.2以上的版本才有tf.keras库。另外推荐使用python3,而不是python2。
# TensorFlow and tf.keras

import tensorflow as tf

from tensorflow import keras

# 其他库

import numpy as np

import matplotlib.pyplot as plt

#查看版本

print(tf.__version__)

#1.9.0
Fashion MNIST数据库
fashion mnist数据库是mnist数据库的一个拓展。目的是取代mnist数据库,类似MINST数据库,fashion mnist数据库为训练集60000张,测试集10000张的28X28大小的服装彩色图片。具体分类如下:
| 标注编号 | 描述 |
|---|---|
| 0 | T-shirt/top(T恤) |
| 1 | Trouser(裤子) |
| 2 | Pullover(套衫) |
| 3 | Dress(裙子) |
| 4 | Coat(外套) |
| 5 | Sandal(凉鞋) |
| 6 | Shirt(汗衫) |
| 7 | Sneaker(运动鞋) |
| 8 | Bag(包) |
| 9 | Ankle boot(踝靴) |
样本描述如下:
| 名称 | 描述 | 样本数量 | 文件大小 | 链接 |
|---|---|---|---|---|
train-images-idx3-ubyte.gz |
训练集的图像 | 60,000 | 26 MBytes | 下载 |
train-labels-idx1-ubyte.gz |
训练集的类别标签 | 60,000 | 29 KBytes | 下载 |
t10k-images-idx3-ubyte.gz |
测试集的图像 | 10,000 | 4.3 MBytes | 下载 |
t10k-labels-idx1-ubyte.gz |
测试集的类别标签 | 10,000 | 5.1 KBytes | 下载 |
单张图像展示代码:
#分类标签

class_names = ['T-shirt/top', 'Trouser', 'Pullover', 'Dress', 'Coat',

               'Sandal', 'Shirt', 'Sneaker', 'Bag', 'Ankle boot']

#单张图像展示,推荐使用python3

plt.figure()

plt.imshow(train_images[0])

#添加颜色渐变条

plt.colorbar()

#不显示网格线

plt.gca().grid(False)
效果图:

样本的展示代码:
#图像预处理

train_images = train_images / 255.0

test_images = test_images / 255.0

#样本展示

plt.figure(figsize=(10,10))

for i in range(25):

    plt.subplot(5,5,i+1)

    plt.xticks([])

    plt.yticks([])

    plt.grid('off')

    plt.imshow(train_images[i], cmap=plt.cm.binary)

    plt.xlabel(class_names[train_labels[i]])
效果图:

分类模型的建立
检测模型输入数据为28X28,1个隐藏层节点数为128,输出类别10类,代码如下:
#检测模型

model = keras.Sequential([

    keras.layers.Flatten(input_shape=(28, 28)),

    keras.layers.Dense(128, activation=tf.nn.relu),

    keras.layers.Dense(10, activation=tf.nn.softmax)

])
模型训练参数设置:
model.compile(optimizer=tf.train.AdamOptimizer(),

          loss='sparse_categorical_crossentropy', #多分类的对数损失函数

          metrics=['accuracy']) #准确度
模型的训练:
model.fit(train_images, train_labels, epochs=5)模型预测
预测函数:
predictions = model.predict(test_images)分类器是softmax分类器,输出的结果一个predictions是一个长度为10的数组,数组中每一个数字的值表示其所对应分类的概率值。如下所示:
predictions[0]

array([2.1840347e-07, 1.9169457e-09, 4.5915922e-08, 5.3185740e-08,

       6.6372898e-08, 2.6090498e-04, 6.5197796e-06, 4.7861701e-03,

       2.9425648e-06, 9.9494308e-01], dtype=float32)
对于predictions[0]其中第10个值最大,则该值对应的分类为class[9]ankle boot。
np.argmax(predictions[0]) #9

test_labels[0] #9
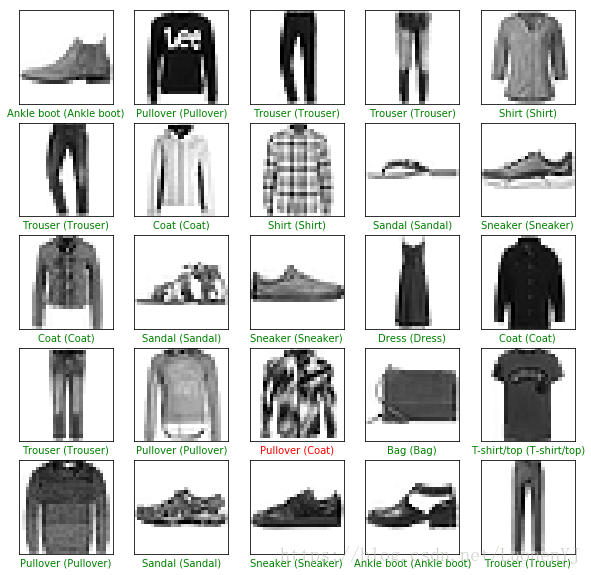
前25张图的分类效果展示:
#前25张图分类效果

plt.figure(figsize=(10,10))

for i in range(25):

    plt.subplot(5,5,i+1)

    plt.xticks([])

    plt.yticks([])

    plt.grid('off')

    plt.imshow(test_images[i], cmap=plt.cm.binary)

    predicted_label = np.argmax(predictions[i])

    true_label = test_labels[i]

    if predicted_label == true_label:

      color = 'green'

    else:

      color = 'red'

    plt.xlabel("{} ({})".format(class_names[predicted_label],

                                  class_names[true_label]),

                                  color=color)
效果图,绿色标签表示分类正确,红色标签表示分类错误:
对于单个图像的预测,需要将图像28X28的输入转换为1X28X28的输入,转换函数为np.expand_dims。函数使用如下:https://www.zhihu.com/question/265545749
#格式转换

img = (np.expand_dims(img,0))

print(img.shape) #1X28X28

predictions = model.predict(img)

prediction = predictions[0]

np.argmax(prediction) #9
总体代码
# TensorFlow and tf.keras

import tensorflow as tf

from tensorflow import keras

# 其他库

import numpy as np

import matplotlib.pyplot as plt

#查看版本

print(tf.__version__)

#1.9.0

fashion_mnist = keras.datasets.fashion_mnist

(train_images, train_labels), (test_images, test_labels) = fashion_mnist.load_data()

#分类标签

class_names = ['T-shirt/top', 'Trouser', 'Pullover', 'Dress', 'Coat',

               'Sandal', 'Shirt', 'Sneaker', 'Bag', 'Ankle boot']

#单张图像展示,推荐使用python3

plt.figure()

plt.imshow(train_images[0])

#添加颜色渐变条

plt.colorbar()

#不显示网格线

plt.gca().grid(False)

#图像预处理

train_images = train_images / 255.0

test_images = test_images / 255.0

#样本展示

plt.figure(figsize=(10,10))

for i in range(25):

    plt.subplot(5,5,i+1)

    plt.xticks([])

    plt.yticks([])

    plt.grid('off')

    plt.imshow(train_images[i], cmap=plt.cm.binary)

    plt.xlabel(class_names[train_labels[i]])

#检测模型

model = keras.Sequential([

    keras.layers.Flatten(input_shape=(28, 28)),

    keras.layers.Dense(128, activation=tf.nn.relu),

    keras.layers.Dense(10, activation=tf.nn.softmax)

])

model.compile(optimizer=tf.train.AdamOptimizer(),

          loss='sparse_categorical_crossentropy', #多分类的对数损失函数

          metrics=['accuracy']) #准确度

model.fit(train_images, train_labels, epochs=5)

predictions = model.predict(test_images)

#前25张图分类效果

plt.figure(figsize=(10,10))

for i in range(25):

    plt.subplot(5,5,i+1)

    plt.xticks([])

    plt.yticks([])

    plt.grid('off')

    plt.imshow(test_images[i], cmap=plt.cm.binary)

    predicted_label = np.argmax(predictions[i])

    true_label = test_labels[i]

    if predicted_label == true_label:

      color = 'green'

    else:

      color = 'red'

    plt.xlabel("{} ({})".format(class_names[predicted_label],

                                  class_names[true_label]),

                                  color=color)

#单个图像检测

img = test_images[0]

print(img.shape) #28X28

#格式转换

img = (np.expand_dims(img,0))

print(img.shape) #1X28X28

predictions = model.predict(img)

prediction = predictions[0]

np.argmax(prediction) #9
[深度学习] tf.keras入门2-分类的更多相关文章
- [深度学习] tf.keras入门1-基本函数介绍
目录 构建一个简单的模型 序贯(Sequential)模型 网络层的构造 模型训练和参数评价 模型训练 模型的训练 tf.data的数据集 模型评估和预测 基本模型的建立 网络层模型 模型子类函数构建 ...
- [深度学习] tf.keras入门4-过拟合和欠拟合
过拟合和欠拟合 简单来说过拟合就是模型训练集精度高,测试集训练精度低:欠拟合则是模型训练集和测试集训练精度都低. 官方文档地址为 https://tensorflow.google.cn/tutori ...
- [深度学习] tf.keras入门5-模型保存和载入
目录 设置 基于checkpoints的模型保存 通过ModelCheckpoint模块来自动保存数据 手动保存权重 整个模型保存 总体代码 模型可以在训练中或者训练完成后保存.具体文档参考:http ...
- [深度学习] tf.keras入门3-回归
目录 波士顿房价数据集 数据集 数据归一化 模型训练和预测 模型建立和训练 模型预测 总结 回归主要基于波士顿房价数据库进行建模,官方文档地址为:https://tensorflow.google.c ...
- 深度学习:Keras入门(一)之基础篇
1.关于Keras 1)简介 Keras是由纯python编写的基于theano/tensorflow的深度学习框架. Keras是一个高层神经网络API,支持快速实验,能够把你的idea迅速转换为结 ...
- 深度学习:Keras入门(一)之基础篇【转】
本文转载自:http://www.cnblogs.com/lc1217/p/7132364.html 1.关于Keras 1)简介 Keras是由纯python编写的基于theano/tensorfl ...
- 深度学习:Keras入门(一)之基础篇(转)
转自http://www.cnblogs.com/lc1217/p/7132364.html 1.关于Keras 1)简介 Keras是由纯python编写的基于theano/tensorflow的深 ...
- 深度学习:Keras入门(二)之卷积神经网络(CNN)
说明:这篇文章需要有一些相关的基础知识,否则看起来可能比较吃力. 1.卷积与神经元 1.1 什么是卷积? 简单来说,卷积(或内积)就是一种先把对应位置相乘然后再把结果相加的运算.(具体含义或者数学公式 ...
- 深度学习:Keras入门(二)之卷积神经网络(CNN)【转】
本文转载自:https://www.cnblogs.com/lc1217/p/7324935.html 说明:这篇文章需要有一些相关的基础知识,否则看起来可能比较吃力. 1.卷积与神经元 1.1 什么 ...
随机推荐
- GMOJ5673 爬山法 题解
Solution 显然先想到处理出每个点能看到的最高的顶点. 然后考虑模拟题目的过程,一段一段走时间复杂度显然不够优秀. 考虑我们要求什么,我们需要求出\(u\)到\(v\)的最近的一个点,使得这个点 ...
- Linux、Windows下Redis的安装即Redis的基本使用详解
前言 什么是Redis Redis是一个基于内存的key-value结构数据库.Redis 是互联网技术领域使用最为广泛的存储中间件,它是「Remote Dictionary Service」的首字母 ...
- 记一次 .NET 某娱乐聊天流平台 CPU 爆高分析
一:背景 1.讲故事 前段时间有位朋友加微信,说他的程序直接 CPU=100%,每次只能手工介入重启,让我帮忙看下到底怎么回事,哈哈,这种CPU打满的事故,程序员压力会非常大, 我让朋友在 CPU 高 ...
- JS逆向实战8——某网实战(基于golang-colly)
其实本章算不上逆向教程 只是介绍golang的colly框架而已 列表页分析 根据关键字搜索 通过抓包分析可知 下一页所请求的参数如下 上图标红的代表所需参数 所以其实我们真正需要的也就是Search ...
- 系统整理K8S的配置管理实战-建议收藏系列
目录 一.ConfigMap 1.1.创建 1.1.1.from-file 1.1.2.from-env-file 1.1.3.from-literal 1.1.4.基于yaml文件创建 1.2.Po ...
- java学习之spring基础
0x00前言 spring框架应用的是ioc模式,ioc模式是指控制反转模式,本质是你不去创建对象让spring框架给你创建对象你去使用对象.多种开发模式通过配置文件和注解的方式去开发的都很值得去学习 ...
- C#使用附加到进程调试
微软官网的调试进程介绍 首先运行bin下的可执行文件,然后打开源代码,选择调试--->附加到进程.
- 2022春每日一题:Day 12
题目:[SDOI2006]线性方程组 显然,高斯消元模板题 代码: #include <cstdio> #include <cstdlib> #include <cstr ...
- [排序算法] 归并排序 (C++)
归并排序解释 归并排序 Merge Sort 是典型的分治法的应用,其算法步骤完全遵循分治模式. 分治法思想 分治法 思想: 将原问题分解为几个规模较小但又保持原问题性质的子问题,递归求解这些子问题, ...
- day10 Test
public class Test{ public static void main(String[] args){ fun1(); } /**1. * 有2个数组,第一个数组内容为:[黑龙江省,浙江 ...