手把手教你使用LabVIEW OpenCV dnn实现物体识别(Object Detection)含源码
前言
今天和大家一起分享如何使用LabVIEW调用pb模型实现物体识别,本博客中使用的智能工具包可到主页置顶博客LabVIEW AI视觉工具包(非NI Vision)下载与安装教程中下载
一、物体识别算法原理概述
1、物体识别的概念
物体识别也称目标检测,目标检测所要解决的问题是目标在哪里以及其状态的问题。但是,这个问题并不是很容易解决。形态不合理,对象出现的区域不确定,更不用说对象也可以是多个类别。 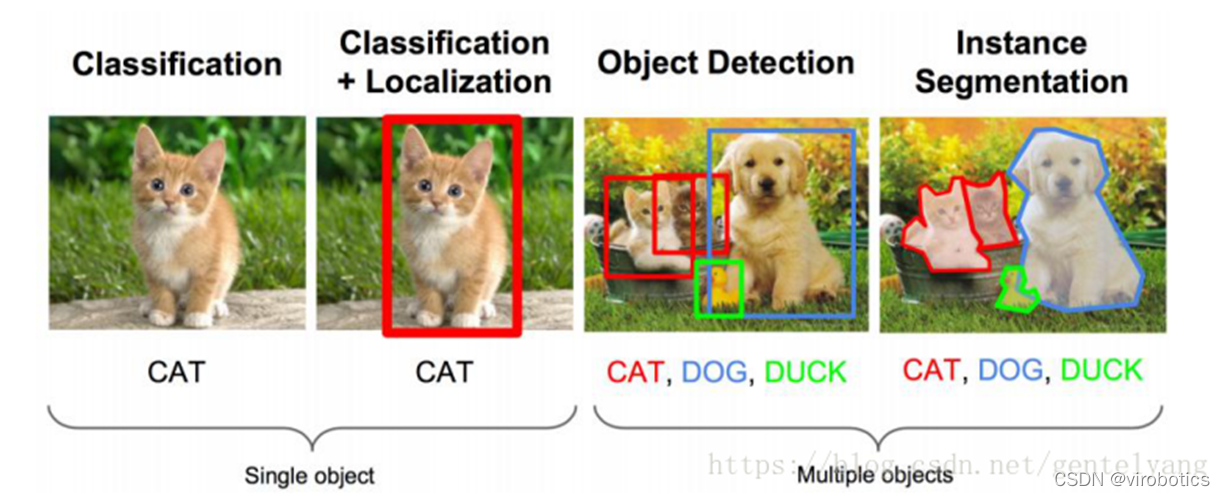
目标检测用的比较多的主要是RCNN,spp- net,fast- rcnn,faster- rcnn;YOLO系列,如YOLOV3和YOLOV4;除此之外还有SSD,ResNet等。
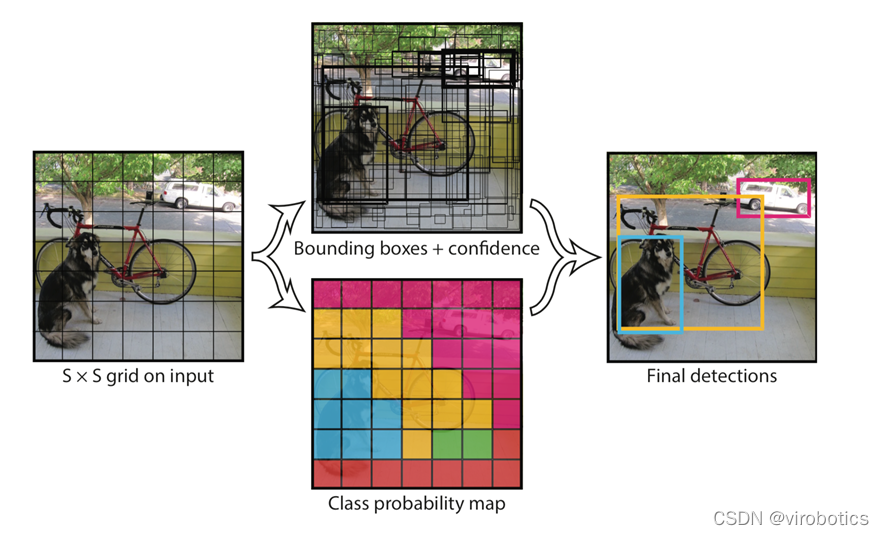
2、Yolo算法原理概述
Yolo的识别原理简单清晰。对于输入的图片,将整张图片分为7×7(7为参数,可调)个方格。当某个物体的中心点落在了某个方格中,该方格则负责预测该物体。每个方格会为被预测物体产生2(参数,可调)个候选框并生成每个框的置信度。最后选取置信度较高的方框作为预测结果。
二、opencv调用darknet物体识别模型(yolov3/yolov4)
相关源码及模型在darknt文件夹下

使用darknet训练yolo的模型,生成weights文件。使用opencv调用生成的模型
1、darknet模型的获取
文件含义:
cfg文件:模型描述文件
weights文件:模型权重文件
Yolov3获取链接:
https://github.com/pjreddie/darknet/blob/master/cfg/yolov3.cfg
https://pjreddie.com/media/files/yolov3.weights
Yolov4获取链接:
https://github.com/AlexeyAB/darknet/releases/download/darknet_yolo_v3_optimal/yolov4.cfg
https://github.com/AlexeyAB/darknet/releases/download/darknet_yolo_v3_optimal/yolov4.weights
2、python调用darknet模型实现物体识别
(1)dnn模块调用darknet模型
net = cv2.dnn.readNetFromDarknet("yolov3/yolov3.cfg", "yolov3/yolov3.weights")(2)获取三个输出端的LayerName
使用getUnconnectedOutLayer获取三个只有输入,没有输出的层的名字,Yolov3的三个输出端层名为:['yolo_82', 'yolo_94', 'yolo_106']
def getOutputsNames(net):

    # Get the names of all the layers in the network

    layersNames = net.getLayerNames()

    # Get the names of the output layers, i.e. the layers with unconnected outputs

    return [layersNames[i - 1] for i in net.getUnconnectedOutLayers()]
(3)图像预处理
使用blobFromImage将图像转为image Size=(416,416)或(608,608) Scale=1/255 Means=[0,0,0]
blob = cv2.dnn.blobFromImage(frame, 1/255, (416, 416), [0,0,0], 1, crop=False)(4)推理
使用net.forward(multiNames)获取多个层的结果,其中getOutputsNames(net)=['yolo_82', 'yolo_94', 'yolo_106']
net.setInput(blob)

outs = net.forward(getOutputsNames(net))
(5)后处理(postrocess)
获取的结果(outs)里面有三个矩阵(out),每个矩阵的大小为85*n,n表示检测到了n个物体,85的排列顺序是这样的:
第0列代表物体中心x在图中的位置(0~1)
第1列表示物体中心y在图中的位置(0~1)
第2列表示物体的宽度
第3列表示物体的高度
第4列是置信概率,值域为[0-1],用来与阈值作比较决定是否标记目标
第5~84列为基于COCO数据集的80分类的标记权重,最大的为输出分类。使用这些参数保留置信度高的识别结果(confidence>confThreshold)
def postprocess(frame, outs):

    frameHeight = frame.shape[0]

    frameWidth = frame.shape[1]

    classIds = []

    confidences = []

    boxes = []

    classIds = []

    confidences = []

    boxes = []

    for out in outs:

        for detection in out:

            scores = detection[5:]

            classId = np.argmax(scores)

            confidence = scores[classId]

            if confidence > confThreshold:

                center_x = int(detection[0] * frameWidth)

                center_y = int(detection[1] * frameHeight)

                width = int(detection[2] * frameWidth)

                height = int(detection[3] * frameHeight)

                left = int(center_x - width / 2)

                top = int(center_y - height / 2)

                classIds.append(classId)

                confidences.append(float(confidence))

                boxes.append([left, top, width, height])

    print(boxes)

    print(confidences)
(6)后处理(postrocess)
使用NMSBoxes函数过滤掉重复识别的区域。
    indices = cv.dnn.NMSBoxes(boxes, confidences, confThreshold, nmsThreshold)

    for i in indices:

        box = boxes[i]

        left = box[0]

        top = box[1]

        width = box[2]

        height = box[3]

        drawPred(classIds[i], confidences[i], left, top, left + width, top + height)
(7)画出检测到的对象
def drawPred(classId, conf, left, top, right, bottom):
# Draw a bounding box.
cv.rectangle(frame, (left, top), (right, bottom), (0, 0, 255))
label = '%.2f' % conf
# Get the label for the class name and its confidence
if classes:
assert(classId < len(classes))
label = '%s:%s' % (classes[classId], label)
#Display the label at the top of the bounding box
labelSize, baseLine = cv.getTextSize(label, cv.FONT_HERSHEY_SIMPLEX, 0.5, 1)
top = max(top, labelSize[1])
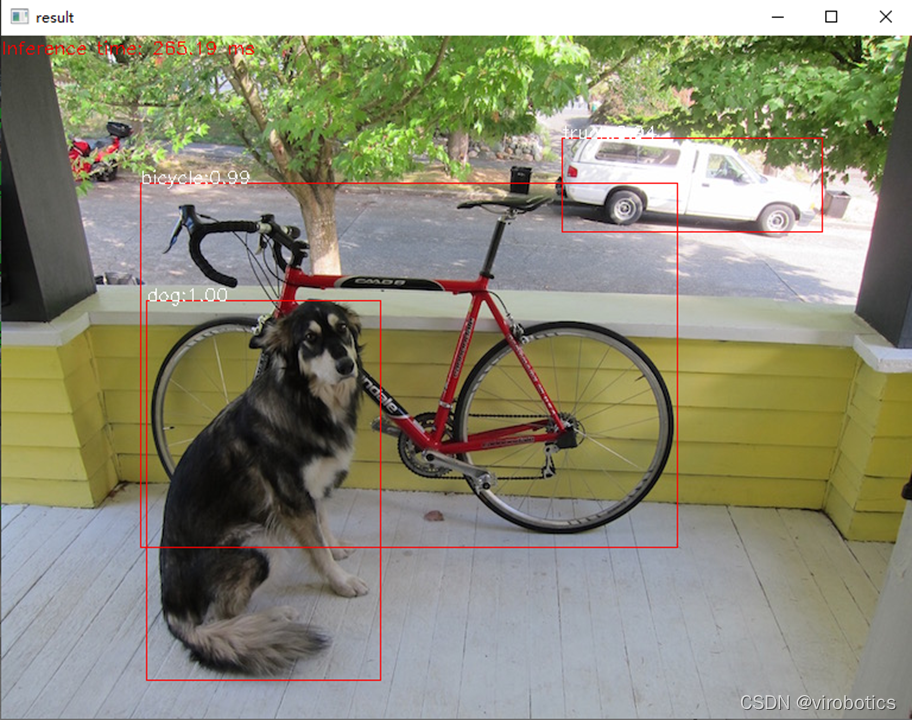
cv.putText(frame, label, (left, top), cv.FONT_HERSHEY_SIMPLEX, 0.5, (255,255,255))(8)完整源码及检测结果(cv_call_yolo.py)
import cv2
cv=cv2
import numpy as np
import time
net = cv2.dnn.readNetFromDarknet("yolov3/yolov3.cfg", "yolov3/yolov3.weights")
net.setPreferableBackend(cv2.dnn.DNN_BACKEND_CUDA)
net.setPreferableTarget(cv2.dnn.DNN_TARGET_CUDA)
confThreshold = 0.5 #Confidence threshold
nmsThreshold = 0.4 #Non-maximum suppression threshold
frame=cv2.imread("dog.jpg")
classesFile = "coco.names";
classes = None
with open(classesFile, 'rt') as f:
classes = f.read().rstrip('\n').split('\n')
def getOutputsNames(net):
# Get the names of all the layers in the network
layersNames = net.getLayerNames()
# Get the names of the output layers, i.e. the layers with unconnected outputs
return [layersNames[i - 1] for i in net.getUnconnectedOutLayers()]
print(getOutputsNames(net))
# Remove the bounding boxes with low confidence using non-maxima suppression
def postprocess(frame, outs):
frameHeight = frame.shape[0]
frameWidth = frame.shape[1]
classIds = []
confidences = []
boxes = []
# Scan through all the bounding boxes output from the network and keep only the
# ones with high confidence scores. Assign the box's class label as the class with the highest score.
classIds = []
confidences = []
boxes = []
for out in outs:
for detection in out:
scores = detection[5:]
classId = np.argmax(scores)
confidence = scores[classId]
if confidence > confThreshold:
center_x = int(detection[0] * frameWidth)
center_y = int(detection[1] * frameHeight)
width = int(detection[2] * frameWidth)
height = int(detection[3] * frameHeight)
left = int(center_x - width / 2)
top = int(center_y - height / 2)
classIds.append(classId)
confidences.append(float(confidence))
boxes.append([left, top, width, height])
# Perform non maximum suppression to eliminate redundant overlapping boxes with
# lower confidences.
print(boxes)
print(confidences)
indices = cv.dnn.NMSBoxes(boxes, confidences, confThreshold, nmsThreshold)
for i in indices:
#print(i)
#i = i[0]
box = boxes[i]
left = box[0]
top = box[1]
width = box[2]
height = box[3]
drawPred(classIds[i], confidences[i], left, top, left + width, top + height)
# Draw the predicted bounding box
def drawPred(classId, conf, left, top, right, bottom):
# Draw a bounding box.
cv.rectangle(frame, (left, top), (right, bottom), (0, 0, 255))
label = '%.2f' % conf
# Get the label for the class name and its confidence
if classes:
assert(classId < len(classes))
label = '%s:%s' % (classes[classId], label)
#Display the label at the top of the bounding box
labelSize, baseLine = cv.getTextSize(label, cv.FONT_HERSHEY_SIMPLEX, 0.5, 1)
top = max(top, labelSize[1])
cv.putText(frame, label, (left, top), cv.FONT_HERSHEY_SIMPLEX, 0.5, (255,255,255))
blob = cv2.dnn.blobFromImage(frame, 1/255, (416, 416), [0,0,0], 1, crop=False)
t1=time.time()
net.setInput(blob)
outs = net.forward(getOutputsNames(net))
print(time.time()-t1)
postprocess(frame, outs)
t, _ = net.getPerfProfile()
label = 'Inference time: %.2f ms' % (t * 1000.0 / cv.getTickFrequency())
cv.putText(frame, label, (0, 15), cv.FONT_HERSHEY_SIMPLEX, 0.5, (0, 0, 255))
cv2.imshow("result",frame)
3、LabVIEW调用darknet模型实现物体识别yolo_example.vi
(1)LabVIEW调用yolov3的方式及步骤和python类似,源码如下所示:  将带识别图片与yolo_example.vi置于同一路径下,即可进行物体识别
(2)识别结果如下:

4、LabVIEW实现实时摄像头物体识别(yolo_example_camera.vi)
(1)使用GPU加速
使用顺序结构检测神经网络推理的时间

比较使用GPU和不使用GPU两种情况下的推理速度
普通模式:net.serPerferenceBackend(0),net.serPerferenceTarget(0)
Nvidia GPU模式:net.serPreferenceBackend(5), net.serPerferenceTarget(6)

注:普通的c++、python、LabVIEW版本的opencv,即便选了GPU模式也没用,程序仍然运行在CPU上,需要安装CUDA和CUDNN后重新从源码编译opencv
(2)程序源码如下:
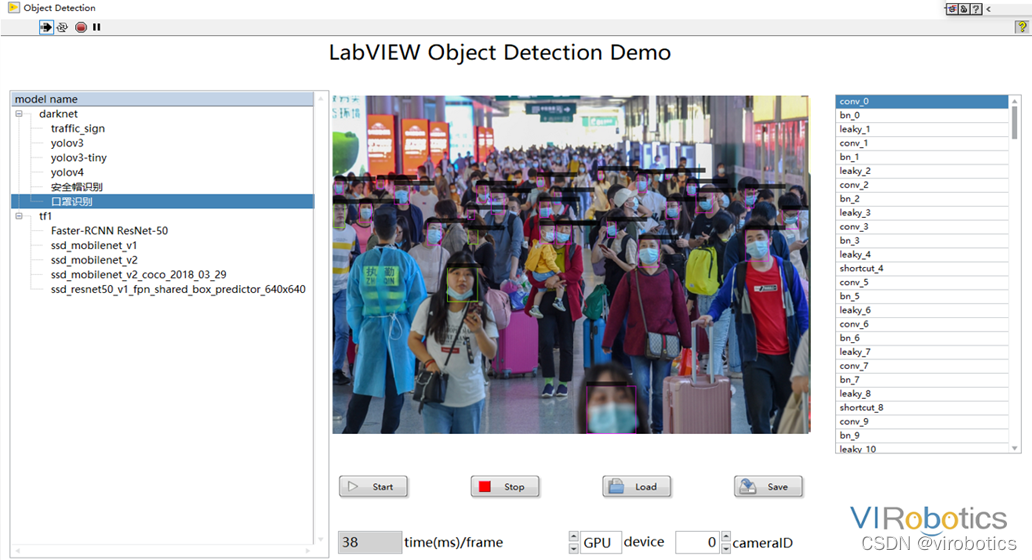
 (3)物体识别结果如下:

注意,使用如上程序,可以点击STOP按钮,停止本次物体识别,也可勾选使用GPU进行加速
(4)使用GPU加速结果:

三、tensorflow的物体识别模型调用
相关源码及模型在tf1文件夹下

1、下载预训练模型并生成pbtxt文件
(1)下载ssd_mobilenet_v2_coco,下载地址如下: http://download.tensorflow.org/models/object_detection/ssd_mobilenet_v2_coco_2018_03_29.tar.gz
(2)解压后的文件内容

(3)根据pb模型生成pbtxt文件 运行 tf_text_graph_ssd.py以生成pptxt文件 在cmd中运行: python tf_text_graph_ssd.py --input ssd_mobilenet_v1_coco_2017_11_17/frozen_inference_graph.pb --config ssd_mobilenet_v1_coco_2017_11_17/ssd_mobilenet_v1_coco.config --output ssd_mobilenet_v1_coco_2017_11_17.pbtxt
2、LabVIEW调用tensorflow模型推理并实现物体识别(callpb.vi)
(1)程序源码如下:

(2)运行结果如下:

四、项目源码及模型下载
链接:https://pan.baidu.com/s/1zwbLQe0VehGhsqNIHyaFRw?pwd=8888 提取码:8888
总结拓展
可以使用Yolov3训练自己的数据集,具体训练方法可参考博客:https://blog.csdn.net/qq_38915710/article/details/97112788 可实现案例:口罩佩戴识别、肺炎分类、CT等,如口罩佩戴检测
更多关于LabVIEW与人工智能技术,可添加技术交流群进一步探讨。qq群号:705637299,请备注暗号:LabVIEW 机器学习
手把手教你使用LabVIEW OpenCV dnn实现物体识别(Object Detection)含源码的更多相关文章
- 手把手教你使用LabVIEW OpenCV DNN实现手写数字识别(含源码)
@ 目录 前言 一.OpenCV DNN模块 1.OpenCV DNN简介 2.LabVIEW中DNN模块函数 二.TensorFlow pb文件的生成和调用 1.TensorFlow2 Keras模 ...
- 手把手教你使用LabVIEW OpenCV dnn实现图像分类(含源码)
@ 目录 前言 一.什么是图像分类? 1.图像分类的概念 2.MobileNet简介 二.使用python实现图像分类(py_to_py_ssd_mobilenet.py) 1.获取预训练模型 2.使 ...
- 手把手教你如何用 OpenCV + Python 实现人脸识别
下午的时候,配好了OpenCV的Python环境,OpenCV的Python环境搭建.于是迫不及待的想体验一下opencv的人脸识别,如下文. 必备知识 Haar-like 通俗的来讲,就是作为人脸特 ...
- 【YOLOv5】手把手教你使用LabVIEW ONNX Runtime部署 TensorRT加速,实现YOLOv5实时物体识别(含源码)
前言 上一篇博客给大家介绍了LabVIEW开放神经网络交互工具包[ONNX],今天我们就一起来看一下如何使用LabVIEW开放神经网络交互工具包实现TensorRT加速YOLOv5. 以下是YOLOv ...
- 【YOLOv5】LabVIEW+YOLOv5快速实现实时物体识别(Object Detection)含源码
前言 前面我们给大家介绍了基于LabVIEW+YOLOv3/YOLOv4的物体识别(对象检测),今天接着上次的内容再来看看YOLOv5.本次主要是和大家分享使用LabVIEW快速实现yolov5的物体 ...
- 手把手教你使用LabVIEW人工智能视觉工具包快速实现传统Opencv算子的调用(含源码)
前言 今天我们一起来使用LabVIEW AI视觉工具包快速实现图像的滤波与增强:图像灰度处理:阈值处理与设定:二值化处理:边缘提取与特征提取等基本操作.工具包的安装与下载方法可见之前的博客. 一.图像 ...
- 手把手教你使用LabVIEW实现Mask R-CNN图像实例分割
前言 前面给大家介绍了使用LabVIEW工具包实现图像分类,目标检测,今天我们来看一下如何使用LabVIEW实现Mask R-CNN图像实例分割. 一.什么是图像实例分割? 图像实例分割(Instan ...
- 手把手教你使用LabVIEW人工智能视觉工具包快速实现图像读取与采集(含源码)
目录 前言 一.工具包位置 二.图像采集与色彩空间转换 1.文件读写 2.实现图片读取 3.使用算子cvtColor实现颜色空间转换 三.从摄像头采集图像 1.Camera类 2.属性节点 3.实现摄 ...
- 10分钟学会使用YOLO及Opencv实现目标检测(下)|附源码
将YOLO应用于视频流对象检测 首先打开 yolo_video.py文件并插入以下代码: # import the necessary packages import numpy as np impo ...
随机推荐
- MySQL8.0错误日志Error log
GreatSQL社区原创内容未经授权不得随意使用,转载请联系小编并注明来源. 理论知识 错误日志内容 错误日志包含mysqld启动和关闭的时间信息,还包含诊断消息,如服务器启动和关闭期间以及服务器运行 ...
- React生命周期和响应式原理(Fiber架构)
注意:只有类组件才有生命周期钩子函数,函数组件没有生命周期钩子函数. 生命周期 装载阶段:constructor() render() componentDidMount() 更新阶段:render( ...
- my2sql工具之快速入门
GreatSQL社区原创内容未经授权不得随意使用,转载请联系小编并注明来源. GreatSQL是MySQL的国产分支版本,使用上与MySQL一致. my2sql工具之快速入门 1.什么是my2sql ...
- host,nslookup,dig 工具安装
DNS-测试工具 在centos7.9 中 安装bind后发现缺少,检测工具 工具包安装: 1 [root@server]# yum install -y bind-utils 安装后再次查询,发现已 ...
- C++ 添加程序图标到我的电脑
C++ 像我的电脑中 百度网盘的 那图标快捷方式.如何生成的呢?设置程序图标到我的电脑 请看下边代码 就ok了(*^__^*) 嘻嘻-- 类似下图: 大家如果看我下边的不是很清楚,可以下载这个具体工程 ...
- 【JDBC】学习路径9-dbcp数据源的使用
第一章:下载 要下载三个东西:commons pool.commons log.dbcp dbcp中有些东西是依赖于commons pool 和 commons log 的. 缺一不可,否则无法正确运 ...
- 【Java】学习路径52-Timer计时器实例
import java.util.Timer; import java.util.TimerTask; public class TimerClass { public static void mai ...
- Linux安装Jenkins及配置svn使用
目录 1. 下载 2. 创建文件夹 3. 安装 4. 修改端口,不用这步 5. 安装插件提速 6. 启动 7. 页面访问 8. 新建用户 9. 安装Subversion插件 10. 安装maven插件 ...
- Codeforces Round #606(B-D)
Dashboard - Codeforces Round #606 (Div. 2, based on Technocup 2020 Elimination Round 4) - Codeforces ...
- 第五十六篇:webpack的loader(四) -打包js中的高级语法
好家伙, 1.打包处理js文件中的高级语法 webpack只能打包处理一部分高级的JavaScript 语法.对于那些webpack无法处理的高级js 语法,需要借 助于 babel-loader 进 ...