linux 安装与启动nginx
linux系统为Centos 64位
一、去http://nginx.org/download/上下载相应的版本下载nginx-1.8.0.tar.gz(注:还有更高版本的)。
二、解压 tar -zxvf nginx-1.8.0.tar.gz
三、进入nginx-1.8.0/文件夹,设置一下配置信息 ./configure --prefix=/usr/local/nginx(安装后的文件存放路径)。
四、配置的时候可能会出现类似这样的信息
./configure: error: the HTTP rewrite module requires the PCRE library.
You can either disable the module by using --without-http_rewrite_module
option, or install the PCRE library into the system, or build the PCRE library
statically from the source with nginx by using --with-pcre=<path> option.
安装pcre-devel解决问题
yum -y install pcre-devel
安装完成后再执行./configure --prefix=/usr/local/nginx
执行完后还有可能会出现这样的问题:
checking for PCRE JIT support ... not found
checking for system md library ... not found
checking for system md5 library ... not found
checking for OpenSSL md5 crypto library ... not found
checking for sha1 in system md library ... not found
checking for OpenSSL sha1 crypto library ... not found
checking for zlib library ... found
解决办法:
yum -y install openssl openssl-devel
安装完成后再执行./configure --prefix=/usr/local/nginx

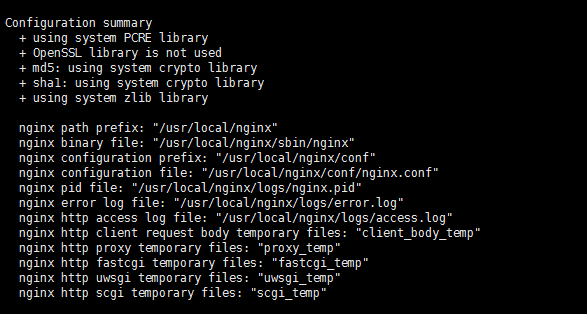
出现这个说明,配置成功了!!~
五、make && make install
出现类似这样的就表示安装成功了
cp conf/nginx.conf '/usr/local/nginx/conf/nginx.conf.default'
test -d '/usr/local/nginx/logs' || mkdir -p '/usr/local/nginx/logs'
test -d '/usr/local/nginx/logs' || mkdir -p '/usr/local/nginx/logs'
test -d '/usr/local/nginx/html' || cp -R html '/usr/local/nginx'
test -d '/usr/local/nginx/logs' || mkdir -p '/usr/local/nginx/logs'
make[1]: Leaving directory `/root/setup/nginx/nginx-1.8.0'
安装完后/usr/local/nginx 后出现几个文件夹conf、html、logs、sbin
启动nginx:
./usr/nginx/sbin/nginx
查看端口:
netstat -antp
Active Internet connections (servers and established)
Proto Recv-Q Send-Q Local Address Foreign Address State PID/Program name
tcp 0 0 0.0.0.0:80 0.0.0.0:* LISTEN 19031/nginx
tcp 0 0 0.0.0.0:21 0.0.0.0:* LISTEN 2771/vsftpd
tcp 0 0 0.0.0.0:22 0.0.0.0:* LISTEN 906/sshd
tcp 0 0 0.0.0.0:3306 0.0.0.0:* LISTEN 2263/mysqld
nginx的80端口启动了。
访问安装nginx的服务器地址,出现如下图,说明成功了。
linux 安装与启动nginx的更多相关文章
- Linux安装ElasticSearch启动报错的解决方法
Linux安装ElasticSearch后,ElasticSearch是不能用root用户启动的,以root用户启动会报错Refer to the log for complete error det ...
- linux centos-7.2-64bit 安装配置启动nginx
1.安装依赖包yum -y install openssl openssl-develyum install pcre*yum install openssl*yum install zlib yum ...
- Linux 安装及配置 Nginx + ftp 服务器
Nginx 安装及配置 一.Nginx 简介: Nginx("engine x") 是一款是由俄罗斯的程序设计师 Igor Sysoev 所开发高性能的 Web和 反向代理服务器, ...
- linux 安装jdk以及nginx详细过程
一.安装jdk 1:首先下载jdk到本地,然后通过git 上传到linux服务器上 2:进入目录usr,并创建目录java,将jdk的压缩文件移动到该目录下 cd /usr mkdir java mv ...
- linux安装jdk tomcat nginx 以及常用命令
linux: 操作系统,应用服务器上 常用命令: cd 切换命令 cd / cd ~ cd ../../ cd xx ll 展示所有的文件 ll -h 友好的展示 mkdir 创建目录 mkdir 目 ...
- linux下docker启动nginx无法访问80端口
问题: Linux安装了docker,docker启动了一个nginx容器,通过 80 端口无法正常访问 故障排查: 1.检查 nginx 容器启动的命令或者yaml文件,查看是否有跟本机端口进行绑定 ...
- mac系统下安装和启动nginx
1.在线安装 localhost:nginx-1.17.1 mhx$ sudo brew install nginx 2.查看是否安装成功 localhost:nginx-1.17.1 mhx$ ng ...
- Linux 普通用户启动nginx
众所周知,apache的80端口为系统保留端口,如果通过其他非root用户启动,会报错如下: ()Permission denied: make_sock: could not bind to add ...
- Linux 安装、启动和卸载SSH
卸载SSH: 先停掉SSH服务:sudo stop ssh 检查SSH是否停止:ssh localhost 检查SSH是否启动: ps -e|grep ssh 卸载SSH:apt-get --purg ...
随机推荐
- PHP基础语法思维导图
- 【for陷阱】遍历的同时删除元素
今晚,哦不,是昨晚了,想删除空行时,给for语句和列表坑得好惨!!! 一般来说,删除字符串的空行有以下几种常见的方法~(然而我竟然想不出来) 假设我们要把下面的字符串之间的空行给去掉 # coding ...
- unity3d和php后台简单交互--一
unity3d开发时,用PHP作为后台是个不错的选择.对一些数据吞吐量不是很大的游戏,比如某个游戏的排名,登录等等,一般的php程序能够胜任了,并且php语言简单,开发容易对数据库尤其是mysql的支 ...
- epoll完整例子
#include <deque> #include <map> #include <vector> #include <pthread.h> #incl ...
- ViewPagerIndicator的使用方法
使用方法: 1.引用library,并解决support v4 jar包冲突 2.布局文件中添加viewpager和viewpagerindicator,布局文件: <LinearLay ...
- Linux安装mysql mysql5.5.40 <NIOT>
一. 操作系统与软件 操作系统及版本 Centos 6.4 依赖包 gcc.gcc-c++.cmake.ncurses-devel 下载目录 /opt Mysql安装目录 /usr/local/ ...
- HDU 5862 Counting Intersections(离散化+树状数组)
HDU 5862 Counting Intersections(离散化+树状数组) 题目链接http://acm.split.hdu.edu.cn/showproblem.php?pid=5862 D ...
- 学习【Web前端开发修炼之道】总结
网页布局 1.申明文档模式 2.设置css标签重置,避免各浏览器解析不同. 3.网页css模块划分,base.css,common.css,page.css 4.低权重原则---避免滥用子选择器 cs ...
- 解决“在UBUNTU下打开windows中创建的文本文件,中文显示乱码”的问题 。
在UBUNTU下打开windows中用notepad等工具创建的txt或程序源码等文本文件,中文显示乱码,原因是windows中的txt文件编码方式为GBK,UBUNTU中为utf-8. 解决办法:在 ...
- shell中$(( )) 与 $( ) 还有${ }的区别
http://blog.chinaunix.net/uid-14351756-id-2820651.html $( ) 与 ` ` (反引号)在 bash shell 中,$( ) 与 ` ` (反引 ...
