ios开发之--tableview单选/多选实现(非tableview的editing状态)及默认选中
实现思路比较简单,这里仅做记录:
直接上代码:
1,实现didSelectRowAtIndexPath方法
-(void)tableView:(UITableView *)tableView didSelectRowAtIndexPath:(NSIndexPath *)indexPath

{

    [[NSUserDefaults standardUserDefaults]setValue:[array objectAtIndex:indexPath.row] forKey:APP_CHANGEVOICE];

    [_sextTableView reloadData];

    [tableView deselectRowAtIndexPath:indexPath animated:YES];

}
在cellForRowAtIndexPath里面实现方法
-(UITableViewCell *)tableView:(UITableView *)tableView cellForRowAtIndexPath:(NSIndexPath *)indexPath

{

    static NSString *CellTableIdentifier = @"CellTableIdentifier";

    hPublickCell *cell = [tableView cellForRowAtIndexPath:indexPath];

    if (cell == nil)

    {

        cell = [[hPublickCell alloc] initWithStyle:UITableViewCellStyleValue1 reuseIdentifier:CellTableIdentifier];

        cell.selectionStyle = UITableViewCellSelectionStyleNone;

    }

    cell.textsLabel.text = array[indexPath.row];

    cell.selectionStyle=UITableViewCellSelectionStyleGray;

    //选择状态的存储

    if ([[[NSUserDefaults standardUserDefaults]valueForKey:APP_CHANGEVOICE] isEqualToString:[array objectAtIndex:indexPath.row]])

    {

        cell.accessoryType = UITableViewCellAccessoryCheckmark;

    }

    else

    {

        cell.accessoryType = UITableViewCellAccessoryNone;

    }

    return cell;

}
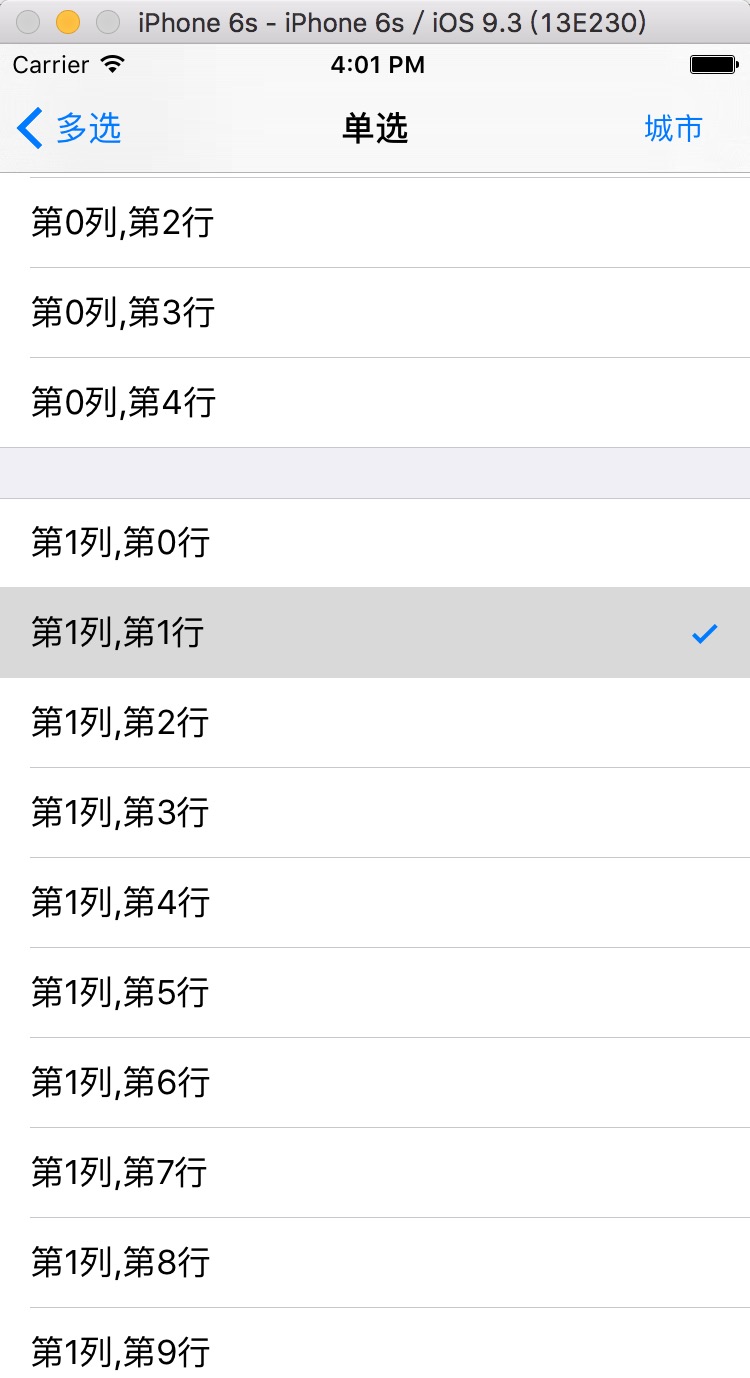
这里面的array是数据源数组。效果图如下:
2,上面这种是系统的选中样式,下面是自定义的:
代码如下:
-(UITableViewCell *)tableView:(UITableView *)tableView cellForRowAtIndexPath:(NSIndexPath *)indexPath

{

    ShippingAddressCell *cell = [tableView dequeueReusableCellWithIdentifier:@"ShippingAddressCell"];

    if (!cell) {

        cell = [[ShippingAddressCell alloc]initWithStyle:UITableViewCellStyleDefault reuseIdentifier:@"ShippingAddressCell"];

    }

    if (self.lastIndexPath == indexPath)

    {

        cell.selectedImg.image = [UIImage imageNamed:@"clicked"];

    }else

    {

        cell.selectedImg.image = [UIImage imageNamed:@"unClick"];

    }

    return cell;

}

-(void)tableView:(UITableView *)tableView didSelectRowAtIndexPath:(NSIndexPath *)indexPath

{

    //之前选中的,取消选择

    ShippingAddressCell *celled = [tableView cellForRowAtIndexPath:_lastIndexPath];

    celled.selectedImg.image = [UIImage imageNamed:@"unClick"];

    //记录当前选中的位置索引

    _lastIndexPath = indexPath;

    //当前选择的打勾

    ShippingAddressCell *cell = [tableView cellForRowAtIndexPath:indexPath];

    cell.selectedImg.image = [UIImage imageNamed:@"clicked"];

}
这样就可以实现了,截图如下:

多选的有空再完善!代码可以直接粘贴使用!
多选,这里我这个单选,没有使用编辑模式,很简单,在这里记录下,demo就不附了,我把代码都粘出来,
我的tableview是拖的xib,不想写,代码如下:
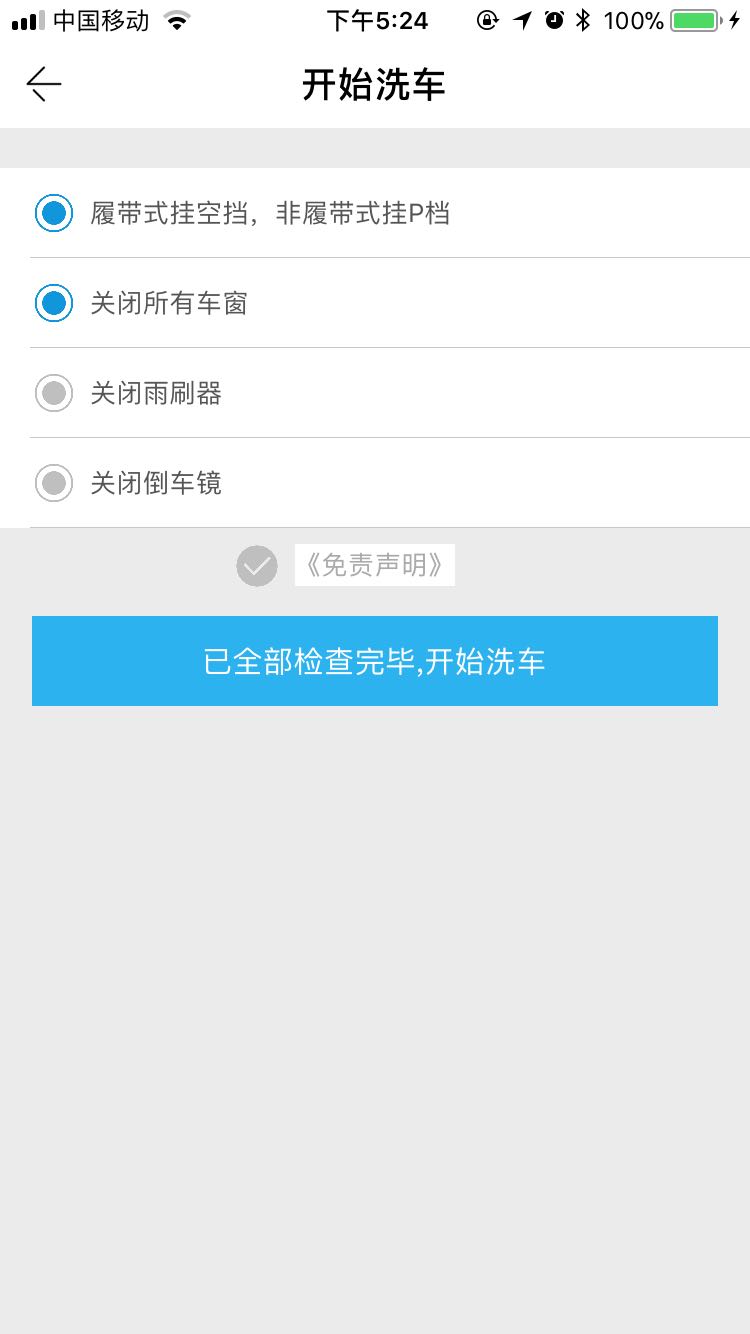
1,自定义cell,我是在最左边有一个imageView,如下图:

2,相关代码:
a 声明
@property (weak, nonatomic) IBOutlet UITableView *startTableView;

@property (strong, nonatomic) NSMutableArray  *selectIndexs; //多选选中的行
b viewDidLoad里面
_selectIndexs = [[NSMutableArray alloc]initWithCapacity:];

    for (int i = ; i < dataAry.count; i ++) {

        [_selectIndexs addObject:@""];

    }
c tableview的相关代理方法:
-(NSInteger)tableView:(UITableView *)tableView numberOfRowsInSection:(NSInteger)section

{

    return dataAry.count;

}

-(UITableViewCell *)tableView:(UITableView *)tableView cellForRowAtIndexPath:(NSIndexPath *)indexPath

{

    StartReachedCell *cell = [tableView dequeueReusableCellWithIdentifier:@"StartReachedCell"];

    if (!cell) {

        cell = [[StartReachedCell alloc]initWithStyle:UITableViewCellStyleDefault reuseIdentifier:@"StartReachedCell"];

    }

    cell.descLab.text = dataAry[indexPath.row];

    if ([_selectIndexs[indexPath.row] isEqualToString:@""]) {

        cell.selImg.image = [UIImage imageNamed:@"unsel"];

    }else

    {

        cell.selImg.image = [UIImage imageNamed:@"sel"];

        cell.tintColor = BLUECOLOR;

    }

    return cell;

}

-(void)tableView:(UITableView *)tableView didSelectRowAtIndexPath:(NSIndexPath *)indexPath

{

    StartReachedCell *cell = [tableView cellForRowAtIndexPath:indexPath];

    NSString *stateStr = _selectIndexs[indexPath.row];

    //连续点击的时候,两种状态进行切换

    NSString *picName = [stateStr isEqualToString:@""]? @"sel":@"unsel";

    NSString *changeStateStr = [stateStr isEqualToString:@""]?@"":@"";

    cell.selImg.image = [UIImage imageNamed:picName];

    [_selectIndexs replaceObjectAtIndex:indexPath.row withObject:changeStateStr];

}
效果如下图:
基本的逻辑是,声明一个空的数组,里面存放我自定义的状态:"0"和"1",第一次进去的时候,是没有状态1的,只有0,在cell的初始化方法里面直接判断展示即可,在进行过点击操作后,在didSelectRowAtIndexPath方法里面把选中所产生的新状态替换掉原来数组里面的老状态,一次循环展示即可。如果想要下次进去是上一次默认的选中,直接把数组存起来即可。
网上有很多的编辑状态,确实很好用,也很简单,有空我会更新下,把单选、复选、多选,全部都更新出来,我这种短小精悍。大家有什么好的写法,可以留言!
默认选中:
- (void)viewWillAppear:(BOOL)animated

{

    [super viewWillAppear:animated];

    [self.tableView selectRowAtIndexPath:self.lastIndexPath animated:YES scrollPosition:UITableViewScrollPositionTop];

    NSIndexPath *path = [NSIndexPath indexPathForItem: inSection:];

    [self tableView:self.tableView didSelectRowAtIndexPath:path];

}
ios开发之--tableview单选/多选实现(非tableview的editing状态)及默认选中的更多相关文章
- iOS开发之--storyboary下,拖拽一个tableview/collectionView/view 等,顶端下沉64个像素的处理方法
大家可能会发现,在sb或者xib里面拖拽一个tableview/collectionview/view的,顶端会自动下沉64个像素,也就是说,运行在模拟器上去,自导航下面又自动下沉了64个像素, 那是 ...
- 【iOS开发-68】APP下载案例:利用tableView自带的cell布局+缓存池cell复用时注意button状态的检查
(1)效果 (2)源码与资源下载 http://pan.baidu.com/s/1pJLo2PP (3)总结 --核心是利用UITableView里面自带的cell来制作样式同样的cell. 与之对应 ...
- iOS开发——网络篇——数据安全(MD5),HTTPS,检测网络状态
一.数据安全 1.提交用户的隐私数据一定要使用POST请求提交用户的隐私数据GET请求的所有参数都直接暴露在URL中请求的URL一般会记录在服务器的访问日志中服务器的访问日志是黑客攻击的重点对象之一 ...
- (转)iOS 开发,工程中混合使用 ARC 和非ARC
[前提知识] ARC:Automatic Reference Counting,自动引用计数 在开发 iOS 3 以及之前的版本的项目时我们要自己负责使用引用计数来管理内存,比如要手动 retain. ...
- iOS 开发,工程中混合使用 ARC 和非ARC(转)
[前提知识] ARC:Automatic Reference Counting,自动引用计数 在开发 iOS 3 以及之前的版本的项目时我们要自己负责使用引用计数来管理内存,比如要手动 retain. ...
- 【iOS开发】在ARC项目中使用非ARC文件
ARC的出现应该说是开发者的一大福利,苹果是推荐使用的,但是因为之前没有ARC机制,好多比较好的类库都是使用的非ARC,或是有些大牛还是不喜欢用ARC,封装的类也是非ARC的,想要在自己的ARC项目中 ...
- iOS开发——常见BUG——导航控制器中的子控制器设置StatusBar状态失效的问题
iOS9之前控制StatusBar的两种方式: 第一种方式:全局控制StatusBar 1. 在项目的Info.plist文件里设置UIViewControllerBasedStatusBarAppe ...
- iOS 开发总结(上)
来源:蝴蝶之梦天使 链接:http://www.jianshu.com/p/d333cf6ae4b0 在iOS开发中经常需要使用的或不常用的知识点的总结,几年的收藏和积累(踩过的坑). 一. iPho ...
- iOS开发-UITableView单选多选/复选实现1
TableView怎样实现单选或者多选呢? 我们的直接思路是改动某一个Cell的样式就可以, 那么改动样式须要通过改动相应的数据, 从这里能够判断我们须要给Cell相应的数据设置一个标志位, 当选中的 ...
随机推荐
- jQuery运行方式818
我们平时打开JQ源码就会看到这么一段代码 (function (window, undefined) { //JQ代码 })(window) 有一点经验的朋友会知道这是js自执行函数 它的好处主要作用 ...
- JQuery之拖拽插件
一直以来,都对JS获取元素的位置感到非常的困惑:一会client.一会offset.一会scroll. 再加上各大浏览器之间的不兼容,唉,搞得哥晕晕乎乎的. 而很多页面效果都要用到这些位置.不得已,得 ...
- [hadoop读书笔记] Hadoop下各技术应用场景
1.数据采集 对于数据采集主要分为三类,即结构化数据库采集,日志和文件采集,网页采集. 对于结构化数据库,采用Sqoop是合适的,可以实现结构化数据库中数据并行批量入库到hdfs存储.对于网页采集,前 ...
- How to properly release Excel COM objects
Posted on Tuesday, November 5th, 2013 at 7:18 am by Pieter van der Westhuizen. You’ll see a lot ...
- 为什么c++中,有时可以用类名直接访问非静态成员函数?
正规的C++语言标准目前(截止到C++14)应该还不支持这种调用方法.目前微软似乎在它的VC++中推行一种叫做C++/CLI的标准,有可能会支持这种调用,如果一定要用这种调用方法的话,还应该用VS20 ...
- 慎用 apt-get autoremove !
apt-get 提供了一个用于下载和安装软件包的简易命令行界面. 卸载软件包主要有这3个命令 remove – 卸载软件包 autoremove – 卸载所有自动安装且不再使用的软件包 purge – ...
- Spring系列-JDBC实例
前言:spring沾过一点点,但细节不了解,实例能力也不行,决定从头学起吧. 没有理论,只有实例代码,理论自行百度多的很的很 帖一下项目整体架构: 1.数据库建表 CREATE TABLE `cust ...
- Unity如何内置Visual Studio
一.问题的起源 软件环境:Unity 2017.3.0f3,Visual Studio 2013 问题描述:在Unity中创建C#脚本后,准备双击打开进行编辑时,出现了Fatal Error. 二.问 ...
- Maven 构建配置文件
什么是构建配置文件? 生成配置文件是一组可以用来设置或覆盖 Maven 构建配置值的默认值.使用生成配置文件,你可以针对不同的环境,如:生产V/S开发环境自定义构建. 配置文件中指定 pom.xml ...
- 【转载】C#之玩转反射
前言 之所以要写这篇关于C#反射的随笔,起因有两个: 第一个是自己开发的网站需要用到 其次就是没看到这方面比较好的文章. 所以下定决心自己写一篇,废话不多说开始进入正题. 前期准备 在VS20 ...