SpringMVC启动流程源码解密
我们知道,SpringMVC最后是通过Tomcat来进行部署的。当在Servlet中进行进行应用部署时,主要步骤为(引用来自http://download.oracle.com/otn-pub/jcp/servlet-3.0-fr-eval-oth-JSpec/servlet-3_0-final-spec.pdf):
When a web application is deployed into a container, the following steps must be
performed, in this order, before the web application begins processing client
requests.
■ Instantiate an instance of each event listener identified by a element
in the deployment descriptor.
■ For instantiated listener instances that implement ServletContextListener , call
the contextInitialized() method.
■ Instantiate an instance of each filter identified by a element in the
deployment descriptor and call each filter instance’s init() method.
■ Instantiate an instance of each servlet identified by a element that
includes a element in the order defined by the load-on-
startup element values, and call each servlet instance’s init() method.
翻译下:当应用部署到容器时,在应用相应客户的请求之前,需要执行以下步骤:
创建并初始化由元素标记的事件监听器。
对于时间监听器,如果实现了ServletContextListener接口,那么调用其contextInitialized()方法。
创建和初始化由元素标记的过滤器,并调用其init()方法。
根据中定义的顺序创建和初始化由元素标记的servlet,并调用其init()方法。
所以在Tomcat下部署的应用,会先初始化listener,然后初始化filter,最后初始化servlet。
在我们的SpringMVC中,最简单的web.xml配置如下
<?xml version="1.0" encoding="UTF-8"?>

<web-app xmlns="http://xmlns.jcp.org/xml/ns/javaee"

       xmlns:xsi="http://www.w3.org/2001/XMLSchema-instance"

       xsi:schemaLocation="http://xmlns.jcp.org/xml/ns/javaee http://xmlns.jcp.org/xml/ns/javaee/web-app_3_1.xsd"

       version="3.1">

   <!--告诉加载器,去这个位置去加载spring的相关配置-->

   <context-param>

      <param-name>contextConfigLocation</param-name>

      <param-value>classpath:spring-mvc.xml</param-value>

   </context-param>

   <!--配置前端控制器-->

   <servlet>

      <servlet-name>springMvc</servlet-name>

      <servlet-class>org.springframework.web.servlet.DispatcherServlet</servlet-class>

      <!--SpringMVC配置文件-->

      <init-param>

         <param-name>contextConfigLocation</param-name>

         <param-value>classpath:spring-mvc.xml</param-value>

      </init-param>

      <load-on-startup>0</load-on-startup>

   </servlet>

   <servlet-mapping>

      <servlet-name>springMvc</servlet-name>

      <url-pattern>/</url-pattern>

   </servlet-mapping>

   <listener>

      <listener-class>org.springframework.web.context.ContextLoaderListener</listener-class>

   </listener>

   <!--解决乱码问题的filter-->

   <filter>

      <filter-name>CharacterEncodingFilter</filter-name>

      <filter-class>org.springframework.web.filter.CharacterEncodingFilter</filter-class>

      <init-param>

         <param-name>encoding</param-name>

         <param-value>utf-8</param-value>

      </init-param>

   </filter>

   <filter-mapping>

      <filter-name>CharacterEncodingFilter</filter-name>

      <url-pattern>/*</url-pattern>

   </filter-mapping>

</web-app>
现在我们根据这个配置文件和上面的初始化流程一起来看一下,SpringMVC是如何来一步步启动容器,并加载相关信息的。
初始化Listener
我们这里定义的的listener类是 ContextLoaderListener ,我们看一下具体类定义
/**

 * Bootstrap listener to start up and shut down Spring's root {@link WebApplicationContext}.

 * Simply delegates to {@link ContextLoader} as well as to {@link ContextCleanupListener}.

 *

 * <p>As of Spring 3.1, {@code ContextLoaderListener} supports injecting the root web

 * application context via the {@link #ContextLoaderListener(WebApplicationContext)}

 * constructor, allowing for programmatic configuration in Servlet 3.0+ environments.

 * See {@link org.springframework.web.WebApplicationInitializer} for usage examples.

 *

 * @author Juergen Hoeller

 * @author Chris Beams

 * @since 17.02.2003

 * @see #setContextInitializers

 * @see org.springframework.web.WebApplicationInitializer

 */

public class ContextLoaderListener extends ContextLoader implements ServletContextListener {
ContextLoaderListener 类继承了 ContextLoader 类并且实现了 ServletContextListener 接口,按照启动程序,会调用其 contextInitialized() 方法
/**

 * Initialize the root web application context.

 */

//初始化根应用上下文

@Override

public void contextInitialized(ServletContextEvent event) {

   initWebApplicationContext(event.getServletContext());

}
那么我们现在再看一下这个应用上下文的初始化过程
//初始化web应用的上下文

//ServletContext官方叫servlet上下文。服务器会为每一个工程创建一个对象,这个对象就是ServletContext对象。这个对象全局唯一,而且工程内部的所有servlet都共享这个对象。所以叫全局应用程序共享对象。

public WebApplicationContext initWebApplicationContext(ServletContext servletContext) {

       /*

          首先通过WebApplicationContext.ROOT_WEB_APPLICATION_CONTEXT_ATTRIBUTE

          这个String类型的静态变量获取一个根IoC容器,根IoC容器作为全局变量

         存储在application对象中,如果存在则有且只能有一个

          如果在初始化根WebApplicationContext即根IoC容器时发现已经存在

          则直接抛出异常,因此web.xml中只允许存在一个ContextLoader类或其子类的对象

          */

   if (servletContext.getAttribute(WebApplicationContext.ROOT_WEB_APPLICATION_CONTEXT_ATTRIBUTE) != null) {

      throw new IllegalStateException(

            "Cannot initialize context because there is already a root application context present - " +

                  "check whether you have multiple ContextLoader* definitions in your web.xml!");

   }

   Log logger = LogFactory.getLog(ContextLoader.class);

   servletContext.log("Initializing Spring root WebApplicationContext");

   if (logger.isInfoEnabled()) {

      logger.info("Root WebApplicationContext: initialization started");

   }

   long startTime = System.currentTimeMillis();

   try {

      // Store context in local instance variable, to guarantee that

      // it is available on ServletContext shutdown.

      //如果context不存在,则进行创建

      if (this.context == null) {

         this.context = createWebApplicationContext(servletContext);

      }

      if (this.context instanceof ConfigurableWebApplicationContext) {

         ConfigurableWebApplicationContext cwac = (ConfigurableWebApplicationContext) this.context;

         if (!cwac.isActive()) {

            // The context has not yet been refreshed -> provide services such as

            // setting the parent context, setting the application context id, etc

            if (cwac.getParent() == null) {

               // The context instance was injected without an explicit parent ->

               // determine parent for root web application context, if any.

               ApplicationContext parent = loadParentContext(servletContext);

               cwac.setParent(parent);

            }

            /**

             * 配置并刷新应用的根IOC容器,这里会进行bean的创建和初始化工作。这里面最终会调用

             * {@link org.springframework.context.support.AbstractApplicationContext#refresh refresh()方法}

             * 并且IOC容器中的bean类会被放在application中

             */

            configureAndRefreshWebApplicationContext(cwac, servletContext);

         }

      }

      //以属性的配置方式将application配置servletContext中,因为servletContext是整个应用唯一的,所以可以根据key值获取到application,从而能够获取到应用的所有信息

      servletContext.setAttribute(WebApplicationContext.ROOT_WEB_APPLICATION_CONTEXT_ATTRIBUTE, this.context);

       ....

}
可以看到,initWebApplicationContext() 方法的整个执行过程都是为了创建应用的上下文,即根IOC容器。并且以 setAttribute 的方式将应用上下文设置到了servletContext中,这样在整个应用中都可以使用servletContext来进行各种应用信息的获取。
我们重点跟踪一下 configureAndRefreshWebApplicationContext() 这个方法。
protected void configureAndRefreshWebApplicationContext(ConfigurableWebApplicationContext wac, ServletContext sc) {

   if (ObjectUtils.identityToString(wac).equals(wac.getId())) {

      // The application context id is still set to its original default value

      // -> assign a more useful id based on available information

      String idParam = sc.getInitParameter(CONTEXT_ID_PARAM);

      if (idParam != null) {

         wac.setId(idParam);

      } else {

         // Generate default id...

         wac.setId(ConfigurableWebApplicationContext.APPLICATION_CONTEXT_ID_PREFIX +

               ObjectUtils.getDisplayString(sc.getContextPath()));

      }

   }

   //将ServletContext设置到application的属性中

   wac.setServletContext(sc);

   //获取web.xml中配置的contextConfigLocation参数值

   String configLocationParam = sc.getInitParameter(CONFIG_LOCATION_PARAM);

   if (configLocationParam != null) {

      //将web.xml的配置信息设置到application中

      wac.setConfigLocation(configLocationParam);

   }

   // The wac environment's #initPropertySources will be called in any case when the context

   // is refreshed; do it eagerly here to ensure servlet property sources are in place for

   // use in any post-processing or initialization that occurs below prior to #refresh

   ConfigurableEnvironment env = wac.getEnvironment();

   if (env instanceof ConfigurableWebEnvironment) {

      ((ConfigurableWebEnvironment) env).initPropertySources(sc, null);

   }

   customizeContext(sc, wac);

   //调用应用的refresh方法,进行IOC容器的装载

   wac.refresh();

}
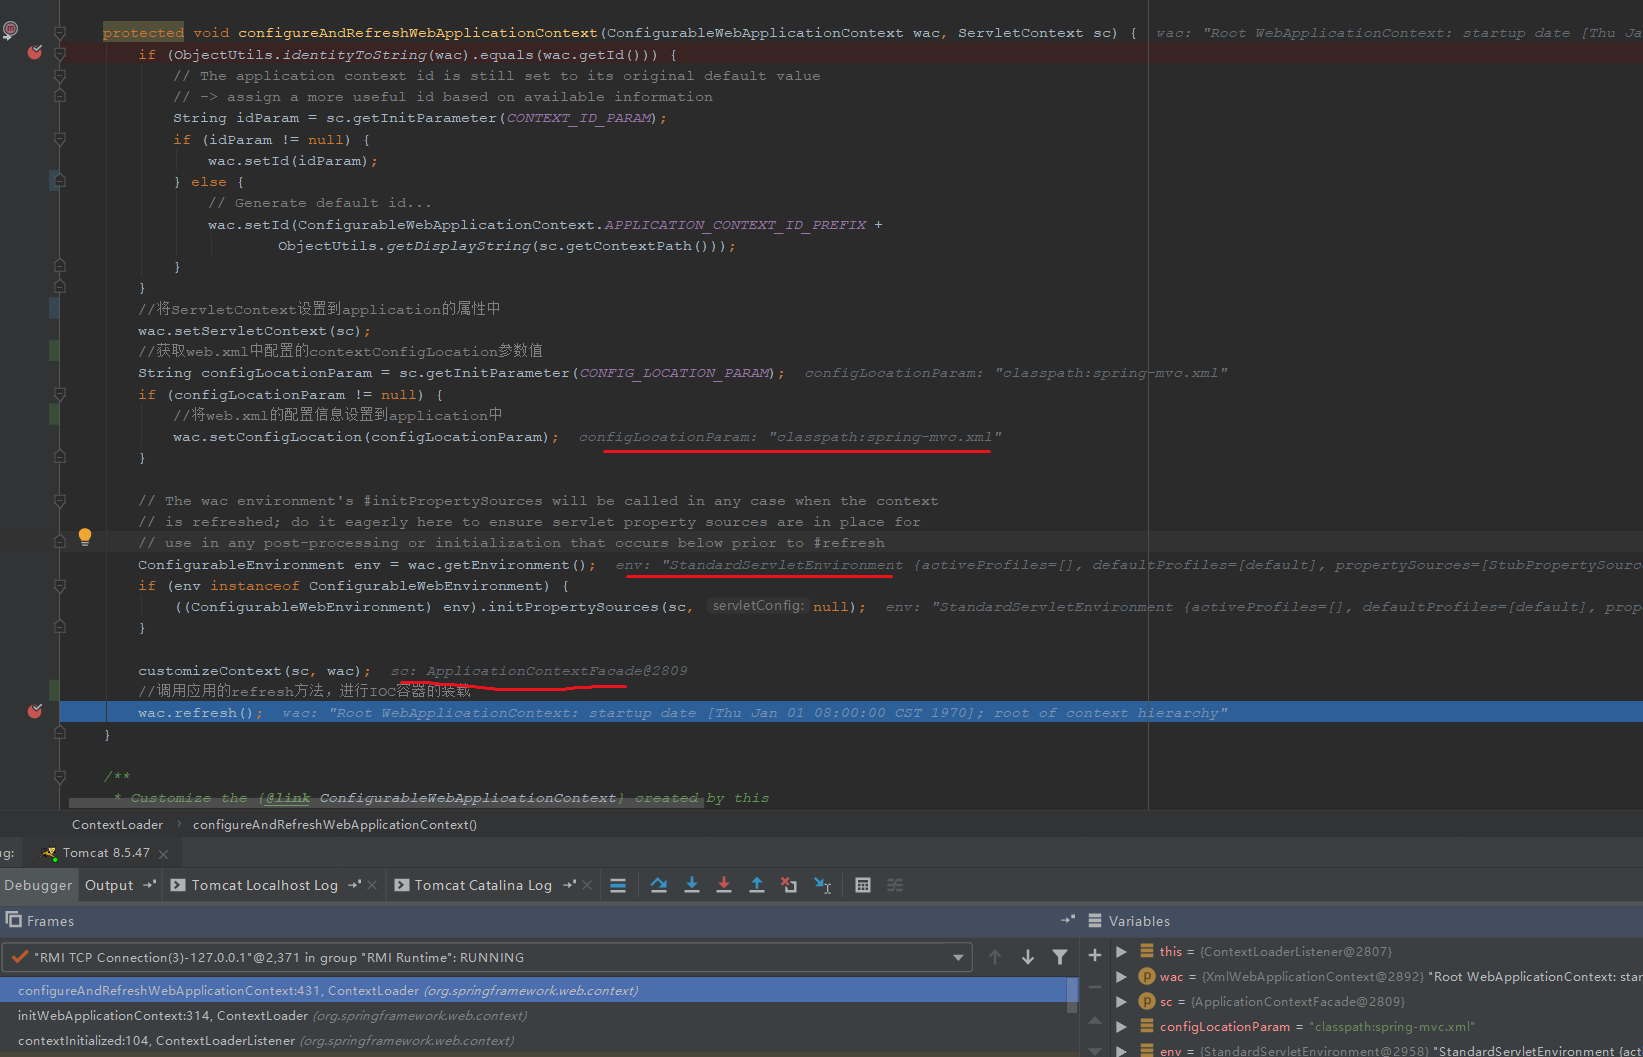
我们跟踪一下debug代码,看看实际的的信息。

我们进入到 refresh() 方法中

可以看到,在refresh中完成了对于IOC容器中bean类的加载处理。
到此为止,SpringMVC已经完成了对于由元素标记的事件监听器。
初始化Filter
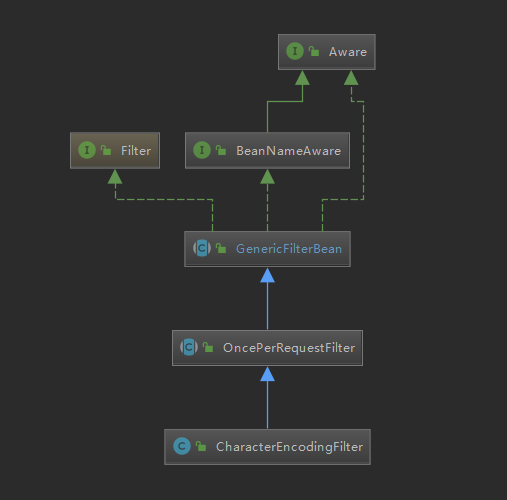
在完成了对于 listener 的初始化操作以后,会进行 filter 的创建和初始化操作。我们这里使用的是 CharacterEncodingFilter 。我们先看一下这个类的具体类图信息。

因为其实现了 Filter 接口,所以会调用其对应的 init(FilterConfig filterConfig) 方法。我们在其父类 GenericFilterBean 中找到了该方法的实现。
@Override

public final void init(FilterConfig filterConfig) throws ServletException {

   this.filterConfig = filterConfig;

   //将设置的初始化参数信息设置到pvs中

   PropertyValues pvs = new FilterConfigPropertyValues(filterConfig, this.requiredProperties);

   if (!pvs.isEmpty()) {

      try {

         //将具体的filter类进行包装

         BeanWrapper bw = PropertyAccessorFactory.forBeanPropertyAccess(this);

         //创建对应的资源加载类

         ResourceLoader resourceLoader = new ServletContextResourceLoader(filterConfig.getServletContext());

         Environment env = this.environment;

         if (env == null) {

            env = new StandardServletEnvironment();

         }

         bw.registerCustomEditor(Resource.class, new ResourceEditor(resourceLoader, env));

         initBeanWrapper(bw);

         bw.setPropertyValues(pvs, true);

      }

      catch (BeansException ex) {

         String msg = "Failed to set bean properties on filter '" +

            filterConfig.getFilterName() + "': " + ex.getMessage();

         logger.error(msg, ex);

         throw new NestedServletException(msg, ex);

      }

   }

   //交由子类来实现

   initFilterBean();

   ...

}
这里并未进行任何的初始化操作。其实Filter的主要作用还是在有请求过来时,进行的 doFilter() 中的处理,在启动阶段,处理比较少。
Servlet的初始化
web应用启动的最后一个步骤就是创建和初始化 Servlet ,我们就从我们使用的 DispatcherServlet 这个类来进行分析,这个类是前端控制器,主要用于分发用户请求到具体的实现类,并返回具体的响应信息。

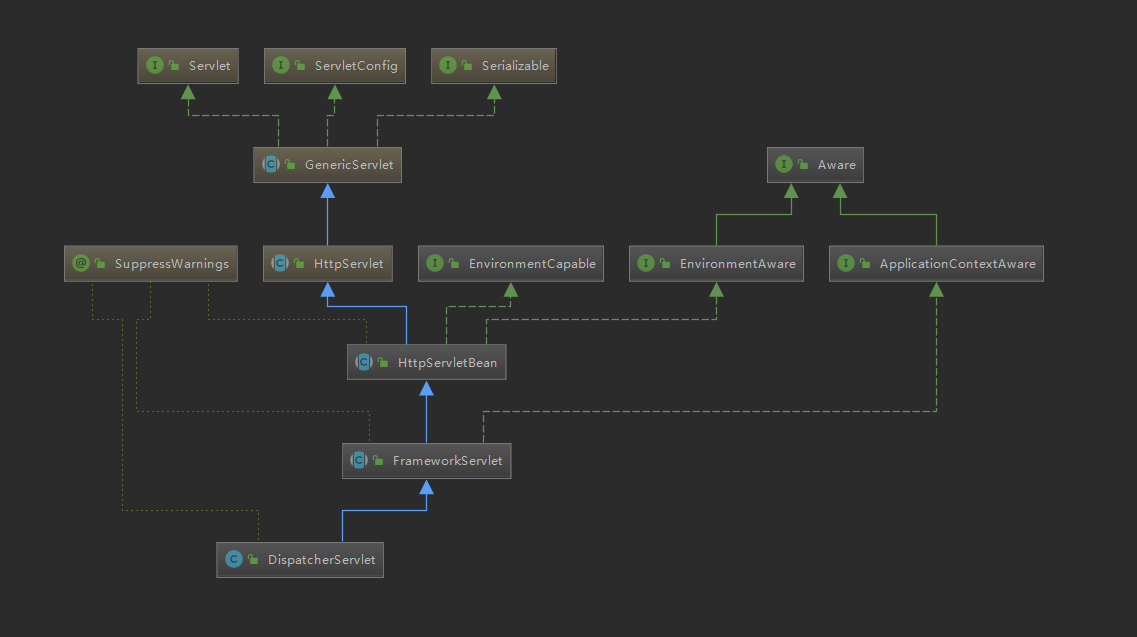
根据类图可以看到,DispatchServlet 实现了 Servlet 接口,所以按照加载过程,最终会调用其 init(ServletConfig config) 方法。我们从 DispatchServlet 中寻找 init(ServletConfig config) 方法的实现,会发现该方法不存在,那么我们继续向上查找,在其父类中去寻找,最终在 GenericServlet 中找到了方法
public void init(ServletConfig config) throws ServletException {

this.config = config;

//交由子类来实现。

this.init();

}
我们在 HttpServletBean 中找到了 init() 方法的具体实现。
public final void init() throws ServletException {

   if (logger.isDebugEnabled()) {

      logger.debug("Initializing servlet '" + getServletName() + "'");

   }

   // Set bean properties from init parameters.

   //设置属性信息

   PropertyValues pvs = new ServletConfigPropertyValues(getServletConfig(), this.requiredProperties);

   if (!pvs.isEmpty()) {

      try {

         //将具体的实现来进行包装,使用了包装者模式

         BeanWrapper bw = PropertyAccessorFactory.forBeanPropertyAccess(this);

         ResourceLoader resourceLoader = new ServletContextResourceLoader(getServletContext());

         bw.registerCustomEditor(Resource.class, new ResourceEditor(resourceLoader, getEnvironment()));

         initBeanWrapper(bw);

         //将web.xml里面设置的属性信息设置到bw中

         bw.setPropertyValues(pvs, true);

      }

      catch (BeansException ex) {

         if (logger.isErrorEnabled()) {

            logger.error("Failed to set bean properties on servlet '" + getServletName() + "'", ex);

         }

         throw ex;

      }

   }

   // Let subclasses do whatever initialization they like.

   //由子类来实现

   initServletBean();

   if (logger.isDebugEnabled()) {

      logger.debug("Servlet '" + getServletName() + "' configured successfully");

   }

}
其中,对于 initServletBean() 方法则又交给了子类来处理,我们最终在 FrameworkServlet 类中找到了对应的实现
@Override

protected final void initServletBean() throws ServletException {

   getServletContext().log("Initializing Spring FrameworkServlet '" + getServletName() + "'");

   if (logger.isInfoEnabled()) {

      logger.info("FrameworkServlet '" + getServletName() + "': initialization started");

   }

   long startTime = System.currentTimeMillis();

   try {

      //初始化web应用容器

      this.webApplicationContext = initWebApplicationContext();

      initFrameworkServlet();

   }

   ...

}
这里面主要是进行了web应用容器上下文的创建,并进行了初始化工作。我们跟踪一下初始化的具体流程
protected WebApplicationContext  () {

   //获取到根IOC容器

   WebApplicationContext rootContext =

         WebApplicationContextUtils.getWebApplicationContext(getServletContext());

   WebApplicationContext wac = null;

   if (this.webApplicationContext != null) {

      // A context instance was injected at construction time -> use it

      wac = this.webApplicationContext;

      if (wac instanceof ConfigurableWebApplicationContext) {

         ConfigurableWebApplicationContext cwac = (ConfigurableWebApplicationContext) wac;

         if (!cwac.isActive()) {

            // The context has not yet been refreshed -> provide services such as

            // setting the parent context, setting the application context id, etc

            if (cwac.getParent() == null) {

               //将根IOC容器设置为servlet的IOC容器的父类

               //如果当前Servlet存在一个WebApplicationContext即子IoC容器

               // 并且上文获取的根IoC容器存在,则将根IoC容器作为子IoC容器的父容器

               cwac.setParent(rootContext);

            }

            //配置并刷新子容器,加载子IOC容器中对应的bean实体类

            configureAndRefreshWebApplicationContext(cwac);

         }

      }

   }

   if (wac == null) {

      // No context instance was injected at construction time -> see if one

      // has been registered in the servlet context. If one exists, it is assumed

      // that the parent context (if any) has already been set and that the

      // user has performed any initialization such as setting the context id

      //如果当前Servlet中不存在子IOC容器,则去查找

      wac = findWebApplicationContext();

   }

   if (wac == null) {

      // No context instance is defined for this servlet -> create a local one

      //如果查找不到,则去创建一个

      wac = createWebApplicationContext(rootContext);

   }

   ...

   return wac;

}
代码比较长,其实 initWebApplicationContext() 函数的主要作用就是初始化一个Web类的IOC容器。通过debug跟踪的时候,我们看到最终会执行到 createWebApplicationContext() 这个方法,继续跟踪代码的执行流程
protected WebApplicationContext createWebApplicationContext(@Nullable ApplicationContext parent) {

   Class<?> contextClass = getContextClass();

   ...

   //根据类信息初始化一个ConfigurableWebApplicationContext对象

   ConfigurableWebApplicationContext wac =

         (ConfigurableWebApplicationContext) BeanUtils.instantiateClass(contextClass);

   //设置web上下文的环境信息

   wac.setEnvironment(getEnvironment());

   //设置其父类为根IOC容器,根IOC容器是整个应用唯一的。

   wac.setParent(parent);

   //设置其具体的配置信息的位置,这里是 classpath:spring-mvc.xml

   String configLocation = getContextConfigLocation();

   if (configLocation != null) {

      wac.setConfigLocation(configLocation);

   }

   //配置并刷新web应用的IOC容器

   configureAndRefreshWebApplicationContext(wac);

   return wac;

}

protected void configureAndRefreshWebApplicationContext(ConfigurableWebApplicationContext wac) {

   ....

   //配置容器的相关信息

   wac.setServletContext(getServletContext());

   wac.setServletConfig(getServletConfig());

   wac.setNamespace(getNamespace());

   //配置容应用的加载监听器

   wac.addApplicationListener(new SourceFilteringListener(wac, new ContextRefreshListener()));

   // The wac environment's #initPropertySources will be called in any case when the context

   // is refreshed; do it eagerly here to ensure servlet property sources are in place for

   // use in any post-processing or initialization that occurs below prior to #refresh

   ConfigurableEnvironment env = wac.getEnvironment();

   if (env instanceof ConfigurableWebEnvironment) {

      ((ConfigurableWebEnvironment) env).initPropertySources(getServletContext(), getServletConfig());

   }

   postProcessWebApplicationContext(wac);

   //应用初始化信息

   applyInitializers(wac);

   //刷新加载里面的Bean实体类

   wac.refresh();

}
这里可以看到,在这个其实主要是根据配置文件信息进行类的加载工作,并且配置了一个容器加载信息的监听器 SourceFilteringListener。在最后通过 refresh() 方法进行了容器中实体类的加载过程。这个 refresh() 方法和我们在 Listener 中实现类的初始化过程使用的是同一个方法。到此为止,在我们应用中配置的所有的类都能够扫描到,并且配置到了我们的IOC容器中。
因为我们配置了相关的容器加载的监听器,在refresh()方法中调用 finishRefresh() 方法时,发送对应的容器加载完成广播信息,从而能够调用我们所注册的监听器 SourceFilteringListener 。我们看一下里面的调用逻辑
public SourceFilteringListener(Object source, ApplicationListener<?> delegate) {

   this.source = source;

   this.delegate = (delegate instanceof GenericApplicationListener ?

         (GenericApplicationListener) delegate : new GenericApplicationListenerAdapter(delegate));

}

@Override

public void onApplicationEvent(ApplicationEvent event) {

	if (event.getSource() == this.source) {

		onApplicationEventInternal(event);

	}

}

protected void onApplicationEventInternal(ApplicationEvent event) {

	if (this.delegate == null) {

		throw new IllegalStateException(

				"Must specify a delegate object or override the onApplicationEventInternal method");

	}

	/**

	 * 这里的delegate,是传入的具体的代理类

	 */

	this.delegate.onApplicationEvent(event);

}
可以看到最后,其实是调用了我们创建这个类时,传入的 ContextRefreshListener 这个对象的 onApplicationEvent 这个方法。我们继续看一眼这个类
private class ContextRefreshListener implements ApplicationListener<ContextRefreshedEvent> {

   @Override

   public void onApplicationEvent(ContextRefreshedEvent event) {

      //最终调用了FrameworkServlet的onApplicationEvent方法

      FrameworkServlet.this.onApplicationEvent(event);

   }

}
继续跟踪:
public void onApplicationEvent(ContextRefreshedEvent event) {

   this.refreshEventReceived = true;

   synchronized (this.onRefreshMonitor) {

      //调用了onRefresh方法

      onRefresh(event.getApplicationContext());

   }

}

protected void onRefresh(ApplicationContext context) {

	// For subclasses: do nothing by default.

}
可以看到,最后的 onRefresh() 是由子类来实现的,也就是我们的 DispatcherServlet 类。
终于到我们的正主出场了。。

我们看看我们的正主到底干了个什么活
    //context为DispatcherServlet创建的一个IoC子容器

    @Override

    protected void onRefresh(ApplicationContext context) {

        initStrategies(context);

    }

	//初始化servlet使用的策略信息,子类可以通过覆写该方法类增加更多的呃策略方法

	protected void initStrategies(ApplicationContext context) {

		//初始化MultipartResolver,可以支持文件的上传

		initMultipartResolver(context);

		//初始化本地解析器

		initLocaleResolver(context);

		//初始化主题解析器

		initThemeResolver(context);

		//处理器映射器,将请求和方法进行映射关联

		initHandlerMappings(context);

		//处理器适配器

		initHandlerAdapters(context);

		//处理器异常解析器

		initHandlerExceptionResolvers(context);

		//

		initRequestToViewNameTranslator(context);

		//视图解析器

		initViewResolvers(context);

		//FlashMap管理器

		initFlashMapManager(context);

	}
可以看到里面主要是初始化了我们的所使用到的一些解析器和处理器等。当接收到请求后,就可以根据这些解析器来进行请求的解析处理、方法的调用、异常的处理等等。
到此为止,Servlet的初始化工作就整个完成了。想当的复杂,主要是将很多的方法实现在父类中进行了处理。层级比较复杂,需要一点点跟踪分析。
本文由 开了肯 发布!
SpringMVC启动流程源码解密的更多相关文章
- Spring IOC 容器预启动流程源码探析
Spring IOC 容器预启动流程源码探析 在应用程序中,一般是通过创建ClassPathXmlApplicationContext或AnnotationConfigApplicationConte ...
- Android Activity启动流程源码全解析(1)
前言 Activity是Android四大组件的老大,我们对它的生命周期方法调用顺序都烂熟于心了,可是这些生命周期方法到底是怎么调用的呢?在启动它的时候会用到startActivty这个方法,但是这个 ...
- Android Activity启动流程源码全解析(2)
接上之前的分析 ++Android Activity启动流程源码全解析(1)++ 1.正在运行的Activity调用startPausingLocked 一个一个分析,先来看看startPausing ...
- Spring IOC容器启动流程源码解析(四)——初始化单实例bean阶段
目录 1. 引言 2. 初始化bean的入口 3 尝试从当前容器及其父容器的缓存中获取bean 3.1 获取真正的beanName 3.2 尝试从当前容器的缓存中获取bean 3.3 从父容器中查找b ...
- Spark(五十一):Spark On YARN(Yarn-Cluster模式)启动流程源码分析(二)
上篇<Spark(四十九):Spark On YARN启动流程源码分析(一)>我们讲到启动SparkContext初始化,ApplicationMaster启动资源中,讲解的内容明显不完整 ...
- Spark(四十九):Spark On YARN启动流程源码分析(一)
引导: 该篇章主要讲解执行spark-submit.sh提交到将任务提交给Yarn阶段代码分析. spark-submit的入口函数 一般提交一个spark作业的方式采用spark-submit来提交 ...
- 【图解源码】Zookeeper3.7源码分析,包含服务启动流程源码、网络通信源码、RequestProcessor处理请求源码
Zookeeper3.7源码剖析 能力目标 能基于Maven导入最新版Zookeeper源码 能说出Zookeeper单机启动流程 理解Zookeeper默认通信中4个线程的作用 掌握Zookeepe ...
- SpringMVC请求流程源码分析
一.SpringMVC使用 1.工程创建 创建maven工程. 添加java.resources目录. 引入Spring-webmvc 依赖. <dependency> <group ...
- SpringMvc请求流程源码解析
目录 SpringMvc请求流程图 请求流程粗讲解 方法细讲 doDispatcher --> 核心 找到Handler#getHandler getHandler(request) mappi ...
随机推荐
- 四叶草(css)
<!DOCTYPE html><html><head> <meta charset="utf-8"> <style> . ...
- java Scanner(简单文本扫描器)
Scanner(File source) 构造一个新的 Scanner,它生成的值是从指定文件扫描的. 备注:实现了Iterable接口 package june6D; import java. ...
- 机器学习——集成学习之Boosting
整理自: https://blog.csdn.net/woaidapaopao/article/details/77806273?locationnum=9&fps=1 AdaBoost GB ...
- H3C STP的作用
- dotnet Framework 源代码 类库的意思
本文告诉大家 dotnet framework 的源代码类库的意思 下面列出来 dotnet framework 源代码的各个类库的作用. System System 命名空间包含基本类和基类,这些类 ...
- spring的69个问题
1.什么是Spring? Spring是一个开源的Java EE开发框架.Spring框架的核心功能可以应用在任何Java应用程序中,但对Java EE平台上的Web应用程序有更好的扩展性.Sprin ...
- dotnet 特性 DynamicallyInvokable 是用来做什么的
我在 Linq 很多函数都看到 __DynamicallyInvokable 这个特性,这是一个没有官方文档的特性,也许是用来优化反射 在堆栈 网找到了以下描述 这个 __DynamicallyInv ...
- 树莓派4安装net core3.0环境
树莓派4官方系统是32系统,所以需要安装arm32版本的net core sk和runtime 1,首先创建一个文件夹 dotnet-arm32 sudo mkdir dotnet arm32 2,下 ...
- Java 学习笔记(10)——容器
之前学习了java中从语法到常用类的部分.在编程中有这样一类需求,就是要保存批量的相同数据类型.针对这种需求一般都是使用容器来存储.之前说过Java中的数组,但是数组不能改变长度.Java中提供了另一 ...
- Android APP开发内容图片不显示
I/Glide: Root cause (1 of 1) Cause (1 of 1): class java.io.FileNotFoundException: No content provide ...
