首先在html中的写法是

<ion-header>
<ion-navbar>
<ion-title>历史数据</ion-title>
</ion-navbar>
</ion-header>
<ion-content >
<div style="display:flex;width:625px;">
 
<div class="head">地区</div>
<div style="overflow: hidden;white-space: nowrap;width:250px;height: 50px;" >
<ion-scroll #scroll1 scrollX="true" overflow-scroll="true" has-bouncing="false" (onScroll)="addScrollEventListener()" style="margin-top:0;height:50px">
<div style="display:flex;width:500px;height:50px" id="right">
<div class="head" >到件量</div>
<div class="head">出仓量</div>
<div class="head">滞留量</div>
<div class="head" style="border-right:0;">未派送量</div>
</div>
</ion-scroll>
</div>
 
</div>
<div style="display:flex;width:625px;height: 650px;white-space: nowrap;" >
<ion-scroll #scroll2   scrollY="true" overflow-scroll="true" has-bouncing="false" style="height:550px;width: 125px">
<div *ngFor="let d of data" class="head" >
{{d.zoneName}}
</div>
</ion-scroll>
<div style="overflow: hidden;white-space: nowrap;width:250px">
<ion-scroll direction="xy" #scroll3 scrollX="true" scrollY="true" overflow-scroll="false" has-bouncing="false" delegate-handle="rightContainerHandle" style="height:550px;">
<div style="width:500px;" >
<div *ngFor="let d of data" style="display:flex;" >
<div class="head" >
{{d.arriveTickets}}
</div>
<div class="head">
{{d.moniOutCnt}}
</div>
<div class="head">
{{d.moniStayCnt}}
</div>
<div class="head" style="border-right:0;">
{{d.moniUndeliveryCnt}}
</div>
</div>
</div>
</ion-scroll>
</div>
</div>
</ion-content>
标红颜色的首先是在ts中滚动时需要用到的变量,是个标识符。这个问题我纠结了两天才搞出来。一定记得滚动的监听事件不是on-scroll了


ts中的代码

import { Component, SystemJsNgModuleLoader,HostListener,NgZone ,ViewChild } from '@angular/core';
import { NavController, NavParams,IonicPageModule} from 'ionic-angular';
import{RestProvider} from '../../providers/rest/rest';
import {Http,Response, Jsonp} from '@angular/http';
import { IonicModule } from 'ionic-angular';
import { NgModule, ErrorHandler ,CUSTOM_ELEMENTS_SCHEMA, SchemaMetadata} from '@angular/core';
import { Directive, ElementRef, Output,Input, EventEmitter } from '@angular/core';
import { ScrollEventModule,ScrollEvent } from 'ngx-scroll-event';
import {Content,Scroll,Spinner} from 'ionic-angular'
import { asElementData } from '@angular/core/src/view';
/**
* Generated class for the AlarmPage page.
*
* See https://ionicframework.com/docs/components/#navigation for more info on
* Ionic pages and navigation.
*/
@Component({
selector: 'page-rank',
templateUrl: 'rank.html',
})
@NgModule({
imports: [IonicModule,IonicPageModule,ScrollEventModule]
})
export class RankPage {
@Output() scrollChange = new EventEmitter<number>();
@ViewChild(Spinner) spinnerElement: Spinner;
@ViewChild(Content) content: Content;
@ViewChild('scroll3') scroll3: Scroll;
@ViewChild('scroll1') scroll1: Scroll;
@ViewChild('scroll2') scroll2: Scroll;
 
//括号中的值在html页面中标注的时候,名称不能其他属性相同。如该文件已经有一个pnavs的变量,则会报错。
 
addScrollEventListener() {
this.scroll2._scrollContent.nativeElement.onscroll = event => {
this.scroll3._scrollContent.nativeElement.scrollTop =this.scroll2._scrollContent.nativeElement.scrollTop;
// this.scroll1._scrollContent.nativeElement.scrollLeft =this.scroll2._scrollContent.nativeElement.scrollLeft;
}
this.scroll1._scrollContent.nativeElement.onscroll = event => {
//this.scroll3._scrollContent.nativeElement.scrollTop =this.scroll2._scrollContent.nativeElement.scrollTop;
this.scroll3._scrollContent.nativeElement.scrollLeft =this.scroll1._scrollContent.nativeElement.scrollLeft;
}
this.scroll3._scrollContent.nativeElement.onscroll = event => {
this.scroll2._scrollContent.nativeElement.scrollTop =this.scroll3._scrollContent.nativeElement.scrollTop;
this.scroll1._scrollContent.nativeElement.scrollLeft =this.scroll3._scrollContent.nativeElement.scrollLeft;
}
}
ionViewDidLoad() {
this.addScrollEventListener();
}
data=[
{'zoneName':'广州区','arriveTickets':'6987','moniOutCnt':'2221','moniStayCnt':'45','moniUndeliveryCnt':'44'},
{'zoneName':'深圳区','arriveTickets':'2356','moniOutCnt':'331','moniStayCnt':'45','moniUndeliveryCnt':'44'},
{'zoneName':'武汉区','arriveTickets':'6744','moniOutCnt':'2621','moniStayCnt':'45','moniUndeliveryCnt':'44'},
{'zoneName':'苏州区','arriveTickets':'6542','moniOutCnt':'2881','moniStayCnt':'45','moniUndeliveryCnt':'44'},
{'zoneName':'杭州区','arriveTickets':'2367','moniOutCnt':'5621','moniStayCnt':'45','moniUndeliveryCnt':'44'},
{'zoneName':'东莞区','arriveTickets':'1129','moniOutCnt':'1221','moniStayCnt':'45','moniUndeliveryCnt':'44'},
{'zoneName':'惠州区','arriveTickets':'7893','moniOutCnt':'4521','moniStayCnt':'45','moniUndeliveryCnt':'44'},
{'zoneName':'汕头区','arriveTickets':'2356','moniOutCnt':'7821','moniStayCnt':'45','moniUndeliveryCnt':'44'},
{'zoneName':'清远区','arriveTickets':'67554','moniOutCnt':'9921','moniStayCnt':'45','moniUndeliveryCnt':'44'},
{'zoneName':'长沙区','arriveTickets':'5534','moniOutCnt':'2221','moniStayCnt':'45','moniUndeliveryCnt':'44'},
{'zoneName':'岳阳区','arriveTickets':'6643','moniOutCnt':'2221','moniStayCnt':'45','moniUndeliveryCnt':'44'},
{'zoneName':'株洲区','arriveTickets':'6546','moniOutCnt':'2221','moniStayCnt':'45','moniUndeliveryCnt':'44'},
{'zoneName':'南充区','arriveTickets':'4353','moniOutCnt':'2221','moniStayCnt':'45','moniUndeliveryCnt':'44'},
{'zoneName':'鞍山区','arriveTickets':'4526','moniOutCnt':'2221','moniStayCnt':'45','moniUndeliveryCnt':'44'}
];
city=["杭州","郑州","上海","广州","杭州","杭州","杭州","杭州","杭州","杭州","杭州","杭州","杭州","杭州","杭州","杭州","杭州","杭州","杭州","杭州","杭州","杭州","杭州","杭州",];
stylefor=["含氮量","含磷量","含钾量","含氮量","含磷量","含钾量","含氮量","含磷量","含钾量","含氮量","含磷量","含钾量","含氮量","含磷量","含钾量","含氮量","含磷量","含钾量",];
d=[1,2,3,4,5,6,7,8,9];
list=[];
public items:any=[];
constructor(public navCtrl: NavController,public rest:RestProvider,public jsonp:Jsonp,public http:Http,public zone: NgZone,private el: ElementRef) {//首次打开要显示的数据
 
this.geturl();
}
geturl(){
//console.log(this.getData("http://www.phonegap100.com/appapi.php?a=getPortalList&catid=20&page=2&callback=JSONP_CALLBACK"));
//var list=this.getData("http://www.phonegap100.com/appapi.php?a=getPortalList&catid=20&page=2&callback=JSONP_CALLBACK");
this.jsonp.get("http://www.phonegap100.com/appapi.php?a=getPortalList&catid=20&page=2&callback=JSONP_CALLBACK").subscribe(function(data){
console.log(data["_body"]);
});
this.http.get("http://www.phonegap100.com/appapi.php?a=getPortalList&catid=20&page=2").subscribe(function(data){
console.log(JSON.parse(data["_body"]));
});
}
public getData(url:string):any{
var rs=this.list;
this.jsonp.get(url).subscribe(function(data){
console.log(data["_body"]["result"]);
var resData:any[]=data["_body"]["result"];
for(var i=0;i<resData.length;i++){
rs.push(resData[i])
}
},function(err){
console.log(err)
})
 
return this.list;
 
}
 
}
 
 
ts中标红的代码是前面html标红的相呼应,然后addScrollEventListener进行滚动的监听 注意:  ionViewDidLoad()这个是ionic3本身的方法,只要触动页面,就能调用这个方法,无论点击还是拉动。
 
然后就是

this.scroll2._scrollContent.nativeElement.onscroll = event => {
this.scroll3._scrollContent.nativeElement.scrollTop =this.scroll2._scrollContent.nativeElement.scrollTop;
// this.scroll1._scrollContent.nativeElement.scrollLeft =this.scroll2._scrollContent.nativeElement.scrollLeft;
}就是监听事件,只要滑动就能触发的事件


css代码

*{

margin:0px;

padding:0px;

}

.focus{

height: 150px;

width: 100%;

ion-slide{

height: 150px;

width: 100%;

img{

height: 150px;

width: 100%;

}

}

}

.slide_product{

//滚动

ion-scroll{

width:100%;

height:800px;

}

ul{

list-style: none;

padding: 0px 5px;

li{

width: 80px;

height: 120px;

float: left;

margin-right: 10px;

p{

padding:4px;

margin:0px;

}

}

}

}

.home_title{

height: 50px;

width: 100%;

background-image: url("../../assets/imgs/pict1.jpg");

}

.home_title{

height: 50px;

}

.cate_content{

width:100%;

height: 100%; /*首先看高度100% 是否管用 如果没有作用我们要给元素设置绝对定位*/

display: flex;

.cate_left{

width: 100px;

height: 100%;

overflow-y: auto;

}

.cate_right{

height: 100%;

flex:1;

margin-left:5px;

overflow-y: auto;

}

}

table.gridtable {

font-family: verdana,arial,sans-serif;

font-size:11px;

color:#333333;

border-width: 1px;

border-color: #666666;

border-collapse: collapse;

}

table.gridtable th {

border-width: 1px;

padding: 8px;

width:2%;

border-style: solid;

border-color: #666666;

background-color: #dedede;

}

table.gridtable td {

border-width: 1px;

padding: 8px;

width:2%;

border-style: solid;

border-color: #666666;

background-color: #ffffff;

color: #f53d3d;

}

.head{

border-bottom:solid 1px #D1D3D6;

border-right:solid 1px #D1D3D6;

height:50px;

display:flex;

align-items:center;

width:125px;

font-size:14px;

color:#262626;

justify-content:center;

}

代码效果图如下
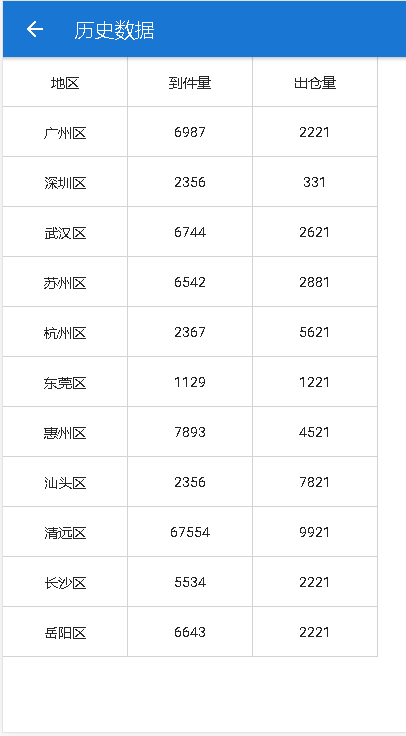
2018-08-17

利用ionic3进行上一行和左一行不动,中间移动的功能的更多相关文章

  1. 【零碎小bug系列】windows下的回车和换行符,cmd(telnet)上输出不左对齐

    cmd(telnet)上输出不左对齐,而是有莫名其妙的空格 目录 cmd(telnet)上输出不左对齐,而是有莫名其妙的空格 背景 解决 细究 背景 在cmd上使用telnet连接本地端口的服务器时, ...

  2. App上架流程[利用Archive进行上传]

    作者 M_Lee2016.01.22 10:47 写了14852字,被32人关注,获得了49个喜欢 [iOS]App上架流程[利用Archive进行上传] 字数2186 阅读507 评论3 喜欢9 今 ...

  3. 【ARM-LInux开发】利用scp 远程上传下载文件/文件夹

    利用scp 远程上传下载文件/文件夹 scp [-1246BCpqrv] [-c cipher] [-F ssh_config] [-i identity_file] [-l limit] [-o s ...

  4. sed在文本第一行和最后一行添加字符串

    shell在文本第一行和最后一行添加字符串 sed -i '1 i\ApiInterfaceName ResposeTime' /tmp/apiLog/apiLogFromatSecond.logse ...

  5. 利用 FormData 对象和 Spring MVC 配合可以实现Ajax文件上载功能

    Ajax文件上载 利用 FormData 对象和 Spring MVC 配合可以实现Ajax文件上载功能: 步骤 导入组件并准备静态脚本 <dependency> <groupId& ...

  6. Android Camera开发系列(上)——Camera的基本调用与实现拍照功能以及获取拍照图片加载大图片

    Android Camera开发系列(上)--Camera的基本调用与实现拍照功能以及获取拍照图片加载大图片 最近也是在搞个破相机,兼容性那叫一个不忍直视啊,于是自己翻阅了一些基本的资料,自己实现了一 ...

  7. js进阶 12-17 jquery实现鼠标左键按下拖拽功能

    js进阶 12-17 jquery实现鼠标左键按下拖拽功能 一.总结 一句话总结:监听的对象必须是文档,鼠标按下运行mousemove事件,鼠标松开取消mousemove事件的绑定,div的偏移的话是 ...

  8. (Demo分享)利用JavaScript(JS)做一个可输入分钟的倒计时钟功能

    利用JavaScript(JS)实现一个可输入分钟的倒计时钟功能本文章为 Tz张无忌 原创文章,转载请注明来源,谢谢合作! 网络各种利用JavaScript做倒计时的Demo对新手很不友好,这里我亲手 ...

  9. 利用WebRequest类上传文件

    说明:1.WebRequest类是一个抽象类,所以上传类实际使用的是其子类 2.打开Fiddler软件,监视正常网页的文件上传,可以看到http协议的请求和响应信息,简略说明 (第一行:请求说明 PO ...

随机推荐

  1. bash的默认组合键

    组合键 组合按键 执行结果 Ctrl+C 终止目前的命令 Ctrl+D 输入结束(EOF),例如邮件结束的时候 Ctrl+M 就是Enter啦! Ctrl+S 暂停屏幕输出 Ctrl+Q 恢复屏幕输出 ...

  2. Math&Random&ThreadLocalRandom类

    Math类 //绝对值值运算: Math.abs(18.999); //返回19.999这个数的绝对值 Math.abs(-12.58); // 返回-12.58这个数的绝对值,为12.58 //取值 ...

  3. SpringBoot2 整合Nacos组件,环境搭建和入门案例详解

    本文源码:GitHub·点这里 || GitEE·点这里 一.Nacos基础简介 1.概念简介 Nacos 是构建以"服务"为中心的现代应用架构,如微服务范式.云原生范式等服务基础 ...

  4. 开发STM32MP1,你需要一块好开发板

    STM32MP1系列的出现吸引了很多STM32的新老用户的关注,但是很多的人都会担心一个问题:以前是基于Cortex M系列MCU惊醒开发,对于cortex-A架构的处理器以及Linux系统都不熟悉. ...

  5. Java操作Jxl实现数据交互。三部曲——《第三篇》

    Java操作Jxl实现上传文本文件实现转PDF格式在线预览. 本文实现背景Web项目:前台用的框架是Easyui+Bootstrap结合使用,需要引入相应的Js.Css文件.页面:Jsp.拦截请求:S ...

  6. python中方法调用和函数调用的区别

    函数调用: 传几个参数,就会有几个实参方法调用: 默认传递一个参数self,至少要定义一个形参

  7. 通过模拟Mybatis动态代理生成Mapper代理类,讲解Mybatis核心原理

    本文将通过模拟Mybatis动态代理生成Mapper代理类,讲解Mybatis原理 1.平常我们是如何使用Mapper的 先写一个简单的UserMapper,它包含一个全表查询的方法,代码如下 pub ...

  8. css文字溢出显示省略号

    1.单行文字溢出显示省略号. overflow: hidden; text-overflow: ellipsis; white-space: nowrap;//文本不换行 2.多行文本溢出显示省略号. ...

  9. Windows 7原版映像中添加usb3.0驱动

    最近用软碟通制作了一个win7原版映像,但是在装新系统的时候发现了一个问题,进入安装界面后,显示没有找到驱动器,但是明明是差了U盘的,通过“shift+f12”调出命令行窗口,输入disk list命 ...

  10. 【自制操作系统06】终于开始用 C 语言了,第一行内核代码!

    一.整理下到目前为止的流程图 写到这,终于才把一些苦力活都干完了,也终于到了我们的内核代码部分,也终于开始第一次用 c 语言写代码了!为了这个阶段性的胜利,以及更好地进入内核部分,下图贴一张到目前为止 ...