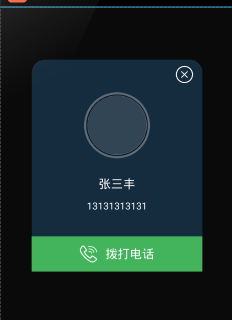
46、PopWindow工具类

<?xml version="1.0" encoding="utf-8"?>

<shape xmlns:android="http://schemas.android.com/apk/res/android"

    android:shape="rectangle">

    <solid android:color="@color/home_00" />

    <corners

        android:bottomLeftRadius="20dp"

        android:bottomRightRadius="20dp"

        android:topLeftRadius="20dp"

        android:topRightRadius="20dp" />

    <stroke

        android:width="2dp"

        android:color="@color/home_00" />

</shape>
<RelativeLayout xmlns:android="http://schemas.android.com/apk/res/android"

    android:layout_width="match_parent"

    android:layout_height="match_parent"

    android:layout_centerHorizontal="true"

    android:layout_centerVertical="true">

    <RelativeLayout

        android:layout_width="280dp"

        android:layout_height="wrap_content"

        android:background="@drawable/pop_bg"

        android:orientation="vertical"

        android:id="@+id/pop_student"

        android:layout_centerVertical="true"

        android:layout_centerHorizontal="true">

        <ImageView

            android:id="@+id/img_pop_close"

            android:layout_width="wrap_content"

            android:layout_height="wrap_content"

            android:src="@drawable/student_close"

            android:layout_alignParentRight="true"

            android:layout_marginTop="10dp"

            android:layout_marginRight="15dp"

            android:layout_alignParentTop="true" />

        <LinearLayout xmlns:app="http://schemas.android.com/apk/res-auto"

            android:id="@+id/layout_head"

            android:background="@drawable/student_head_bg"

            android:layout_below="@id/img_pop_close"

            android:layout_marginTop="15dp"

            android:layout_width="wrap_content"

            android:layout_height="wrap_content"

            android:gravity="center"

            android:orientation="horizontal"

            android:layout_centerHorizontal="true">

            <com.jtx.iintroduce.widget.CircleImageView

                android:id="@+id/img_pop_head"

                android:layout_width="100dp"

                android:layout_height="100dp"

                android:src="@drawable/home_head"

                app:border_width="1dp" />

        </LinearLayout>

        <TextView

            android:id="@+id/txt_pop_name"

            android:layout_width="wrap_content"

            android:layout_height="wrap_content"

            android:layout_below="@id/layout_head"

            android:textColor="@color/white"

            android:layout_centerHorizontal="true"

            android:layout_marginTop="30dp"

            android:textSize="20sp"

            android:text="张三丰" />

        <TextView

            android:id="@+id/txt_pop_phone"

            android:layout_width="wrap_content"

            android:layout_height="wrap_content"

            android:layout_below="@id/txt_pop_name"

            android:textColor="@color/white"

            android:layout_centerHorizontal="true"

            android:layout_marginTop="15dp"

            android:textSize="16sp"

            android:text="13131313131" />

        <LinearLayout

            android:layout_width="match_parent"

            android:layout_height="wrap_content"

            android:layout_below="@id/txt_pop_phone"

            android:gravity="center"

            android:background="@drawable/pop_bg_button"

            android:paddingTop="5dp"

            android:paddingBottom="5dp"

            android:layout_marginTop="40dp">

            <Button

                android:id="@+id/btn_pop_call"

                android:layout_width="wrap_content"

                android:layout_height="wrap_content"

                android:background="@color/transparent"

                android:textColor="@color/white"

                android:textSize="20sp"

                android:text="拨打电话"

                android:drawablePadding="13dp"

                android:drawableLeft="@drawable/student_phone2" />

        </LinearLayout>

   </RelativeLayout>

</RelativeLayout>
 public class StudentPopWindow extends PopupWindow implements View.OnClickListener {

     private View popView = null;

     private BaseActivity act = null;

     private CircleImageView img_pop_head = null;

     private TextView txt_pop_name = null;

     private TextView txt_pop_phone = null;

     private String strPhone = null;

     public StudentPopWindow(BaseActivity act, String head, String name, String phone) {

         super(act);

         LayoutInflater inflater = (LayoutInflater) act

                 .getSystemService(Context.LAYOUT_INFLATER_SERVICE);

         popView = inflater.inflate(R.layout.pop_student, null);

         this.act = act;

         strPhone = phone;

         popView.findViewById(R.id.btn_pop_call).setOnClickListener(this);

         popView.findViewById(R.id.img_pop_close).setOnClickListener(this);

         img_pop_head = (CircleImageView) popView.findViewById(R.id.img_pop_head);

         txt_pop_name = (TextView) popView.findViewById(R.id.txt_pop_name);

         txt_pop_phone = (TextView) popView.findViewById(R.id.txt_pop_phone);

         act.mToolBitmap.display(img_pop_head, head);

         txt_pop_name.setText(name);

         txt_pop_phone.setText(phone);

         //设置SelectPicPopupWindow的View

         this.setContentView(popView);

         //设置SelectPicPopupWindow弹出窗体的宽

         this.setWidth(LayoutParams.MATCH_PARENT);

         //设置SelectPicPopupWindow弹出窗体的高

         this.setHeight(LayoutParams.MATCH_PARENT);

         //设置SelectPicPopupWindow弹出窗体可点击

         this.setFocusable(true);

         //设置SelectPicPopupWindow弹出窗体动画效果

         //this.setAnimationStyle(R.style.AnimBottom);

         //实例化一个ColorDrawable颜色为半透明

         ColorDrawable dw = new ColorDrawable(act.getResources().getColor(R.color.b_translucent));

         //设置SelectPicPopupWindow弹出窗体的背景

         this.setBackgroundDrawable(dw);

         //mMenuView添加OnTouchListener监听判断获取触屏位置如果在选择框外面则销毁弹出框

         /*popView.setOnTouchListener(new OnTouchListener() {

             public boolean onTouch(View v, MotionEvent event) {

                 int height = popView.findViewById(R.id.pop_student).getTop();

                 int y=(int) event.getY();

                 if (event.getAction() == MotionEvent.ACTION_UP) {

                     if (y < height) {

                         dismissPop();

                     }

                 }

                 return true;

             }

         });*/

     }

     @Override

     public void onClick(View v) {

         switch (v.getId()) {

             case R.id.img_pop_close:

                 dismissPop();

                 break;

             case R.id.btn_pop_call:

                 Intent intent = new Intent(Intent.ACTION_CALL, Uri.parse("tel://" + strPhone));

                 act.startActivity(intent);

                 break;

         }

     }

     private void dismissPop() {

         popView = null;

         act = null;

         img_pop_head = null;

         txt_pop_name = null;

         txt_pop_phone = null;

         strPhone = null;

         dismiss();

     }

 }
String strHead = listData.get(position).photo;

String strName = listData.get(position).name;

String strPhone = listData.get(position).phone;

popWindow = new StudentPopWindow(mActivity, strHead, strName, strPhone);

                popWindow.setHeight(ViewGroup.LayoutParams.MATCH_PARENT);

popWindow.setWidth(ViewGroup.LayoutParams.MATCH_PARENT);

//显示窗口

//设置layout在PopupWindow中显示的位置

popWindow.showAtLocation(view, Gravity.CENTER, 0, 0);
46、PopWindow工具类的更多相关文章
- Android 工作流提交审批填写审批意见PopWindow工具类
公司的项目中几乎都会有走工作流这个环节,为了提高效率,现在特意把弹出的填写审批意见PopWindow改转成工具类,提高效率,免得下次又得整.先看运行效果.
- Java 集合-Arrays工具类的介绍
2017-10-31 18:39:46 Arrrays工具类:此类包含用来操作数组(比如排序和搜索)的各种方法. 常用方法: 主要是数组的一些常用方法如: asList:将数组转成集合 binaryS ...
- Java常用类归纳(Object、System、Properties、包装类和工具类等等)
Object类 Object 是类层次结构的根类.每个类都使用 Object 作为超类,所有对象(包括数组)都实现这个类的方法.了解Object的方法是很有必要的. protected Object ...
- Android—关于自定义对话框的工具类
开发中有很多地方会用到自定义对话框,为了避免不必要的城府代码,在此总结出一个工具类. 弹出对话框的地方很多,但是都大同小异,不同无非就是提示内容或者图片不同,下面这个类是将提示内容和图片放到了自定义函 ...
- [转]Java常用工具类集合
转自:http://blog.csdn.net/justdb/article/details/8653166 数据库连接工具类——仅仅获得连接对象 ConnDB.java package com.ut ...
- .net使用正则表达式校验、匹配字符工具类
开发程序离不开数据的校验,这里整理了一些数据的校验.匹配的方法: /// <summary> /// 字符(串)验证.匹配工具类 /// </summary> public c ...
- Android 系统工具类SystemUtils
包含的功能有: 获取系统中所有APP应用.获取用户安装的APP应用.根据包名和Activity启动类查询应用信息.跳转到WIFI设置.WIFI网络开关.移动网络开关.GPS开关 当前若关则打开 当前若 ...
- App开发流程之加密工具类
科技优家 2016-09-08 18:10 从这篇记录开始,记录的都算是干货了,都是一些编程日常的积累. 我建议先将基础的工具加入项目,后续的开发效率会呈指数增长.如果在专注功能开发过程中,才发现缺少 ...
- Json与javaBean之间的转换工具类
/** * Json与javaBean之间的转换工具类 * * {@code 现使用json-lib组件实现 * 需要 * json-lib-2.4-jdk15.jar * ...
随机推荐
- java 压缩和解压zip包
网上有关压缩和解压zip包的博文一大堆,我随便找了一个.看了看,依照自己的须要改动了一下,与各位分享一下,希望各位大神指正: package com.wangpeng.utill; import ja ...
- 使用Google-Authenticator加强serverSSH登录
对于须要特殊加密的人群,我这里给出对应的方法来进行谷歌式加密. 过程例如以下: 准备: 首先在你的手机上准备好client(自己百度下载) 接下来依照命令做: date 查看系统时间 da ...
- 利用 MySQL 技能学习 DB2 Express: DB2 与 MySQL 的管理任务和基本任务
原文地址:http://www.ibm.com/developerworks/cn/data/library/techarticles/dm-0602tham2/index.html 简单介绍 管理不 ...
- Sencha Touch开发完整流程快速讲解
1.目录 移动框架简介,为什么选择Sencha Touch? 环境搭建 创建项目框架,框架文件简介 创建简单Tabpanel案例 自定义图标的方式 WebApp产品测试和发布 HTML5离线缓存 发布 ...
- flask 框架 前端和后端请求超时问题
部署模式 flask + Gunicorn + nginx 为什么要用Gunicorn + nginx ? 请看知乎大神们的回答:https://www.zhihu.com/question/3852 ...
- (二)Oracle学习笔记—— 序列
1. 序列简介 序列作为数据库里的对象,可以将序列值装入内存以提高访问效率,主要作用是生成唯一的主键值.其作用相当于一个计数器,它并不会与特定的表关联.通过创建Oracle序列和触发器实现表的主键自增 ...
- Python-PyQt安装
Windows下安装PyQt需要使用 mingw32-make工具, 以在windows下make
- <转>大白菜的后门
转自360论坛
- 【MyBatis学习10】高级映射之多对多查询
本文来总结一下mybatis中的多对多映射,从第8节的文章中可以看出,用户表和商品表示多对多关系,它们两的多对多是通过订单项和订单明细这两张表所关联起来的,那么这一节主要来总结一下用户表和商品表之间的 ...
- 牛散NO.3:MACD放之四海 假作真时真亦假
大宗商品日线“异曲同工夺命勾魂枪” 话说有实战意义的技术在任何资本市场里都能产生出神奇的效果.不能说放之四海皆准,但至少起到触类旁通的“牵强”吧.大宗商品特别是在国际市场交易的大宗 商品由于是来自各方 ...
