angular : copy vs extend
While using AngularJS, we come across some situation in which we need to copy one object to another object. In that case, we probably have two solutions: angular.copy() or angular.extend(). Lets see how they work differently.
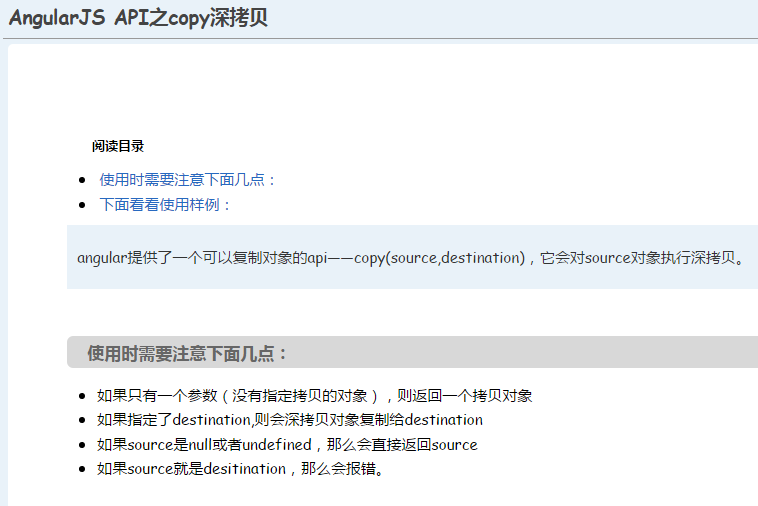
1. angular.copy(source, destination) : It creates a deep copy of source object or array and assign it to destination where ‘destination’ is optional. By writing deep copy, we mean that a new copy of the referred object is made. For example:
var mySource = {'name' : 'sakshi', 'age' : '24', 'obj' :{'key':'value'}}

var myDest = {}

angular.copy(mySource, myDest);

console.log(myDest);
Output: {'name' : 'sakshi', 'age' : '24', 'obj' :{'key':'value'}}
If we check mySource.obj === myDest.obj , this will give false because both point to different objects. This is called as deep copying.
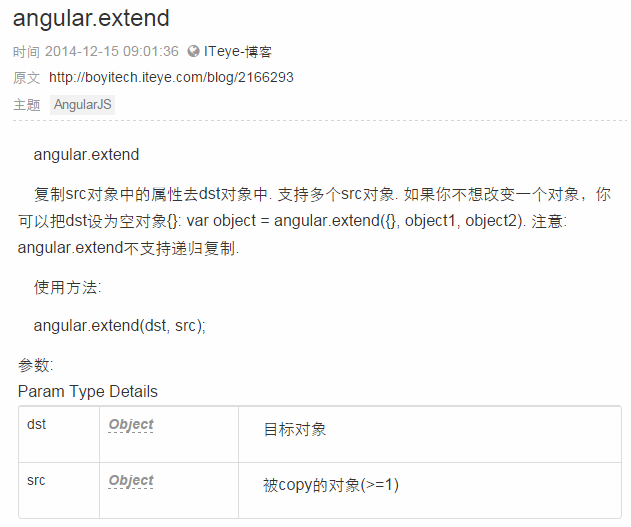
2. angular.extend(destination, src1, src2 …) : It creates a shallow copy of one or more sources provided and assign them to destination. For example:
var mySource1 = {'name' : 'neha', 'age' : '26', obj2 : {}}

var mySource2 = {'course' : 'MCA'}

var myDest = {}

angular.extend(myDest, mySource1,mySource2)

console.log(myDest);
Output: {name: "neha", age: "26", course: "MCA", obj2: Object}
Now we check mySource1.obj2 === myDest.obj2 , this will give true because both point to same reference of object. This is called as shallow copying.
NOTE : angular.copy() is slower than angular.extend()
来源:http://www.tuicool.com/articles/En6Jve
中文解释如下截图:


可参考:
http://docs.angularjs.cn/api/ng/function/angular.copy
http://docs.angularjs.cn/api/ng/function/angular.extend
http://www.cnblogs.com/xing901022/p/4934329.html
http://www.tuicool.com/articles/vM7r6v
angular : copy vs extend的更多相关文章
- angular.extend()和 angular.copy()的区别
1.angular.copy angular.copy(source, [destination]); // source: copy的对象. 可以使任意类型, 包括null和undefined. ...
- angular.js 的angular.copy 、 angular.extend 、 angular.merge
<!DOCTYPE html> <html> <head> <meta charset="UTF-8"> <title> ...
- angular.extend vs angular.copy
1.angular.copy angular.copy(source, [destination]); // source: copy的对象. 可以使任意类型, 包括null和undefined. ...
- AngularJs angular.bind、angular.bootstrap、angular.copy
angular.bind 返回一个调用self的函数fn(self代表fn里的this).可以给fn提供参数args(*).这个功能也被称为局部操作,以区别功能. 格式:angular.bind(se ...
- Angular - - angular.bind、angular.bootstrap、angular.copy
angular.bind 返回一个调用self的函数fn(self代表fn里的this).可以给fn提供参数args(*).这个功能也被称为局部操作,以区别功能. 格式:angular.bind(se ...
- angular.copy()
<!DOCTYPE html> <html> <head> <meta charset="UTF-8"> <title> ...
- angular.copy(source, destination)
angular.copy(source, destination)只有1个参数,返回source的深拷贝有2个参数source的深拷贝复制给destination
- AngularJS方法 —— angular.copy
描述: 复制一个对象或者一个数组(好吧,万物皆对象,数组也是一个对象). 如果省略了destination,一个新的对象或数组将会被创建出来: 如果提供了destination,则source对象中的 ...
- angular JS中 ‘=’与angular.copy的区别
先来看代码: <b>{{test1}}</b> <input type="text" ng-model="test2" title ...
随机推荐
- for语句中多重定义
"}; vector<string> vecStr(Arr, Arr + sizeof(Arr)/sizeof(string)); , sz = vecStr.size(); i ...
- IMX6Q RTC驱动分析
对于在工作中学习驱动的,讲究的是先使用,再理解.好吧,我们来看看板子里是如何注册的? 在板文件里,它的注册函数是这样的: imx6q_add_imx_snvs_rtc() 好吧,让我们追踪下去: 1 ...
- gstreamer——文档/资源/使用
http://gstreamer.freedesktop.org/src/ http://gstreamer.freedesktop.org/data/doc/gstreamer/head/qt-gs ...
- 防止iframe被别的网站引用
try{ top.location.hostname; if (top.location.hostname != window.location.hostname) { top.location.hr ...
- INSPIRED启示录 读书笔记 - 第25章 快速响应阶段
产品出炉后切莫虎头蛇尾 急于“撤军”是项目管理和产品开发流程中的大忌,只要稍微延长项目周期,观察用户对产品的反应,效果就会有天壤之别.这样做投资之小.回报之高会令你瞠目结舌,绝非其他项目阶段可比 产品 ...
- Jsp&Servlet实现读取本地图片并展示
在Web开发中图片的读取和展示是一个很常见的功能,实现的过程大致也都一样(包括在各种框架中--)!接下来用流的方式来实现图片的展示 1. 创建Servlet,实现读取,请求方式使用get请求: p ...
- Codeforces Beta Round #61 (Div. 2) D. Petya and His Friends 想法
D. Petya and His Friends time limit per test 2 seconds memory limit per test 256 megabytes input sta ...
- spring启动加载类,手动加载bean
方法一: public final class Assembler implements BeanFactoryPostProcessor { private static ConfigurableL ...
- Keystone Federation Identity
转自 http://wsfdl.com/openstack/2016/01/14/Keystone-Federation-Identity.html Keystone federation ident ...
- 分享知识-快乐自己:Spring线程池配置
Spring通过ThreadPoolTaskExecutor实现线程池技术,它是使用jdk中的Java.util.concurrent.ThreadPoolExecutor进行实现. Spring 配 ...
