Android -- 自定义ViewGroup实现FlowLayout效果
1,在开发的时候,常在我们的需求中会有这种效果,添加一个商品的一些热门标签,效果图如下: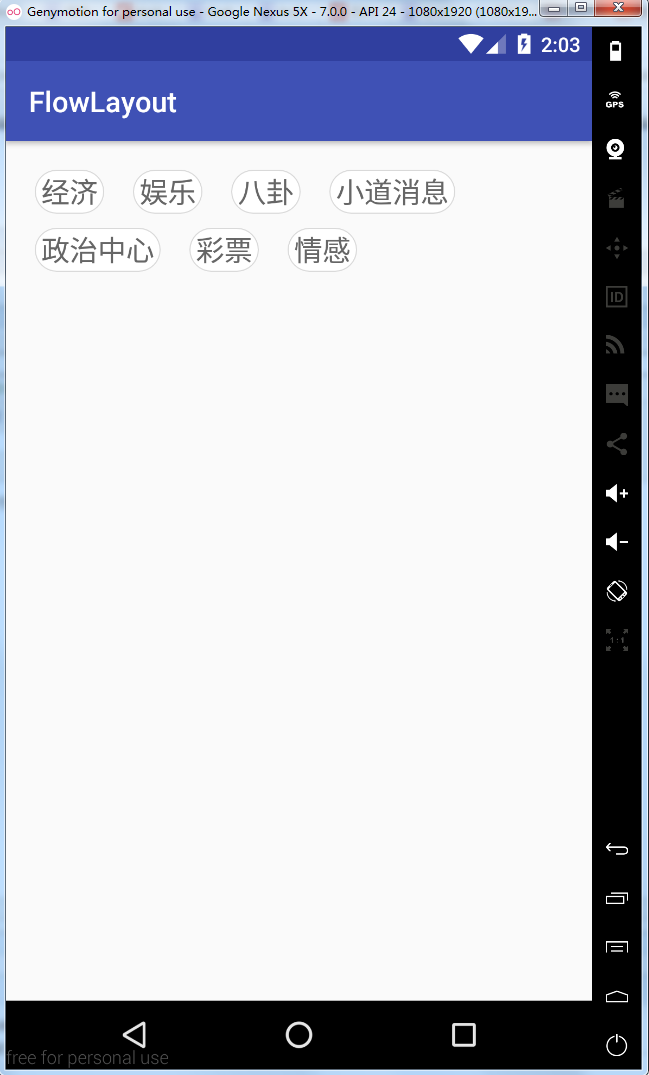
2,从上面效果可以看得出来,这是一个自定义的ViewGroup,然后实现换行效果,让我们一起来实现一下
- 自定义属性
从上面的效果来看,我们需要动态的设置每个lable的宽度和高度,所以我们编写如下的自定义属性
<?xml version="1.0" encoding="utf-8"?>

<resources>

    <declare-styleable name="FlowLayout">

        <!--    标签之间的间距-->

        <attr name="lineSpace" format="dimension"/>

        <!--    每一行之间的间距-->

        <attr name="rowSpace" format="dimension"/>

    </declare-styleable>

</resources>
在布局文件中使用
<?xml version="1.0" encoding="utf-8"?>

<LinearLayout xmlns:android="http://schemas.android.com/apk/res/android"

              xmlns:app="http://schemas.android.com/apk/res-auto"

              xmlns:flowlayout="http://schemas.android.com/apk/res-auto"

              android:layout_width="match_parent"

              android:layout_height="match_parent">

<com.qianmo.flowlayout.FlowLayout

    android:id="@+id/flowLayout"

    android:layout_width="match_parent"

    android:layout_height="wrap_content"

    android:layout_margin="20dip"

    flowlayout:lineSpace="20dip"

    flowlayout:rowSpace="10dip"/>

</LinearLayout>
在类中获取自定义属性
public class FlowLayout extends ViewGroup {

    private static String TAG = "FlowLayout";

    //自定义属性

    private int LINE_SPACE;

    private int ROW_SPACE;

    //放置标签的集合

    private List<String> lables;

    private List<String> lableSelects;

    public FlowLayout(Context context) {

        this(context, null);

    }

    public FlowLayout(Context context, AttributeSet attrs) {

        this(context, attrs, 0);

    }

    public FlowLayout(Context context, AttributeSet attrs, int defStyleAttr) {

        super(context, attrs, defStyleAttr);

        //获取自定义属性

        TypedArray a = context.obtainStyledAttributes(attrs, R.styleable.FlowLayout);

        LINE_SPACE = a.getDimensionPixelSize(R.styleable.FlowLayout_lineSpace, 10);

        ROW_SPACE = a.getDimensionPixelSize(R.styleable.FlowLayout_rowSpace, 10);

        a.recycle();

    }

}
- 初始化数据数据源
向FlowLayout类中添加数据
 /**

     * 添加标签

     *

     * @param lables 标签集合

     * @param isAdd  是否添加

     */

    public void setLables(List<String> lables, boolean isAdd) {

        if (this.lables == null) {

            this.lables = new ArrayList<>();

        }

        if (this.lableSelects == null) {

            this.lableSelects = new ArrayList<>();

        }

        if (isAdd) {

            this.lables.addAll(lables);

        } else {

            this.lables.clear();

            this.lables = lables;

        }

        if (lables != null && lables.size() > 0) {

            for (final String lable : lables) {

                final TextView tv = new TextView(getContext());

                tv.setLayoutParams(new LayoutParams(LayoutParams.WRAP_CONTENT,

                        LayoutParams.WRAP_CONTENT));

                tv.setText(lable);

                tv.setTextSize(20);

                tv.setBackgroundResource(R.drawable.shape_item_lable_bg);

                tv.setTextColor(Color.BLACK);

                tv.setGravity(Gravity.CENTER);

                tv.setPadding(12, 5, 12, 5);

                //判断是否选中

                if (lableSelects.contains(lable)) {

                    tv.setSelected(true);

                    tv.setTextColor(getResources().getColor(R.color.tv_blue));

                } else {

                    tv.setSelected(false);

                    tv.setTextColor(getResources().getColor(R.color.tv_gray));

                }

                //点击之后选中标签

                tv.setOnClickListener(new OnClickListener() {

                    @Override

                    public void onClick(View v) {

                        tv.setSelected(tv.isSelected() ? false : true);

                        if (tv.isSelected()) {

                            tv.setTextColor(getResources().getColor(R.color.tv_blue));

                            lableSelects.add(lable);

                        } else {

                            tv.setTextColor(getResources().getColor(R.color.tv_gray));

                            lableSelects.remove(lable);

                        }

                    }

                });

                //添加到容器中

                addView(tv);

            }

        }

    }
下面的代码是textview的背景选择器
<?xml version="1.0" encoding="utf-8"?>

<selector xmlns:android="http://schemas.android.com/apk/res/android" >

    <!--选中效果-->

    <item android:state_selected="true">

        <shape >

            <solid android:color="#ffffff" />

            <stroke android:color="@color/tv_blue"

                    android:width="2px"/>

            <corners android:radius="10000dip"/>

        </shape>

    </item>

    <!--默认效果-->

    <item>

        <shape >

            <solid android:color="#ffffff" />

            <stroke android:color="@color/divider_gray"

                    android:width="2px"/>

            <corners android:radius="10000dip"/>

        </shape>

    </item>

</selector>
- 重写onMeasure方法
本布局在宽度上是使用的建议的宽度(填充父窗体或者具体的size),如果需要wrap_content的效果,还需要重新计算,当然这种需求是非常少见的,所以直接用建议宽度即可;布局的高度就得看其中的标签需要占据多少行(row ),那么高度就为row * 单个标签的高度+(row -1) * 行距,代码如下:
 /**

     * 通过测量子控件高度,来设置自身控件的高度

     * 主要是计算

     *

     * @param widthMeasureSpec

     * @param heightMeasureSpec

     */

    @Override

    protected void onMeasure(int widthMeasureSpec, int heightMeasureSpec) {

        //测量所有子view的宽高

        measureChildren(widthMeasureSpec, heightMeasureSpec);

        //获取view的宽高测量模式

        int widthMode = MeasureSpec.getMode(widthMeasureSpec);

        int widthSize = MeasureSpec.getSize(widthMeasureSpec);

        int heightMode = MeasureSpec.getMode(heightMeasureSpec);

        int heightSize = MeasureSpec.getSize(heightMeasureSpec);

        //这里的宽度建议使用match_parent或者具体值,当然当使用wrap_content的时候没有重写的话也是match_parent所以这里的宽度就直接使用测量的宽度

        int width = widthSize;

        int height;

        //判断宽度

        if (heightMode == MeasureSpec.EXACTLY) {

            height = heightSize;

        } else {

            int row = 1;

            int widthSpace = width; //宽度剩余空间

            for (int i = 0; i < getChildCount(); i++) {

                View view = getChildAt(i);

                //获取标签宽度

                int childW = view.getMeasuredWidth();

                //判断剩余宽度是否大于此标签宽度

                if (widthSpace >= childW) {

                    widthSpace -= childW;

                } else {

                    row++;

                    widthSpace = width - childW;

                }

                //减去两边间距

                widthSpace -= LINE_SPACE;

            }

            //获取子控件的高度

            int childH = getChildAt(0).getMeasuredHeight();

            //测算最终所需要的高度

            height = (childH * row) + (row - 1) * ROW_SPACE;

        }

        //保存测量高度

        setMeasuredDimension(width, height);

    }
- 重写OnLayout方法
onLayout(boolean changed, int l, int t, int r, int b)方法是一个抽象方法,自定义ViewGroup时必须实现它,用于给布局中的子控件分配位置,其中的参数l,t,r,b分别代表本ViewGroup的可用空间(除去margin和padding后的剩余空间)的左、上、右、下的坐标(相对于自身),相当于一个约束,如果子控件摆放的位置超过这个范围,超出的部分将不可见。
 /**

     * 摆放子view

     *

     * @param changed

     * @param l

     * @param t

     * @param r

     * @param b

     */

    @Override

    protected void onLayout(boolean changed, int l, int t, int r, int b) {

        int row = 0;

        int right = 0;

        int bottom = 0;

        for (int i = 0; i < getChildCount(); i++) {

            View chileView = getChildAt(i);

            int childW = chileView.getMeasuredWidth();

            int childH = chileView.getMeasuredHeight();

            right += childW;

            bottom = (childH + ROW_SPACE) * row + childH;

            if (right > (r - LINE_SPACE)) {

                row++;

                right = childW;

                bottom = (childH + ROW_SPACE) * row + childH;

            }

            chileView.layout(right - childW, bottom - childH, right, bottom);

            right += LINE_SPACE;

        }

    }
看一下实现的效果图
ok,这样我们就全部实现了,需要源码的同学可以在这里去下载
Android -- 自定义ViewGroup实现FlowLayout效果的更多相关文章
- android自定义viewgroup之我也玩瀑布流
先看效果图吧, 继上一篇<android自定义viewgroup实现等分格子布局>中实现的布局效果,这里稍微有些区别,每个格子的高度不规则,就是传说的瀑布流布局,一般实现这种效果,要么用第 ...
- Android 自定义ViewGroup 实战篇 -> 实现FlowLayout
转载请标明出处:http://blog.csdn.net/lmj623565791/article/details/38352503 ,本文出自[张鸿洋的博客] 1.概述 上一篇已经基本给大家介绍了如 ...
- android自定义viewgroup实现等分格子布局
先上效果图: 实现这样的效果: 一般的思路就是,直接写布局文件,用LinearLayout 嵌套多层子LinearLayout,然后根据权重layout_weight可以达到上面的效果 还有就是利用g ...
- android 自定义ViewGroup和对view进行切图动画实现滑动菜单SlidingMenu
示意图就不展示了,和上一节的一样,滑动菜单SlidingMenu效果如何大家都比较熟悉,在这里我简单说明一下用自定义ViewGroup来实现. 实现方法:我们自定义一个ViewGroup实现左右滑动, ...
- android 自定义ViewGroup和对view进行切图动画实现滑动菜单SlidingMenu[转]
http://blog.csdn.net/jj120522/article/details/8095852 示意图就不展示了,和上一节的一样,滑动菜单SlidingMenu效果如何大家都比较熟悉,在这 ...
- android 自定义view之侧滑效果
效果图: 看网上的都是两个view拼接,默认右侧的不显示,水平移动的时候把右侧的view显示出来.但是看最新版QQ上的效果不是这样的,但给人的感觉却很好,所以献丑来一发比较高仿的. 知识点: 1.Vi ...
- Android自定义ViewGroup(四、打造自己的布局容器)
转载请标明出处: http://blog.csdn.net/xmxkf/article/details/51500304 本文出自:[openXu的博客] 目录: 简单实现水平排列效果 自定义Layo ...
- android自定义viewgroup初步之一----抽屉菜单
转载请注明出处 http://blog.csdn.net/wingichoy/article/details/47832151 几天前在慕课网上看到鸿洋老师的 自定义卫星菜单,感觉很有意思,于是看完视 ...
- Android 自定义ViewGroup手把手教你实现ArcMenu
转载请标明出处:http://blog.csdn.net/lmj623565791/article/details/37567907 逛eoe发现这样的UI效果,感觉很不错,后来知道github上有这 ...
随机推荐
- [ovs] ovs开启日志debug
如题 [root@vrouter1 ~]# ovs-appctl vlog/set netdev:file:dbg [root@vrouter1 ~]# ovs-appctl vlog/set net ...
- web.xml中 /和/*的区别
< url-pattern>/</url-pattern> 会匹配到/login这样的路径型url,不会匹配到模式为*.jsp这样的后缀型url< url-patter ...
- ORACLE监听配置及测试实验
实验一: 修改db_domain和service_name 我们将Db_name和Db_domain两个参数用'.'连接起来,表示一个数据库,并将该数据库的名称称为Global_name即等于serv ...
- 实验一:Java开发环境的熟悉
实验一:Java开发环境的熟悉 一.实验一-1 在码云中建立"20165317exp1"的项目. 从git中下载该项目. 在"20165317exp1"目录下建 ...
- 如何实现一个字符的反转 (Java)
一..通过jdk自带reverse的方法.
- 【pyqtgraph绘图】安装pyqtgraph
解读官方API-安装 安装 参考:http://www.pyqtgraph.org/documentation/installation.html 根据您的需要,有许多不同的方式来安装pyqtgrap ...
- 关于linux特殊含义的转义符\033
格式: echo -e "\033[字背景颜色;字体颜色m字符串\033[0m" 例如: echo -e "\033[41;36m something here \033 ...
- Maven项目Update Project后JRE System Library自动变回1.5解决办法
最近在搭建Spring Boot项目<一步步搭建 Spring Boot maven 框架的工程>的时候,虽然设置JRE System Library为1.8,但是,当我 用 Maven ...
- 关于eclipse调试时程序控制台不能自动打开
对于这个程序,在刚开始的时候,没有敲上22,29,33行的打印语句时,在调试的时候不会自动弹开控制台,所以一直在怀疑代码可能出错了.因此可以自己手动打开,但是如果敲上那些代码,系统可以自动弹开控制 ...
- 8-GPIO复用
8-GPIO引脚复用与重映射 0.通用GPIO 在复位期间及复位刚刚完成后,复用功能尚未激活,I/O 端口被配置为输入浮空模式. 复位后,调试引脚处于复用功能上拉/下拉状态: ● PA15:JTDI ...