[Tensorflow] Object Detection API - predict through your exclusive model
开始预测
一、训练结果
From: Testing Custom Object Detector - TensorFlow Object Detection API Tutorial p.6
- 训练结果

- 生成frozen的模型
export PYTHONPATH=/home/unsw/Dropbox/Programmer/1-python/Tensorflow/ssd_proj/models/research/slim::pwd:pwd/slim:$PYTHONPATH

python object_detection/export_inference_graph.py \
    --input_type image_tensor \
    --pipeline_config_path training/ssd_mobilenet_v1_pets.config \
    --trained_checkpoint_prefix training/model.ckpt-0 \
    --output_directory exported_model_directory
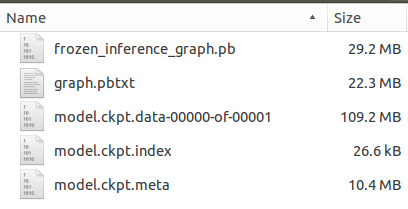
Result:
unsw@unsw-UX303UB$ ls exported_model_directory/

checkpoint                 model.ckpt.data-00000-of-00001  model.ckpt.meta

frozen_inference_graph.pb  model.ckpt.index                saved_model
二、使用新模型
- 预测 .py文件
打开 object_detection_tutorial.py 内容。

- 加载模型和配置文件
实际使用的 model 是:exported_model_directory 文件夹下面的 frozen_inference_graph.pb。
- 加载图片并预测

# coding: utf-8 # # Object Detection Demo
# Welcome to the object detection inference walkthrough! This notebook will walk you step by step through the process of using a pre-trained model to detect objects in an image. Make sure to follow the [installation instructions](https://github.com/tensorflow/models/blob/master/research/object_detection/g3doc/installation.md) before you start. # # Imports # In[ ]: import numpy as np
import os
import six.moves.urllib as urllib
import sys
import tarfile
import tensorflow as tf
import zipfile from collections import defaultdict
from io import StringIO
from matplotlib import pyplot as plt
from PIL import Image # ## Env setup # In[ ]: # This is needed to display the images.
#get_ipython().magic('matplotlib inline') # This is needed since the notebook is stored in the object_detection folder.
sys.path.append("..") # ## Object detection imports
# Here are the imports from the object detection module. # In[ ]: from utils import label_map_util from utils import visualization_utils as vis_util # # Model preparation # ## Variables
#
# Any model exported using the `export_inference_graph.py` tool can be loaded here simply by changing `PATH_TO_CKPT` to point to a new .pb file.
#
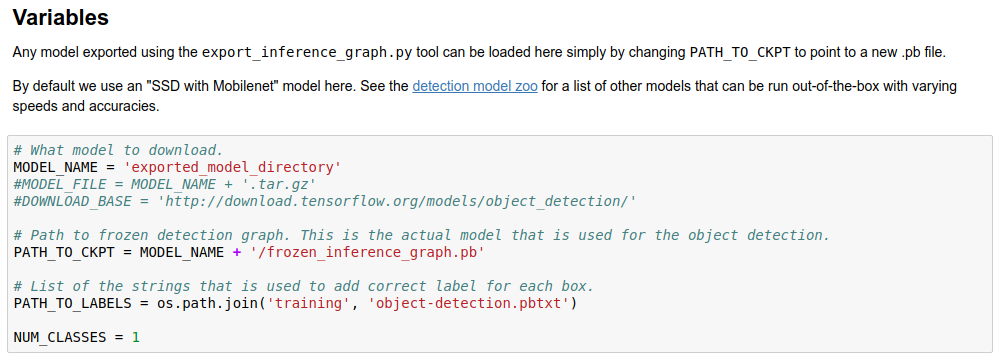
# By default we use an "SSD with Mobilenet" model here. See the [detection model zoo](https://github.com/tensorflow/models/blob/master/research/object_detection/g3doc/detection_model_zoo.md) for a list of other models that can be run out-of-the-box with varying speeds and accuracies. # In[ ]: # What model to download.
MODEL_NAME = 'exported_model_directory'
#MODEL_FILE = MODEL_NAME + '.tar.gz'
#DOWNLOAD_BASE = 'http://download.tensorflow.org/models/object_detection/' # Path to frozen detection graph. This is the actual model that is used for the object detection.
PATH_TO_CKPT = MODEL_NAME + '/frozen_inference_graph.pb' # List of the strings that is used to add correct label for each box.
PATH_TO_LABELS = os.path.join('training', 'object-detection.pbtxt') NUM_CLASSES = 1 # ## Download Model # In[ ]: #opener = urllib.request.URLopener()
#opener.retrieve(DOWNLOAD_BASE + MODEL_FILE, MODEL_FILE)
#tar_file = tarfile.open(MODEL_FILE)
#for file in tar_file.getmembers():
# file_name = os.path.basename(file.name)
# if 'frozen_inference_graph.pb' in file_name:
# tar_file.extract(file, os.getcwd()) # ## Load a (frozen) Tensorflow model into memory. # In[ ]: detection_graph = tf.Graph()
with detection_graph.as_default():
od_graph_def = tf.GraphDef()
with tf.gfile.GFile(PATH_TO_CKPT, 'rb') as fid:
serialized_graph = fid.read()
od_graph_def.ParseFromString(serialized_graph)
tf.import_graph_def(od_graph_def, name='') # ## Loading label map
# Label maps map indices to category names, so that when our convolution network predicts `5`, we know that this corresponds to `airplane`. Here we use internal utility functions, but anything that returns a dictionary mapping integers to appropriate string labels would be fine # In[ ]: label_map = label_map_util.load_labelmap(PATH_TO_LABELS)
categories = label_map_util.convert_label_map_to_categories(label_map, max_num_classes=NUM_CLASSES, use_display_name=True)
category_index = label_map_util.create_category_index(categories) # ## Helper code # In[ ]: def load_image_into_numpy_array(image):
(im_width, im_height) = image.size
return np.array(image.getdata()).reshape(
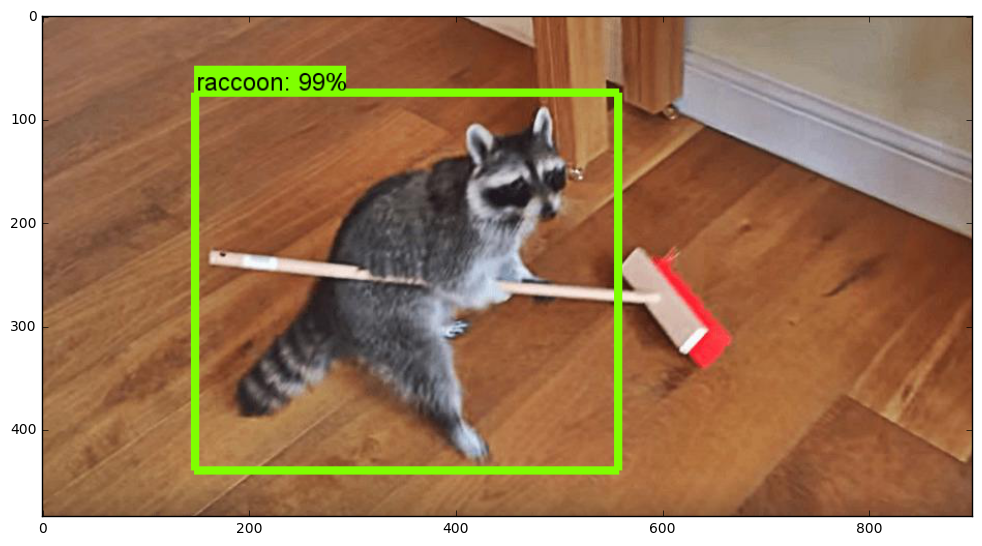
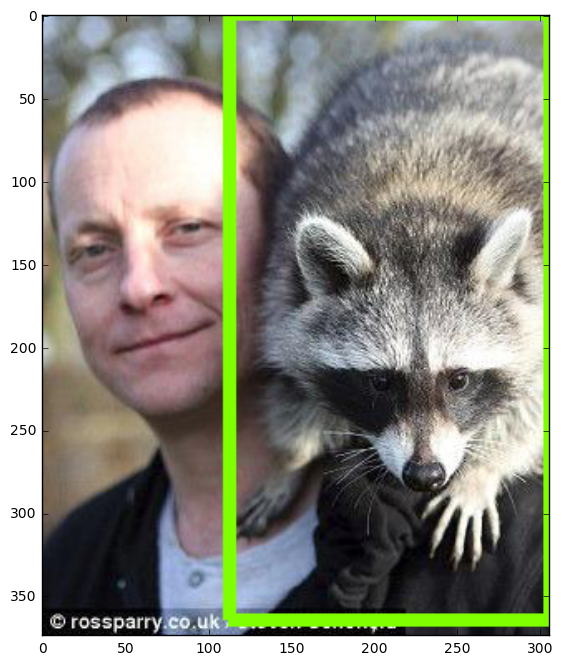
(im_height, im_width, 3)).astype(np.uint8) # # Detection # In[ ]: # For the sake of simplicity we will use only 2 images:
# image1.jpg
# image2.jpg
# If you want to test the code with your images, just add path to the images to the TEST_IMAGE_PATHS.
PATH_TO_TEST_IMAGES_DIR = 'object_detection/test_images'
TEST_IMAGE_PATHS = [ os.path.join(PATH_TO_TEST_IMAGES_DIR, 'image{}.jpg'.format(i)) for i in range(1, 3) ] # Size, in inches, of the output images.
IMAGE_SIZE = (12, 8) # In[ ]: with detection_graph.as_default():
with tf.Session(graph=detection_graph) as sess:
# Definite input and output Tensors for detection_graph
image_tensor = detection_graph.get_tensor_by_name('image_tensor:0')
# Each box represents a part of the image where a particular object was detected.
detection_boxes = detection_graph.get_tensor_by_name('detection_boxes:0')
# Each score represent how level of confidence for each of the objects.
# Score is shown on the result image, together with the class label.
detection_scores = detection_graph.get_tensor_by_name('detection_scores:0')
detection_classes = detection_graph.get_tensor_by_name('detection_classes:0')
num_detections = detection_graph.get_tensor_by_name('num_detections:0')
for image_path in TEST_IMAGE_PATHS:
image = Image.open(image_path)
# the array based representation of the image will be used later in order to prepare the
# result image with boxes and labels on it.
image_np = load_image_into_numpy_array(image)
# Expand dimensions since the model expects images to have shape: [1, None, None, 3]
image_np_expanded = np.expand_dims(image_np, axis=0)
# Actual detection.
(boxes, scores, classes, num) = sess.run(
[detection_boxes, detection_scores, detection_classes, num_detections],
feed_dict={image_tensor: image_np_expanded})
# Visualization of the results of a detection.
vis_util.visualize_boxes_and_labels_on_image_array(
image_np,
np.squeeze(boxes),
np.squeeze(classes).astype(np.int32),
np.squeeze(scores),
category_index,
use_normalized_coordinates=True,
line_thickness=8)
plt.figure(figsize=IMAGE_SIZE)
plt.imshow(image_np) # In[ ]:
The question is how to use opencv to load this trained tensorflow model?
三、模型文件解释
Ref: http://blog.csdn.net/u011961856/article/details/77064631
- 模型保存
tensorflow模型保存函数为:
tf.train.Saver()
例如下列代码:
import tensorflow as tf
v1= tf.Variable(tf.random_normal([784, 200], stddev=0.35), name="v1")
v2= tf.Variable(tf.zeros([200]), name="v2")
v3= tf.Variable(tf.zeros([100]), name="v3")
saver = tf.train.Saver()
with tf.Session() as sess:
init_op = tf.global_variables_initializer()
sess.run(init_op)
saver.save(sess,"checkpoint/model.ckpt",global_step=1)
运行后,保存模型保存,得到三个文件,分别为 .data, .meta, .index,
model.ckpt.data-00000-of-00001   # 保存了模型的所有变量的值

model.ckpt.index                 # 一个 string-string table: {key:tensor名; value:BundleEntryProto}

model.ckpt.meta                  # 保存了graph结构,包括 GraphDef, SaverDef等
- 模型加载
with tf.Session() as sess:

  saver.restore(sess, "/checkpoint/model.ckpt")
四、机器学习模型的创建、保存和恢复
From: TensorFlow极简教程:创建、保存和恢复机器学习模型
恢复操作和其它元数据
一个重要的信息是,Saver 将保存与你的图相关联的任何元数据。【但预测时可能没必要】
这意味着加载元检查点还将恢复与图相关联的所有空变量、操作和集合(例如,它将恢复训练优化器)。
当你恢复一个元检查点时,实际上是将保存的图加载到当前默认的图中。现在你可以通过它来加载任何包含的内容,如张量、操作或集合。
import tensorflow as tf

# Let's load a previously saved meta graph in the default graph

# This function returns a Saver

saver = tf.train.import_meta_graph('results/model.ckpt-1000.meta')

# We can now access the default graph where all our metadata has been loaded

graph = tf.get_default_graph()

# Finally we can retrieve tensors, operations, collections, etc.

global_step_tensor = graph.get_tensor_by_name('loss/global_step:0')

train_op = graph.get_operation_by_name('loss/train_op')

hyperparameters = tf.get_collection('hyperparameters')
恢复权重
请记住,实际的权重只存在于一个会话中。这意味着「恢复」操作必须能够访问会话以恢复图内的权重。理解恢复操作的最好方法是将其简单地当作一种初始化。
with tf.Session() as sess:

  # To initialize values with saved data

  saver.restore(sess, 'results/model.ckpt.data-1000-00000-of-00001')

  print(sess.run(global_step_tensor)) # returns 1000
Protocol Buffer
协议缓冲区(Protocol Buffer/简写 Protobufs)是 TF 有效存储和传输数据的常用方式。
我不在这里详细介绍它,但可以把它当成一个更快的 JSON 格式,当你在存储/传输时需要节省空间/带宽,你可以压缩它。简而言之,你可以使用 Protobufs 作为:
一种未压缩的、人性化的文本格式,扩展名为 .pbtxt
一种压缩的、机器友好的二进制格式,扩展名为 .pb 或根本没有扩展名
这就像在开发设置中使用 JSON,并且在迁移到生产环境时为了提高效率而压缩数据一样。用 Protobufs 可以做更多的事情,如果你有兴趣可以查看教程
整洁的小技巧:在张量流中处理 protobufs 的所有操作都有这个表示「协议缓冲区定义」的「_def」后缀。
例如,要加载保存的图的 protobufs,可以使用函数:tf.import_graph_def。要获取当前图作为 protobufs,可以使用:Graph.as_graph_def()。
文件的架构
回到 TF,当保存你的数据时,你会得到 5 种不同类型的文件:
「检查点」文件
「事件(event)」文件
「文本 protobufs」文件
一些「chkp」文件
一些「元 chkp」文件
现在让我们休息一下。当你想到,当你在做机器学习时可能会保存什么?
- 你可以保存模型的架构和与其关联的学习到的权重。
- 你可能希望在训练或事件整个训练架构时保存一些训练特征,如模型的损失(loss)和准确率(accuracy)。
- 你可能希望保存超参数和其它操作,以便之后重新启动训练或重复实现结果。这正是 TensorFlow 的作用。
在这里,检查点文件的三种类型用于存储模型及其权重有关的压缩后数据。
检查点文件只是一个簿记文件,你可以结合使用高级辅助程序加载不同时间保存的 chkp 文件。
元 chkp 文件包含模型的压缩 Protobufs 图以及所有与之关联的元数据(集合、学习速率、操作等)。
chkp 文件保存数据(权重)本身(这一个通常是相当大的大小)。
如果你想做一些调试,Graph.pbtxt 文件只是模型的非压缩 Protobufs 图。
最后,事件文件在 TensorBoard 中存储了所有你需要用来可视化模型和训练时测量的所有数据。这与保存/恢复模型本身无关。
下面让我们看一下结果文件夹的屏幕截图:
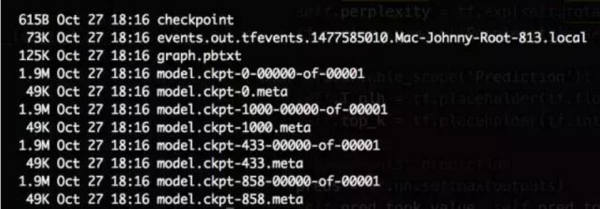
一些随机训练的结果文件夹的屏幕截图
该模型已经在步骤 433,858,1000 被保存了 3 次。为什么这些数字看起来像随机?因为我设定每 S 秒保存一次模型,而不是每 T 次迭代后保存。
chkp 文件比 chkp.meta 文件更大,因为它包含我们模型的权重。【权重才是size大头】
graph.pbtxt 文件比 chkp.meta 文件大一点:它被认为是非压缩版本。
OpenCV DNN Module
一、DNN模块
OpenCV 3.3 不完全支持
We have seen this from [OpenCV 3.3] OpenCV 3.3 with DNN
Jeff:这里暂时支持caffe,不支持tf。参见:[OpenCV] Install OpenCV 3.3 with DNN
net = cv2.dnn.readNetFromCaffe(args["prototxt"], args["model"])

- 不支持 Tensorflow
Why there is only one parameter for readNetFromTensorflow?
From: https://github.com/opencv/opencv/issues/9536
可见,tf的 dropout 是个棘手问题。

Solved here: https://github.com/opencv/opencv/pull/9673
I don't know when his problem can be solved. Caffe maybe a better solution. T_T
二、OpenCV 3.4 支持 TF
参见:[OpenCV] Install OpenCV 3.4 with DNN
hello!I want to know how to generate the ssd_mobilenet_v1_coco.pbtxt【就是未压缩的protobuf】
重要的两个链接:
These links are useful
https://github.com/opencv/opencv/blob/master/samples/dnn/tf_text_graph_ssd.py
and
https://github.com/opencv/opencv/wiki/TensorFlow-Object-Detection-API#generate-a-config-file
[Tensorflow] Object Detection API - predict through your exclusive model的更多相关文章
- TensorFlow Object Detection API中的Faster R-CNN /SSD模型参数调整
关于TensorFlow Object Detection API配置,可以参考之前的文章https://becominghuman.ai/tensorflow-object-detection-ap ...
- 使用TensorFlow Object Detection API+Google ML Engine训练自己的手掌识别器
上次使用Google ML Engine跑了一下TensorFlow Object Detection API中的Quick Start(http://www.cnblogs.com/take-fet ...
- 谷歌开源的TensorFlow Object Detection API视频物体识别系统实现教程
视频中的物体识别 摘要 物体识别(Object Recognition)在计算机视觉领域里指的是在一张图像或一组视频序列中找到给定的物体.本文主要是利用谷歌开源TensorFlow Object De ...
- TensorFlow object detection API
cloud执行:https://github.com/tensorflow/models/blob/master/research/object_detection/g3doc/running_pet ...
- Tensorflow object detection API 搭建属于自己的物体识别模型
一.下载Tensorflow object detection API工程源码 网址:https://github.com/tensorflow/models,可通过Git下载,打开Git Bash, ...
- Tensorflow object detection API ——环境搭建与测试
1.开发环境搭建 ①.安装Anaconda 建议选择 Anaconda3-5.0.1 版本,已经集成大多数库,并将其作为默认python版本(3.6.3),配置好环境变量(Anaconda安装则已经配 ...
- Tensorflow object detection API 搭建物体识别模型(四)
四.模型测试 1)下载文件 在已经阅读并且实践过前3篇文章的情况下,读者会有一些文件夹.因为每个读者的实际操作不同,则文件夹中的内容不同.为了保持本篇文章的独立性,制作了可以独立运行的文件夹目标检测. ...
- Tensorflow object detection API 搭建物体识别模型(三)
三.模型训练 1)错误一: 在桌面的目标检测文件夹中打开cmd,即在路径中输入cmd后按Enter键运行.在cmd中运行命令: python /your_path/models-master/rese ...
- Tensorflow object detection API 搭建物体识别模型(一)
一.开发环境 1)python3.5 2)tensorflow1.12.0 3)Tensorflow object detection API :https://github.com/tensorfl ...
随机推荐
- Netbeans异常之cannet locate java installation in specified jdkhome
原因:更改了jdk安装版本 方法:修改netbeans安装目录下ect下netbeans文件, 详细代码位置: # Default location of JDK: # (set by install ...
- js selection对象使用方法
IE:document.selection FireFox:window.getSelection() document.selection只有IE支持,window.getSelection()也只 ...
- GoDaddy账户间域名转移PUSH以及ACCEPT接受域名过户方法
GoDaddy账户之间的域名进行过户PUSH.以及接受ACCEPT一般发生在我们有要求代购.交易域名账户之间的处理.一般的海外域名注册商账户之间是直接可以用户交易过户的,不需要经过商家允许,但是不同的 ...
- Linux:修改和删除已有变量
变量修改 变量的修改有以下几种方式: 变量设置方式 说明 ${变量名#匹配字串} 从头向后开始匹配,删除符合匹配字串的最短数据 ${变量名##匹配字串} 从头向后开始匹配,删除符合匹配字串的最长数据 ...
- import pandas as pd Python安装pandas模块
在学习python过程中需要用到一个叫pandas的模块,在pycharm中安装时总是出错. 千般百度折腾还是无果,后来发现它需要安装很多依赖包.就问你气不气~ 需要手动安装啊,千万记住,这里有个py ...
- Go语言之高级篇beego框架之cookie与session
1.cookie的用法 this.Ctx.SetCookie("name", name, maxage, "/") this.Ctx.SetCookie(&qu ...
- Windows IIS注册asp 此操作系统版本不支持此选项 错误解决方法
更新Win10,原来的IIS站点访问不了,原因是因为IIS 没有.net 4.5,使用网上的aspnet_regiis.exe -i命令,一点都不靠谱,直接提示: C:\WINDOWS\system3 ...
- Android中asset文件夹和raw文件夹区别与用法
*res/raw和assets的相同点: 1.两者目录下的文件在打包后会原封不动的保存在apk包中,不会被编译成二进制. *res/raw和assets的不同点:1.res/raw中的文件会被映射到R ...
- Apktool编译找不到“keyboardNavigationCluster”
喜欢用使用apktool来反编译.编译安卓程序,然后用其他工具来分析.签名.优化等,它比其他工具的优点是不易出错. 命令 反编译命令:apktool d -f XX.apk -o 反编译输出的目录(如 ...
- pandas基础用法——索引
# -*- coding: utf-8 -*- # Time : 2016/11/28 15:14 # Author : XiaoDeng # version : python3.5 # Softwa ...